How to Use Track Triggers
m |
m (→In Surveyor Classic (S10)) |
||
| Line 192: | Line 192: | ||
<tr valign="top"> | <tr valign="top"> | ||
<td width=629><span id="skipAddS10"></span> | <td width=629><span id="skipAddS10"></span> | ||
| − | |||
| − | |||
| − | |||
| − | |||
| − | |||
| − | |||
| − | |||
| − | |||
| − | |||
| − | |||
| − | |||
===Adding a Trigger (S10)=== | ===Adding a Trigger (S10)=== | ||
| Line 238: | Line 227: | ||
<tr valign="top"> | <tr valign="top"> | ||
<td colspan=2>This will place the Trigger on the track and open its properties window.</td> | <td colspan=2>This will place the Trigger on the track and open its properties window.</td> | ||
| − | |||
| − | |||
| − | |||
</tr> | </tr> | ||
</table> | </table> | ||
| Line 247: | Line 233: | ||
</table> | </table> | ||
<br> | <br> | ||
| − | |||
| − | |||
| − | |||
| − | |||
| − | |||
| − | |||
| − | |||
| − | |||
| − | |||
| − | |||
| − | |||
| − | |||
| − | |||
| − | |||
| − | |||
| − | |||
| − | |||
| − | |||
| − | |||
| − | |||
| − | |||
| − | |||
| − | |||
| − | |||
| − | |||
| − | |||
| − | |||
| − | |||
| − | |||
| − | |||
| − | |||
| − | |||
| − | |||
| − | |||
| − | |||
| − | |||
| − | |||
| − | |||
| − | |||
| − | |||
| − | |||
| − | |||
| − | |||
| − | |||
| − | |||
| − | |||
| − | |||
| − | |||
<table bgcolor=#000000 cellpadding=2> | <table bgcolor=#000000 cellpadding=2> | ||
<tr valign="top"> | <tr valign="top"> | ||
<td> | <td> | ||
| − | <table bgcolor=# | + | <table bgcolor=#ffffe0 cellpadding=2> |
<tr valign="top"> | <tr valign="top"> | ||
| − | <td width=25>[[image: | + | <td width=25>[[image:PencilTips.PNG|link=]]</td> |
| − | <td> | + | <td>Avoid placing a '''Track Trigger''' on a junction. You can accidently and easily place the trigger on the wrong junction branch which means that it will have no effect if the targetted train is directed to the other junction branch</td> |
| − | + | ||
| − | + | ||
| − | + | ||
| − | + | ||
| − | + | ||
| − | + | ||
| − | + | ||
| − | + | ||
| − | + | ||
| − | + | ||
| − | + | ||
| − | + | ||
| − | + | ||
| − | + | ||
| − | + | ||
| − | + | ||
| − | + | ||
| − | + | ||
| − | + | ||
| − | + | ||
| − | + | ||
| − | + | ||
| − | + | ||
| − | + | ||
| − | + | ||
| − | + | ||
| − | + | ||
| − | + | ||
| − | + | ||
| − | + | ||
| − | + | ||
| − | + | ||
| − | + | ||
| − | + | ||
| − | + | ||
| − | + | ||
| − | + | ||
| − | + | ||
| − | + | ||
| − | + | ||
| − | + | ||
| − | + | ||
| − | + | ||
| − | + | ||
| − | + | ||
| − | + | ||
| − | + | ||
| − | + | ||
| − | + | ||
| − | + | ||
| − | + | ||
| − | + | ||
| − | + | ||
| − | + | ||
| − | + | ||
| − | + | ||
| − | + | ||
| − | + | ||
| − | + | ||
| − | + | ||
| − | + | ||
| − | + | ||
| − | + | ||
| − | + | ||
| − | + | ||
| − | + | ||
| − | + | ||
| − | + | ||
| − | + | ||
| − | + | ||
| − | + | ||
| − | + | ||
| − | + | ||
| − | + | ||
| − | + | ||
| − | + | ||
| − | + | ||
| − | + | ||
| − | + | ||
| − | + | ||
| − | + | ||
| − | + | ||
| − | + | ||
| − | + | ||
| − | + | ||
| − | + | ||
| − | + | ||
| − | + | ||
| − | + | ||
| − | + | ||
| − | + | ||
| − | + | ||
| − | + | ||
| − | + | ||
| − | + | ||
| − | + | ||
| − | + | ||
| − | </td> | + | |
</tr> | </tr> | ||
</table> | </table> | ||
| Line 409: | Line 249: | ||
</table> | </table> | ||
<br> | <br> | ||
| − | <table | + | <table width=1000> |
<tr valign="top"> | <tr valign="top"> | ||
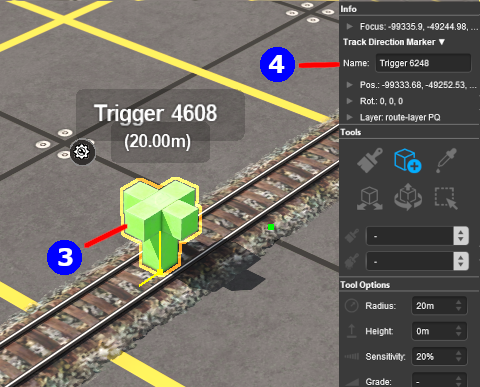
| − | <td> | + | <td>As soon as a new trigger has been placed, its properties window will open on the screen. It will initially be given a default name and assigned to the currently active layer.</td> |
| − | + | ||
| − | + | ||
| − | + | ||
| − | + | ||
| − | + | ||
| − | + | ||
| − | + | ||
| − | </td> | + | |
</tr> | </tr> | ||
</table> | </table> | ||
<br> | <br> | ||
| − | + | ||
| − | + | ||
| − | + | ||
=='''In Surveyor 2.0 (S20)'''== | =='''In Surveyor 2.0 (S20)'''== | ||
</td> | </td> | ||
Revision as of 21:55, 26 December 2025
The information in this Wiki Page applies to TANE, TRS19, Trainz Plus and TRS22.
|
|
What are Track Triggers? |
| Track triggers can be programmed to respond when a train (any train or a specific train) passes over them in Driver Mode. The response comes from executing a set of Session Rules that have been attached to a |
||||||||
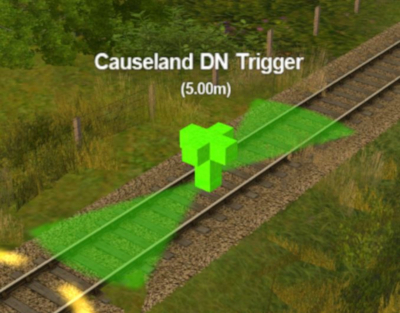
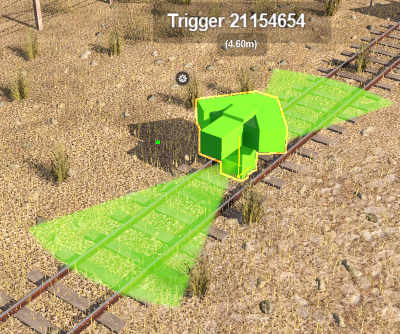
Shown below left is a standard Trigger and below right is a Directional Trigger. They are just two examples of several types of track triggers. In both cases:-
|
||||||||
|
||||||||
Route or Session? |
| Triggers can be placed in a Route Layer or in a Session Layer |
|
 |
Information on Route and Session layers can be found at:- |
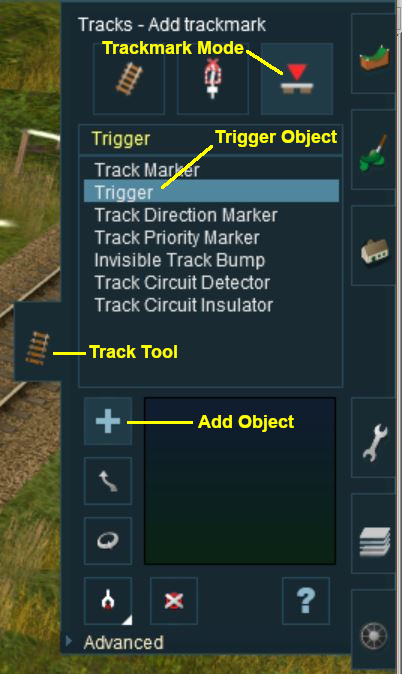
Adding a Trigger |
|
Adding a Trigger (S10)
In Surveyor 2.0 (S20) |
|||||||||||||||||||||||||||
|
Adding a Trigger (S20)
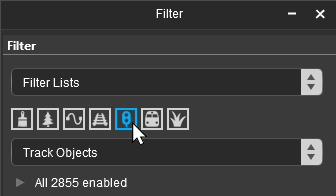
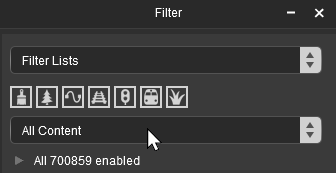
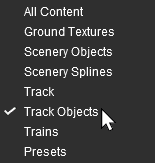
![]() In the Filter Palette either:-
In the Filter Palette either:-
|
|
||||||||||||||||||||||||||||||||||||
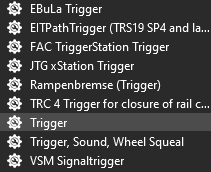
![]() In the Assets Palette to narrow down the filter list, type "trigger" (UPPER/lower case does not matter) in the Search Text Box
In the Assets Palette to narrow down the filter list, type "trigger" (UPPER/lower case does not matter) in the Search Text Box
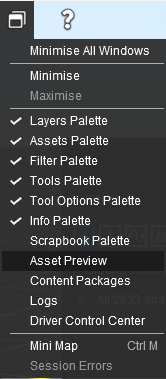
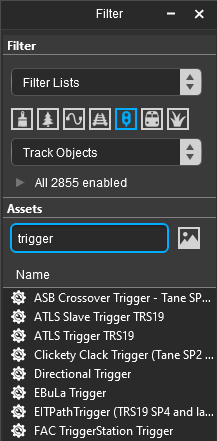 Both pallets shown docked |
|
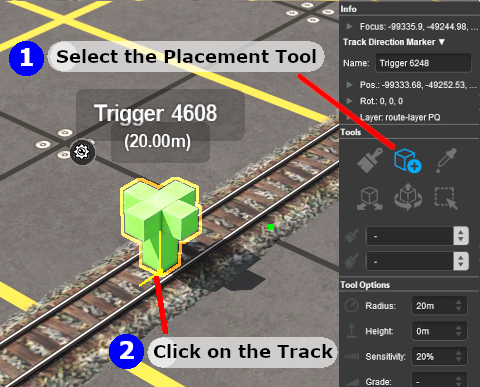
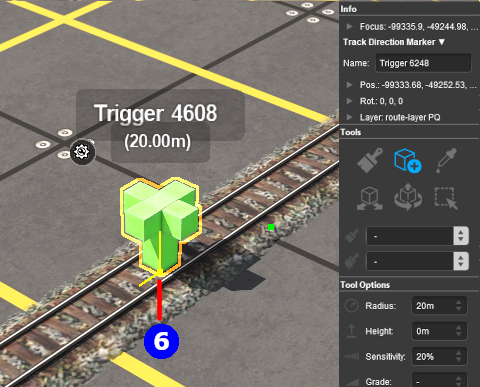
![]() Place the Trigger on the track.
Place the Trigger on the track.
 |
|
|||||||||||||||||||||||
|
|||||||||
Change Its Name (S20)
The name of the Trigger IS important. It is needed to identify the Trigger in Session Rules.
 |
|
|||||||
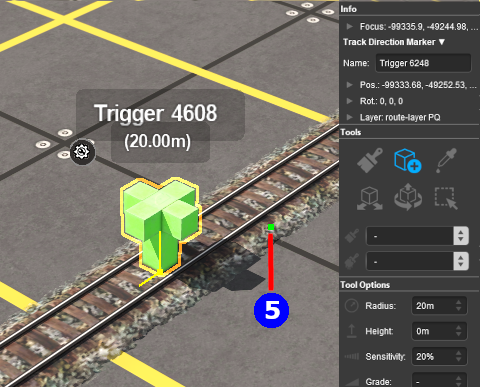
Set its Effect Radius (S20)
| The Effect Radius sets the size of green "effect wings" attached both ends of the Trigger. This sets how close a consist has to approach to trigger its "event". The smaller the radius the closer it must approach. |
 |
|
||||||||||
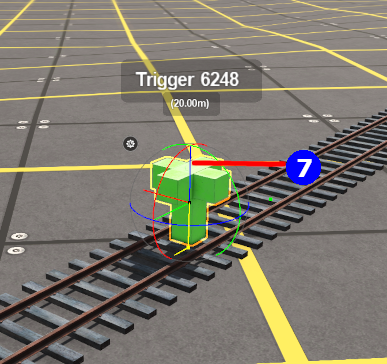
Move a Trigger Along the Track (S20)
Triggers can be moved along the track or to other tracks.
 |
|
|||||
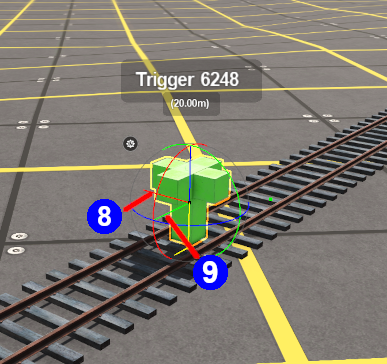
Move the Trigger Vertically (S20)
| Triggers can be physically placed above (or below) the track. This feature allows them to be placed, for example, above the track so that they will not be hidden in Surveyor if a consist is parked on the Trigger. |
 |
|
|||||||||||||||||||
Move the Trigger Horizontally (S20)
| Triggers can be physically placed left or right alongside the track. This feature allows them to be placed, for example, beside the track so that they will not be hidden in Surveyor if a consist is parked on the Trigger. |
 |
|
|||||||||||||||||||||
|
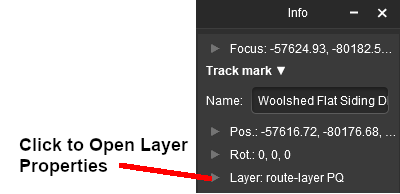
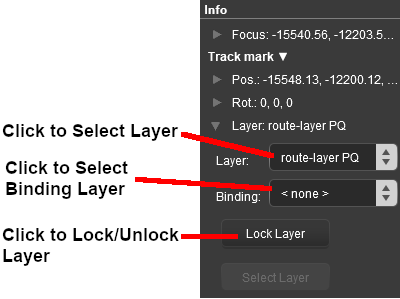
Assign a Trigger to a New Layer (S20)
| The Info Palette will show the layer assigned to the currently selected object. To the left of the layer name is a small arrowhead object. | |||||||||||||||||||||||
  |
|
||||||||||||||||||||||
Creating a Trigger Event |
| When a consist enters the Effect Radius of a Trigger it will create an "event" that can be detected and responded to by some Session Rules and some Driver Commands. One such rule is the Trigger Check Rule which is added to a Session in the |
|
More information on the Trigger Check Rule can be found on the Trainz Wiki Rules Page at:- |
| Steps: | |||||||||
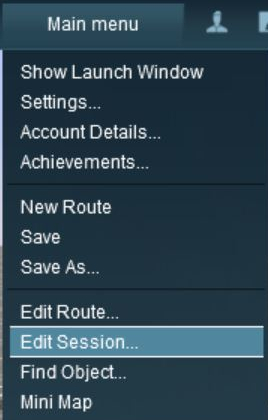
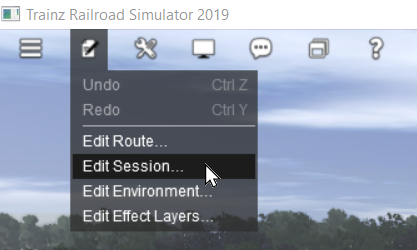
Open the Session Editor:
|
|||||||||
| Add the Trigger Check Rule: | ||||||||||
|
|
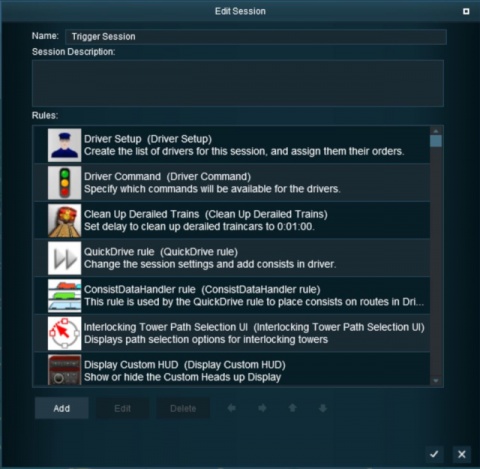 |
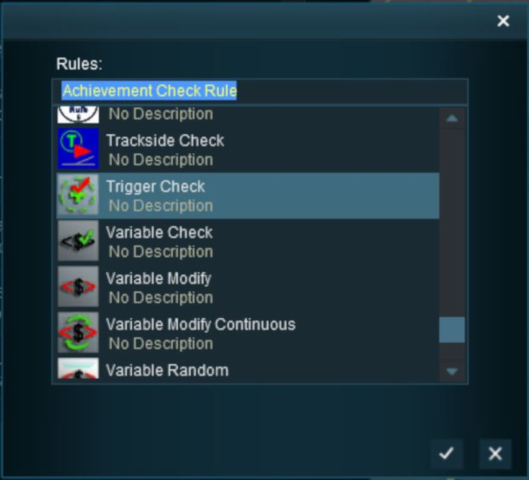 |
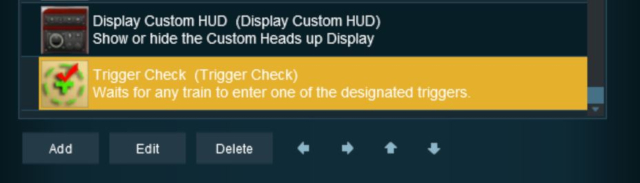
This will add the Trigger Check rule to the session. |
|
Open the Trigger Check Rule Properties:
|
|||||
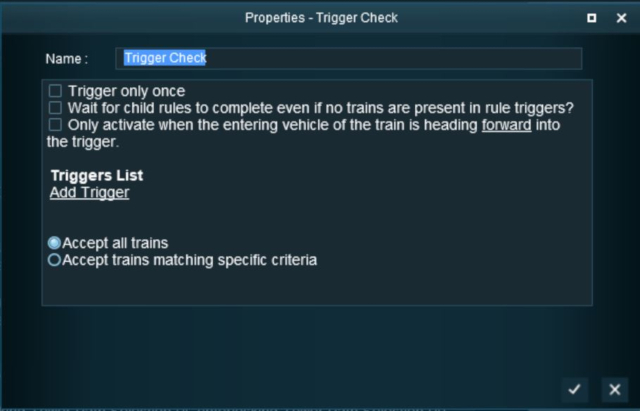
Configure the Rule:
|
|||||||||||
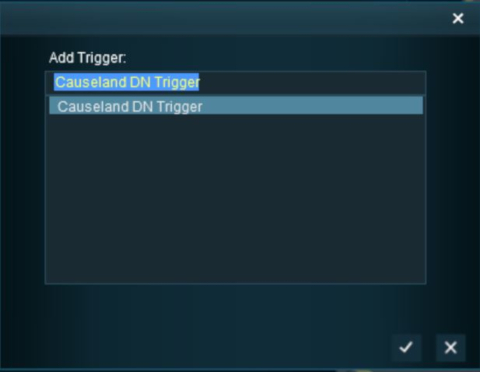
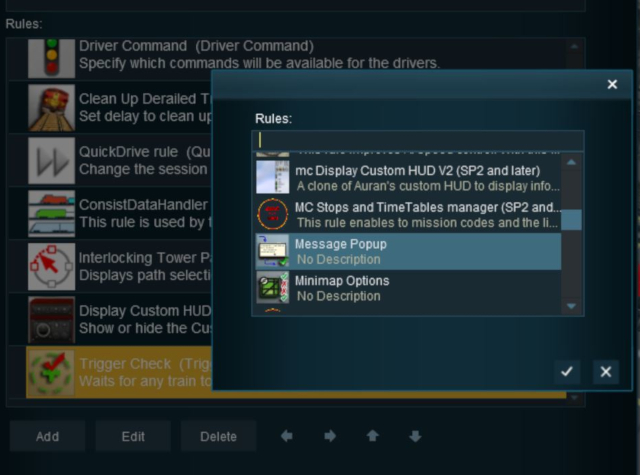
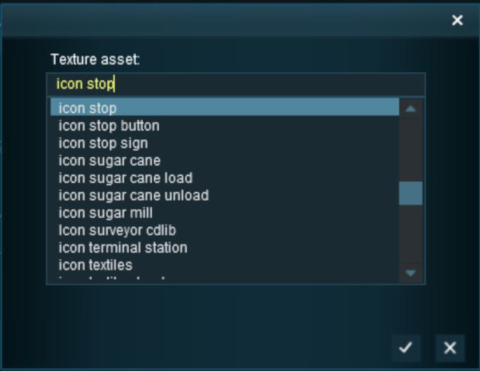
| Select the Trigger: The Trigger Selection Window will open and list all the Triggers in your Route.
|
|||||||||
Adding an Instruction to the Trigger Event |
Adding a Child Rule
To test your trigger event you will need to add some Session Rules.
| Steps: | ||||||||||||||
Add A Message Popup Rule:
|
||||||||||||||
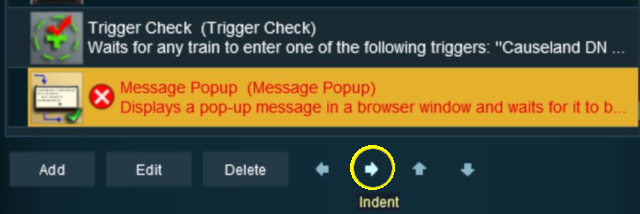
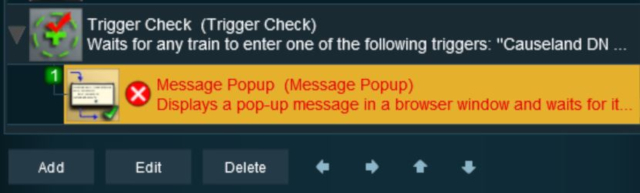
Indent the Popup Message Rule:
|
|||||||||
Configuring the Message and Testing |
| Steps: | |||||
Open the Message Popup Rule for Editing:
|
|||||
|
|
|||||||||||||||||||||||
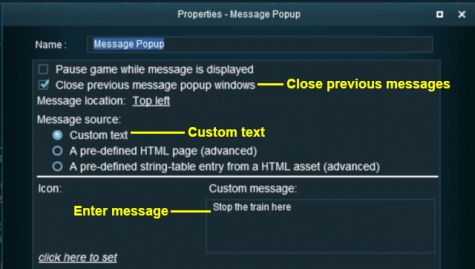
| Left Click on the |
The completed Message Popup Rule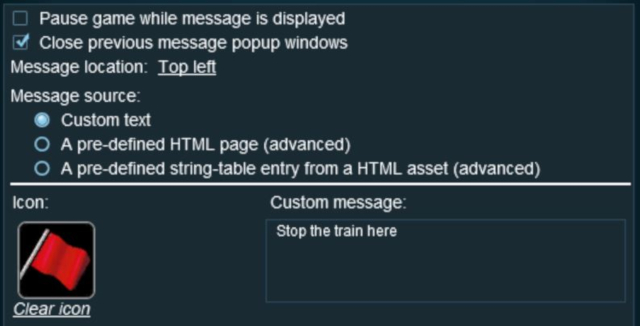 |
|
More information on this rule can be found on the Trainz Wiki Page at:- |
|
Another example of using the Trigger Check Rule can be found in the Trainz Wiki Page ![]() How to Use Message Popup Rule (Applications).
How to Use Message Popup Rule (Applications).
Alternatives to the Trigger Check Rule |
 |
There are other Session Rules that can be used in place of the Trigger Check Rule and Triggers. A few possibilities are listed below:-
|
 |
There is a driver command that can be used in place of the Trigger Check Rule:-
|
Trainz Wiki
|
|

This page was created by Trainz user pware in May 2018 and was last updated as shown below.