How to Use Track Triggers
m (→Adding a Trigger (S20)) |
(Reformatted to correct a major error) |
||
| Line 192: | Line 192: | ||
<tr valign="top"> | <tr valign="top"> | ||
<td width=629><span id="skipAddS10"></span> | <td width=629><span id="skipAddS10"></span> | ||
| + | =='''In Surveyor Classic (S10)'''== | ||
| + | </td> | ||
| + | <td width=50>[[image:SkipDown.png|link=#skipAddS20|Skip Down]]</td> <!-- skip Down --> | ||
| + | <td width=50>[[image:SkipUp.png|link=#stepAdding|Skip Up]]</td> <!-- skip Up --> | ||
| + | <td width=46> </td> | ||
| + | <td width=75> </td> | ||
| + | <td width=75> </td> | ||
| + | <td width=75> </td> | ||
| + | </tr> | ||
| + | </table> <!-- END Nav Buttons Table --> | ||
| + | |||
===Adding a Trigger (S10)=== | ===Adding a Trigger (S10)=== | ||
| Line 255: | Line 266: | ||
</table> | </table> | ||
<br> | <br> | ||
| + | ===Set the Trigger Name and Layer (S10)=== | ||
| + | <table width=1000> | ||
| + | <tr valign="top"> | ||
| + | <td width=500>[[image:TrackTriggerProperties.JPG|link=]]</td> | ||
| + | </tr> | ||
| + | </table> | ||
| + | |||
| + | <table width=1000 bgcolor=#000000 cellpadding=2> | ||
| + | <tr valign="top"> | ||
| + | <td> | ||
| + | <table width=996 bgcolor=#ffffff cellpadding=2> | ||
| + | <tr valign="top"> | ||
| + | <td width=25>[[image:DotPoint1.JPG|link=]]</td> | ||
| + | <td>To change the trigger name <span style="font-weight: 700; font-size: 15px; background-color: lightcyan;">Left Click</span> on the name text entry box, delete the highlighted default name and enter a new name</td> | ||
| + | </tr> | ||
| + | <tr valign="top"> | ||
| + | <td>[[image:DotPoint2.JPG|link=]]</td> | ||
| + | <td>To change its assigned layer <span style="font-weight: 700; font-size: 15px; background-color: lightcyan;">Left Click</span> on the layer text entry box (or use its scroll arrowheads) and select a new layer - see the '''Trainz Wiki Page''' [[image:WikiLink.PNG|link=]] '''[[How_to_Use_Layers|How to Use layers]]''' for more details on layers</td> | ||
| + | </tr> | ||
| + | <tr valign="top"> | ||
| + | <td>[[image:DotPoint3.JPG|link=]]</td> | ||
| + | <td>To confirm the changes <span style="font-weight: 700; font-size: 15px; background-color: lightcyan;">Left Click</span> on the [[image:Tick.PNG|link=]] icon or the <span style="font-weight: 700; font-size: 15px; color: white; background-color: black;"> Save Changes </span> button (depending on your '''Trainz''' version) at the bottom of the window</td> | ||
| + | </tr> | ||
| + | </table> | ||
| + | </td> | ||
| + | </tr> | ||
| + | </table> | ||
| + | <br> | ||
| + | ===Set the Effect Radius (S10)=== | ||
| + | |||
| + | At the bottom of the '''Track Tools''' flyout menu is an '''Advanced''' button. <span style="font-weight: 700; font-size: 15px; background-color: lightcyan;">Left Click</span> this button to open the advanced tools.<br> | ||
| + | |||
| + | <table width=1000> | ||
| + | <tr valign="top"> | ||
| + | <td>The '''Effect Radius''' sets the size of green "effect wings" attached both ends of the Trigger. This sets how close a consist has to approach to trigger its "event". The smaller the radius the closer it must approach.</td> | ||
| + | </tr> | ||
| + | </table> | ||
| + | <br> | ||
| + | <table width=1000> | ||
| + | <tr valign="middle"> | ||
| + | <td width=400>[[image:TrackMarkRadiusTools.png|link=]]<br> | ||
| + | <table bgcolor=#000000 cellpadding=2> | ||
| + | <tr valign="top"> | ||
| + | <td> | ||
| + | <table bgcolor=#ffffb0 cellpadding=2> | ||
| + | <tr valign="top"> | ||
| + | <td width=25>[[image:NotePad.PNG|link=]]</td> | ||
| + | <td>Other track objects that have a '''Trigger Effect Radius''' include '''Track Markers''', '''Track Priority Markers''' and '''Whistle Signs'''. In some cases the visible "effect wings" are red instead of green.</td> | ||
| + | </tr> | ||
| + | </table> | ||
| + | </td> | ||
| + | </tr> | ||
| + | </table> | ||
| + | </td> | ||
| + | <td> | ||
| + | <table width=600 bgcolor=#000000 cellpadding=2> | ||
| + | <tr valign="top"> | ||
| + | <td> | ||
| + | <table bgcolor=#ffffff cellpadding=2> | ||
| + | <tr valign="top"> | ||
| + | <td colspan=2><span style="font-weight: 700; font-size: 15px;">Steps:</span> To set a Triggers Effect Radius:-</td> | ||
| + | </tr> | ||
| + | <tr valign="top"> | ||
| + | <td width=25>[[image:DotPoint1.JPG|link=]]</td> | ||
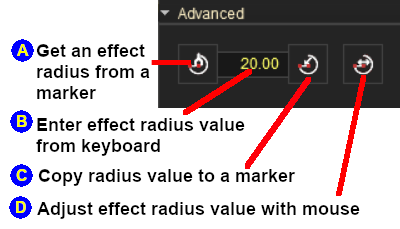
| + | <td>In the '''Track Tools''' flyout, <span style="font-weight: 700; font-size: 15px; background-color: lightcyan;">Left Click</span> on the '''Advanced''' button to open the Radius tools and properties. You will have a choice of 4 methods to set and adjust the Effect Radius</td> | ||
| + | </tr> | ||
| + | <tr valign="top"> | ||
| + | <td colspan=2> | ||
| + | <table> | ||
| + | <tr valign="top"> | ||
| + | <td colspan=2><span style="font-weight: 700; font-size: 15px;">Options:</span> Choose one of:-</td> | ||
| + | </tr> | ||
| + | <tr valign="top"> | ||
| + | <td width=25>[[image:Ablue.png|link=]]</td> | ||
| + | <td>To copy the '''Effect Radius''' of an existing '''Trigger''' | ||
| + | <table> | ||
| + | <tr valign="top"> | ||
| + | <td width=25>[[image:DotPoint2.JPG|link=]]</td> | ||
| + | <td><span style="font-weight: 700; font-size: 15px; background-color: lightcyan;">Left Click</span> the '''Get Effect Radius''' icon</td> | ||
| + | </tr> | ||
| + | <tr valign="top"> | ||
| + | <td>[[image:DotPoint3.JPG|link=]]</td> | ||
| + | <td><span style="font-weight: 700; font-size: 15px; background-color: lightcyan;">Left Click</span> on the '''Trigger''' whose radius you want to copy - the radius will be copied into the Effect Radius Value text box (the default value is 20.00 metres)</td> | ||
| + | </tr> | ||
| + | <tr valign="top"> | ||
| + | <td>[[image:DotPoint4.JPG|link=]]</td> | ||
| + | <td>To apply the new value see option [[image:Cblue.png|link=]] below</td> | ||
| + | </tr> | ||
| + | </table> | ||
| + | </td> | ||
| + | </tr> | ||
| + | <tr valign="top"> | ||
| + | <td>[[image:Bblue.png|link=]]</td> | ||
| + | <td>To manually alter the '''Effect Radius''' value | ||
| + | <table> | ||
| + | <tr valign="top"> | ||
| + | <td width=25>[[image:DotPoint2.JPG|link=]]</td> | ||
| + | <td>Type the new value (in metres) into the Effect Radius Value text box</td> | ||
| + | </tr> | ||
| + | <tr valign="top"> | ||
| + | <td>[[image:DotPoint3.JPG|link=]]</td> | ||
| + | <td>To apply the new value see option [[image:Cblue.png|link=]] below</td> | ||
| + | </tr> | ||
| + | </table> | ||
| + | </td> | ||
| + | </tr> | ||
| + | <tr valign="top"> | ||
| + | <td>[[image:Cblue.png|link=]]</td> | ||
| + | <td>To apply a value in the '''Effect Radius Value''' text box (from methods [[image:Ablue.png|link=]], [[image:Bblue.png|link=]] or [[image:Dblue.png|link=]]) to another '''Trigger''' | ||
| + | <table> | ||
| + | <tr valign="top"> | ||
| + | <td width=25>[[image:DotPoint2.JPG|link=]]</td> | ||
| + | <td><span style="font-weight: 700; font-size: 15px; background-color: lightcyan;">Left Click</span> the '''Copy Radius Value''' icon</td> | ||
| + | </tr> | ||
| + | <tr valign="top"> | ||
| + | <td>[[image:DotPoint3.JPG|link=]]</td> | ||
| + | <td><span style="font-weight: 700; font-size: 15px; background-color: lightcyan;">Left Click</span> on the '''Trigger''' that is to receive the new value (you can click on more than one)</td> | ||
| + | </tr> | ||
| + | </table> | ||
| + | </td> | ||
| + | </tr> | ||
| + | <tr valign="top"> | ||
| + | <td>[[image:Dblue.png|link=]]</td> | ||
| + | <td>To adjust the Effect Radius value up or down | ||
| + | <table> | ||
| + | <tr valign="top"> | ||
| + | <td width=25>[[image:DotPoint2.JPG|link=]]</td> | ||
| + | <td><span style="font-weight: 700; font-size: 15px; background-color: lightcyan;">Left Click</span> the '''Adjust Effect Radius''' button</td> | ||
| + | </tr> | ||
| + | <tr valign="top"> | ||
| + | <td>[[image:DotPoint3.JPG|link=]]</td> | ||
| + | <td>Select the '''Trigger'''</td> | ||
| + | </tr> | ||
| + | <tr valign="top"> | ||
| + | <td>[[image:DotPoint4.JPG|link=]]</td> | ||
| + | <td><span style="font-weight: 700; font-size: 15px; background-color: lightcyan;">Left Click and Drag</span> '''Forward''' (to increase the value) or '''Backward''' (to reduce the value)</td> | ||
| + | </tr> | ||
| + | <tr valign="top"> | ||
| + | <td>[[image:DotPoint5.JPG|link=]]</td> | ||
| + | <td>The new value will be immediately applied to the selected Trigger as the mouse moves (but only one Trigger at a time)</td> | ||
| + | </tr> | ||
| + | </table> | ||
| + | </td> | ||
| + | </tr> | ||
| + | </table> | ||
| + | </td> | ||
| + | </tr> | ||
| + | </table> | ||
| + | </td> | ||
| + | </tr> | ||
| + | </table> | ||
| + | </td> | ||
| + | </tr> | ||
| + | </table> | ||
| + | <br> | ||
| + | <table bgcolor=#000000 width=900> | ||
| + | <tr valign="top"> | ||
| + | <td> | ||
| + | <table bgcolor=#ffffe0 width=896> | ||
| + | <tr valign="top"> | ||
| + | <td>[[image:PencilTips.PNG|link=]]</td> | ||
| + | <td>Once you have an Effect Radius entered in the value box, you can apply it to any number of Triggers by using method [[image:Cblue.png|link=]] shown above | ||
| + | </td> | ||
| + | </tr> | ||
| + | </table> | ||
| + | </td> | ||
| + | </tr> | ||
| + | </table> | ||
| + | <br> | ||
| + | <table width=1000> <!-- BEGIN Nav Buttons Table SKIPS NO SECTIONS --> | ||
| + | <tr valign="top"> | ||
| + | <td width=629><span id="skipAddS20"></span> | ||
=='''In Surveyor 2.0 (S20)'''== | =='''In Surveyor 2.0 (S20)'''== | ||
</td> | </td> | ||
| Line 510: | Line 693: | ||
</table> | </table> | ||
<br> | <br> | ||
| − | <table width=1000 > | + | <table width=1000> |
<tr valign="top"> | <tr valign="top"> | ||
<td> | <td> | ||
| Line 561: | Line 744: | ||
</table> | </table> | ||
<br> | <br> | ||
| − | |||
===Change Its Name (S20)=== | ===Change Its Name (S20)=== | ||
Latest revision as of 14:40, 7 January 2026
The information in this Wiki Page applies to TANE, TRS19, Trainz Plus and TRS22.
|
|
[edit] What are Track Triggers? |
| Track triggers can be programmed to respond when a train (any train or a specific train) passes over them in Driver Mode. The response comes from executing a set of Session Rules that have been attached to a |
||||||||
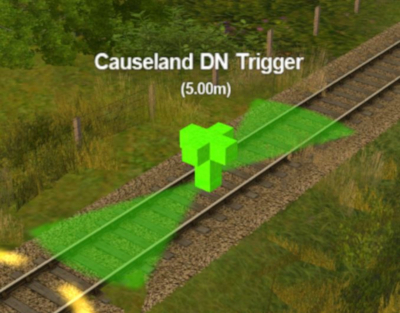
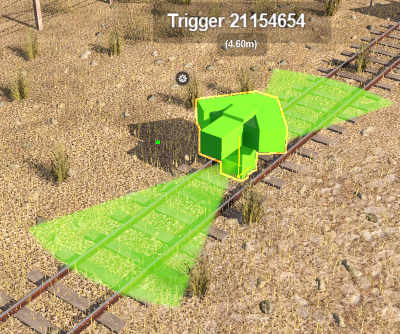
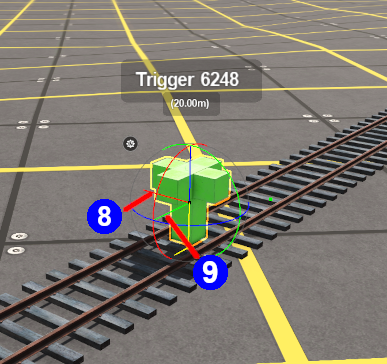
Shown below left is a standard Trigger and below right is a Directional Trigger. They are just two examples of several types of track triggers. In both cases:-
|
||||||||
|
||||||||
[edit] Route or Session? |
| Triggers can be placed in a Route Layer or in a Session Layer |
|
 |
Information on Route and Session layers can be found at:- |
[edit] Adding a Trigger |
|
[edit] In Surveyor Classic (S10) |
[edit] Adding a Trigger (S10)
 |
|
||||||||||||||||||
| As soon as a new trigger has been placed, its properties window will open on the screen. It will initially be given a default name and assigned to the currently active layer. |
[edit] Set the Trigger Name and Layer (S10)
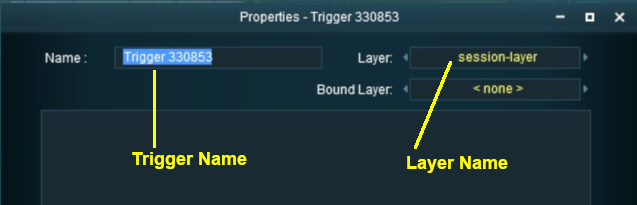 |
|
[edit] Set the Effect Radius (S10)
At the bottom of the Track Tools flyout menu is an Advanced button. Left Click this button to open the advanced tools.
| The Effect Radius sets the size of green "effect wings" attached both ends of the Trigger. This sets how close a consist has to approach to trigger its "event". The smaller the radius the closer it must approach. |
|
|
||||||||||||||||||||||||||||||||||||||||||
|
[edit] In Surveyor 2.0 (S20) |
|
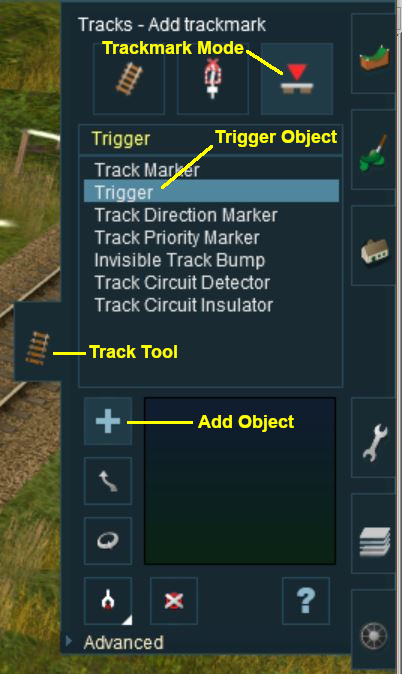
[edit] Adding a Trigger (S20)
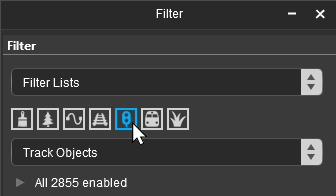
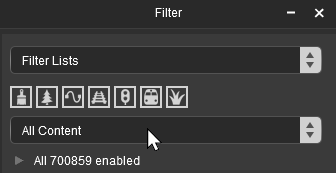
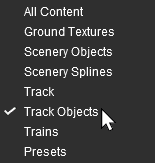
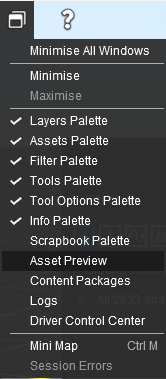
![]() In the Filter Palette either:-
In the Filter Palette either:-
|
|
||||||||||||||||||||||||||||||||||||
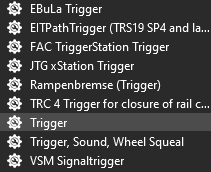
![]() In the Assets Palette to narrow down the filter list, type "trigger" (UPPER/lower case does not matter) in the Search Text Box
In the Assets Palette to narrow down the filter list, type "trigger" (UPPER/lower case does not matter) in the Search Text Box
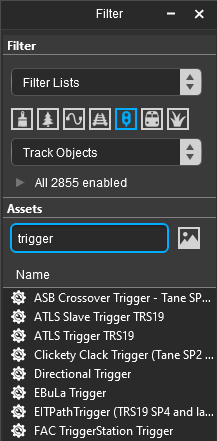 Both pallets shown docked |
|
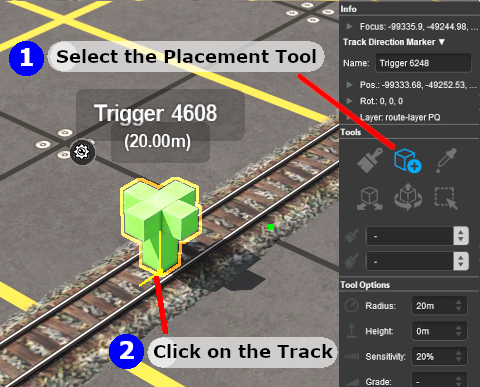
![]() Place the Trigger on the track.
Place the Trigger on the track.
 |
|
|||||||||||||||||||||||
|
|
||||||||||||||
[edit] Change Its Name (S20)
The name of the Trigger IS important. It is needed to identify the Trigger in Session Rules.
 |
|
|||||||
[edit] Set its Effect Radius (S20)
| The Effect Radius sets the size of green "effect wings" attached both ends of the Trigger. This sets how close a consist has to approach to trigger its "event". The smaller the radius the closer it must approach. |
 |
|
||||||||||
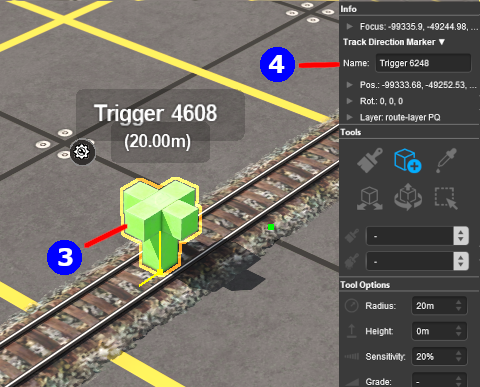
[edit] Move a Trigger Along the Track (S20)
Triggers can be moved along the track or to other tracks.
 |
|
|||||
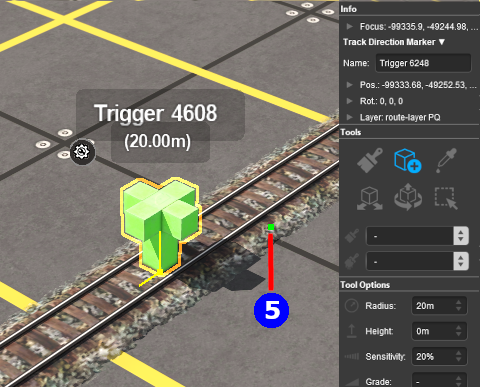
[edit] Move the Trigger Vertically (S20)
| Triggers can be physically placed above (or below) the track. This feature allows them to be placed, for example, above the track so that they will not be hidden in Surveyor if a consist is parked on the Trigger. |
 |
|
|||||||||||||||||||
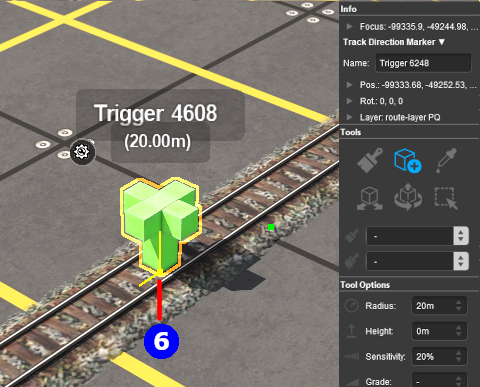
[edit] Move the Trigger Horizontally (S20)
| Triggers can be physically placed left or right alongside the track. This feature allows them to be placed, for example, beside the track so that they will not be hidden in Surveyor if a consist is parked on the Trigger. |
 |
|
|||||||||||||||||||||
|
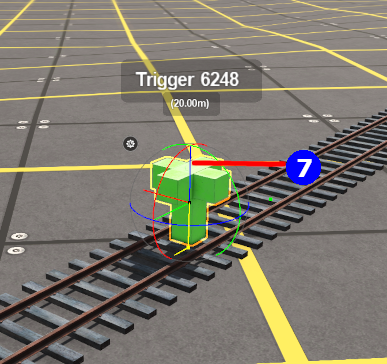
[edit] Assign a Trigger to a New Layer (S20)
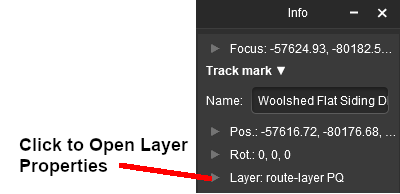
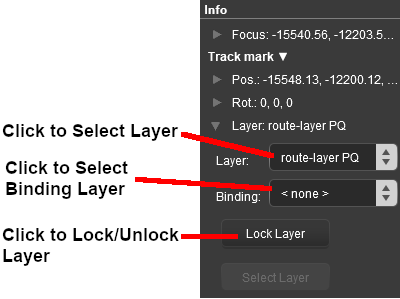
| The Info Palette will show the layer assigned to the currently selected object. To the left of the layer name is a small arrowhead object. | |||||||||||||||||||||||
  |
|
||||||||||||||||||||||
[edit] Creating a Trigger Event |
| When a consist enters the Effect Radius of a Trigger it will create an "event" that can be detected and responded to by some Session Rules and some Driver Commands. One such rule is the Trigger Check Rule which is added to a Session in the |
|
More information on the Trigger Check Rule can be found on the Trainz Wiki Rules Page at:- |
| Steps: | |||||||||
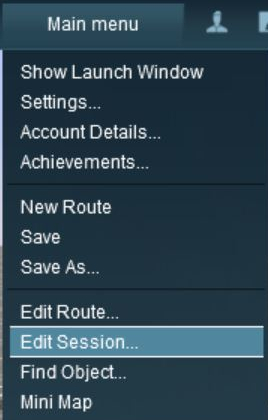
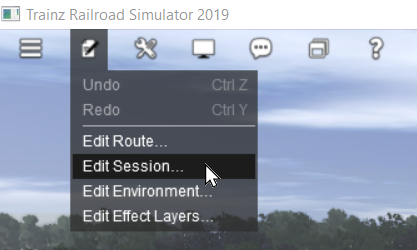
Open the Session Editor:
|
|||||||||
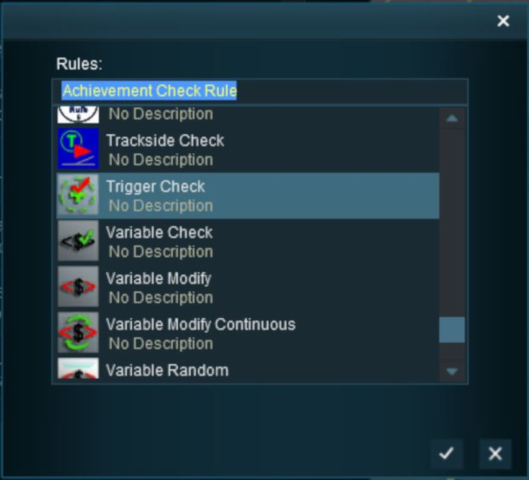
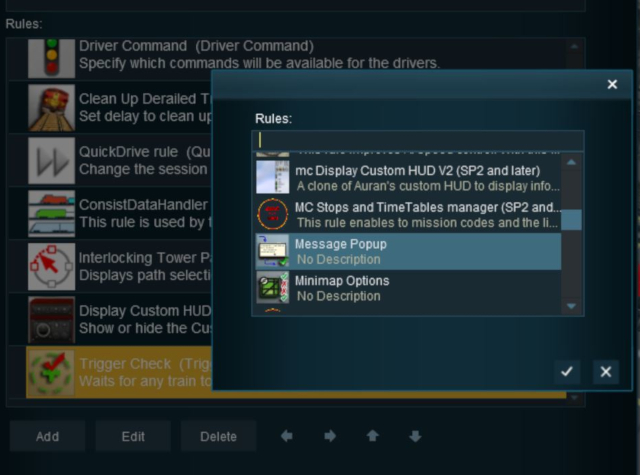
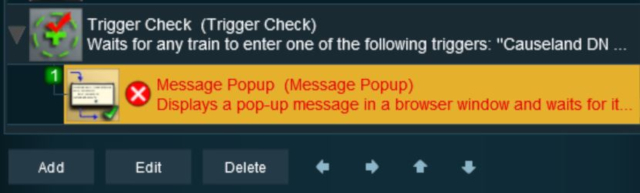
| Add the Trigger Check Rule: | ||||||||||
|
|
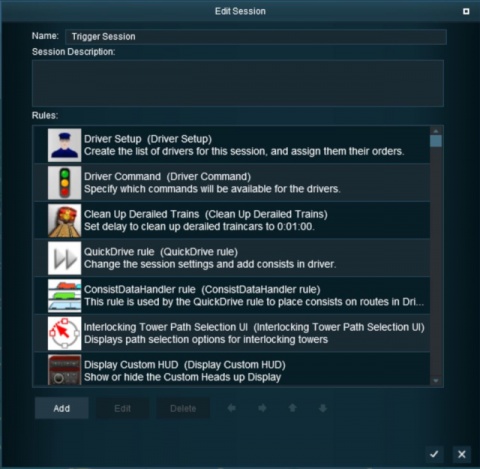 |
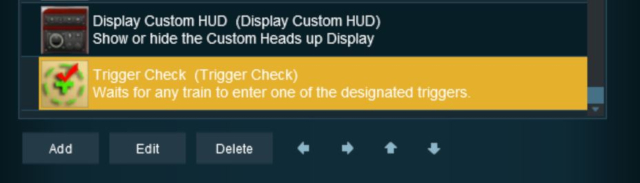
 |
This will add the Trigger Check rule to the session. |
|
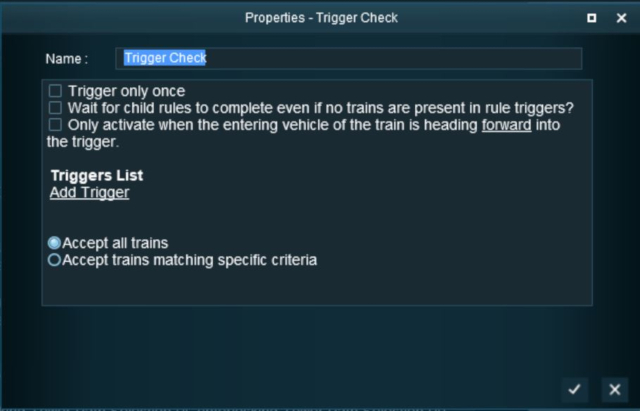
Open the Trigger Check Rule Properties:
|
|||||
Configure the Rule:
|
|||||||||||
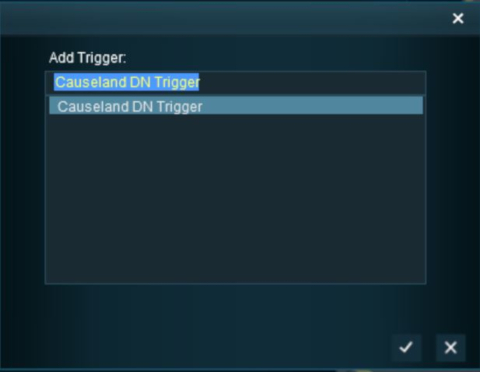
| Select the Trigger: The Trigger Selection Window will open and list all the Triggers in your Route.
|
|||||||||
[edit] Adding an Instruction to the Trigger Event |
[edit] Adding a Child Rule
To test your trigger event you will need to add some Session Rules.
| Steps: | ||||||||||||||
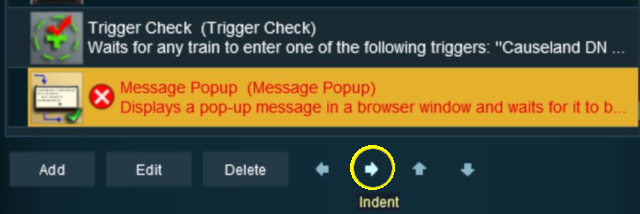
Add A Message Popup Rule:
|
||||||||||||||
Indent the Popup Message Rule:
|
|||||||||
[edit] Configuring the Message and Testing |
| Steps: | |||||
Open the Message Popup Rule for Editing:
|
|||||
|
|
|||||||||||||||||||||||
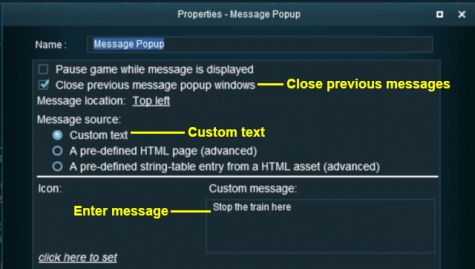
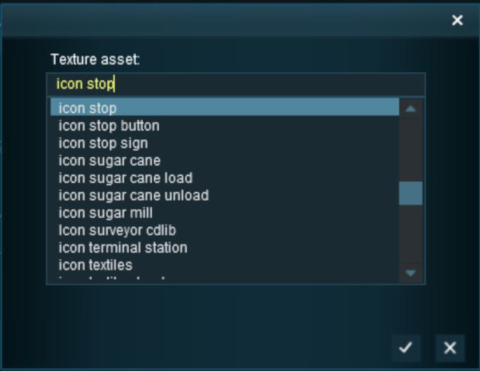
| Left Click on the |
The completed Message Popup Rule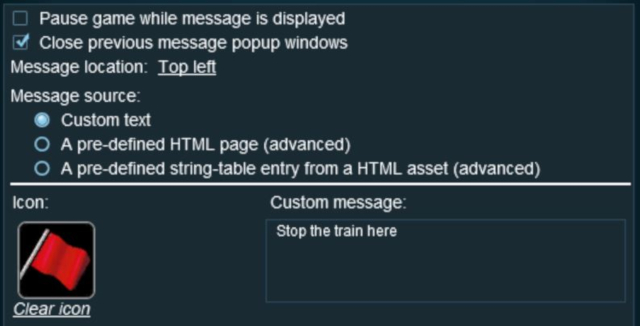 |
|
More information on this rule can be found on the Trainz Wiki Page at:- |
|
Another example of using the Trigger Check Rule can be found in the Trainz Wiki Page ![]() How to Use Message Popup Rule (Applications).
How to Use Message Popup Rule (Applications).
[edit] Alternatives to the Trigger Check Rule |
 |
There are other Session Rules that can be used in place of the Trigger Check Rule and Triggers. A few possibilities are listed below:-
|
 |
There is a driver command that can be used in place of the Trigger Check Rule:-
|
[edit] Trainz Wiki
|
|

This page was created by Trainz user pware in May 2018 and was last updated as shown below.