How to Use Track Direction Markers
m (corrections) |
m |
||
| Line 403: | Line 403: | ||
[[image:DotPoint1.JPG|link=]] In the '''Filter Palette''' either:- | [[image:DotPoint1.JPG|link=]] In the '''Filter Palette''' either:- | ||
<table width=1100> | <table width=1100> | ||
| + | <tr valign="top"> | ||
| + | <td> | ||
| + | <table width=790> | ||
<tr valign="top"> | <tr valign="top"> | ||
<td> | <td> | ||
| Line 421: | Line 424: | ||
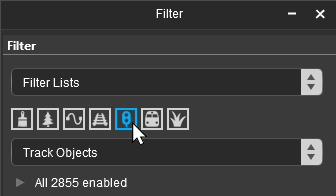
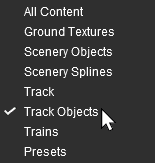
Then select '''Track Objects'''<br> | Then select '''Track Objects'''<br> | ||
[[image:FilterSelectTrackObjects_S20.png|link=]] | [[image:FilterSelectTrackObjects_S20.png|link=]] | ||
| + | </td> | ||
| + | </tr> | ||
| + | </table> | ||
| + | </td> | ||
| + | </tr> | ||
| + | <tr valign="top"> | ||
| + | <td colspan=3> | ||
| + | <br> | ||
| + | <table bgcolor=#000000 cellpadding=2> | ||
| + | <tr valign="top"> | ||
| + | <td> | ||
| + | <table bgcolor=#ffffe0 cellpadding=2> | ||
| + | <tr valign="top"> | ||
| + | <td colspan=2>[[image:PencilTips.PNG|link=]] <span style="font-size: 15px; font-weight: 700; color: white; background-color: blue;"> Shortcut </span><br> | ||
| + | If you already have a '''Direction Marker''' placed in your route then:-</td> | ||
| + | </tr> | ||
| + | <tr valign="top"> | ||
| + | <td width=20>[[image:DotPoint1Blue.png|link=]]</td> | ||
| + | <td>move the tool pointer over the existing Direction Marker object and hold down the <span style="font-weight: 700; font-size: 15px; color: white; background-color: black;"> Alt </span> key. The object name will appear in a '''ToolTip''' attached to the pointer</td> | ||
| + | </tr> | ||
| + | <tr valign="top"> | ||
| + | <td>[[image:DotPoint2Blue.png|link=]]</td> | ||
| + | <td>while holding down the <span style="font-weight: 700; font-size: 15px; color: white; background-color: black;"> Alt </span> key <span style="font-weight: 700; font-size: 15px; background-color: lightcyan;">Left Click</span> on the Direction Marker to identify it in the '''Assets Palette''' and to select the '''Placement Tool'''. Release the key.</td> | ||
| + | </tr> | ||
| + | <tr valign="top"> | ||
| + | <td colspan=2>Jump to '''Step [[image:DotPoint5.JPG|link=]]''' below.</td> | ||
| + | </tr> | ||
| + | </table> | ||
| + | </td> | ||
| + | </tr> | ||
| + | </table> | ||
</td> | </td> | ||
</tr> | </tr> | ||
| Line 485: | Line 519: | ||
</table> | </table> | ||
<br> | <br> | ||
| − | |||
| − | |||
| − | |||
| − | |||
| − | |||
| − | |||
| − | |||
| − | |||
| − | |||
| − | |||
| − | |||
| − | |||
| − | |||
| − | |||
| − | |||
| − | |||
| − | |||
| − | |||
| − | |||
| − | |||
| − | |||
| − | |||
| − | |||
[[image:DotPoint2.JPG|link=]] In the '''Assets Palette''' to narrow down the filter list, type "direction" ('''UPPER/lower''' case does not matter) in the '''Search Text Box'''<br> | [[image:DotPoint2.JPG|link=]] In the '''Assets Palette''' to narrow down the filter list, type "direction" ('''UPPER/lower''' case does not matter) in the '''Search Text Box'''<br> | ||
<table width=1000> | <table width=1000> | ||
Revision as of 09:30, 11 September 2024
The information in this Wiki Page applies to TANE, TRS19, Trainz Plus and TRS22.
|
What are Track Direction Markers? |
|
 |
Route or Session? |
| Direction Markers can be placed in a Route Layer or in a Session Layer |
|
 |
Information on Route and Session layers can be found at:- |
Adding a Direction Marker |
|
In Surveyor Classic (S10) |
Adding a Direction Marker (S10)
 |
|
|||||||||||||||||
|
Set its Effect Radius (S10)
At the bottom of the Track Tools flyout menu is an Advanced button. Left Click this button to open the advanced tools.
The Effect Radius sets the size of green "effect wings" attached to both ends of the Direction Marker.
|
 |
|
|||||||||||||||||||||||||||||||||||||||
|
In Surveyor 2.0 (S20) |
Surveyor 2.0 is currently only available in Trainz Plus and TRS22 Platinum.
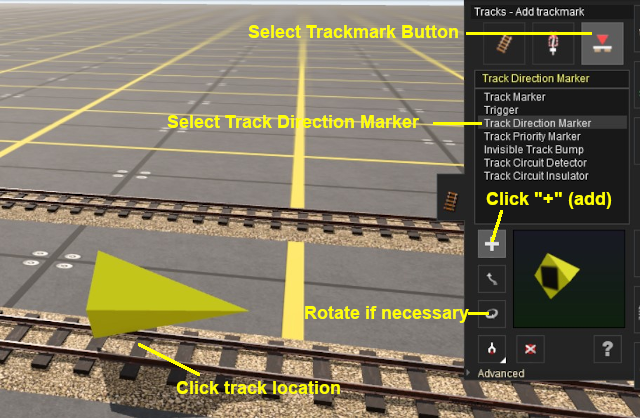
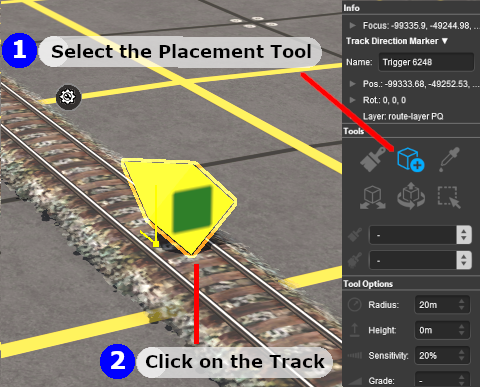
Adding a Direction Marker (S20)
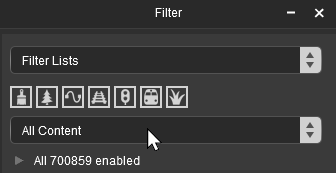
![]() In the Filter Palette either:-
In the Filter Palette either:-
|
|
||||||||||||||||||||||||||||||||||||
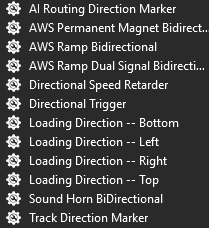
![]() In the Assets Palette to narrow down the filter list, type "direction" (UPPER/lower case does not matter) in the Search Text Box
In the Assets Palette to narrow down the filter list, type "direction" (UPPER/lower case does not matter) in the Search Text Box
 Both pallets shown docked |
|
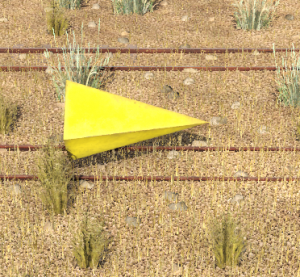
![]() Place the selected Direction Marker on the track.
Place the selected Direction Marker on the track.
 |
|
|||||||||||||||||||||
Set the Marker Direction (S20)
The direction that the Direction Marker points is its ONLY important property.
 |
 |
|||||
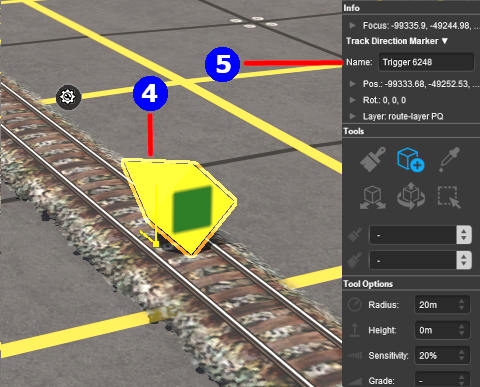
Change its Name (S20)
The name of the Direction Marker is only useful for finding it in the route. It is not needed for any operational purpose.
 |
|
|||||||
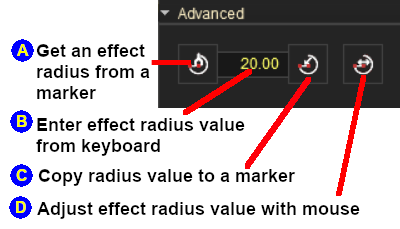
Set its Effect Radius (S20)
| The Effect Radius sets the size of green "effect wings" attached to both ends of the Direction Marker. It has no effect on its operation but allows you to keep its "visibility" clear of other track objects such as junctions and other markers. |
 |
|
|||||||
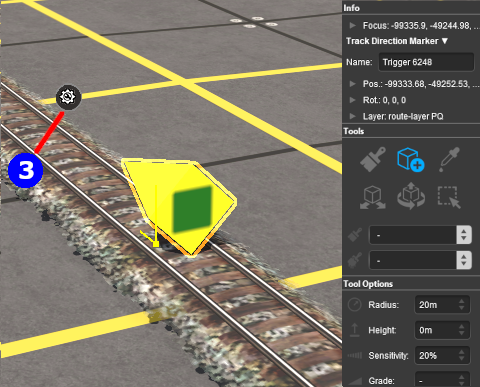
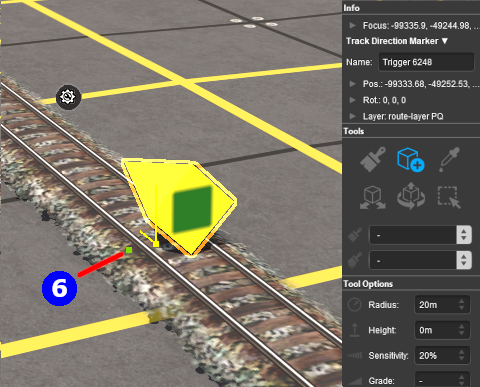
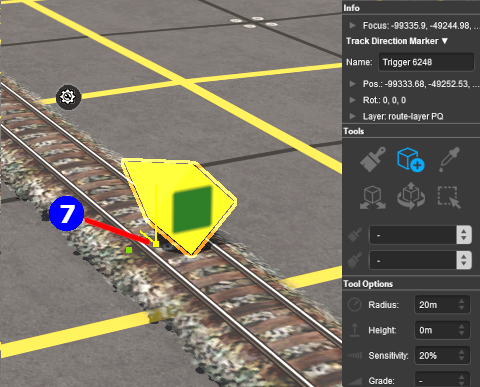
Move the Direction Marker Along the Track (S20)
Direction Markers can be moved along the track or to other tracks.
 |
|
|||||
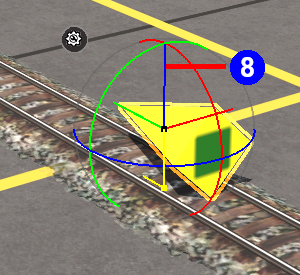
Move the Direction Marker Vertically (S20)
| Direction Markers can be physically placed above (or below) the track. This feature allows them to be placed, for example, above the track so that they will not be hidden in Surveyor if a consist is parked on the Direction Marker. |
 |
|
|||||||||||||||||||
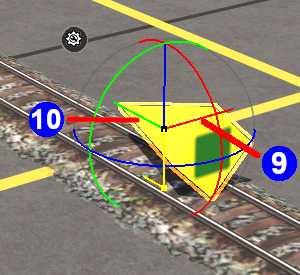
Move the Direction Marker Horizontally (S20)
| Direction Markers can be physically placed left or right alongside the track. This feature allows them to be placed, for example, beside the track so that they will not be hidden in Surveyor if a consist is parked on the Direction Marker. |
 |
|
|||||||||||||||||||||
|
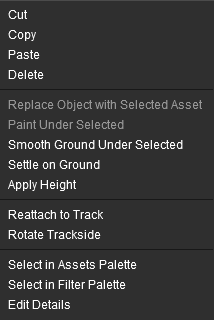
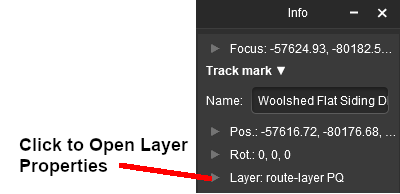
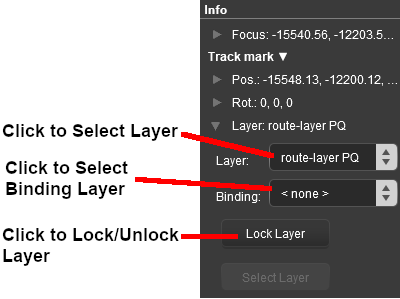
Assign a Direction Marker to Another Layer (S20)
| The Info Palette will show the layer assigned to the currently selected object. To the left of the layer name is a small arrowhead object. | |||||||||||||||||||||||
  |
|
||||||||||||||||||||||
Direction Marker Operation |
| Track Direction Markers only work on AI controlled trains. They have no effect on manually controlled trains | |
| If the set path is blocked, then the AI will NOT attempt to find another path | |
| A set path will be ignored if a shorter path is available |
| Consider the situation represented in the diagrams below. An AI controlled train is moving left to right towards a junction and a loop line. A Direction Marker (yellow triangle) has been set on the main line which only allows AI trains traveling right-to-left to pass along that section of track. |
| In Figure 1 below, The train approaches the junction at the start of the one way section. |

Figure 1
| In Figure 2 below, the train has been forced to take the loop line to avoid the section controlled by the Direction Markers. |

Figure 2
| In Figure 3 below, the loop line has been blocked by another train. The moving train will attempt to use the loop line but it will be halted and will not attempt to find another path. |

Figure 3
| Direction Markers can be ignored by the AI In Figure 4 below, the Direction Marker has been placed on the loop line and is pointing in the same direction as the moving train. However, the mainline path represents the shorter route for the consist so the "preferred" direction, as indicated by the Direction Markers, is ignored. Placing a Direction Marker is no guarantee that the path will be followed if more suitable paths are available. |

Figure 4
Trainz Wiki |
|
|

This page was created by Trainz user pware in September 2019 and was last updated as shown below.