How to Use Track Markers
(→Change the Track Mark Name (S20)) |
m |
||
| (4 intermediate revisions by one user not shown) | |||
| Line 737: | Line 737: | ||
<tr valign="top"> | <tr valign="top"> | ||
<td>[[image:DotPoint4Blue.png|link=]]</td> | <td>[[image:DotPoint4Blue.png|link=]]</td> | ||
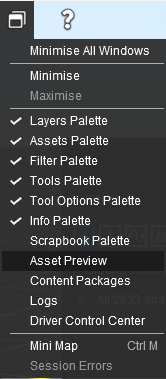
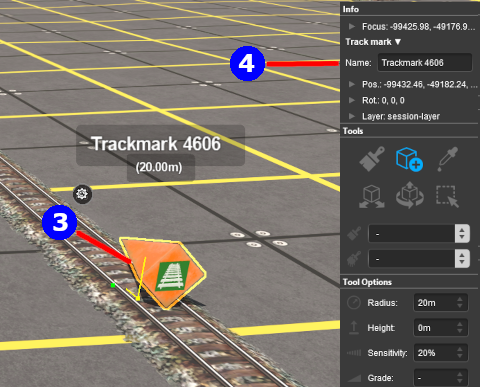
| − | <td>in the '''Info Palette''' (you may need to make this palette visible - see the '''Notes:''' for '''Step''' <span style="font-weight: 700; font-size: 15px; color: white; background-color: red;"> 1 </span> above) <span style="font-weight: 700; font-size: 15px; background-color: lightcyan;">Left Click</span> in the '''Name:''' entry box. Enter a name for the '''Track Mark''' and press the <span style="font-weight: 700; font-size: 15px; color: white; background-color: black;"> Enter </span> key | + | <td>in the '''Info Palette''' (you may need to make this palette visible - see the '''Notes:''' for '''Adding a Track Mark - Step''' <span style="font-weight: 700; font-size: 15px; color: white; background-color: red;"> 1 </span> above) <span style="font-weight: 700; font-size: 15px; background-color: lightcyan;">Left Click</span> in the '''Name:''' entry box. Enter a name for the '''Track Mark''' and press the <span style="font-weight: 700; font-size: 15px; color: white; background-color: black;"> Enter </span> key</td> |
| − | + | ||
| − | + | ||
| − | + | ||
| − | + | ||
| − | + | ||
| − | + | ||
| − | + | ||
| − | + | ||
| − | + | ||
| − | + | ||
| − | + | ||
| − | + | ||
| − | + | ||
| − | + | ||
| − | + | ||
| − | + | ||
| − | + | ||
| − | + | ||
| − | + | ||
| − | + | ||
</tr> | </tr> | ||
</table> | </table> | ||
| Line 767: | Line 747: | ||
</table> | </table> | ||
<br> | <br> | ||
| − | |||
===Set its Effect Radius (S20)=== | ===Set its Effect Radius (S20)=== | ||
| Line 810: | Line 789: | ||
<td width=25>[[image:NotePad.PNG|link=]]</td> | <td width=25>[[image:NotePad.PNG|link=]]</td> | ||
<td>Other track objects that have a '''Trigger Effect Radius''' include '''Track Direction Markers''', '''Track Priority Markers''', '''Track Triggers''' and '''Whistle Signs'''. In some cases the visible "effect wings" are green instead of red.</td> | <td>Other track objects that have a '''Trigger Effect Radius''' include '''Track Direction Markers''', '''Track Priority Markers''', '''Track Triggers''' and '''Whistle Signs'''. In some cases the visible "effect wings" are green instead of red.</td> | ||
| + | </tr> | ||
| + | </table> | ||
| + | </td> | ||
| + | </tr> | ||
| + | </table> | ||
| + | <br> | ||
| + | <table bgcolor=#000000 cellpadding=2> | ||
| + | <tr valign="top"> | ||
| + | <td> | ||
| + | <table bgcolor=#ffffe0 cellpadding=2> | ||
| + | <tr valign="top"> | ||
| + | <td width=25>[[image:PencilTips.PNG|link=]]</td> | ||
| + | <td>Once you have set the '''Name''' and '''Effect Radius''' of a track mark it can be quickly duplicated (cloned) in '''Surveyor 2.0''' with those settings and moved to a new location. You can easily edit the clones name at the new location.<br> | ||
| + | See [[image:WikiLink.PNG|link=]] '''[[How_to_Use_S20_Tools#Cloning_Objects|How to Use S20 Tools - Cloning Objects]]''' for the details</td> | ||
</tr> | </tr> | ||
</table> | </table> | ||
Latest revision as of 06:22, 14 December 2025
The information in this Wiki Page applies to TANE, TRS19, Trainz Plus and TRS22.
|
|
[edit] What are Track Marks? |
| The Trainz AI relies heavily on Track Marks to direct trains around a layout. They are only visible in Surveyor |
|
 |
||||||||||||
[edit] Route or Session? |
| Track Marks can be placed in a Route Layer or in a Session Layer |
|
 |
Information on Route and Session layers can be found at:- |
[edit] Adding a Track Mark |
|
[edit] In Surveyor Classic (S10) |
[edit] Adding a Track Mark (S10)
 |
|
|||||||||||||||
Immediately after the Track Mark has been placed its properties window will appear. You can:-
|
 |
|
[edit] Set the Track Mark Effect Radius (S10)
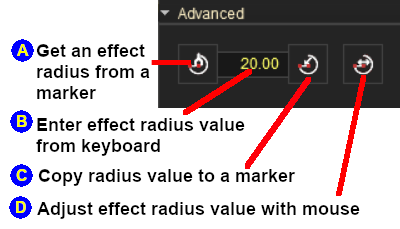
At the bottom of the Track Tools flyout menu is an Advanced button. Left Click this button to open the advanced tools.
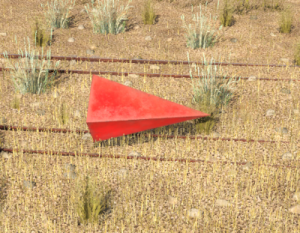
| The Effect Radius is the size of red "effect wings" attached to both ends of the marker. This sets how close a consist has to approach the marker to complete certain driver commands such as "Drive To Trackmark". The smaller the radius the closer it must approach. |
|
|
||||||||||||||||||||||||||||||||||||||||||
|
[edit] In Surveyor 2.0 (S20) |
|
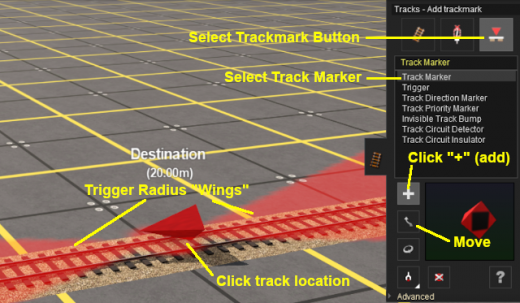
[edit] Adding a Track Mark (S20)
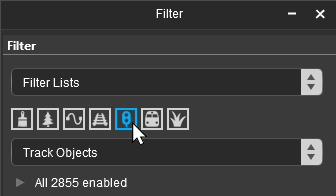
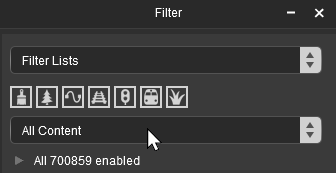
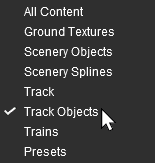
![]() In the Filter Palette either:-
In the Filter Palette either:-
|
|
||||||||||||||||||||||||||||||||||||
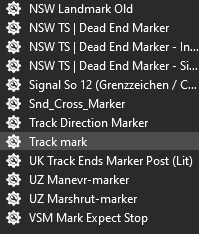
![]() In the Assets Palette to narrow down the filter list, type "mark" (UPPER/lower case does not matter) in the Search Text Box
In the Assets Palette to narrow down the filter list, type "mark" (UPPER/lower case does not matter) in the Search Text Box
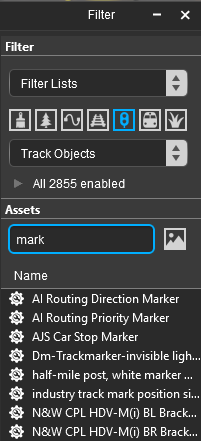 Both pallets shown docked |
|
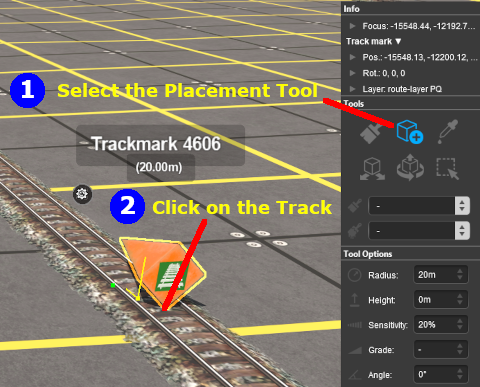
![]() Place the Track Mark on the track.
Place the Track Mark on the track.
 |
|
|||||||||||||||||||||||
|
|||||||||
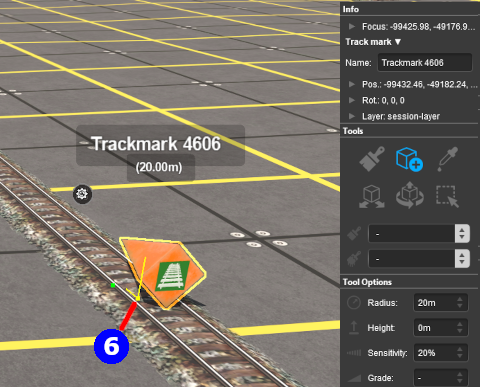
[edit] Change the Track Mark Name (S20)
The Track Mark name is used to identify it for Drive and other commands.
 |
|
|||||||
[edit] Set its Effect Radius (S20)
| The Effect Radius is the size of red "effect wings" attached to both ends of the marker. This sets how close a consist has to approach the marker to complete certain driver commands such as "Drive To Trackmark". The smaller the radius the closer it must approach. |
 |
|
|||||||||||||
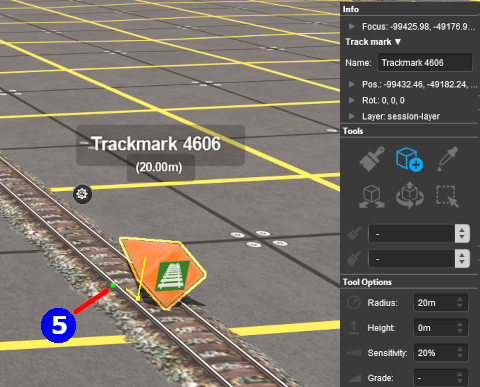
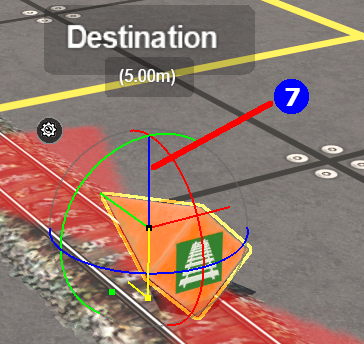
[edit] Move the Track Mark Along the Track (S20)
Track Marks can be moved along the track or to other tracks.
 |
|
|||||
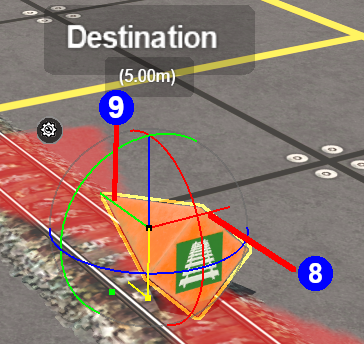
[edit] Move the Track Mark Vertically (S20)
| Track Marks can be physically placed above (or below) the track. This feature allows them to be placed, for example, above the track so that they will not be hidden in Surveyor if a consist is parked on a marker. |
 |
|
|||||||||||||||||||
[edit] Move the Track Mark Horizontally (S20)
| Track Marks can be physically placed left or right alongside the track. This feature allows them to be placed, for example, beside the track so that they will not be hidden in Surveyor if a consist is parked on a marker. |
 |
|
|||||||||||||||||||||
|
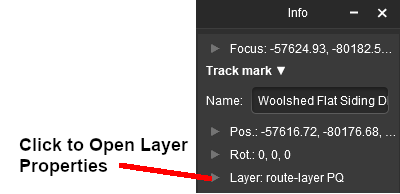
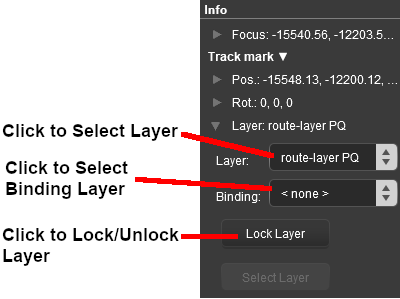
[edit] Assign a Track Mark to Another Layer (S20)
| The Info Palette will show the layer assigned to the currently selected object. To the left of the layer name is a small arrowhead object. | |||||||||||||||||||||||
  |
|
||||||||||||||||||||||
[edit] Track Mark Operation |
The most common use for Track Marks is as destinations for driver commands or as "way points" to direct a train to a destination via one or more intermediate places. They can also be used as the targets for Navigation Points and coupling operations.
[edit]
|
Information on adding driver commands can be found at:- |
|
 |
Drive To Trackmark Instructs the AI driver to Drive, via the shortest available path, to the designated Track Mark. The AI will noticeably slow the train as it approaches the Track Mark. Switches ahead of the train that are not locked against the AI will be set to allow the train to proceed and reset after the train has cleared the switch. The AI driver will NOT attempt to find a way around blockages when calculating the shortest path to the Track Mark. All signals and speed signs along the route are obeyed. |
 |
Drive Via Trackmark Instructs the AI driver to Drive, via the shortest available path, to and through the designated Track Mark. If there are no further navigation commands (e.g. Drive To, etc) then the AI will halt the train after passing the Track Mark. If there are further navigation commands then the AI will proceed through the Track Mark to the next Track Mark or Industry at normal speed. Switches ahead of the train that are not locked against the AI will be set to allow the train to proceed and reset after the train has cleared the switch. The AI driver will NOT attempt to find a way around blockages when calculating the shortest path to the Track Mark. All signals and speed signs along the route are obeyed. |
|
Navigate To Trackmark Instructs the AI driver to Drive, via the shortest available path, to the designated Track Mark. The AI will noticeably slow the train as it approaches the Track Mark. Switches ahead of the train that are not locked against the AI will be set to allow the train to proceed and reset after the train has cleared the switch. The AI driver will attempt to find a way around blockages when calculating the shortest path to the Track Mark. All signals and speed signs along the route are obeyed. |
|
Navigate Via Trackmark Instructs the AI driver to Drive, via the shortest available path, to and through the designated Track Mark. If there are no further navigation commands (e.g. Navigate To, etc) then the AI will halt the train after passing the Track Mark. If there are further navigation commands then the AI will proceed through the Track Mark to the next Track Mark or Industry at normal speed. Switches ahead of the train that are not locked against the AI will be set to allow the train to proceed and reset after the train has cleared the switch. The AI driver will attempt to find a way around blockages when calculating the shortest path to the Track Mark. All signals and speed signs along the route are obeyed. |
[edit]
Navigation Points can be attached to Track Marks to provide users with session instructions.
|
Information on navigation points can be found at:- |
[edit] Coupling Operations
An AI controlled train can be issued with a driver command to couple with the consist located at a specified Track Mark.
 |
The AI driver moves the train (or just the locomotive if it is by itself) to couple with the wagon that is closest to a specified trackmark. More information on this command can be found at This command must be downloaded from the DLS and installed in Trainz |
|
Information on adding driver commands can be found at:- |
[edit] Trainz Wiki
|
|

This page was created by Trainz user pware in September 2019 and was last updated as shown below.