How to Use Track Triggers
m |
(Updated to include S2.0 Filter Palette) |
||
| Line 20: | Line 20: | ||
<tr valign="top"> | <tr valign="top"> | ||
<td width=10>[[image:BlueDot10x10.png|link=]]</td> | <td width=10>[[image:BlueDot10x10.png|link=]]</td> | ||
| − | <td>'''Track Triggers''' are | + | <td>'''Track Triggers''' are markers that are invisible in '''Driver''' but visible in '''Surveyor'''</td> |
</tr> | </tr> | ||
<tr valign="top"> | <tr valign="top"> | ||
| Line 51: | Line 51: | ||
<table width=1000> | <table width=1000> | ||
<tr valign="top"> | <tr valign="top"> | ||
| − | <td colspan=2>Track triggers can be programmed to respond when a train (any train or a specific train) passes over them in Driver Mode. The response comes from executing a set of '''Session Rules''' that have been attached to a [[image:WikiLink.PNG|link=]] '''[[Session_Rule_List_with_Parameters#Trigger_Check_Rule|Trigger Check Rule]]''' (or a similar rule) or a '''Driver Command''' that is monitoring the | + | <td colspan=2>Track triggers can be programmed to respond when a train (any train or a specific train) passes over them in Driver Mode. The response comes from executing a set of '''Session Rules''' that have been attached to a [[image:WikiLink.PNG|link=]] '''[[Session_Rule_List_with_Parameters#Trigger_Check_Rule|Trigger Check Rule]]''' (or a similar rule) or a '''Driver Command''' that is monitoring the trigger.</td> |
</tr> | </tr> | ||
<tr valign="top"> | <tr valign="top"> | ||
| − | <td>Shown below left is a standard ''' | + | <td>Shown below left is a standard '''Trigger''' and below right is a '''Directional Trigger'''. They are just two examples of several types of track triggers. In both cases:- |
<table> | <table> | ||
<tr valign="top"> | <tr valign="top"> | ||
| Line 66: | Line 66: | ||
<tr valign="top"> | <tr valign="top"> | ||
<td width=10>[[image:redDot10x10.png|link=]]</td> | <td width=10>[[image:redDot10x10.png|link=]]</td> | ||
| − | <td>the '''Directional | + | <td>the '''Directional Trigger''' will normally only be triggered if the consist is moving in the direction indicated by the arrow</td> |
</tr> | </tr> | ||
<tr valign="top"> | <tr valign="top"> | ||
<td>[[image:RedDot10x10.png|link=]]</td> | <td>[[image:RedDot10x10.png|link=]]</td> | ||
| − | <td>the standard ''' | + | <td>the standard '''Trigger''' will be triggered regardless of the direction of movement</td> |
</tr> | </tr> | ||
</table> | </table> | ||
| Line 83: | Line 83: | ||
<tr valign="top"> | <tr valign="top"> | ||
<td width=500 align="center">[[image:TrackTrigger.JPG|link=]]<br> | <td width=500 align="center">[[image:TrackTrigger.JPG|link=]]<br> | ||
| − | '''"Standard" | + | '''"Standard" Trigger'''</td> |
<td width=500 align="center">[[image:TrackDTrigger.png|link=]]<br> | <td width=500 align="center">[[image:TrackDTrigger.png|link=]]<br> | ||
| − | '''Directional | + | '''Directional Trigger'''</td> |
</tr> | </tr> | ||
</table> | </table> | ||
| Line 109: | Line 109: | ||
<tr valign="top"> | <tr valign="top"> | ||
<td width=10>[[image:BlueDot10x10.png|link=]]</td> | <td width=10>[[image:BlueDot10x10.png|link=]]</td> | ||
| − | <td>''' | + | <td>'''Triggers''' can be placed in a '''Route Layer''' or in a '''Session Layer'''</td> |
</tr> | </tr> | ||
</table> | </table> | ||
| Line 125: | Line 125: | ||
<tr valign="top"> | <tr valign="top"> | ||
<td width=10>[[image:DotPoint.JPG|10px|link=]]</td> | <td width=10>[[image:DotPoint.JPG|10px|link=]]</td> | ||
| − | <td>Placing | + | <td>Placing Triggers in a '''Route layer''' (e.g. in the same layer as the track) means that they will be available in '''all Sessions''' created using that particular Route</td> |
</tr> | </tr> | ||
<tr valign="top"> | <tr valign="top"> | ||
<td>[[image:DotPoint.JPG|10px|link=]]</td> | <td>[[image:DotPoint.JPG|10px|link=]]</td> | ||
| − | <td>Placing | + | <td>Placing Triggers in a '''Session layer''' means that they will only be available in that Session. This can be useful if two or more Sessions are being created and you want to use different triggers in each Session</td> |
</tr> | </tr> | ||
</table> | </table> | ||
| Line 148: | Line 148: | ||
<tr valign="top"> | <tr valign="top"> | ||
<td width=629><span id="stepAdding"></span> | <td width=629><span id="stepAdding"></span> | ||
| − | ='''Adding a | + | ='''Adding a Trigger'''= |
</td> | </td> | ||
<td width=50>[[image:SkipDown.png|link=#skipAddS10|Skip Down]]</td> | <td width=50>[[image:SkipDown.png|link=#skipAddS10|Skip Down]]</td> | ||
| Line 167: | Line 167: | ||
<td><span style="font-size: 17px; font-weight: 700;">Notes:'''</span><br> | <td><span style="font-size: 17px; font-weight: 700;">Notes:'''</span><br> | ||
---- | ---- | ||
| − | A ''' | + | A '''Trigger''' has two important properties:- |
<table> | <table> | ||
<tr valign="top"> | <tr valign="top"> | ||
<td width=10>[[image:DotPoint.JPG|10px|link=]]</td> | <td width=10>[[image:DotPoint.JPG|10px|link=]]</td> | ||
| − | <td>its name which is needed for all commands and rules that use the ''' | + | <td>its name which is needed for all commands and rules that use the '''Trigger''', and</td> |
</tr> | </tr> | ||
<tr valign="top"> | <tr valign="top"> | ||
<td>[[image:DotPoint.JPG|10px|link=]]</td> | <td>[[image:DotPoint.JPG|10px|link=]]</td> | ||
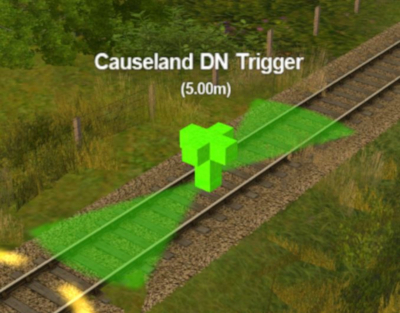
| − | <td>its ''' | + | <td>its '''Effect Radius''' (the green "wings" shown in the image above with the radius value, in metres, shown below the trigger name). This controls how closely an AI train has to approach the trigger to activate it (smaller radius = closer to the trigger)</td> |
</tr> | </tr> | ||
</table> | </table> | ||
| Line 182: | Line 182: | ||
<tr valign="top" bgcolor=#ffffe0> | <tr valign="top" bgcolor=#ffffe0> | ||
<td>[[image:PencilTips.PNG|link=]]</td> | <td>[[image:PencilTips.PNG|link=]]</td> | ||
| − | <td>A "standard" ''' | + | <td>A "standard" '''Trigger''' has no visible direction and, while it can be rotated, this has '''NO EFFECT''' on its operation. The '''Directional Trigger''' does have a direction because it is only triggered by trains travelling in a specific direction</td> |
</tr> | </tr> | ||
</table> | </table> | ||
| Line 203: | Line 203: | ||
</table> <!-- END Nav Buttons Table --> | </table> <!-- END Nav Buttons Table --> | ||
| − | ===Adding a | + | ===Adding a Trigger (S10)=== |
<table width=1000> | <table width=1000> | ||
| Line 214: | Line 214: | ||
<table bgcolor=#ffffff cellpadding=2> | <table bgcolor=#ffffff cellpadding=2> | ||
<tr valign="top"> | <tr valign="top"> | ||
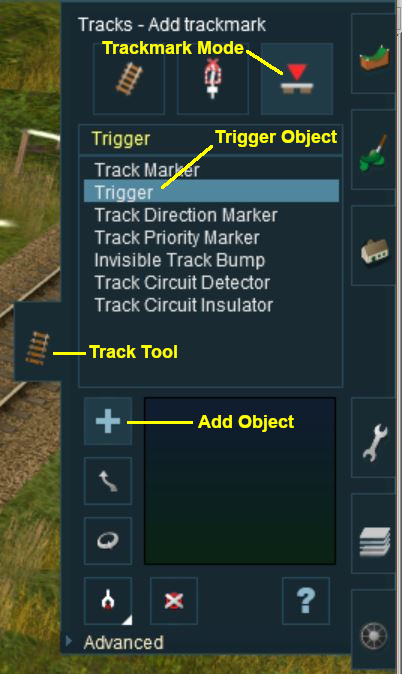
| − | <td colspan=2><span style="font-weight: 700; font-size: 15px;">Steps:</span> To add a '''Trigger | + | <td colspan=2><span style="font-weight: 700; font-size: 15px;">Steps:</span> To add a '''Trigger''':-</td> |
</tr> | </tr> | ||
<tr valign="top"> | <tr valign="top"> | ||
| Line 234: | Line 234: | ||
<tr valign="top"> | <tr valign="top"> | ||
<td>[[image:DotPoint5.JPG|link=]]</td> | <td>[[image:DotPoint5.JPG|link=]]</td> | ||
| − | <td><span style="font-weight: 700; font-size: 15px; background-color: lightcyan;">Left Click</span> on the track location where the | + | <td><span style="font-weight: 700; font-size: 15px; background-color: lightcyan;">Left Click</span> on the track location where the Trigger is to be placed</td> |
</tr> | </tr> | ||
<tr valign="top"> | <tr valign="top"> | ||
| − | <td colspan=2>This will place the | + | <td colspan=2>This will place the Trigger on the track and open its properties window.</td> |
</tr> | </tr> | ||
</table> | </table> | ||
| Line 249: | Line 249: | ||
<table width=1000> | <table width=1000> | ||
<tr valign="top"> | <tr valign="top"> | ||
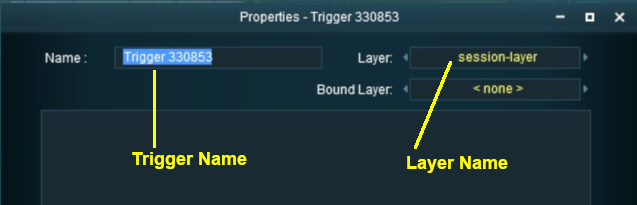
| − | <td>As soon as a new | + | <td>As soon as a new trigger has been placed, its properties window will open on the screen. It will initially be given a default name and assigned to the currently active layer.</td> |
</tr> | </tr> | ||
</table> | </table> | ||
| Line 267: | Line 267: | ||
<tr valign="top"> | <tr valign="top"> | ||
<td width=25>[[image:DotPoint1.JPG|link=]]</td> | <td width=25>[[image:DotPoint1.JPG|link=]]</td> | ||
| − | <td>To change the | + | <td>To change the trigger name <span style="font-weight: 700; font-size: 15px; background-color: lightcyan;">Left Click</span> on the name text entry box, delete the highlighted default name and enter a new name</td> |
</tr> | </tr> | ||
<tr valign="top"> | <tr valign="top"> | ||
| Line 288: | Line 288: | ||
<table width=1000> | <table width=1000> | ||
<tr valign="top"> | <tr valign="top"> | ||
| − | <td>The '''Effect Radius''' sets the size of green "effect wings" attached both ends of the | + | <td>The '''Effect Radius''' sets the size of green "effect wings" attached both ends of the Trigger. This sets how close a consist has to approach to trigger its "event". The smaller the radius the closer it must approach.</td> |
</tr> | </tr> | ||
</table> | </table> | ||
| Line 301: | Line 301: | ||
<table bgcolor=#ffffff cellpadding=2> | <table bgcolor=#ffffff cellpadding=2> | ||
<tr valign="top"> | <tr valign="top"> | ||
| − | <td colspan=2><span style="font-weight: 700; font-size: 15px;">Steps:</span> To set a | + | <td colspan=2><span style="font-weight: 700; font-size: 15px;">Steps:</span> To set a Triggers Effect Radius:-</td> |
</tr> | </tr> | ||
<tr valign="top"> | <tr valign="top"> | ||
| Line 315: | Line 315: | ||
<tr valign="top"> | <tr valign="top"> | ||
<td width=25>[[image:Ablue.png|link=]]</td> | <td width=25>[[image:Ablue.png|link=]]</td> | ||
| − | <td>To copy the '''Effect Radius''' of an existing ''' | + | <td>To copy the '''Effect Radius''' of an existing '''Trigger''' |
<table> | <table> | ||
<tr valign="top"> | <tr valign="top"> | ||
| Line 323: | Line 323: | ||
<tr valign="top"> | <tr valign="top"> | ||
<td>[[image:DotPoint3.JPG|link=]]</td> | <td>[[image:DotPoint3.JPG|link=]]</td> | ||
| − | <td><span style="font-weight: 700; font-size: 15px; background-color: lightcyan;">Left Click</span> on the ''' | + | <td><span style="font-weight: 700; font-size: 15px; background-color: lightcyan;">Left Click</span> on the '''Trigger''' whose radius you want to copy - the radius will be copied into the Effect Radius Value text box (the default value is 20.00 metres)</td> |
</tr> | </tr> | ||
<tr valign="top"> | <tr valign="top"> | ||
| Line 349: | Line 349: | ||
<tr valign="top"> | <tr valign="top"> | ||
<td>[[image:Cblue.png|link=]]</td> | <td>[[image:Cblue.png|link=]]</td> | ||
| − | <td>To apply a value in the '''Effect Radius Value''' text box (from methods [[image:Ablue.png|link=]], [[image:Bblue.png|link=]] or [[image:Dblue.png|link=]]) to another ''' | + | <td>To apply a value in the '''Effect Radius Value''' text box (from methods [[image:Ablue.png|link=]], [[image:Bblue.png|link=]] or [[image:Dblue.png|link=]]) to another '''Trigger''' |
<table> | <table> | ||
<tr valign="top"> | <tr valign="top"> | ||
| Line 357: | Line 357: | ||
<tr valign="top"> | <tr valign="top"> | ||
<td>[[image:DotPoint3.JPG|link=]]</td> | <td>[[image:DotPoint3.JPG|link=]]</td> | ||
| − | <td><span style="font-weight: 700; font-size: 15px; background-color: lightcyan;">Left Click</span> on the ''' | + | <td><span style="font-weight: 700; font-size: 15px; background-color: lightcyan;">Left Click</span> on the '''Trigger''' that is to receive the new value (you can click on more than one)</td> |
</tr> | </tr> | ||
</table> | </table> | ||
| Line 372: | Line 372: | ||
<tr valign="top"> | <tr valign="top"> | ||
<td>[[image:DotPoint3.JPG|link=]]</td> | <td>[[image:DotPoint3.JPG|link=]]</td> | ||
| − | <td>Select the ''' | + | <td>Select the '''Trigger'''</td> |
</tr> | </tr> | ||
<tr valign="top"> | <tr valign="top"> | ||
| Line 380: | Line 380: | ||
<tr valign="top"> | <tr valign="top"> | ||
<td>[[image:DotPoint5.JPG|link=]]</td> | <td>[[image:DotPoint5.JPG|link=]]</td> | ||
| − | <td>The new value will be immediately applied to the selected | + | <td>The new value will be immediately applied to the selected Trigger as the mouse moves (but only one Trigger at a time)</td> |
</tr> | </tr> | ||
</table> | </table> | ||
| Line 402: | Line 402: | ||
<tr valign="top"> | <tr valign="top"> | ||
<td>[[image:PencilTips.PNG|link=]]</td> | <td>[[image:PencilTips.PNG|link=]]</td> | ||
| − | <td>Once you have an Effect Radius entered in the value box, you can apply it to any number of | + | <td>Once you have an Effect Radius entered in the value box, you can apply it to any number of Triggers by using method [[image:Cblue.png|link=]] shown above |
</td> | </td> | ||
</tr> | </tr> | ||
| Line 424: | Line 424: | ||
</table> <!-- END Nav Buttons Table --> | </table> <!-- END Nav Buttons Table --> | ||
| − | |||
| − | |||
| − | [[image:DotPoint1.JPG|link=]] In the ''' | + | <table width=1000 bgcolor=#000000 cellpadding=2> |
| − | <table width= | + | <tr valign="top"> |
| + | <td> | ||
| + | <table width=996 bgcolor=#ffffff cellpadding=2> | ||
| + | <tr valign="top"> | ||
| + | <td>'''Surveyor 2.0''' is only available in '''Trainz Plus''' and '''TRS22 Platinum'''</td> | ||
| + | </tr> | ||
| + | </table> | ||
| + | </td> | ||
| + | </tr> | ||
| + | </table> | ||
| + | <br> | ||
| + | ===Adding a Trigger (S20)=== | ||
| + | |||
| + | [[image:DotPoint1.JPG|link=]] In the '''Filter Palette''' either:- | ||
| + | <table width=1100> | ||
<tr valign="top"> | <tr valign="top"> | ||
<td> | <td> | ||
<table border=1> | <table border=1> | ||
<tr valign="top"> | <tr valign="top"> | ||
| − | <td width= | + | <td width=340 align="center">[[image:Ablue.png|link=]] <span style="font-weight: 700; font-size: 15px; background-color: lightcyan;">Left Click</span> on the '''Track Objects''' icon<br> |
| − | [[image: | + | [[image:FilterPaletteTrackObjectsSelected_S20.png|link=]] |
</td> | </td> | ||
</tr> | </tr> | ||
| Line 444: | Line 456: | ||
<table border=1> | <table border=1> | ||
<tr valign="top"> | <tr valign="top"> | ||
| − | <td align="center">[[image:Bblue.png|link=]] <span style="font-weight: 700; font-size: 15px; background-color: lightcyan;">Left Click</span> on the '''Content Drop | + | <td width=340 align="center">[[image:Bblue.png|link=]] <span style="font-weight: 700; font-size: 15px; background-color: lightcyan;">Left Click</span> on the '''Content Drop Down Box'''<br> |
| − | [[image: | + | [[image:FilterPaletteNoIconSelected_S20.png|link=]]<br> |
Then select '''Track Objects'''<br> | Then select '''Track Objects'''<br> | ||
| − | [[image: | + | [[image:FilterSelectTrackObjects_S20.png|link=]] |
</td> | </td> | ||
</tr> | </tr> | ||
| Line 465: | Line 477: | ||
<tr valign="top"> | <tr valign="top"> | ||
<td colspan=2> | <td colspan=2> | ||
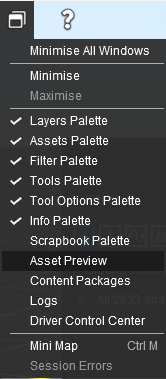
| − | If the '''Assets Palette''' | + | If the '''Filter Palette''' and the '''Assets Palette''' are not shown on the screen, then:- |
<table> | <table> | ||
<tr valign="top"> | <tr valign="top"> | ||
| Line 495: | Line 507: | ||
<tr valign="top"> | <tr valign="top"> | ||
<td>[[image:DotPoint2.JPG|link=]]</td> | <td>[[image:DotPoint2.JPG|link=]]</td> | ||
| − | <td>if | + | <td>if any required palette does not have a tick next to its name then <span style="font-weight: 700; font-size: 15px; background-color: lightcyan;">Left Click</span> on the name of the palette or on the empty [[image:BulletNoTick.png|link=]] box next to its name. This will add a [[image:BulletTick.png|link=]] and make the palette visible</td> |
</tr> | </tr> | ||
</table> | </table> | ||
| Line 518: | Line 530: | ||
<tr valign="top"> | <tr valign="top"> | ||
<td colspan=2>[[image:PencilTips.PNG|link=]] <span style="font-size: 15px; font-weight: 700; color: white; background-color: blue;"> Shortcut </span><br> | <td colspan=2>[[image:PencilTips.PNG|link=]] <span style="font-size: 15px; font-weight: 700; color: white; background-color: blue;"> Shortcut </span><br> | ||
| − | If you already have a ''' | + | If you already have a '''Trigger''' placed in your route then:-</td> |
</tr> | </tr> | ||
<tr valign="top"> | <tr valign="top"> | ||
| Line 526: | Line 538: | ||
<tr valign="top"> | <tr valign="top"> | ||
<td>[[image:DotPoint2Blue.png|link=]]</td> | <td>[[image:DotPoint2Blue.png|link=]]</td> | ||
| − | <td> | + | <td>while holding down the <span style="font-weight: 700; font-size: 15px; color: white; background-color: black;"> Alt </span> key <span style="font-weight: 700; font-size: 15px; background-color: lightcyan;">Left Click</span> on the trigger to identify it in the '''Assets Palette''' and to select the '''Placement Tool'''. Release the key.</td> |
</tr> | </tr> | ||
<tr valign="top"> | <tr valign="top"> | ||
| Line 536: | Line 548: | ||
</table> | </table> | ||
<br> | <br> | ||
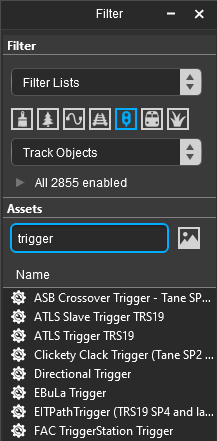
| − | [[image:DotPoint2.JPG|link=]] | + | [[image:DotPoint2.JPG|link=]] In the '''Assets Palette''' to narrow down the filter list, type "trigger" ('''UPPER/lower''' case does not matter) in the '''Search Text Box'''<br> |
<table width=1000> | <table width=1000> | ||
<tr valign="top"> | <tr valign="top"> | ||
| − | <td>[[image: | + | <td align="center">[[image:FilterPaletteSearchTrigger_S20.png|link=]]<br>'''Both pallets shown docked'''</td> |
| − | + | <td> | |
| + | <br> | ||
<table> | <table> | ||
<tr valign="top"> | <tr valign="top"> | ||
| − | <td>[[image: | + | <td>[[image:DotPoint3.JPG|link=]]</td> |
| − | <td | + | <td>This will list all the '''Track Objects''' containing the text "trigger" in their names or descriptions.</td> |
| − | + | ||
</tr> | </tr> | ||
| − | |||
| − | |||
| − | |||
| − | |||
| − | |||
| − | |||
<tr valign="top"> | <tr valign="top"> | ||
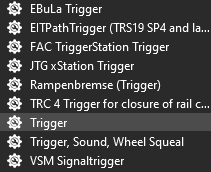
| − | <td | + | <td>[[image:DotPoint4.JPG|link=]]</td> |
| − | < | + | <td><span style="font-weight: 700; font-size: 15px; background-color: lightcyan;">Left Click</span> on the item name '''Trigger''' (or another trigger object) in the list - you may have to scroll down the list to find the asset.<br> |
| − | < | + | [[image:FilterPaletteSearchTriggerScrolled_S20.png|link=]] |
| − | < | + | <br> |
| − | < | + | If you are not sure about an asset then <span style="font-weight: 700; font-size: 15px; background-color: lightcyan;">Double Left Click</span> on the name to bring up its image and description.<br> |
<table bgcolor=#000000 cellpadding=2> | <table bgcolor=#000000 cellpadding=2> | ||
<tr valign="top"> | <tr valign="top"> | ||
| Line 565: | Line 571: | ||
<tr valign="top"> | <tr valign="top"> | ||
<td width=25>[[image:NotePad.PNG|link=]]</td> | <td width=25>[[image:NotePad.PNG|link=]]</td> | ||
| − | <td> | + | <td>When you select any asset in the '''Assets Palette''' list it will automatically select the '''Placement Tool''' so the next <span style="font-weight: 700; font-size: 15px; background-color: lightcyan;">Left Click</span> in your '''Trainz World''' will add that asset to your '''Trainz World'''</td> |
| − | + | ||
| − | + | ||
| − | + | ||
| − | + | ||
| − | + | ||
| − | + | ||
| − | + | ||
| − | + | ||
| − | + | ||
| − | + | ||
</tr> | </tr> | ||
</table> | </table> | ||
| Line 587: | Line 583: | ||
</tr> | </tr> | ||
</table> | </table> | ||
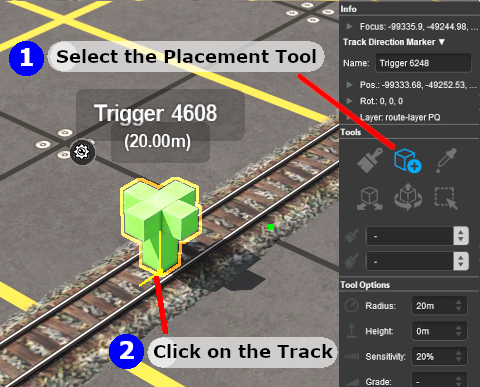
| + | [[image:DotPoint5.JPG|link=]] Place the '''Trigger''' on the track.<br> | ||
<table width=1000> | <table width=1000> | ||
<tr valign="top"> | <tr valign="top"> | ||
| − | <td width=480>[[image:TriggerAdd_S20.png|link= | + | <td width=480>[[image:TriggerAdd_S20.png|link=]]</td> |
<td> | <td> | ||
| − | <table bgcolor=#000000 cellpadding=2> | + | <table width=520 bgcolor=#000000 cellpadding=2> |
<tr valign="top"> | <tr valign="top"> | ||
<td> | <td> | ||
| − | <table bgcolor=#ffffff cellpadding=2> | + | <table width=516 bgcolor=#ffffff cellpadding=2> |
<tr valign="top"> | <tr valign="top"> | ||
| − | <td colspan=2><span style="font-weight: 700; font-size: 15px;">Steps:</span> To add a | + | <td colspan=2><span style="font-weight: 700; font-size: 15px;">Steps:</span> To add a Trigger:-</td> |
</tr> | </tr> | ||
<tr valign="top"> | <tr valign="top"> | ||
<td width=25>[[image:DotPoint1Blue.png|link=]]</td> | <td width=25>[[image:DotPoint1Blue.png|link=]]</td> | ||
| − | <td> | + | <td>If, for some reason, the '''Placement Tool''' has not been selected then <span style="font-weight: 700; font-size: 15px; background-color: lightcyan;">Left Click</span> on the '''Placement Tool''' or press the <span style="font-weight: 700; font-size: 15px; color: white; background-color: black;"> E </span> key</td> |
</tr> | </tr> | ||
<tr valign="top"> | <tr valign="top"> | ||
| − | <td>[[image:DotPoint2Blue.png|link=]]</td> | + | <td width=25>[[image:DotPoint2Blue.png|link=]]</td> |
| − | <td><span style="font-weight: 700; font-size: 15px; background-color: lightcyan;">Left Click</span> on the track at the position where you want to place the | + | <td><span style="font-weight: 700; font-size: 15px; background-color: lightcyan;">Left Click</span> on the track at the position where you want to place the '''Trigger'''</td> |
</tr> | </tr> | ||
<tr valign="top"> | <tr valign="top"> | ||
| − | <td colspan=2>Once placed a ''' | + | <td colspan=2>Once placed a '''Trigger''' can be easily moved if needed.</td> |
</tr> | </tr> | ||
</table> | </table> | ||
| Line 615: | Line 612: | ||
</table> | </table> | ||
<br> | <br> | ||
| − | <table bgcolor=#000000 cellpadding=2> | + | <table width=520 bgcolor=#000000 cellpadding=2> |
<tr valign="top"> | <tr valign="top"> | ||
<td> | <td> | ||
| − | <table bgcolor=#ffffb0 cellpadding=2> | + | <table width=516 bgcolor=#ffffb0 cellpadding=2> |
<tr valign="top"> | <tr valign="top"> | ||
<td>[[image:NotePad.PNG|link=]]</td> | <td>[[image:NotePad.PNG|link=]]</td> | ||
<td><span style="font-size: 17px; font-weight: 700;">Notes:'''</span><br> | <td><span style="font-size: 17px; font-weight: 700;">Notes:'''</span><br> | ||
---- | ---- | ||
| − | To delete a ''' | + | To delete a '''Trigger''' (or any asset):- |
<table bgcolor=#ffffff> | <table bgcolor=#ffffff> | ||
<tr valign="top"> | <tr valign="top"> | ||
| Line 645: | Line 642: | ||
<tr valign="top"> | <tr valign="top"> | ||
<td>[[image:DotPoint2.JPG|link=]]</td> | <td>[[image:DotPoint2.JPG|link=]]</td> | ||
| − | <td><span style="font-weight: 700; font-size: 15px; background-color: lightcyan;">Left Click</span> on the ''' | + | <td><span style="font-weight: 700; font-size: 15px; background-color: lightcyan;">Left Click</span> on the '''Trigger'''</td> |
</tr> | </tr> | ||
<tr valign="top"> | <tr valign="top"> | ||
| Line 668: | Line 665: | ||
<tr valign="top"> | <tr valign="top"> | ||
<td>[[image:PencilTips.PNG|link=]]</td> | <td>[[image:PencilTips.PNG|link=]]</td> | ||
| − | <td>If you need to rotate the ''' | + | <td>If you need to rotate the '''Trigger''' to face the opposite direction then:- |
<table bgcolor=#ffffff> | <table bgcolor=#ffffff> | ||
<tr valign="top"> | <tr valign="top"> | ||
| Line 675: | Line 672: | ||
<tr valign="top"> | <tr valign="top"> | ||
<td width=25>[[image:DotPoint1.JPG|link=]]</td> | <td width=25>[[image:DotPoint1.JPG|link=]]</td> | ||
| − | <td>select the | + | <td>select the Trigger then <span style="font-weight: 700; font-size: 15px; background-color: lightcyan;">Left Click</span> on its '''Context Menu Icon''' (or press the <span style="font-weight: 700; font-size: 17px; color: white; background-color: black;"> T </span> key)</td> |
</tr> | </tr> | ||
<tr valign="top"> | <tr valign="top"> | ||
| Line 685: | Line 682: | ||
</tr> | </tr> | ||
<tr valign="top"> | <tr valign="top"> | ||
| − | <td colspan=2>'''Note:''' the direction | + | <td colspan=2>'''Note:''' the direction it faces has no effect on its operation</td> |
</tr> | </tr> | ||
</table> | </table> | ||
| Line 692: | Line 689: | ||
</table> | </table> | ||
<br> | <br> | ||
| − | |||
===Change Its Name (S20)=== | ===Change Its Name (S20)=== | ||
| − | The name of the | + | The name of the Trigger '''IS''' important. It is needed to identify the Trigger in '''Session Rules'''.<br> |
<table width=1000> | <table width=1000> | ||
<tr valign="top"> | <tr valign="top"> | ||
| Line 705: | Line 701: | ||
<table bgcolor=#ffffff cellpadding=2> | <table bgcolor=#ffffff cellpadding=2> | ||
<tr valign="top"> | <tr valign="top"> | ||
| − | <td colspan=2><span style="font-weight: 700; font-size: 15px;">Steps:</span> To change the name of a ''' | + | <td colspan=2><span style="font-weight: 700; font-size: 15px;">Steps:</span> To change the name of a '''Trigger''':-</td> |
</tr> | </tr> | ||
<tr valign="top"> | <tr valign="top"> | ||
<td width=25>[[image:DotPoint3Blue.png|link=]]</td> | <td width=25>[[image:DotPoint3Blue.png|link=]]</td> | ||
| − | <td>using either the '''Free Move Tool''' or the '''Fine Adjustment Tool''' select (<span style="font-weight: 700; font-size: 15px; background-color: lightcyan;">Left Click</span> on) the ''' | + | <td>using either the '''Free Move Tool''' or the '''Fine Adjustment Tool''' select (<span style="font-weight: 700; font-size: 15px; background-color: lightcyan;">Left Click</span> on) the '''Trigger''' to be renamed</td> |
</tr> | </tr> | ||
<tr valign="top"> | <tr valign="top"> | ||
<td>[[image:DotPoint4Blue.png|link=]]</td> | <td>[[image:DotPoint4Blue.png|link=]]</td> | ||
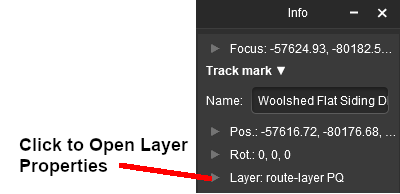
| − | <td>in the '''Info Palette''' (you may need to make this palette visible - see the '''Notes:''' for '''Step''' <span style="font-weight: 700; font-size: 15px; color: white; background-color: red;"> 1 </span> above) <span style="font-weight: 700; font-size: 15px; background-color: lightcyan;">Left Click</span> in the '''Name:''' entry box. Enter a name for the ''' | + | <td>in the '''Info Palette''' (you may need to make this palette visible - see the '''Notes:''' for '''Step''' <span style="font-weight: 700; font-size: 15px; color: white; background-color: red;"> 1 </span> above) <span style="font-weight: 700; font-size: 15px; background-color: lightcyan;">Left Click</span> in the '''Name:''' entry box. Enter a name for the '''Trigger''' and press the <span style="font-weight: 700; font-size: 15px; color: white; background-color: black;"> Enter </span> key</td> |
</tr> | </tr> | ||
</table> | </table> | ||
| Line 727: | Line 723: | ||
<table width=1000> | <table width=1000> | ||
<tr valign="top"> | <tr valign="top"> | ||
| − | <td>The '''Effect Radius''' sets the size of green "effect wings" attached both ends of the | + | <td>The '''Effect Radius''' sets the size of green "effect wings" attached both ends of the Trigger. This sets how close a consist has to approach to trigger its "event". The smaller the radius the closer it must approach.</td> |
</tr> | </tr> | ||
</table> | </table> | ||
| Line 740: | Line 736: | ||
<table bgcolor=#ffffff cellpadding=2> | <table bgcolor=#ffffff cellpadding=2> | ||
<tr valign="top"> | <tr valign="top"> | ||
| − | <td colspan=2><span style="font-weight: 700; font-size: 15px;">Steps:</span> To adjust the effect radius of a | + | <td colspan=2><span style="font-weight: 700; font-size: 15px;">Steps:</span> To adjust the effect radius of a Trigger:-</td> |
</tr> | </tr> | ||
<tr valign="top"> | <tr valign="top"> | ||
<td width=25>[[image:DotPoint5Blue.png|link=]]</td> | <td width=25>[[image:DotPoint5Blue.png|link=]]</td> | ||
| − | <td><span style="font-weight: 700; font-size: 15px; background-color: lightcyan;">Left Click and Drag</span> '''Forward''' or '''Backward''' on the '''Green Dot''' next to the ''' | + | <td><span style="font-weight: 700; font-size: 15px; background-color: lightcyan;">Left Click and Drag</span> '''Forward''' or '''Backward''' on the '''Green Dot''' next to the '''Trigger''' to increase or reduce its '''Effect Radius''' |
| + | <table bgcolor=#ffffe0 cellpadding=2> | ||
| + | <tr valign="top"> | ||
| + | <td width=25>[[image:PencilTips.PNG|link=]]</td> | ||
| + | <td>For the best results when adjusting the '''Effect Radius''' of any track object, move your camera POV (point of view) to directly '''above''' the object</td> | ||
| + | </tr> | ||
| + | </table> | ||
| + | </td> | ||
</tr> | </tr> | ||
</table> | </table> | ||
| Line 754: | Line 757: | ||
</table> | </table> | ||
| − | ===Move a | + | ===Move a Trigger Along the Track (S20)=== |
| − | + | Triggers can be moved along the track or to other tracks.<br> | |
<table width=1000> | <table width=1000> | ||
<tr valign="top"> | <tr valign="top"> | ||
| Line 766: | Line 769: | ||
<table bgcolor=#ffffff cellpadding=2> | <table bgcolor=#ffffff cellpadding=2> | ||
<tr valign="top"> | <tr valign="top"> | ||
| − | <td colspan=2><span style="font-weight: 700; font-size: 15px;">Steps:</span> To move the | + | <td colspan=2><span style="font-weight: 700; font-size: 15px;">Steps:</span> To move the Trigger:-</td> |
</tr> | </tr> | ||
<tr valign="top"> | <tr valign="top"> | ||
<td width=25>[[image:DotPoint6Blue.png|link=]]</td> | <td width=25>[[image:DotPoint6Blue.png|link=]]</td> | ||
| − | <td><span style="font-weight: 700; font-size: 15px; background-color: lightcyan;">Left Click and Drag</span> '''Forward''' or '''Backward''' on the '''Yellow Dot''' next to the ''' | + | <td><span style="font-weight: 700; font-size: 15px; background-color: lightcyan;">Left Click and Drag</span> '''Forward''' or '''Backward''' on the '''Yellow Dot''' next to the '''Trigger''' to move it along the track or to another track</td> |
</tr> | </tr> | ||
</table> | </table> | ||
| Line 780: | Line 783: | ||
</table> | </table> | ||
| − | ===Move the | + | ===Move the Trigger Vertically (S20)=== |
<table width=1000> | <table width=1000> | ||
<tr valign="top"> | <tr valign="top"> | ||
| − | <td> | + | <td>Triggers can be physically placed above (or below) the track. This feature allows them to be placed, for example, above the track so that they will not be hidden in Surveyor if a consist is parked on the Trigger.</td> |
</tr> | </tr> | ||
</table> | </table> | ||
| Line 797: | Line 800: | ||
<table bgcolor=#ffffff cellpadding=2> | <table bgcolor=#ffffff cellpadding=2> | ||
<tr valign="top"> | <tr valign="top"> | ||
| − | <td colspan=2><span style="font-weight: 700; font-size: 15px;">Steps:</span> To move a | + | <td colspan=2><span style="font-weight: 700; font-size: 15px;">Steps:</span> To move a Trigger vertically:-</td> |
</tr> | </tr> | ||
<tr valign="top"> | <tr valign="top"> | ||
| Line 811: | Line 814: | ||
<tr valign="top"> | <tr valign="top"> | ||
<td width=25>[[image:DotPoint7Blue.png|link=]]</td> | <td width=25>[[image:DotPoint7Blue.png|link=]]</td> | ||
| − | <td><span style="font-weight: 700; font-size: 15px; background-color: lightcyan;">Left Click and Drag</span> '''Forward''' or '''Backward''' on the <span style="font-weight: 700; font-size: 15px; color: white; background-color: blue;"> Blue </span> '''Vertical Axis Line''' above the | + | <td><span style="font-weight: 700; font-size: 15px; background-color: lightcyan;">Left Click and Drag</span> '''Forward''' or '''Backward''' on the <span style="font-weight: 700; font-size: 15px; color: white; background-color: blue;"> Blue </span> '''Vertical Axis Line''' above the Trigger to it up or down</td> |
</tr> | </tr> | ||
<tr valign="top"> | <tr valign="top"> | ||
| Line 818: | Line 821: | ||
<tr valign="top"> | <tr valign="top"> | ||
<td>[[image:PencilTips.PNG|link=]]</td> | <td>[[image:PencilTips.PNG|link=]]</td> | ||
| − | <td>If you need to return the ''' | + | <td>If you need to return the '''Trigger''' to its original position then:- |
<table bgcolor=#ffffff cellpadding=2> | <table bgcolor=#ffffff cellpadding=2> | ||
<tr valign="top"> | <tr valign="top"> | ||
| − | <td colspan=2><span style="font-weight: 700; font-size: 15px;">Steps:</span> To correctly reattach the | + | <td colspan=2><span style="font-weight: 700; font-size: 15px;">Steps:</span> To correctly reattach the Trigger to the track:-</td> |
</tr> | </tr> | ||
<tr valign="top"> | <tr valign="top"> | ||
| Line 845: | Line 848: | ||
</table> | </table> | ||
| − | ===Move the | + | ===Move the Trigger Horizontally (S20)=== |
<table width=1000> | <table width=1000> | ||
<tr valign="top"> | <tr valign="top"> | ||
| − | <td> | + | <td>Triggers can be physically placed left or right alongside the track. This feature allows them to be placed, for example, beside the track so that they will not be hidden in Surveyor if a consist is parked on the Trigger.</td> |
</tr> | </tr> | ||
</table> | </table> | ||
| Line 862: | Line 865: | ||
<table bgcolor=#ffffff cellpadding=2> | <table bgcolor=#ffffff cellpadding=2> | ||
<tr valign="top"> | <tr valign="top"> | ||
| − | <td colspan=2><span style="font-weight: 700; font-size: 15px;">Steps:</span> To move a | + | <td colspan=2><span style="font-weight: 700; font-size: 15px;">Steps:</span> To move a Trigger horizontally:-</td> |
</tr> | </tr> | ||
<tr valign="top"> | <tr valign="top"> | ||
| Line 876: | Line 879: | ||
<tr valign="top"> | <tr valign="top"> | ||
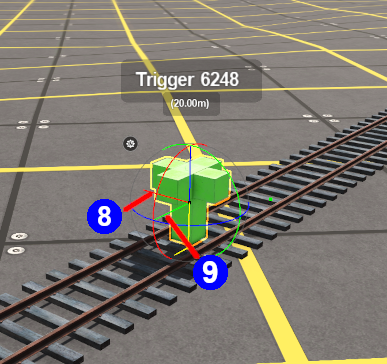
<td width=25>[[image:DotPoint8Blue.png|link=]]</td> | <td width=25>[[image:DotPoint8Blue.png|link=]]</td> | ||
| − | <td><span style="font-weight: 700; font-size: 15px; background-color: lightcyan;">Left Click and Drag</span> '''Forward''' or '''Backward''' on the <span style="font-weight: 700; font-size: 15px; color: white; background-color: red;"> Red </span> '''Horizontal Axis Line''' attached to the | + | <td><span style="font-weight: 700; font-size: 15px; background-color: lightcyan;">Left Click and Drag</span> '''Forward''' or '''Backward''' on the <span style="font-weight: 700; font-size: 15px; color: white; background-color: red;"> Red </span> '''Horizontal Axis Line''' attached to the Trigger to move it left or right</td> |
</tr> | </tr> | ||
<tr valign="top"> | <tr valign="top"> | ||
<td>[[image:DotPoint9Blue.png|link=]]</td> | <td>[[image:DotPoint9Blue.png|link=]]</td> | ||
| − | <td><span style="font-weight: 700; font-size: 15px; background-color: lightcyan;">Left Click and Drag</span> '''Forward''' or '''Backward''' on the <span style="font-weight: 700; font-size: 15px; color: white; background-color: green;"> Green </span> '''Horizontal Axis Line''' attached to the | + | <td><span style="font-weight: 700; font-size: 15px; background-color: lightcyan;">Left Click and Drag</span> '''Forward''' or '''Backward''' on the <span style="font-weight: 700; font-size: 15px; color: white; background-color: green;"> Green </span> '''Horizontal Axis Line''' attached to the Trigger to move it forward or back</td> |
</tr> | </tr> | ||
<tr valign="top"> | <tr valign="top"> | ||
| Line 887: | Line 890: | ||
<tr valign="top"> | <tr valign="top"> | ||
<td>[[image:PencilTips.PNG|link=]]</td> | <td>[[image:PencilTips.PNG|link=]]</td> | ||
| − | <td>If you need to return the | + | <td>If you need to return the Trigger to its original position then:- |
<table bgcolor=#ffffff cellpadding=2> | <table bgcolor=#ffffff cellpadding=2> | ||
<tr valign="top"> | <tr valign="top"> | ||
| − | <td colspan=2><span style="font-weight: 700; font-size: 15px;">Steps:</span> To correctly reattach the | + | <td colspan=2><span style="font-weight: 700; font-size: 15px;">Steps:</span> To correctly reattach the Trigger to the track:-</td> |
</tr> | </tr> | ||
<tr valign="top"> | <tr valign="top"> | ||
| Line 922: | Line 925: | ||
<td><span style="font-size: 17px; font-weight: 700;">Notes:'''</span><br> | <td><span style="font-size: 17px; font-weight: 700;">Notes:'''</span><br> | ||
---- | ---- | ||
| − | The <span style="font-weight: 700; font-size: 15px; color: white; background-color: green;"> Green </span> '''Horizontal Axis Line''' shown as [[image:DotPoint9Blue.png|link=]] in the image pointing forward from the | + | The <span style="font-weight: 700; font-size: 15px; color: white; background-color: green;"> Green </span> '''Horizontal Axis Line''' shown as [[image:DotPoint9Blue.png|link=]] in the image pointing forward from the Trigger will move it forward/backward regardless of whether it is on the track or not. It has the same effect as [[image:DotPoint6Blue.png|link=]] <span style="font-weight: 700; font-size: 15px;">Move a Trigger Along the Track</span>. However, by using this tool it is possible to move the Trigger beyond the end of the track if that is ever required.</td> |
</tr> | </tr> | ||
</table> | </table> | ||
| Line 929: | Line 932: | ||
</table> | </table> | ||
| − | ===Assign a | + | ===Assign a Trigger to a New Layer (S20)=== |
<table width=1000 cellpadding=2 bgcolor=#ffffff> | <table width=1000 cellpadding=2 bgcolor=#ffffff> | ||
| Line 944: | Line 947: | ||
<table bgcolor=#ffffff cellpadding=2> | <table bgcolor=#ffffff cellpadding=2> | ||
<tr valign="top"> | <tr valign="top"> | ||
| − | <td colspan=2><span style="font-weight: 700; font-size: 15px;">Steps:</span> To assign a | + | <td colspan=2><span style="font-weight: 700; font-size: 15px;">Steps:</span> To assign a Trigger to a layer:-</td> |
</tr> | </tr> | ||
<tr valign="top"> | <tr valign="top"> | ||
| Line 1,009: | Line 1,012: | ||
<tr valign="top"> | <tr valign="top"> | ||
<td width=629><span id="stepCreating"></span> | <td width=629><span id="stepCreating"></span> | ||
| − | ='''Creating a | + | ='''Creating a Trigger Event'''= |
</td> | </td> | ||
<td width=50> </td> | <td width=50> </td> | ||
| Line 1,022: | Line 1,025: | ||
<table width=1000> | <table width=1000> | ||
<tr valign="top"> | <tr valign="top"> | ||
| − | <td>When a consist enters the '''Effect Radius''' of a ''' | + | <td>When a consist enters the '''Effect Radius''' of a '''Trigger''' it will create an "event" that can be detected and responded to by some Session Rules and some Driver Commands. One such rule is the '''Trigger Check Rule''' which is added to a Session in the [[image:WikiLink.PNG|link=]] '''[[How to Use Session Editor|Session Editor]]'''.</td> |
</tr> | </tr> | ||
</table> | </table> | ||
| Line 1,138: | Line 1,141: | ||
<table> <!-- BEGIN Step 4 table --> | <table> <!-- BEGIN Step 4 table --> | ||
<tr valign="top"> | <tr valign="top"> | ||
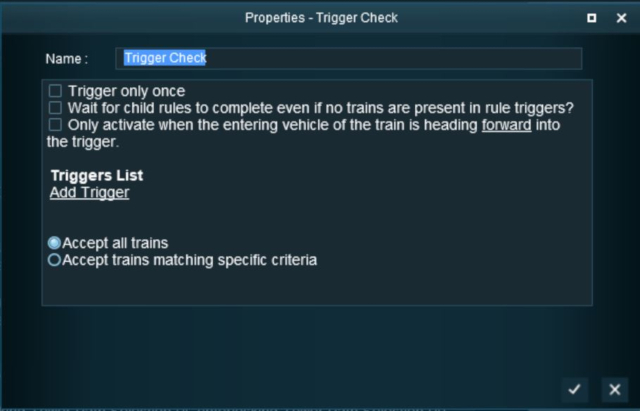
| − | <td colspan=2>For this example we will leave all settings unchanged and simply identify the | + | <td colspan=2>For this example we will leave all settings unchanged and simply identify the Trigger to be used.<br> |
In the Trigger Properties window (shown below):-</td> | In the Trigger Properties window (shown below):-</td> | ||
</tr> | </tr> | ||
<tr valign="top"> | <tr valign="top"> | ||
<td width=25>[[image:DotPoint6Blue.png|link=]]</td> | <td width=25>[[image:DotPoint6Blue.png|link=]]</td> | ||
| − | <td><span style="font-weight: 700; font-size: 15px; background-color: lightcyan;">Left Click</span> on the '''''<span style="text-decoration: underline;">Add trigger</span>''''' | + | <td><span style="font-weight: 700; font-size: 15px; background-color: lightcyan;">Left Click</span> on the '''''<span style="text-decoration: underline;">Add trigger</span>''''' ;</td> |
</tr> | </tr> | ||
<tr valign="top"> | <tr valign="top"> | ||
| Line 1,170: | Line 1,173: | ||
<td width=25>[[image:DotPoint5.JPG|link=]]</td> | <td width=25>[[image:DotPoint5.JPG|link=]]</td> | ||
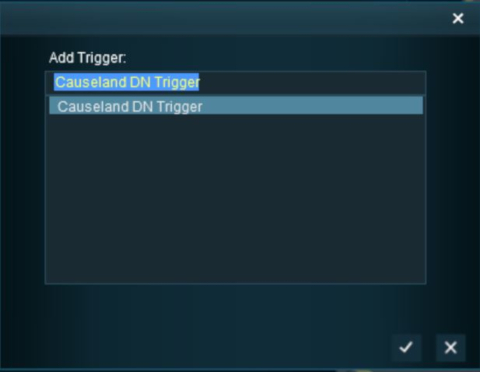
<td><span style="font-size: 17px; font-weight: 700;">Select the Trigger:</span><br> | <td><span style="font-size: 17px; font-weight: 700;">Select the Trigger:</span><br> | ||
| − | The '''Trigger Selection Window''' will open and list all the ''' | + | The '''Trigger Selection Window''' will open and list all the '''Triggers''' in your Route. |
<table> | <table> | ||
<tr valign="top"> | <tr valign="top"> | ||
<td width=25>[[image:DotPoint7Blue.png|link=]]</td> | <td width=25>[[image:DotPoint7Blue.png|link=]]</td> | ||
| − | <td>Select the | + | <td>Select the Trigger you have just added</td> |
</tr> | </tr> | ||
<tr valign="top"> | <tr valign="top"> | ||
| Line 1,185: | Line 1,188: | ||
<tr valign="top"> | <tr valign="top"> | ||
<td>[[image:DotPoint9Blue.png|link=]]</td> | <td>[[image:DotPoint9Blue.png|link=]]</td> | ||
| − | <td>Once the | + | <td>Once the Trigger has been added to the rule, <span style="font-weight: 700; font-size: 15px; background-color: lightcyan;">Left Click</span> on the [[image:Tick.PNG|link=]] icon in the '''Trigger Check''' properties window to accept the change and close the Session Editor.</td> |
</tr> | </tr> | ||
</table> <!-- END Step 5 table --> | </table> <!-- END Step 5 table --> | ||
| Line 1,272: | Line 1,275: | ||
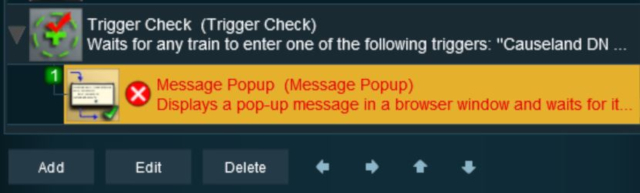
<tr> | <tr> | ||
<td colspan=2><br> | <td colspan=2><br> | ||
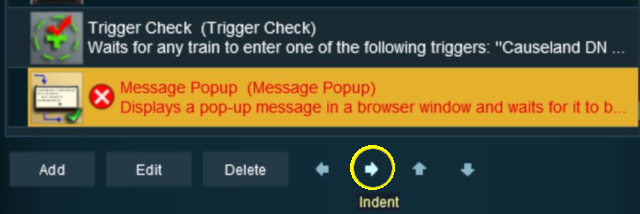
| − | The '''Message Popup Rule''' is now a '''Child Rule''' of the '''Trigger Check Rule''' and will only be executed ''after'' the | + | The '''Message Popup Rule''' is now a '''Child Rule''' of the '''Trigger Check Rule''' and will only be executed ''after'' the Trigger has been activated by a train.</td> |
</tr> | </tr> | ||
</table> <!-- END Steps Table --> | </table> <!-- END Steps Table --> | ||
| Line 1,359: | Line 1,362: | ||
<tr valign="top"> | <tr valign="top"> | ||
<td width=25>[[image:DotPoint1Blue.png|link=]]</td> | <td width=25>[[image:DotPoint1Blue.png|link=]]</td> | ||
| − | <td><span style="font-weight: 700; font-size: 15px; background-color: lightcyan;">Left Click</span> the | + | <td><span style="font-weight: 700; font-size: 15px; background-color: lightcyan;">Left Click</span> the ; '''''<span style="text-decoration: underline;">click here to set</span>''''' (shown left) and either:- |
<table> | <table> | ||
<tr valign="top"> | <tr valign="top"> | ||
| Line 1,396: | Line 1,399: | ||
</tr> | </tr> | ||
</table> | </table> | ||
| − | <!-- END Step 2 | + | <!-- END Step 2 Wiki; Table --> |
<table width=1000> | <table width=1000> | ||
<tr valign="top"> | <tr valign="top"> | ||
| Line 1,404: | Line 1,407: | ||
</table> | </table> | ||
<br> | <br> | ||
| − | <table cellpadding=2 bgcolor="Aquamarine"> <!-- BEGIN Step 2 | + | <table cellpadding=2 bgcolor="Aquamarine"> <!-- BEGIN Step 2 Wiki; Table --> |
<tr valign="top"> | <tr valign="top"> | ||
<td>[[image:LinkWiki.PNG|link=]]</td> | <td>[[image:LinkWiki.PNG|link=]]</td> | ||
| Line 1,427: | Line 1,430: | ||
<tr valign="top"> | <tr valign="top"> | ||
<td>[[image:DotPoint2Blue.png|link=]]</td> | <td>[[image:DotPoint2Blue.png|link=]]</td> | ||
| − | <td>Add a consist to your layout a short distance from the | + | <td>Add a consist to your layout a short distance from the Trigger (but further away than its radius), save the Surveyor Session, and then test in '''Driver'''</td> |
</tr> | </tr> | ||
</table> | </table> | ||
| Line 1,456: | Line 1,459: | ||
<tr valign="top"> | <tr valign="top"> | ||
<td width=50>[[image:RulesWiki.PNG|link=]]</td> | <td width=50>[[image:RulesWiki.PNG|link=]]</td> | ||
| − | <td width=950>There are other '''Session Rules''' that can be used in place of the '''Trigger Check Rule''' and | + | <td width=950>There are other '''Session Rules''' that can be used in place of the '''Trigger Check Rule''' and Triggers. A few possibilities are listed below:- |
<table> | <table> | ||
<tr valign="top"> | <tr valign="top"> | ||
| Line 1,468: | Line 1,471: | ||
<tr valign="top"> | <tr valign="top"> | ||
<td>[[image:DotPoint.JPG|10px|link=]]</td> | <td>[[image:DotPoint.JPG|10px|link=]]</td> | ||
| − | <td>'''Navigation Points''' (see the '''How to Guides''' | + | <td>'''Navigation Points''' (see the '''How to Guides''' ; below) are more complex but provide more advanced controls and options</td> |
</tr> | </tr> | ||
<tr valign="top"> | <tr valign="top"> | ||
| Line 1,495: | Line 1,498: | ||
<tr valign="top"> | <tr valign="top"> | ||
<td width=25>[[image:DotPoint.JPG|10px|link=]]</td> | <td width=25>[[image:DotPoint.JPG|10px|link=]]</td> | ||
| − | <td>'''[[Driver_Commands_List#WaitForTrigger|Wait For Trigger]]''' - forces an AI controlled train to wait until a specified | + | <td>'''[[Driver_Commands_List#WaitForTrigger|Wait For Trigger]]''' - forces an AI controlled train to wait until a specified Trigger has been activated by another train</td> |
</tr> | </tr> | ||
</table> | </table> | ||
| Line 1,522: | Line 1,525: | ||
<td> | <td> | ||
<span style="font-size: 17px;">'''More Tutorials and Guides to Using Trainz'''</span><br> | <span style="font-size: 17px;">'''More Tutorials and Guides to Using Trainz'''</span><br> | ||
| − | *'''<span class=" | + | *'''<span class="plain;s">[http://online.ts2009.com/mediaWiki/index.php/HowTo How to Guides]</span>''' |
*'''[[Driver Commands List]]''' | *'''[[Driver Commands List]]''' | ||
*'''[[Session Rule List with Parameters|Session Rules List (Alphabetical) with Parameters]]''' | *'''[[Session Rule List with Parameters|Session Rules List (Alphabetical) with Parameters]]''' | ||
| Line 1,546: | Line 1,549: | ||
</table> | </table> | ||
---- | ---- | ||
| − | This page was created by Trainz user '''<span class=" | + | This page was created by Trainz user '''<span class="plain;s">[http://online.ts2009.com/mediaWiki/index.php/User:Pware pware]</span>''' in May 2018 and was last updated as shown below. |
---- | ---- | ||
[[Category:How-to guides]][[Category:Rules]] | [[Category:How-to guides]][[Category:Rules]] | ||
Revision as of 10:54, 28 July 2024
The information in this Wiki Page applies to TANE, TRS19, Trainz Plus and TRS22.
|
|
What are Track Triggers? |
| Track triggers can be programmed to respond when a train (any train or a specific train) passes over them in Driver Mode. The response comes from executing a set of Session Rules that have been attached to a |
||||||||
Shown below left is a standard Trigger and below right is a Directional Trigger. They are just two examples of several types of track triggers. In both cases:-
|
||||||||
|
||||||||
Route or Session? |
| Triggers can be placed in a Route Layer or in a Session Layer |
|
 |
Information on Route and Session layers can be found at:- |
Adding a Trigger |
|
In Surveyor Classic (S10) |
Adding a Trigger (S10)
 |
|
|||||||||||||||
| As soon as a new trigger has been placed, its properties window will open on the screen. It will initially be given a default name and assigned to the currently active layer. |
Set the Trigger Name and Layer (S10)
 |
|
Set the Effect Radius (S10)
At the bottom of the Track Tools flyout menu is an Advanced button. Left Click this button to open the advanced tools.
| The Effect Radius sets the size of green "effect wings" attached both ends of the Trigger. This sets how close a consist has to approach to trigger its "event". The smaller the radius the closer it must approach. |
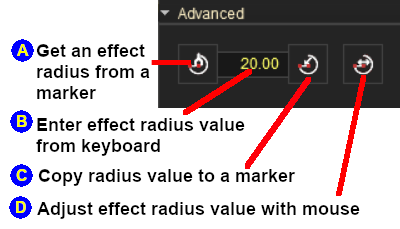 |
|
|||||||||||||||||||||||||||||||||||||||
|
In Surveyor 2.0 (S20) |
|
Adding a Trigger (S20)
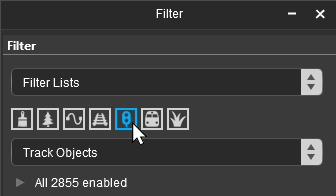
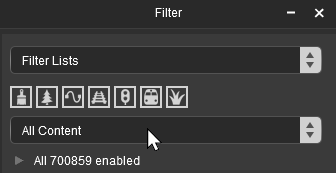
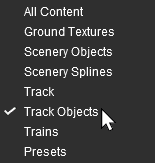
![]() In the Filter Palette either:-
In the Filter Palette either:-
|
OR |
|
|
|||||||||||||||||||||
|
||||||||
![]() In the Assets Palette to narrow down the filter list, type "trigger" (UPPER/lower case does not matter) in the Search Text Box
In the Assets Palette to narrow down the filter list, type "trigger" (UPPER/lower case does not matter) in the Search Text Box
 Both pallets shown docked |
|
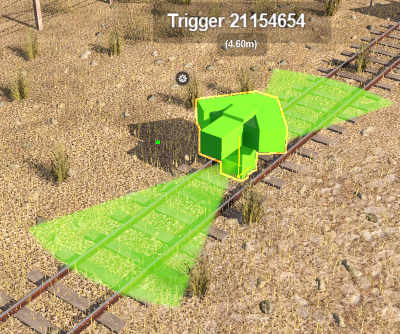
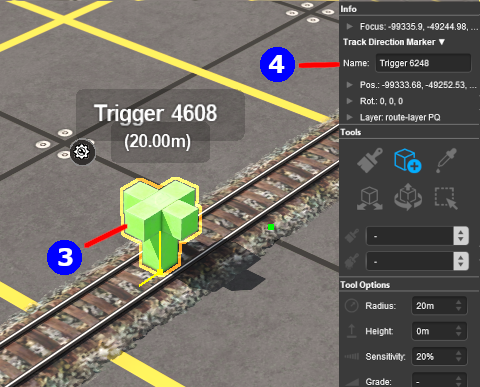
![]() Place the Trigger on the track.
Place the Trigger on the track.
 |
|
|||||||||||||||||||||||
|
|||||||||
Change Its Name (S20)
The name of the Trigger IS important. It is needed to identify the Trigger in Session Rules.
 |
|
|||||||
Set its Effect Radius (S20)
| The Effect Radius sets the size of green "effect wings" attached both ends of the Trigger. This sets how close a consist has to approach to trigger its "event". The smaller the radius the closer it must approach. |
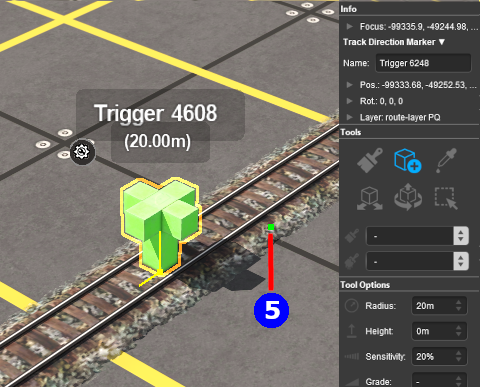 |
|
|||||||
Move a Trigger Along the Track (S20)
Triggers can be moved along the track or to other tracks.
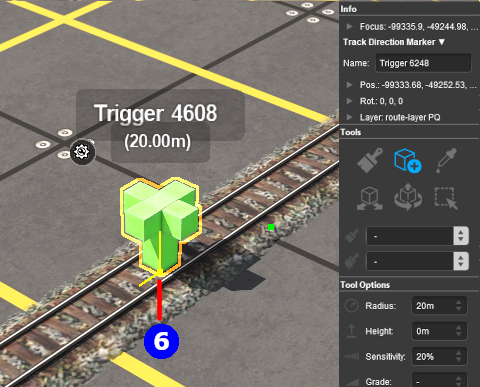 |
|
|||||
Move the Trigger Vertically (S20)
| Triggers can be physically placed above (or below) the track. This feature allows them to be placed, for example, above the track so that they will not be hidden in Surveyor if a consist is parked on the Trigger. |
 |
|
|||||||||||||||||||
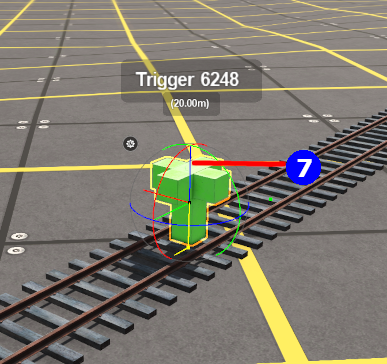
Move the Trigger Horizontally (S20)
| Triggers can be physically placed left or right alongside the track. This feature allows them to be placed, for example, beside the track so that they will not be hidden in Surveyor if a consist is parked on the Trigger. |
 |
|
|||||||||||||||||||||
|
Assign a Trigger to a New Layer (S20)
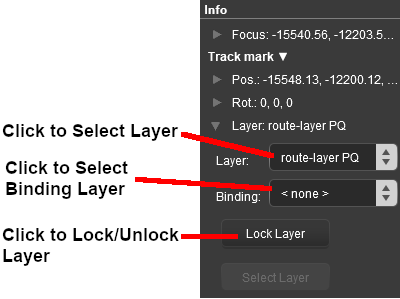
| The Info Palette will show the layer assigned to the currently selected object. To the left of the layer name is a small arrowhead object. | |||||||||||||||||||||||
  |
|
||||||||||||||||||||||
Creating a Trigger Event |
| When a consist enters the Effect Radius of a Trigger it will create an "event" that can be detected and responded to by some Session Rules and some Driver Commands. One such rule is the Trigger Check Rule which is added to a Session in the |
|
More information on the Trigger Check Rule can be found on the Trainz Wiki Rules Page at:- |
| Steps: | |||||||||
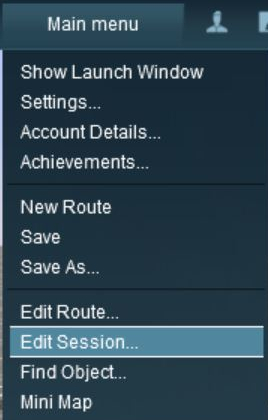
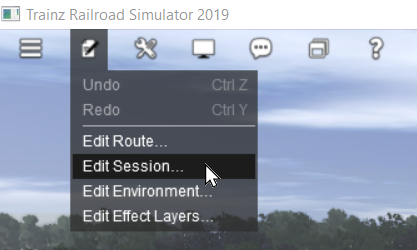
Open the Session Editor:
|
|||||||||
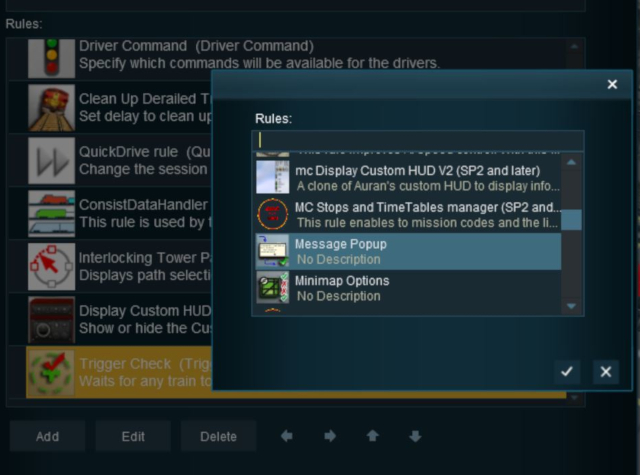
| Add the Trigger Check Rule: | ||||||||||
|
|
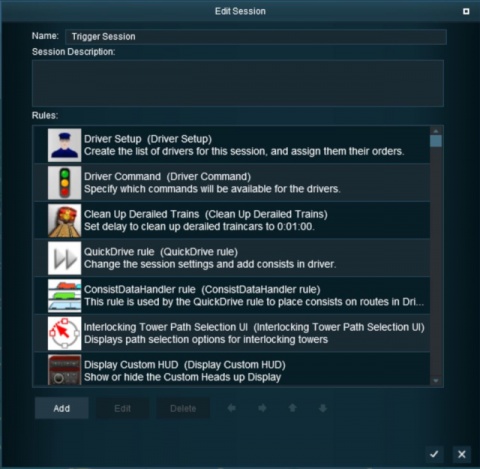 |
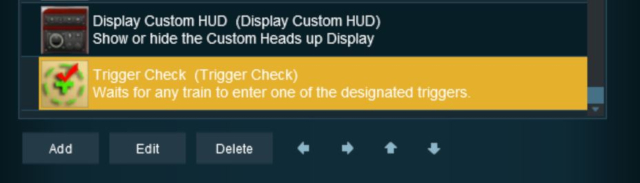
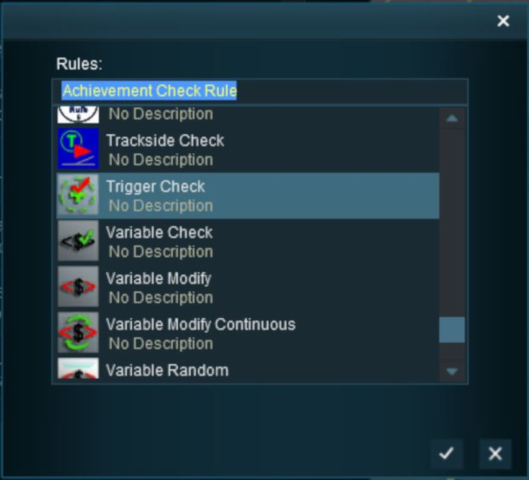 |
This will add the Trigger Check rule to the session. |
|
Open the Trigger Check Rule Properties:
|
|||||
Configure the Rule:
|
|||||||||||
| Select the Trigger: The Trigger Selection Window will open and list all the Triggers in your Route.
|
|||||||||
Adding an Instruction to the Trigger Event |
Adding a Child Rule
To test your trigger event you will need to add some Session Rules.
| Steps: | ||||||||||||||
Add A Message Popup Rule:
|
||||||||||||||
Indent the Popup Message Rule:
|
|||||||||
Configuring the Message and Testing |
| Steps: | |||||
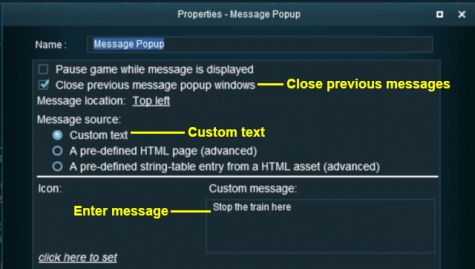
Open the Message Popup Rule for Editing:
|
|||||
|
|
|||||||||||||||||||||||
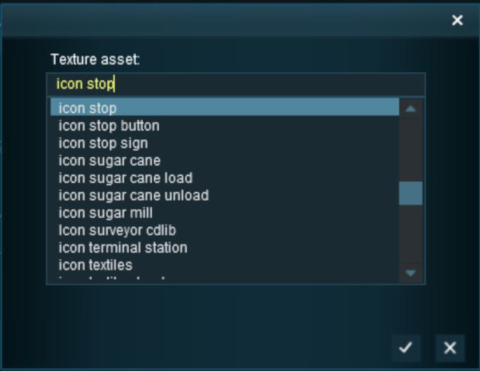
| Left Click on the |
The completed Message Popup Rule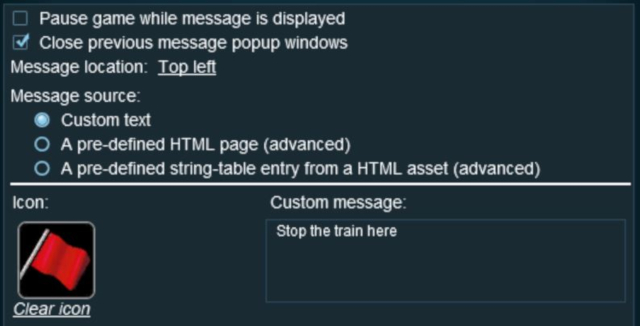 |
|
More information on this rule can be found on the Trainz Wiki Page at:- |
|
Another example of using the Trigger Check Rule can be found in the Trainz Wiki Page ![]() How to Use Message Popup Rule (Applications).
How to Use Message Popup Rule (Applications).
Alternatives to the Trigger Check Rule |
 |
There are other Session Rules that can be used in place of the Trigger Check Rule and Triggers. A few possibilities are listed below:-
|
 |
There is a driver command that can be used in place of the Trigger Check Rule:-
|
Trainz Wiki
|
|

This page was created by Trainz user pware in May 2018 and was last updated as shown below.