HowTo/Build an animated Neon Sign
(Note: This is a work in progress)
Contents |
Building an Animated Neon Sign using 3DS Max
Introduction
This tutorial describes a process for creating a simple animated neon sign in 3DS Max. It is intended to be used in conjunction with the Neon Font effect tutorial at HowTo/Create_a_Neon_Font_Effect_with_PhotoShop_C4
Skill level
Some experience with 3DS Max needed. This is NOT a 3DS Max Tutorial, if you do not know any of the basics shown here, learn its basics first. Blender and GMax users can most likely work out how to do similar in their own 3D programs by reading this. Most content creators know how animations work, it is not for those this tutorial has been made. Those who do not know might get the hang of animating with it in 3D.
Process
OK, these are simple animations where one Neon Sign textured panel being seen is placed a small distance in front of the other textured Neon Sign panel(s) not being seen. At the changing of the displayed panel, another panel replaced the first one which at the same time moves back behind this front panel while not being seen.
You start off by creating a dummy (or helper) in TOP VIEW of 3DS Max (IMPORTANT or the animation will not work) and name it "b.r.1". Set its location coordinates to 0.0m on the x, y and z axis. Then either create 2 more dummies in the same x y z location (0.0.m) or simply clone the just created dummy twice or as many times needed, name these "b.r.2" (b.r.3 and so on) and one extra dummy/helper only in the same xyz location named "b.r.main". These 2 or 3 "b.r.x" dummies are your animation helpers, "b.r.1" and "b.r.2" doing the animation and both of these will be linked to "b.r.main" later on when finally exporting the animated Neon Sign out of 3DS Max. These 2 dummies (b.r.1 and b.r.2) are needed for a simple on/off animation, showing the bare unlit neon tube texture as the first animation (b.r.1) and the neon effect copy of it as the second animation (b.r.2) shown.
If needing more dummies for a more elaborate animation cycle, name these dummies in an descending order like b.r.3, b.r.4, b.r.5 and so on. Similar with the extra planes names you need to create (as explained below).
Then create 2 or 3 simple planes of the SAME SIZE as needed for the Neon Sign by cloning the first plane, oblong or somewhat square, depending what you want to have on your sign and name these 1, 2 and/or 3 (depending if 2 or 3 animation cycles are required. and link these on their bottom edge to the 2 or 3 "b.r.x" dummies. Number 1 plane to b.r.1, number 2 plane to b.r.2 and so on. Which will be again at XYZ coordinates at 0.0m each, which will link the bottom edge of each panel into the middle of the dummies. You could also create now the box around your panels, with its front open to show the textured panels or you can do this later. If so, you can see how the panels move with no box there yet to obstruct.
If you would like to create a 3 animation cycle Neon Sign, say, showing the first animation as a distinctive neon colour, the second another colour and the third again another neon colour, then you need to create an extra dummy called "b.r.3" and an extra plane called 3 for the third animation showing. Still with me so far?
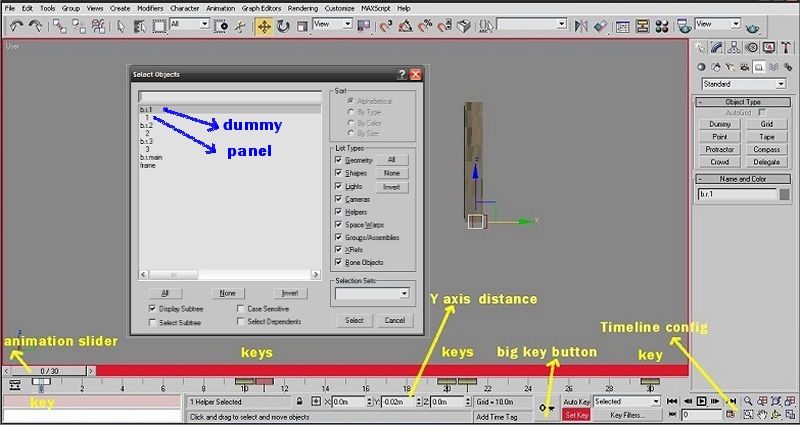
Where one can see the highlighted dummy b.r.1 above to be 0.02m (20mm) in front of the other, brown coloured dummy/dummies. The Neon Sign is seen from side on, 90 degrees, for a better view of the dummies. In the pictures I left the box there when I animated my signs.
Back to the simple on/off animation. Now when starting to animate, REMEMBER, for creating any animation, ONLY THE DUMMIES are selected as needed, the panes which are linked to these dummies will just follow wherever the dummies will be set in the animation, as they are LINKED to each dummy. Again, ONLY A DUMMY needs to be selected for setting/locking the animation keys in the animation or this WILL NOT WORK.
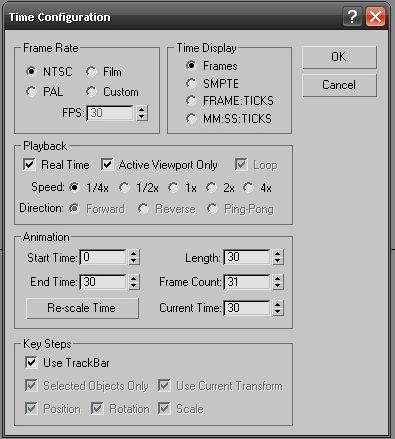
OK, now set your animation frames in the "Time Configuration" on bottom right of 3DS Max as per the picture below to the length of 30, which will be 31 frames, select 1/4 speed for this, just look at the picture of how to do this.
Then work out HOW the animation should work. Say, you only need an on/off Neon Sign, you only need the unlit neon tube texture to show somewhat briefly and the coloured neon effect texture to show a bit longer. Right? So the unlit neon tube texture part might show only a third or less of the whole animation and the neon effect twice as long or so before repeating itself. So you need, say, the first 10 frames of the animation to be set for the unlit neon tube texture to show and the rest of the frames for the neon text effect, for which I also used these 30 frames.
Note, as seen in the picture above, you will not see all keys in 3DS Max as needed for the animation, this animation above is already completed there.
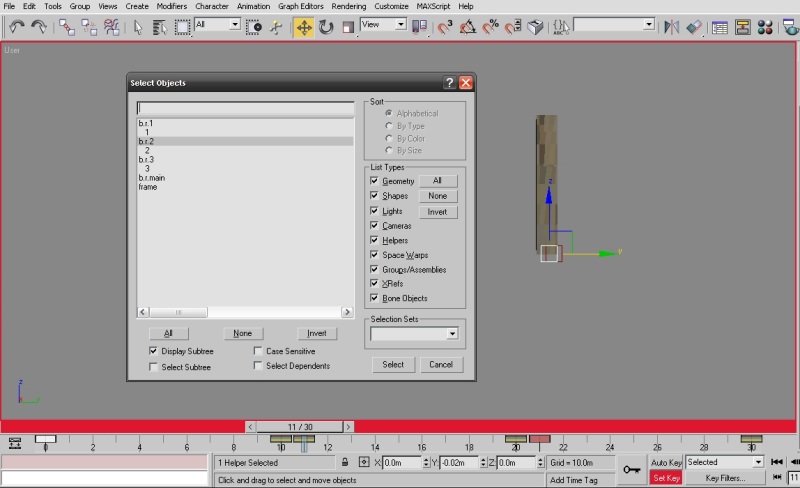
When starting off with the animation, you will only see the FIRST key on frame 0/30 on the animation slider, none of the other keys in the above picture will be seen, OK? When setting the dummy b.r.1 to Y axis -0.02m (<---LOOK, there is a MINUS SIGN in front of the numbers) and the other dummy/dummies are at Y axis 0.0m, click the "Set Key" button while on frame 0/30 showing on the animation slider and you will get the red surround of your 3DS Max view as seen above, meaning you are in animation mode. Next press the "Big Key" button, to lock the dummy b.r.1 at the Y axis location it currently is (-0.02m) to the 1st key on frame 0/30 showing on the animation slider. All other b.r.x dummy/dummies are locked as well on XYZ axis at 0.0m. Then move the animation slider along to frame 10/30, making sure all the dummies are at the Y axis location they were on frame 0/30, press the "Big Key" button again, to lock the dummy/dummies to frame 10/30. You will now see a new, second key created there. Note, you will ONLY see 2 created and locked keys so far, NOT all keys are visible as shown in the pictures here.
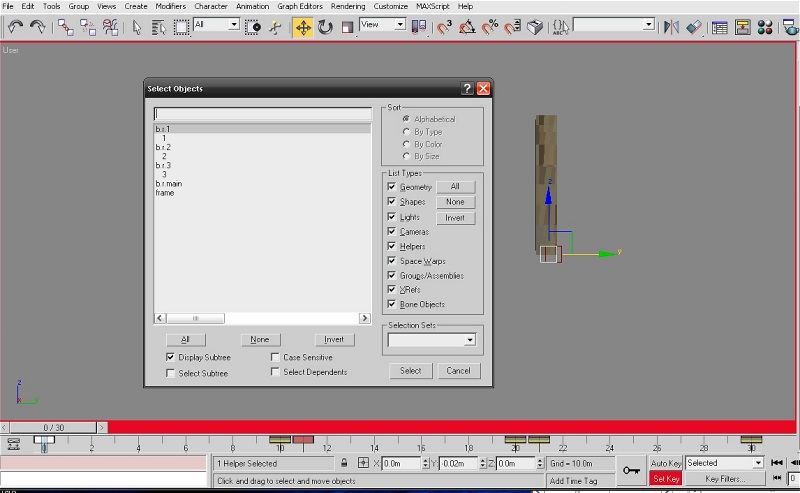
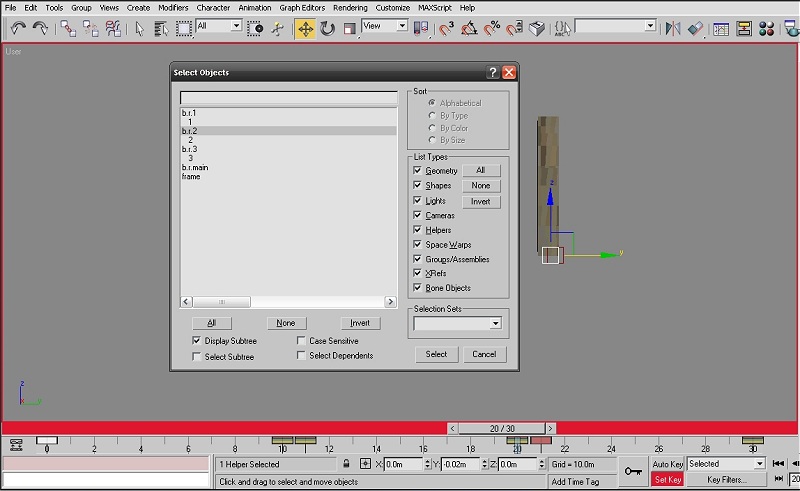
Now move the animation slider to frame 11/30, move dummy b.r.1 to Y axis location 0.0m and move dummy b.r.2 to Y axis location -0.02m, where b.r.1 used to be. After rechecking all dummies to be there where they need to be as described here, press the "Big Key" button with your mouse to lock all dummies to their respective places in the animation. You now will see 3 keys created. B.r.1 is now on Y axis 0.0m here in the picture below.
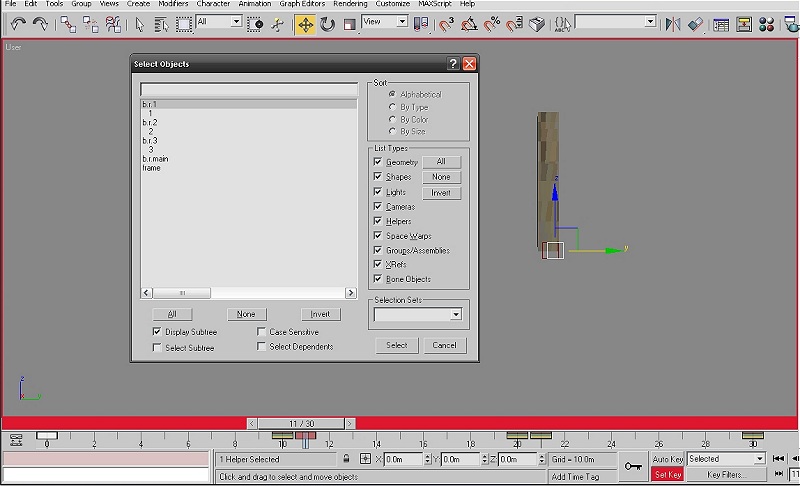
B.r.2 highlighted is now on Y axis -0.02m in the picture below.
Then move the animation slider to frame 29/30, leave b.r.2 at its Y axis at -0.02m, again checking all other dummies are on XYZ 0.0m and lock the animation with, yes, the "Big Key" button. You have created another new key, 4 keys so far.
Now move the animation slider to frame 30/30, move b.r.2 to 0.0m, b.r.1 to -0.02m and lock the key there. Again, you will ONLY see a new key created by locking a key with the "BIG KEY" button. NOT as the pictures here show with all keys present, which you will only see after the animation is finished. Now you have 5 new animation keys in your 3DS Max showing. 1st key on 0/30, 2nd key on 10/30, 3rd key on 11/30, 4th key on 29/30 and the fifth key on 30/30 on the animation slider. Wasn't that easy?
That was for a 2 cycle animation where one wants to show only 2 different textured planes with it. When the animation is looping (repeating), it will start anew from frame 0, cycle through the keys, either with the "play" button or sliding the animation slider back and forth. Seeing and moving the texture panels as locked with the "Big Key" button above to their respective XYZ location and therefore showing you the animation by the dummies moving back and forth in 3DS Max.
If you want to create a Neon Sign showing 3 colours, a different colour at each time, divide your animation length of 30 by 3 times as shown above and make this 10 frames each for an equal length of frames for each different animated neon effect to show. On now to creating the other animation keys. You will need an extra dummy, b.r.3 for this and an extra texture panel, numbered 3, all on XYZ 0.0m.
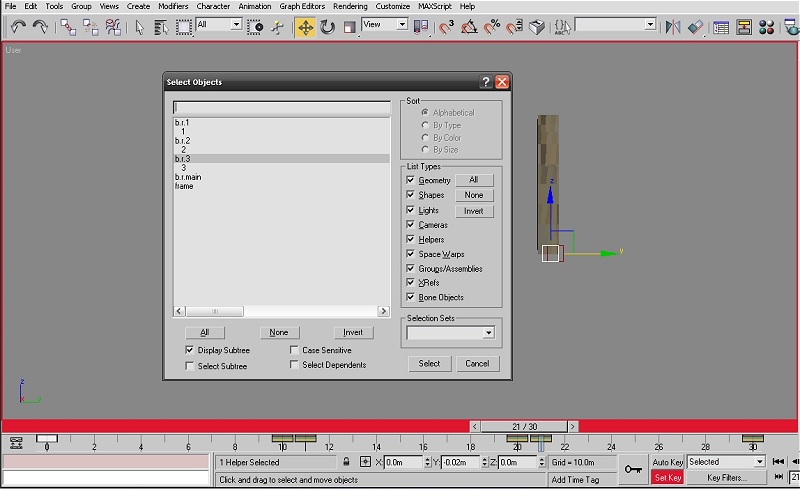
Start off with the animation as shown further above, create keys on frames 0/30, 10/30, 11/30 as done above for the simple on/off sign. Now move the animation slider to frame 20/30, leave b.r.2 on its Y axis on -0.02m, making sure all other dummies are on Y axis 0.0m and lock this frame with the "Big Key" button there as can be seen below.
Then move the animation slider to frame 21/30, move b.r.2 back to its Y axis to 0.0m, move the dummy b.r.3 to Y axis -0.02m, again checking all other dummies are on 0.0m and lock the animation with, yes, the "Big Key" button.
Moving now the animation slider to frame 29/30, NOTE, NOT shown in any of the pictures here, leave b.r.3 where it is on -0.02m, all other dummies on 0.0m and lock the key with the "Big Key" button.
Next move the animation slider to frame 30/30, move b.r.3 to 0.0m, b.r.1 to -0.02m and lock the key there. Again, you will ONLY see a new key created by locking a key. NOT as the pictures show with all keys present, which you will see only after the animation is finished. Hey, you just created another animation if all was done as described here.
That was for a 3 cycle animation where one wants to show 3 different coloured textured planes with it. Similar on 4 or more animation cycles, where you need to break the amount of frames needed into equal parts with extra b.r.x dummies and extra planes needed. Where you, when starting this, most likely need to increase the frame count in the Time configuration to more frames, depending of how many different cycles of animations one wants.
All the time by moving the extra dummies needed at the right frame/key to the fore front (Y axis -0.02), while all other dummies MUST REMAIN on Y axis at 0.0m when locking the frames/keys. Should the odd dummy misbehave and not be in its rightful location, move it to where it needs to be (either at Y axis 0.0m or -0.02m) and LOCK THIS misbehaving dummy AGAIN BUT ONLY ON THE KEYS ALREADY MADE and where that misbehaving dummy should be.
To rehash, ONLY the dummies need to be animated, the attached planes will follow them as they are linked to these dummies.
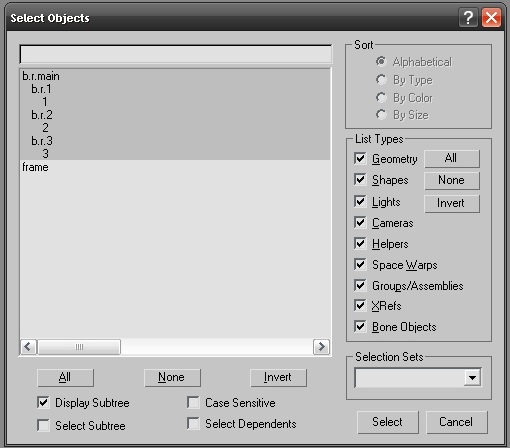
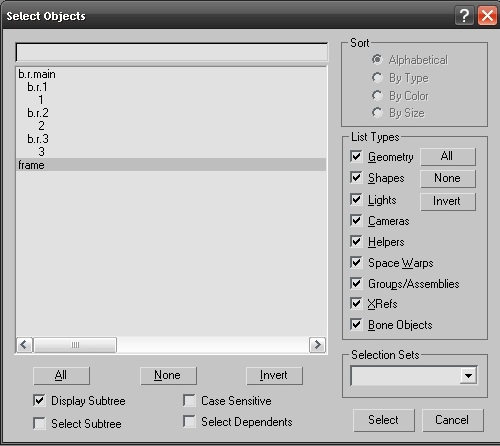
Next, for placing and UVW unwrapping textures on the simple on/off animated Neon Sign made and animated above, place the unlit neon tube texture from your texture map on to plane 1, the lit neon texture on plane 2, roughly where they need to be showing in Trainz. This is for the simple on/off animation. Create and texture the box around the neon effect planes if you haven't made this yet, name it frame or box or whatever (check out any of my to the DLS uploaded Neon Signs for "How I did this" and check the config.txt there too, use this configuration as your own configuration template by altering/changing it with your own details) and ONLY NOW link your b.r.1 and b.r.2 dummies (etc.) with their already linked textured planes to b.r.main, highlight all these dummies with their attached texture planes including b.r.main and export this as "n.im" as is shown below. Export the animation as "anim.kin" with the N3V Games 3DS Max Exporter installed in your 3DS Max and found for d/loading on the TrainzWiki. This is your nightmode mesh.
Then export the textured box/frame next which is NOT LINKED TO ANY DUMMY as "d.im" as shown above, as seen per my configuration names in one of my d/loaded Neon Signs.
Include all your texture maps you used on this Neon Sign with their needed texture.txt files (your Max Exporter can export your textures used and create the necessary texture.txt files), create a JPG screenshot picture 240x180 pixels for it, create a correct config.txt (use the one modified from my created Neon Sign as a template) and export and place the lot into your Content Manager. If you did everything correctly, your created Neon Sign will show in Surveyor of Trainz.
Check in Surveyor if the textures are synchronized, meaning, they do not jump all over your texture planes and are lined up perfectly with the previous texture(s) showing in the animation by adjust these again in 3DS Max by moving/adjusting the texture after UVW unwrapping them, until they show exactly in the same place where the others show on the texture panels in Surveyor and until you are happy with what you see in Trainz. If the animation is too fast or too slow, you can adjust this in your Neon Sign configuration text for the right speed, experiment. You will also note, I used the NIGHTMODE tag as CONSTANT, which will give me the same colour density of the texture maps day AND night in Trainz. It cuts also down on file size, as one needs only one animation and one texture map and not 2 of these for the day mesh and the night mesh, it cuts down on CDP size and nowadays in any city/town one will see Neon Signs operating during the day, so this does not look out of place in Trainz.
For more animations needed, repeat the adjusting of the texture map placement on each texture plane/panel, to be in sync with size etc. until you are happy with its look.
Finally export as a CDP for uploading this, if all is correct, as it should be, again, by using one of my created Neon Signs as a template of "How I did this..".
Remember, you can place 2 of the same signs back to back and mount these two back to back signs 90 degrees away from a building wall. Instant double sided Neon Signs.
Check out how to create Neon Texture Effects for your texture maps as seen in the "How to" section of the TrainzWiki. HowTo/Create_a_Neon_Font_Effect_with_PhotoShop_C4
The pictures you see here above are from an older version of 3DS Max, your version of 3DS Max might look slightly different.
Have fun.
Lennard Dorfer aka Lendorf
Copyright Notes
The original text and images of this tutorial were sourced from http://the-commander.com/tuts/neonsign.htm at the request of, and with the permision of the original author (Lennard Dorfer).
