How to Create a Clean Install
m |
m |
||
| Line 189: | Line 189: | ||
<tr valign="top"> | <tr valign="top"> | ||
<td> | <td> | ||
| − | <table> | + | <table width=500> |
<tr valign="top"> | <tr valign="top"> | ||
<td colspan=2><span style="font-weight: 700; font-size: 15px;">Steps:</span></td> | <td colspan=2><span style="font-weight: 700; font-size: 15px;">Steps:</span></td> | ||
| Line 195: | Line 195: | ||
<tr valign="top"> | <tr valign="top"> | ||
<td width=25>[[image:DotPoint1Blue.png|link=]]</td> | <td width=25>[[image:DotPoint1Blue.png|link=]]</td> | ||
| − | <td><span style="font-weight: 700; font-size: 15px; background-color: lightcyan;"> Left Click </span> on the | + | <td><span style="font-weight: 700; font-size: 15px; background-color: lightcyan;"> Left Click </span> on the [[image:3DotsBtn.png|link=]] button next to the folder address box</td> |
</tr> | </tr> | ||
<tr valign="top"> | <tr valign="top"> | ||
| Line 203: | Line 203: | ||
<tr valign="top"> | <tr valign="top"> | ||
<td>[[image:DotPoint3Blue.png|link=]]</td> | <td>[[image:DotPoint3Blue.png|link=]]</td> | ||
| − | <td><span style="font-weight: 700; font-size: 15px; background-color: lightcyan;"> Left Click </span> on the | + | <td><span style="font-weight: 700; font-size: 15px; background-color: lightcyan;"> Left Click </span> on the [[image:SelectFolderBtn.png|link=]] button</td> |
</tr> | </tr> | ||
</table> | </table> | ||
| Line 236: | Line 236: | ||
<tr valign="top"> | <tr valign="top"> | ||
<td>[[image:MoveUserData15.png|link=]]<br><br></td> | <td>[[image:MoveUserData15.png|link=]]<br><br></td> | ||
| − | <td><span style="font-weight: 700; font-size: 15px; background-color: lightcyan;"> Left Click </span> | + | <td><span style="font-weight: 700; font-size: 15px; background-color: lightcyan;"> Left Click </span> on the [[image:OKBtn.png|link=]] button to acknowledge it.</td> |
</tr> | </tr> | ||
</table> | </table> | ||
| Line 345: | Line 345: | ||
<tr valign="top"> | <tr valign="top"> | ||
<td width=25>[[image:DotPoint1Blue.png|link=]]</td> | <td width=25>[[image:DotPoint1Blue.png|link=]]</td> | ||
| − | <td><span style="font-weight: 700; font-size: 15px; background-color: lightcyan;"> Left Click </span> on the | + | <td><span style="font-weight: 700; font-size: 15px; background-color: lightcyan;"> Left Click </span> on the [[image:3DotsBtn.png|link=]] button next to the folder address box</td> |
</tr> | </tr> | ||
<tr valign="top"> | <tr valign="top"> | ||
| Line 376: | Line 376: | ||
<tr valign="top"> | <tr valign="top"> | ||
<td width=25>[[image:DotPoint3Blue.png|link=]]</td> | <td width=25>[[image:DotPoint3Blue.png|link=]]</td> | ||
| − | <td><span style="font-weight: 700; font-size: 15px; background-color: lightcyan;"> Left Click </span> on the | + | <td><span style="font-weight: 700; font-size: 15px; background-color: lightcyan;"> Left Click </span> on the [[image:SelectFolderBtn.png|link=]] button. The new '''User Data Folder''' will be selected in the '''Settings - Install Tab'''<br> |
[[image:MoveUserData14.png|link=]]</td> | [[image:MoveUserData14.png|link=]]</td> | ||
</tr> | </tr> | ||
| Line 392: | Line 392: | ||
<tr valign="top"> | <tr valign="top"> | ||
<td>[[image:MoveUserData15.png|link=]]<br><br></td> | <td>[[image:MoveUserData15.png|link=]]<br><br></td> | ||
| − | <td><span style="font-weight: 700; font-size: 15px; background-color: lightcyan;"> Left Click </span> | + | <td><span style="font-weight: 700; font-size: 15px; background-color: lightcyan;"> Left Click </span> on the [[image:OKBtn.png|link=]] button to acknowledge it.</td> |
</tr> | </tr> | ||
</table> | </table> | ||
Revision as of 19:01, 17 November 2023
| The information in this Wiki Page applies to T:ANE, TRS19, TRS22 and Trainz Plus. It describes how to set up one (or more) alternative User Data Folders that can contain different sets of installed assets from a bare minimum (built-in and base assets only) to various specialist installs. |
What is a "Clean Install"
| A Clean Install is a User Data Folder that contains only those assets that were originally installed with your version of Trainz | |
| There will be no assets that are Installed from DLS, Payware, Packaged or Modified but these can be added |
| A Clean Install will create a User Data Folder that is identical to the one that existed immediately after you first installed your current version of Trainz. | ||||||||||||||||||||||||||||
|
|
|||||||||||||||||||||||||||
Setting Up the New User Data Folder |
| Steps: | ||||||||||||||
| 1 | Create a Destination Folder for the New User Data Install
|
|||||||||||||
| 2 | Start Trainz |
|||||||||||||
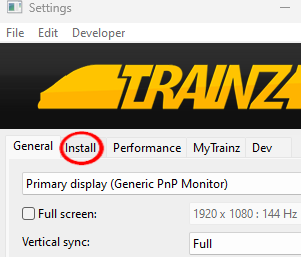
| 3 | Open Trainz Settings From the Trainz Launcher select Trainz Settings 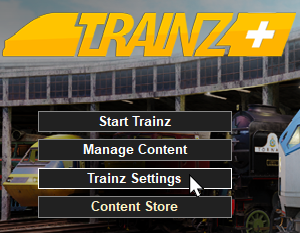 |
|||||||||||||
| 4 | Open Install Left Click on the Install tab 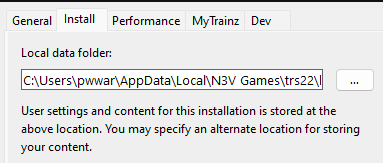 |
|||||||||||||
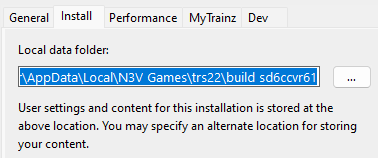
| 5 | Copy and Save the Current Folder Address Strongly Recommended but not Compulsory
|
|||||||||||||
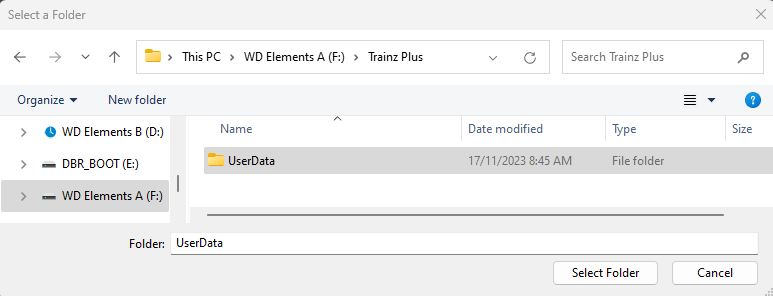
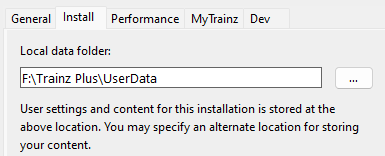
| 6 | Point Trainz to the New User Data Folder
|
|||||||||||||
 |
||||||||||||||
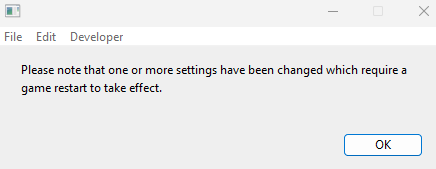
| 7 | Close the Trainz Settings Window You will be shown a message asking for a restart.
|
|||||||||||||
| 8 | Close the Trainz Launcher Dropping you back to the Windows desktop. |
|||||||||||||
| 9 | Restart Trainz Launcher You may get a dialogue window asking you to set your display options (Ultra, etc). If so select one to suit. |
|||||||||||||
| 10 | Start Trainz Select the Start Trainz option from the Launcher |
|||||||||||||

|
Switching Between User Data Folders |
| You can switch Trainz between your seperate User Data Folders at any time | |
| Only those assets installed in your currently selected User Data Folder will be available for use in Trainz |
Once you have set up an alternative User Data Folder or Folders you can easily switch between them and the original at any time.
| Steps: | ||||||||||||||||||
| 1 | Open the Trainz Settings Install Tab (A repeat of Steps 2 , 3 and 4 in the section above)
|
|||||||||||||||||
| 2 | Navigate to the Alternative User Data Folder
|
|||||||||||||||||
| 3 | Close the Trainz Settings Window You will be shown a message asking for a restart.
|
|||||||||||||||||
| 4 | Close the Trainz Launcher Dropping you back to the Windows desktop. |
|||||||||||||||||
| 5 | Restart Trainz Launcher You may get a dialogue window asking you to set your display options (Ultra, etc). If so select one to suit. |
|||||||||||||||||
| 6 | Start Trainz Select the Start Trainz option from the Launcher |
|||||||||||||||||
|
This page was created by Trainz user pware in November 2023 and was last updated as shown below.