How to Use Track Triggers
m (→Related Links) |
m |
||
| Line 2: | Line 2: | ||
__TOC__ | __TOC__ | ||
| + | <table> <!-- BEGIN Nav Buttons Table --> | ||
| + | <tr valign="top"> | ||
| + | <td width=729><span id="stepWhat"></span> </td> | ||
| + | <td width=46>[[file:BackToTop.png|link=#top|alt=Top|Top]]</td> | ||
| + | <td width=75> </td> | ||
| + | <td width=75>[[file:NextDown.png|link=#stepRoute|alt=Next Down|Next Down]]</td> | ||
| + | <td width=75>[[file:BackToBottom.png|link=#bottom|alt=Bottom|Bottom]]</td> | ||
| + | </tr> | ||
| + | </table> <!-- END Nav Buttons Table --> | ||
='''What are Track Triggers?'''= | ='''What are Track Triggers?'''= | ||
<table cellpadding="4" bgcolor=#c1e7e7> | <table cellpadding="4" bgcolor=#c1e7e7> | ||
| Line 19: | Line 28: | ||
</tr> | </tr> | ||
</table> | </table> | ||
| − | < | + | <table> <!-- BEGIN Nav Buttons Table --> |
| − | + | <tr valign="top"> | |
| + | <td width=729><span id="stepRoute"></span> </td> | ||
| + | <td width=46>[[file:BackToTop.png|link=#top|alt=Top|Top]]</td> | ||
| + | <td width=75>[[file:NextUp.png|link=#stepWhat|alt=Next Up|Top]]</td> | ||
| + | <td width=75>[[file:NextDown.png|link=#stepAdding|alt=Next Down|Next Down]]</td> | ||
| + | <td width=75>[[file:BackToBottom.png|link=#bottom|alt=Bottom|Bottom]]</td> | ||
| + | </tr> | ||
| + | </table> <!-- END Nav Buttons Table --> | ||
='''Route or Session?'''= | ='''Route or Session?'''= | ||
| Line 38: | Line 54: | ||
</tr> | </tr> | ||
</table> | </table> | ||
| − | + | ||
<table cellpadding="4" bgcolor="Aquamarine"> | <table cellpadding="4" bgcolor="Aquamarine"> | ||
<tr valign="top"> | <tr valign="top"> | ||
| Line 47: | Line 63: | ||
</tr> | </tr> | ||
</table> | </table> | ||
| − | + | <table> <!-- BEGIN Nav Buttons Table --> | |
| − | <table | + | |
<tr valign="top"> | <tr valign="top"> | ||
| − | <td | + | <td width=729><span id="stepAdding"></span> </td> |
| + | <td width=46>[[file:BackToTop.png|link=#top|alt=Top|Top]]</td> | ||
| + | <td width=75>[[file:NextUp.png|link=#stepRoute|alt=Next Up|Top]]</td> | ||
| + | <td width=75>[[file:NextDown.png|link=#stepConfiguring|alt=Next Down|Next Down]]</td> | ||
| + | <td width=75>[[file:BackToBottom.png|link=#bottom|alt=Bottom|Bottom]]</td> | ||
</tr> | </tr> | ||
| − | </table> | + | </table> <!-- END Nav Buttons Table --> |
| − | + | ||
='''Adding a Track Trigger'''= | ='''Adding a Track Trigger'''= | ||
| Line 82: | Line 100: | ||
</tr> | </tr> | ||
</table> | </table> | ||
| − | < | + | <table> <!-- BEGIN Nav Buttons Table --> |
| − | < | + | |
<tr valign="top"> | <tr valign="top"> | ||
| − | <td | + | <td width=729><span id="stepConfiguring"></span> </td> |
| + | <td width=46>[[file:BackToTop.png|link=#top|alt=Top|Top]]</td> | ||
| + | <td width=75>[[file:NextUp.png|link=#stepAdding|alt=Next Up|Top]]</td> | ||
| + | <td width=75>[[file:NextDown.png|link=#stepCreating|alt=Next Down|Next Down]]</td> | ||
| + | <td width=75>[[file:BackToBottom.png|link=#bottom|alt=Bottom|Bottom]]</td> | ||
</tr> | </tr> | ||
| − | </table> | + | </table> <!-- END Nav Buttons Table --> |
| − | + | ||
='''Configuring a Track Trigger'''= | ='''Configuring a Track Trigger'''= | ||
| Line 150: | Line 170: | ||
</tr> | </tr> | ||
</table> <!-- END Steps Table --> | </table> <!-- END Steps Table --> | ||
| − | <table | + | <table> <!-- BEGIN Nav Buttons Table --> |
<tr valign="top"> | <tr valign="top"> | ||
| − | <td | + | <td width=729><span id="stepCreating"></span> </td> |
| + | <td width=46>[[file:BackToTop.png|link=#top|alt=Top|Top]]</td> | ||
| + | <td width=75>[[file:NextUp.png|link=#stepConfiguring|alt=Next Up|Top]]</td> | ||
| + | <td width=75>[[file:NextDown.png|link=#stepEvent|alt=Next Down|Next Down]]</td> | ||
| + | <td width=75>[[file:BackToBottom.png|link=#bottom|alt=Bottom|Bottom]]</td> | ||
</tr> | </tr> | ||
| − | </table> | + | </table> <!-- END Nav Buttons Table --> |
| − | + | ||
='''Creating a Track Trigger Event'''= | ='''Creating a Track Trigger Event'''= | ||
| Line 303: | Line 326: | ||
</tr> | </tr> | ||
</table> <!-- END Step Table --> | </table> <!-- END Step Table --> | ||
| − | <table | + | |
| + | <table> <!-- BEGIN Nav Buttons Table --> | ||
<tr valign="top"> | <tr valign="top"> | ||
| − | <td | + | <td width=729><span id="stepEvent"></span> </td> |
| + | <td width=46>[[file:BackToTop.png|link=#top|alt=Top|Top]]</td> | ||
| + | <td width=75>[[file:NextUp.png|link=#stepCreating|alt=Next Up|Top]]</td> | ||
| + | <td width=75>[[file:NextDown.png|link=#stepAlternatives|alt=Next Down|Next Down]]</td> | ||
| + | <td width=75>[[file:BackToBottom.png|link=#bottom|alt=Bottom|Bottom]]</td> | ||
</tr> | </tr> | ||
| − | </table> | + | </table> <!-- END Nav Buttons Table --> |
| − | + | ||
='''Adding an Instruction to the Trigger Event'''= | ='''Adding an Instruction to the Trigger Event'''= | ||
| − | To test your trigger event you will need to add at least one rule. | + | To test your trigger event you will need to add at least one rule. |
==Adding a Child Rule== | ==Adding a Child Rule== | ||
| Line 369: | Line 396: | ||
</tr> | </tr> | ||
</table> <!-- END Steps Table --> | </table> <!-- END Steps Table --> | ||
| − | |||
| − | |||
| − | |||
| − | |||
| − | |||
| − | |||
==Configuring the Message and Testing== | ==Configuring the Message and Testing== | ||
| Line 474: | Line 495: | ||
</table> <!-- END Steps Table --> | </table> <!-- END Steps Table --> | ||
| − | <table | + | <table> <!-- BEGIN Nav Buttons Table --> |
<tr valign="top"> | <tr valign="top"> | ||
| − | <td | + | <td width=729><span id="stepAlternatives"></span> </td> |
| + | <td width=46>[[file:BackToTop.png|link=#top|alt=Top|Top]]</td> | ||
| + | <td width=75>[[file:NextUp.png|link=#stepEvent|alt=Next Up|Top]]</td> | ||
| + | <td width=75> </td> | ||
| + | <td width=75>[[file:BackToBottom.png|link=#bottom|alt=Bottom|Bottom]]</td> | ||
</tr> | </tr> | ||
| − | </table> | + | </table> <!-- END Nav Buttons Table --> |
| − | + | ||
='''Alternatives to the Trigger Check Rule'''= | ='''Alternatives to the Trigger Check Rule'''= | ||
| Line 520: | Line 544: | ||
</tr> | </tr> | ||
</table> | </table> | ||
| − | <table | + | <table> <!-- BEGIN Nav Buttons Table --> |
<tr valign="top"> | <tr valign="top"> | ||
| − | <td | + | <td width=729><span id="bottom"></span> </td> |
| + | <td width=46>[[file:BackToTop.png|link=#top|alt=Top|Top]]</td> | ||
| + | <td width=75>[[file:NextUp.png|link=#stepAlternatives|alt=Next Up|Top]]</td> | ||
| + | <td width=75> </td> | ||
| + | <td width=75> </td> | ||
</tr> | </tr> | ||
| − | </table> | + | </table> <!-- END Nav Buttons Table --> |
---- | ---- | ||
---- | ---- | ||
Revision as of 09:12, 19 August 2021
The information in this Wiki Page applies to TANE, TRS19 and Trainz Plus.
Contents |
What are Track Triggers?
| Track triggers are track markers that are invisible in Driver Mode but visible in Surveyor Mode. They are used to activate Session Rules and some Driver Commands |
Track triggers can be programmed to respond when a train (any train or a specific train) passes over them in Driver Mode. The response comes from executing a set of Session Rules that have been attached to a Trigger Check Rule (or a similar rule) or a Driver Command that is monitoring the track trigger.
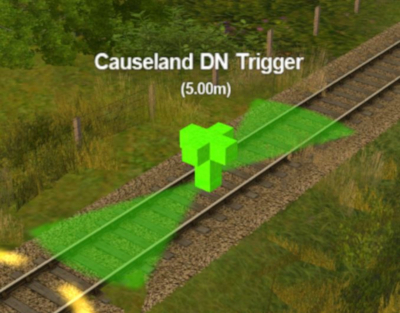 |
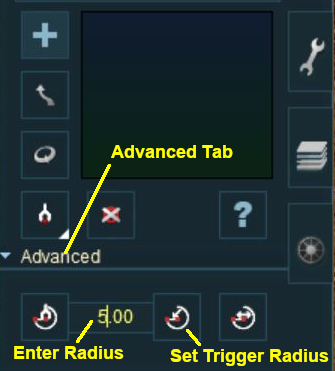
Shown at left is a Track Trigger placed on a track in Surveyor Mode. It is NOT visible in Driver Mode. The "5.00m" shown below the trigger name is the trigger detection radius |
Route or Session?
| Track Triggers can be placed in a Route layer or in a Session layer |
Notes:
|
 |
Information on Route and Session layers can be found at:- |
Adding a Track Trigger
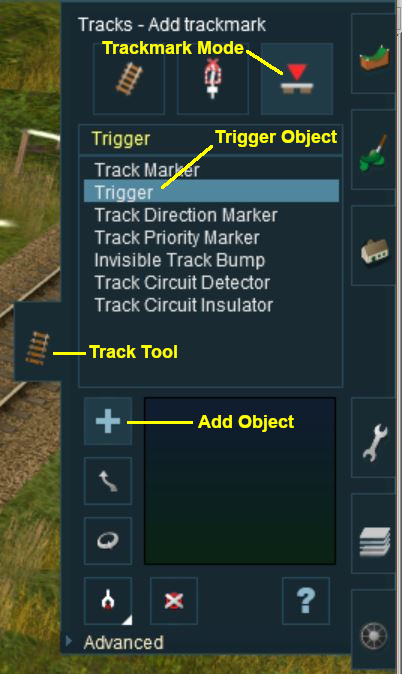 |
|
||||||
Configuring a Track Trigger
As soon as a new track trigger has been placed, its properties window will open on the screen. It will be given a default name and assigned to the currently active layer.
|
|
|||||||||
 Steps |
|
||||||||
|
|||||||||
Creating a Track Trigger Event
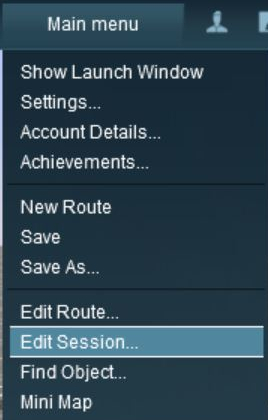
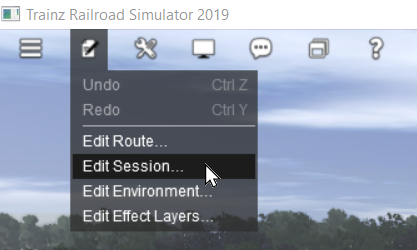
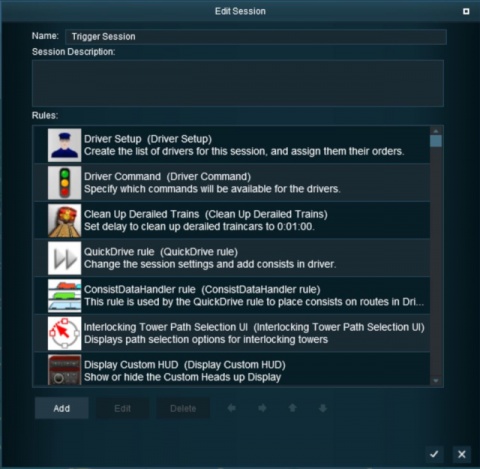
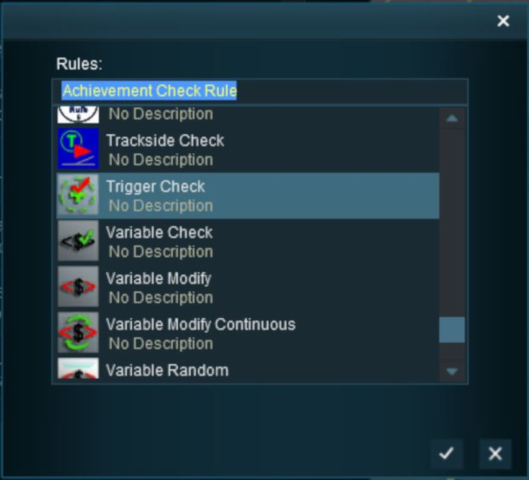
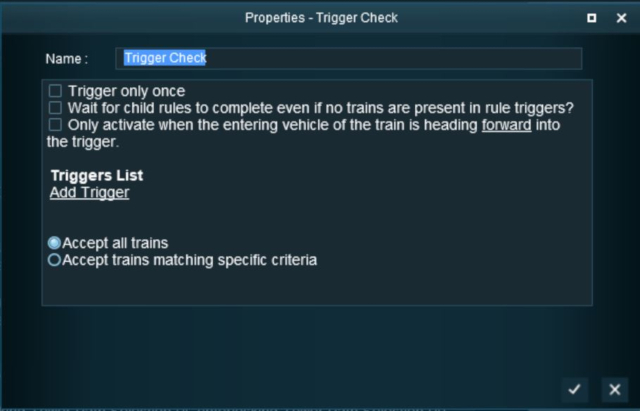
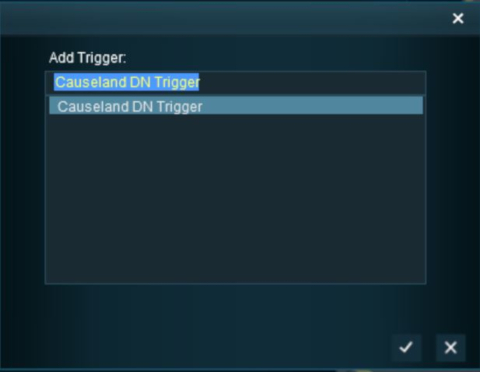
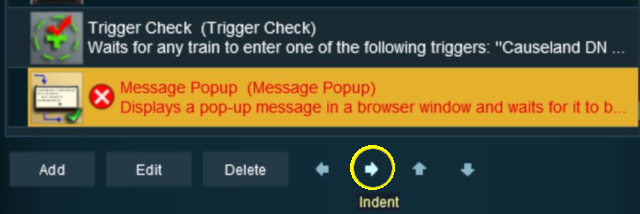
Track trigger events are handled by the Trigger Check Rule (or a similar rule) which is added to a Session in the Session Editor.
 |
More information on the Trigger Check Rule can be found on the Trainz Wiki Rules Page at:- |
|
|
||||||||||
 Steps |
|
|||||||||
|
||||||||||
|
||||||||||
|
||||||||||
|
||||||||||
Adding an Instruction to the Trigger Event
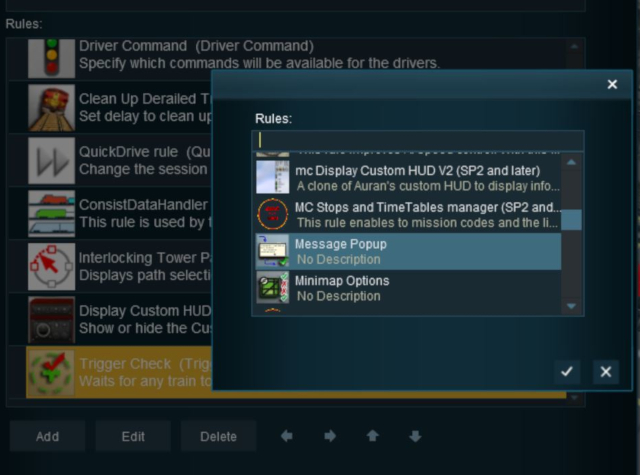
To test your trigger event you will need to add at least one rule.
Adding a Child Rule
 Steps |
|
|||||
|
||||||
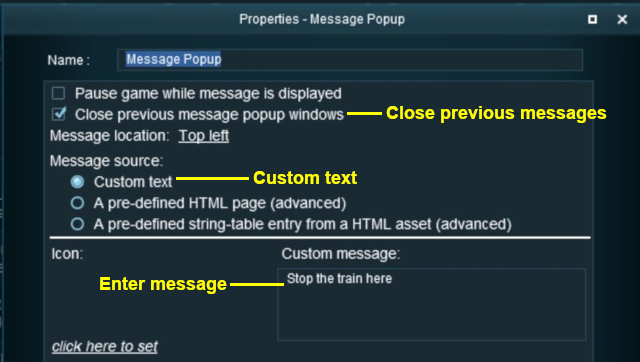
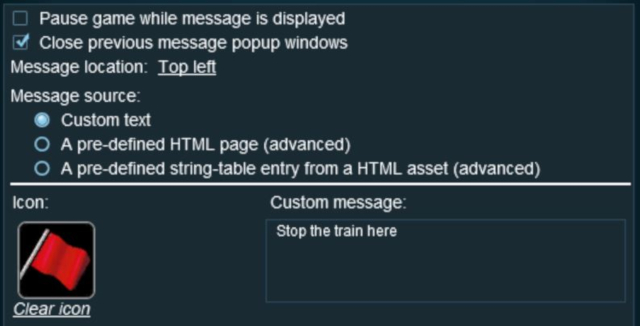
Configuring the Message and Testing
 Steps |
|
|||||||
|
||||||||
|
||||||||
Another example of using the Trigger Check Rule can be found in the Trainz Wiki Page |
||||||||
Alternatives to the Trigger Check Rule
 |
There are other rules that can be used in place of the Trigger Check Rule and triggers. A few possibilities are listed below:- |
- Directional Trigger Check Rule - identical to the Trigger Check Rule but adds the ability to test the train direction. Requires the use of a special Directional Trigger. For an example of its use see the Trainz Wiki Page
Controlling Signals in Sessions.
- Trackside Check Rule - very similar to the Trigger Check Rule but provides some different options.
- Navigation Points (see the How to Guides link below) are more complex but provide more advanced controls and options.
- Multiple Resource Check Rule - monitors and acts on changes in multiple industry or multiple wagon resource (commodity) levels.
- Resource Verify Rule - monitors and acts on changes in a single industry or wagon resource (commodity) level.
- Timecheck Rule - triggers an event at a set time.
 |
There is a driver command that can be used in place of the Trigger Check Rule. |
- Wait For Trigger - forces an AI controlled train to wait until a specified trigger has been activated by another train.
Related Links
 |
Trainz Wiki
 |
More Tutorials and Guides to Using Trainz |
This page was created by Trainz user pware in May 2018 and was last updated as shown below.

