How to Use Track Triggers
m |
(Added Surveyor 2.0 instructions) |
||
| Line 236: | Line 236: | ||
</table> <!-- END Steps Table --> | </table> <!-- END Steps Table --> | ||
<br> | <br> | ||
| + | =='''In Surveyor 2.0 (S20)'''== | ||
| + | |||
| + | <span style="font-size: 17px; font-weight: 700; color: white; background-color: black;"> Adding a Track Trigger </span><br> | ||
| + | |||
| + | [[image:DotPoint1.JPG|link=]] In the '''Asset Palette''' either:- | ||
| + | <table width=1000> | ||
| + | <tr valign="top"> | ||
| + | <td> | ||
| + | <table border=1> | ||
| + | <tr valign="top"> | ||
| + | <td width=250 align="center">[[image:Ablue.png|link=]] '''Left''' click the '''Track Mesh Filter''' icon<br> | ||
| + | [[image:TrackMeshFilter.png|link=|alt=Track mesh]] | ||
| + | </td> | ||
| + | </tr> | ||
| + | </table> | ||
| + | </td> | ||
| + | <td width=50 align="center"><span style="font-size: 17px; font-weight: 700;">OR</span></td> | ||
| + | <td> | ||
| + | <table border=1> | ||
| + | <tr valign="top"> | ||
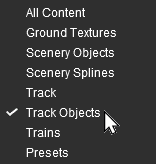
| + | <td align="center">[[image:Bblue.png|link=]] '''Left''' click the '''Content Drop-down Box'''<br> | ||
| + | [[image:FilterSelect.png|link=|alt=Filter List]]<br> | ||
| + | Then select '''Track Objects'''<br> | ||
| + | [[image:FilterSelectTrackType.png|link=|alt=Track Objects]] | ||
| + | </td> | ||
| + | </tr> | ||
| + | </table> | ||
| + | </td> | ||
| + | <td> | ||
| + | <table bgcolor=#000000 width=400 cellpadding=2> | ||
| + | <tr valign="top"> | ||
| + | <td> | ||
| + | <table bgcolor=#ffffe0 width=396 cellpadding=2> | ||
| + | <tr valign="top"> | ||
| + | <td>[[image:PencilTips.PNG|link=]] <span style="font-size: 15px; font-weight: 700; color: white; background-color: blue;"> Shortcut </span><br> | ||
| + | If you already have a '''Track Trigger''' in your route then:- | ||
| + | # select the '''Eyedropper Tool''' in the '''Tools Palette''' (or press the <span style="font-weight: 700; font-size: 17px; color: white; background-color: black;"> R </span> key) | ||
| + | # '''Left''' click on the existing '''Track Trigger''' object | ||
| + | This will instantly select the '''Track Trigger''' in the filter list.<br> | ||
| + | |||
| + | Jump down to '''Step [[image:DotPoint5.JPG|link=]]''' below.</td> | ||
| + | </tr> | ||
| + | </table> | ||
| + | </td> | ||
| + | </tr> | ||
| + | </table> | ||
| + | </td> | ||
| + | </tr> | ||
| + | </table> | ||
| + | <br> | ||
| + | [[image:DotPoint2.JPG|link=]] To narrow down the filter list, type "trig" ('''UPPER/lower''' case does not matter) in the '''Search Text Box'''<br> | ||
| + | <table width=1000> | ||
| + | <tr valign="top"> | ||
| + | <td>[[image:FilterSelectSearchTrigger.png|link=|alt=Text search]]</td> | ||
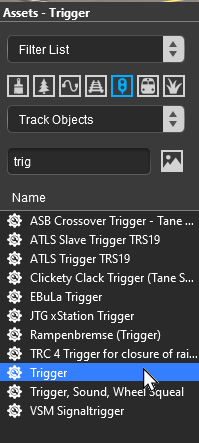
| + | <td><br>[[image:DotPoint3.JPG|link=]] This will list all the '''Track Objects''' containing the text "trig" in the filter list.<br> | ||
| + | <table> | ||
| + | <tr valign="top"> | ||
| + | <td>[[image:FilterSelectTrigger.png|link=|alt=Filtered list]]</td> | ||
| + | <td valign="middle">[[image:DotPoint4.JPG|link=]] Select the item '''Track Trigger'''.<br><br> | ||
| + | If you are not sure about an asset then '''double-click''' on the name to bring up its image and description.</td> | ||
| + | </tr> | ||
| + | </table> | ||
| + | </td> | ||
| + | </tr> | ||
| + | </table> | ||
| + | [[image:DotPoint5.JPG|link=]] Place the '''Track Trigger''' on the track.<br> | ||
| + | <table width=1000> | ||
| + | <tr valign="top"> | ||
| + | <td>[[image:TriggerAdd_S20.png|link=|alt=Add trigger]]<br> | ||
| + | <br> | ||
| + | <table bgcolor=#000000 width=480 cellpadding=2> | ||
| + | <tr valign="top"> | ||
| + | <td> | ||
| + | <table bgcolor=#ffffb0 width=476 cellpadding=2> | ||
| + | <tr valign="top"> | ||
| + | <td>[[image:NotePad.PNG|link=]]</td> | ||
| + | <td><span style="font-size: 17px; font-weight: 700;">Notes:'''</span><br> | ||
| + | ---- | ||
| + | To delete a '''Track Trigger''' (or any asset):- | ||
| + | # select either the:- | ||
| + | #* '''Free Move Tool''' (or press <span style="font-weight: 700; font-size: 17px; color: white; background-color: black;"> S </span>) or | ||
| + | #* '''Fine Adjustment Tool''' (or press <span style="font-weight: 700; font-size: 17px; color: white; background-color: black;"> D </span>) | ||
| + | # '''Left''' click on the '''Track Trigger''' | ||
| + | # press the <span style="font-weight: 700; font-size: 17px; color: white; background-color: black;"> Delete </span> key | ||
| + | </td> | ||
| + | </tr> | ||
| + | </table> | ||
| + | </td> | ||
| + | </tr> | ||
| + | </table> | ||
| + | <br> | ||
| + | <table bgcolor=#000000 width=460> | ||
| + | <tr valign="top"> | ||
| + | <td> | ||
| + | <table bgcolor=#ffffe0 width=456> | ||
| + | <tr valign="top"> | ||
| + | <td>[[image:PencilTips.PNG|link=]]</td> | ||
| + | <td>If you need to rotate the '''Track Trigger''' to face the opposite direction then:- | ||
| + | # '''Left''' click on its '''Context Tool''' (or press the <span style="font-weight: 700; font-size: 17px; color: white; background-color: black;"> T </span> key if the asset has already been selected) | ||
| + | # from the popup menu select '''Rotate Trackside''' | ||
| + | But note that the direction it faces has no effect on its operation.</td> | ||
| + | </tr> | ||
| + | </table> | ||
| + | </td> | ||
| + | </tr> | ||
| + | </table> | ||
| + | </td> | ||
| + | <td> | ||
| + | <table cellpadding=4 bgcolor=#ffffff> | ||
| + | <tr> | ||
| + | <td colspan="2"> | ||
| + | ----</td> | ||
| + | </tr> | ||
| + | <tr valign="top"> | ||
| + | <td>[[image:Steps.PNG|link=]]</td> | ||
| + | <td><span style="font-size: 17px; font-weight: 700;">Steps:</span><br> | ||
| + | <table> | ||
| + | <tr valign="top"> | ||
| + | <td>[[image:DotPoint1Blue.png|link=]]</td> | ||
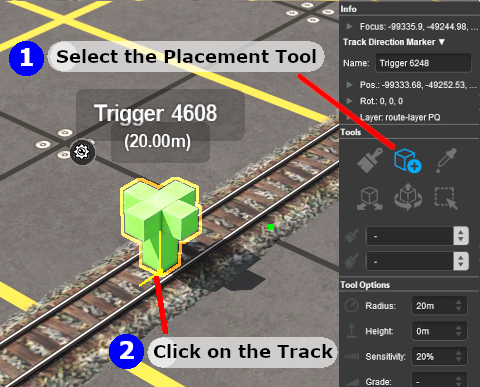
| + | <td>Select the '''Placement Tool''' (or press the <span style="font-weight: 700; font-size: 17px; color: white; background-color: black;"> E </span> key) from the '''Tools Palette'''</td> | ||
| + | </tr> | ||
| + | <tr valign="top"> | ||
| + | <td>[[image:DotPoint2Blue.png|link=]]</td> | ||
| + | <td>'''Left''' click on the track at the position where you want to place the '''Track Trigger'''</td> | ||
| + | </tr> | ||
| + | </table> | ||
| + | The '''Track Trigger''' can be easily moved if needed - see below. | ||
| + | </td> | ||
| + | </tr> | ||
| + | <tr> | ||
| + | <td colspan="2"> | ||
| + | ----</td> | ||
| + | </tr> | ||
| + | </table><br> | ||
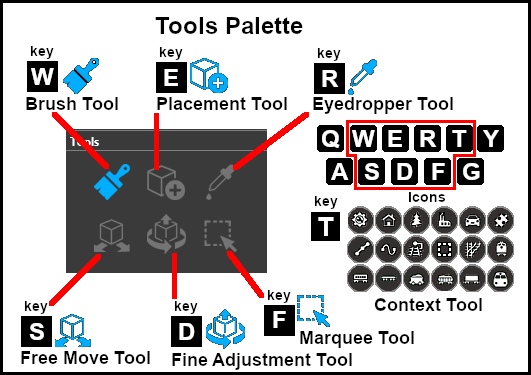
| + | [[image:Tools_S20.png|link=|alt=Tools and keymap for S20]] | ||
| + | </td> | ||
| + | </tr> | ||
| + | </table> | ||
| + | <br> | ||
| + | <span style="font-size: 17px; font-weight: 700; color: white; background-color: black;"> Set the Track Trigger Properties </span><br> | ||
| + | <table width=900> | ||
| + | <tr valign="top"> | ||
| + | <td>[[image:TriggerAdjust_S20.png|link=]]</td> | ||
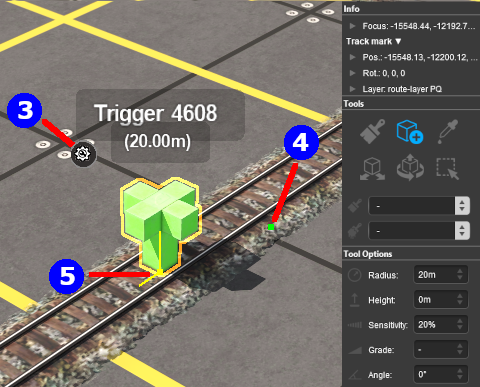
| + | <td>[[image:DotPoint3Blue.png|link=]] <span style="font-weight: 700; font-size: 17px;">Change Its Name</span><br> | ||
| + | <table cellpadding=4 bgcolor=#ffffff> | ||
| + | <tr> | ||
| + | <td colspan="2"> | ||
| + | ----</td> | ||
| + | </tr> | ||
| + | <tr valign="top"> | ||
| + | <td>[[image:Steps.PNG|link=]]</td> | ||
| + | <td><span style="font-size: 17px; font-weight: 700;">Steps:</span><br> | ||
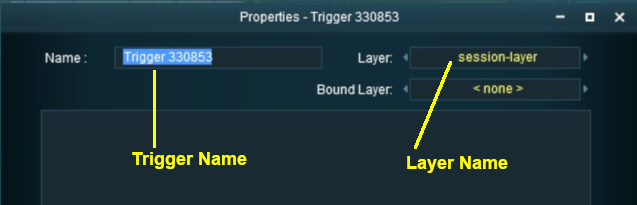
| + | # '''Left''' click on the '''Context Tool''' ([[image:DotPoint3Blue.png|link=]] in the image on the left or press the <span style="font-weight: 700; font-size: 17px; color: white; background-color: black;"> T </span> key if the asset has already been selected) to open up the object property and control menu | ||
| + | # '''Left''' click on '''Edit Properties''' option | ||
| + | # Enter a name for the '''Track Trigger''' | ||
| + | </td> | ||
| + | </tr> | ||
| + | <tr> | ||
| + | <td colspan="2"> | ||
| + | ----</td> | ||
| + | </tr> | ||
| + | </table> | ||
| + | </td> | ||
| + | </tr> | ||
| + | </table> | ||
| + | <br> | ||
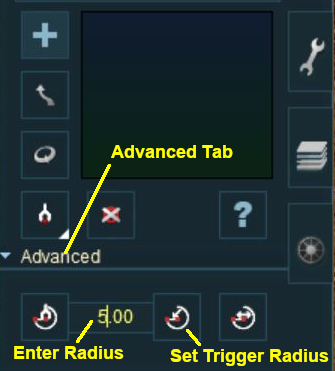
| + | [[image:DotPoint4Blue.png|link=]] <span style="font-weight: 700; font-size: 17px;">Set its Trigger Radius</span><br> | ||
| + | The '''Trigger Radius''' controls how closely an AI train has to approach the marker to activate it (smaller radius = closer to the trigger).<br> | ||
| + | <table cellpadding=4 bgcolor=#ffffff> | ||
| + | <tr> | ||
| + | <td colspan="2"> | ||
| + | ----</td> | ||
| + | </tr> | ||
| + | <tr valign="top"> | ||
| + | <td>[[image:Steps.PNG|link=]]</td> | ||
| + | <td><span style="font-size: 17px; font-weight: 700;">Steps:</span><br> | ||
| + | # '''Left''' click and hold down the mouse button on the '''Green Dot''' next to the '''Track Trigger''' ([[image:DotPoint4Blue.png|link=]] in the image above) | ||
| + | # While holding down the '''Left''' mouse button, move the mouse '''Forward''' or '''Backward''' to increase or reduce the trigger radius | ||
| + | </td> | ||
| + | </tr> | ||
| + | <tr> | ||
| + | <td colspan="2"> | ||
| + | ----</td> | ||
| + | </tr> | ||
| + | </table> | ||
| + | <br> | ||
| + | [[image:DotPoint5Blue.png|link=]] <span style="font-weight: 700; font-size: 17px;">Move it Along the Track</span><br> | ||
| + | <table cellpadding=4 bgcolor=#ffffff> | ||
| + | <tr> | ||
| + | <td colspan="2"> | ||
| + | ----</td> | ||
| + | </tr> | ||
| + | <tr valign="top"> | ||
| + | <td>[[image:Steps.PNG|link=]]</td> | ||
| + | <td><span style="font-size: 17px; font-weight: 700;">Steps:</span><br> | ||
| + | # '''Left''' click and hold down the mouse button on the '''Yellow Dot''' next to the '''Track Trigger''' ([[image:DotPoint5Blue.png|link=]] in the image above) | ||
| + | # While holding down the '''Left''' mouse button, move the mouse '''Forward''' or '''Backward''' to drag the '''Track Trigger''' along the track | ||
| + | </td> | ||
| + | </tr> | ||
| + | <tr> | ||
| + | <td colspan="2"> | ||
| + | ----</td> | ||
| + | </tr> | ||
| + | </table> | ||
| + | <br> | ||
| + | <table width=900> | ||
| + | <tr valign="top"> | ||
| + | <td>[[image:TriggerFineAdjust_S20.png|link=]]<td> | ||
| + | <td>[[image:DotPoint6Blue.png|link=]] <span style="font-weight: 700; font-size: 17px;">Reposition it Up/Down</span><br> | ||
| + | This feature allows a '''Track Trigger''' to be physically placed above the track so that it will not be hidden if a consist is parked on the '''Track Trigger'''.<br> | ||
| + | <table cellpadding=4 bgcolor=#ffffff width=530> | ||
| + | <tr> | ||
| + | <td colspan="2"> | ||
| + | ----</td> | ||
| + | </tr> | ||
| + | <tr valign="top"> | ||
| + | <td>[[image:Steps.PNG|link=]]</td> | ||
| + | <td><span style="font-size: 17px; font-weight: 700;">Steps:</span><br> | ||
| + | # Select the '''Fine Adjustment Tool''' (or press the <span style="font-weight: 700; font-size: 17px; color: white;background-color: black;"> D </span> key) | ||
| + | # '''Left''' click and hold down the mouse button on the '''Blue Vertical Axis Line''' above the '''Track Trigger''' ([[image:DotPoint6Blue.png|link=]] in the image on the left) | ||
| + | # While holding down the '''Left''' mouse button, move the mouse '''Forward''' or '''Backward''' to move the '''Track Trigger''' '''Up''' or '''Down''' | ||
| + | </td> | ||
| + | </tr> | ||
| + | <tr> | ||
| + | <td colspan="2"> | ||
| + | ----</td> | ||
| + | </tr> | ||
| + | </table> | ||
| + | <table bgcolor=#000000 width=530> | ||
| + | <tr valign="top"> | ||
| + | <td> | ||
| + | <table bgcolor=#ffffe0 width=526> | ||
| + | <tr valign="top"> | ||
| + | <td>[[image:PencilTips.PNG|link=]]</td> | ||
| + | <td>If you need to return the '''Track Trigger''' to its original position then:- | ||
| + | # '''Left''' click on its '''Context Tool''' (or press the <span style="font-weight: 700; font-size: 17px; color: white; background-color: black;"> T </span> key if the asset has already been selected) | ||
| + | # from the popup menu select '''Reattach to Track'''</td> | ||
| + | </tr> | ||
| + | </table> | ||
| + | </td> | ||
| + | </tr> | ||
| + | </table> | ||
| + | </td> | ||
| + | </tr> | ||
| + | </table> | ||
| + | <br> | ||
| + | |||
| + | [[image:DotPoint7Blue.png|link=]] <span style="font-weight: 700; font-size: 17px;">Reposition the it Left/Right</span><br> | ||
| + | This feature allows a '''Track Trigger''' to be physically placed left or right alongside the track so that it will not be hidden if a consist is parked on the '''Track Trigger'''.<br> | ||
| + | <table cellpadding=4 bgcolor=#ffffff width=900> | ||
| + | <tr> | ||
| + | <td colspan="2"> | ||
| + | ----</td> | ||
| + | </tr> | ||
| + | <tr valign="top"> | ||
| + | <td>[[image:Steps.PNG|link=]]</td> | ||
| + | <td><span style="font-size: 17px; font-weight: 700;">Steps:</span><br> | ||
| + | # Select the '''Fine Adjustment Tool''' (or press the <span style="font-weight: 700; font-size: 17px; color: white;background-color: black;"> D </span> key) | ||
| + | # '''Left''' click and hold down the mouse button on the '''Red Horizontal Axis Line''' on the '''Track Trigger''' ([[image:DotPoint7Blue.png|link=]] in the image above) | ||
| + | # While holding down the '''Left''' mouse button, move the mouse '''Forward''' or '''Backward''' to move the '''Track Trigger''' '''Left''' or '''Right''' of the track | ||
| + | </td> | ||
| + | </tr> | ||
| + | <tr valign="top"> | ||
| + | <td colspan=2> | ||
| + | |||
| + | <table bgcolor=#000000 width=800> | ||
| + | <tr valign="top"> | ||
| + | <td> | ||
| + | <table bgcolor=#ffffb0 width=796> | ||
| + | <tr valign="top"> | ||
| + | <td>[[image:NotePad.PNG|link=]]</td> | ||
| + | <td><span style="font-size: 17px; font-weight: 700;">Notes:'''</span><br> | ||
| + | ---- | ||
| + | The '''Green Horizontal Axis Line''' also shown in the image above pointing forward from the '''Track Trigger''' will move the '''Track Trigger''' forward/backward regardless of whether it is on the track or not. It has the same effect as the instructions shown in [[image:DotPoint5Blue.png|link=]] <span style="font-weight: 700; font-size: 15px;">Move it Along the Track</span> above. | ||
| + | </td> | ||
| + | </tr> | ||
| + | </table> | ||
| + | </td> | ||
| + | </tr> | ||
| + | </table> | ||
| + | </td> | ||
| + | </tr> | ||
| + | <tr> | ||
| + | <td colspan="2"> | ||
| + | ----</td> | ||
| + | </tr> | ||
| + | </table> | ||
| + | <table bgcolor=#000000 width=530> | ||
| + | <tr valign="top"> | ||
| + | <td> | ||
| + | <table bgcolor=#ffffe0 width=526> | ||
| + | <tr valign="top"> | ||
| + | <td>[[image:PencilTips.PNG|link=]]</td> | ||
| + | <td>If you need to return the '''Track Trigger''' to its original position then:- | ||
| + | # '''Left''' click on its '''Context Tool''' (or press the <span style="font-weight: 700; font-size: 17px; color: white; background-color: black;"> T </span> key if the asset has already been selected) | ||
| + | # from the popup menu select '''Reattach to Track'''</td> | ||
| + | </tr> | ||
| + | </table> | ||
| + | </td> | ||
| + | </tr> | ||
| + | </table> | ||
| + | <br> | ||
| + | |||
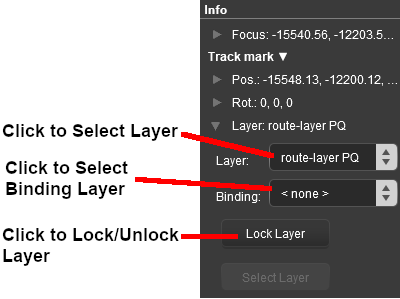
| + | <span style="font-weight: 700; font-size: 17px;">Move a Track Trigger to a New Layer</span><br> | ||
| + | <table cellpadding=4 bgcolor=#ffffff width=1000> | ||
| + | <tr valign="top"> | ||
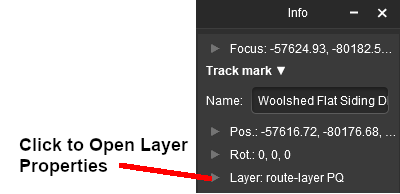
| + | <td colspan=2>The '''Info Palette''' will show the layer assigned to the currently selected object. To the left of the layer name is a small arrow object.</td> | ||
| + | </tr> | ||
| + | <tr valign="top"> | ||
| + | <td> | ||
| + | [[image:TrackmarkInfo_S20.png|link=|alt=Info palette]]<br><br> | ||
| + | [[image:TrackmarkLayerInfo_S20.png|link=|alt=Layer control]] | ||
| + | </td> | ||
| + | <td> | ||
| + | <table> | ||
| + | <tr valign="top"> | ||
| + | <td colspan="2"> | ||
| + | ----</td> | ||
| + | </tr> | ||
| + | <tr valign="top"> | ||
| + | <td>[[image:Steps.PNG|link=]]</td> | ||
| + | <td><span style="font-size: 17px; font-weight: 700;">Steps:</span><br> | ||
| + | # click the small arrow next to the layer name. This will open the layer properties for the selected object | ||
| + | # click the '''Layer''' drop down box to select a new layer for the object | ||
| + | # if required, click the '''Binding''' drop down box to select a new binding layer for the object | ||
| + | # if required, click the <span style="font-weight: 700; font-size: 17px; color: white; background-color: black;"> Lock Layer </span> button to lock the selected layer. If the layer is already locked then this will be shown as an <span style="font-weight: 700; font-size: 17px; color: white; background-color: black;"> Unlock Layer </span> button | ||
| + | <br> | ||
| + | <table bgcolor=#ff0000 width=550> | ||
| + | <tr valign="top"> | ||
| + | <td> | ||
| + | <table bgcolor=#fcbcbc width=546> | ||
| + | <tr valign="top"> | ||
| + | <td>[[file:Stop.PNG|link=]]</td> | ||
| + | <td><span style="font-size: 15px; font-weight: 700;">WARNING:</span><br> | ||
| + | You will not be allowed to place a track object in a layer that is higher up the list than the layer containing the track. | ||
| + | </td> | ||
| + | </tr> | ||
| + | </table> | ||
| + | </td> | ||
| + | </tr> | ||
| + | </table> | ||
| + | </td> | ||
| + | </tr> | ||
| + | <tr> | ||
| + | <td colspan="2"> | ||
| + | ----</td> | ||
| + | </tr> | ||
| + | </table> | ||
| + | <table cellpadding=4 bgcolor="Aquamarine"> | ||
| + | <tr valign="top"> | ||
| + | <td>[[file:LinkWiki.PNG|link=]]</td> | ||
| + | <td>Information on layers can be found at:-<br> | ||
| + | * '''[[How to Use Layers]]''' | ||
| + | </td> | ||
| + | </tr> | ||
| + | </table> | ||
| + | </td> | ||
| + | </tr> | ||
| + | </table> | ||
| + | |||
<table> <!-- BEGIN Nav Buttons Table --> | <table> <!-- BEGIN Nav Buttons Table --> | ||
<tr valign="top"> | <tr valign="top"> | ||
Revision as of 10:16, 24 December 2022
The information in this Wiki Page applies to TANE, TRS19, Trainz Plus and TRS22.
|
|
|||||||||
What are Track Triggers?
Track triggers can be programmed to respond when a train (any train or a specific train) passes over them in Driver Mode. The response comes from executing a set of Session Rules that have been attached to a ![]() Trigger Check Rule (or a similar rule) or a Driver Command that is monitoring the track trigger.
Trigger Check Rule (or a similar rule) or a Driver Command that is monitoring the track trigger.
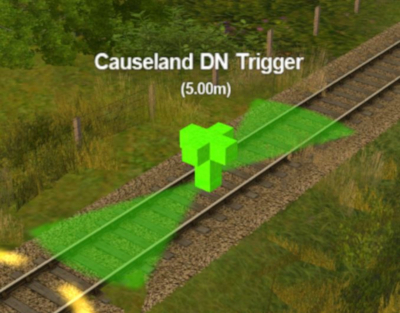 |
Shown at left is a Track Trigger placed on a track in Surveyor Mode
|
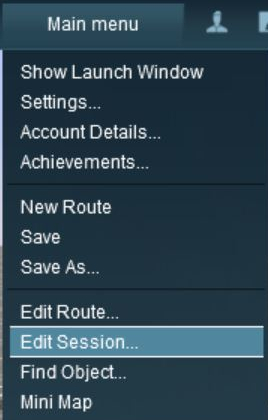
Route or Session?
| Track Triggers can be placed in a Route layer or in a Session layer |
|
 |
Information on Route and Session layers can be found at:- |
Adding a Track Trigger
|
In Surveyor Classic (S10)
 |
|
||||||
As soon as a new track trigger has been placed, its properties window will open on the screen. It will be given a default name and assigned to the currently active layer.
|
|
||||||||||
 Steps |
|
|||||||||
|
||||||||||
In Surveyor 2.0 (S20)
Adding a Track Trigger
![]() In the Asset Palette either:-
In the Asset Palette either:-
|
OR |
|
|
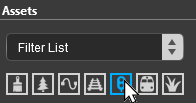

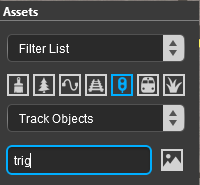
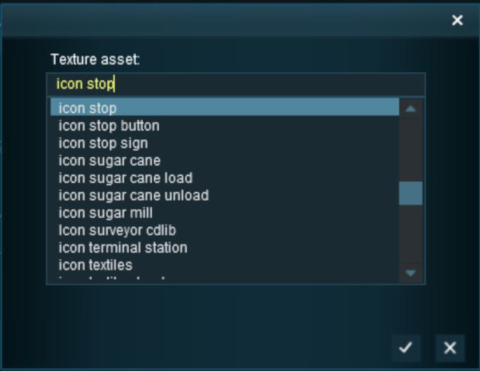
![]() To narrow down the filter list, type "trig" (UPPER/lower case does not matter) in the Search Text Box
To narrow down the filter list, type "trig" (UPPER/lower case does not matter) in the Search Text Box
 |
|
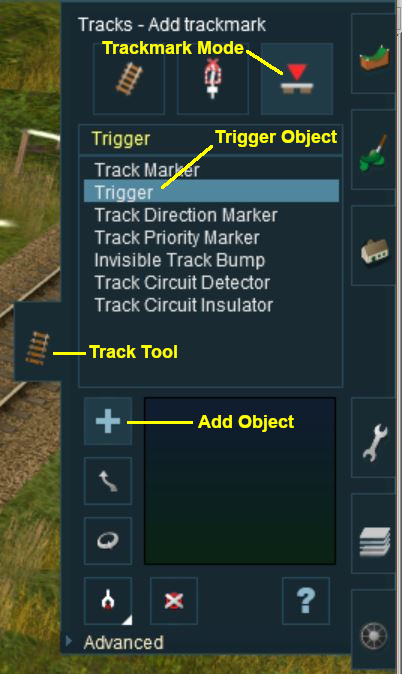
![]() Place the Track Trigger on the track.
Place the Track Trigger on the track.
|
|
||||||||||||||||
Set the Track Trigger Properties
 |
|
||||||
![]() Set its Trigger Radius
Set its Trigger Radius
The Trigger Radius controls how closely an AI train has to approach the marker to activate it (smaller radius = closer to the trigger).
|
|
|
|
Steps:
|
|
|
|
![]() Move it Along the Track
Move it Along the Track
|
|
|
|
Steps:
|
|
|
|
 | This feature allows a Track Trigger to be physically placed above the track so that it will not be hidden if a consist is parked on the Track Trigger.
|
||||||||||
![]() Reposition the it Left/Right
Reposition the it Left/Right
This feature allows a Track Trigger to be physically placed left or right alongside the track so that it will not be hidden if a consist is parked on the Track Trigger.
|
|
||||
|
Steps:
|
|||
|
||||
|
|
||||
|
Move a Track Trigger to a New Layer
| The Info Palette will show the layer assigned to the currently selected object. To the left of the layer name is a small arrow object. | ||||||||||||
|
|
|
|||||||||||
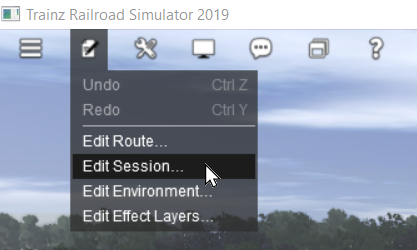
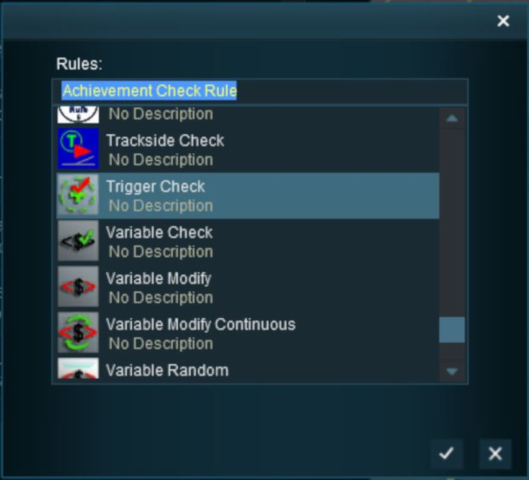
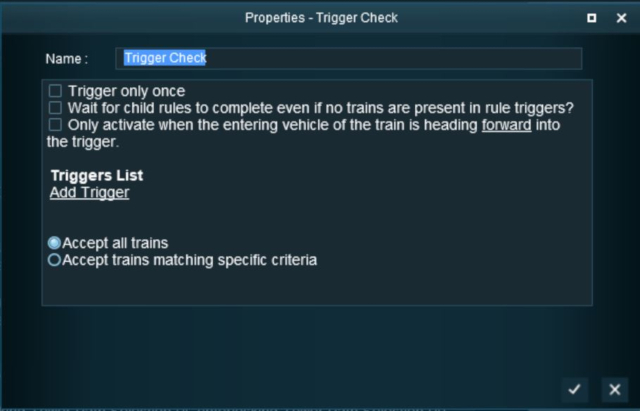
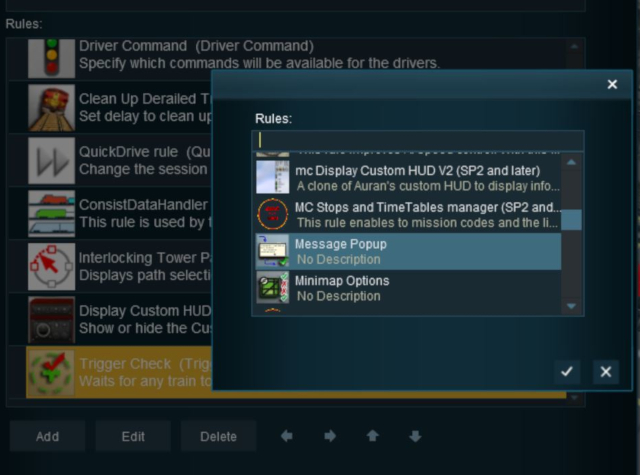
Creating a Track Trigger Event
Track trigger events are handled by the Trigger Check Rule (or a similar rule) which is added to a Session in the ![]() Session Editor.
Session Editor.
|
More information on the Trigger Check Rule can be found on the Trainz Wiki Rules Page at:- |
|
|
||||||||||
Steps |
|
|||||||||
|
||||||||||
|
||||||||||
|
||||||||||
|
||||||||||
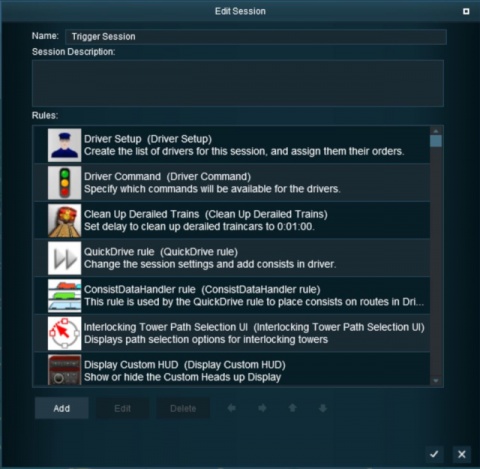
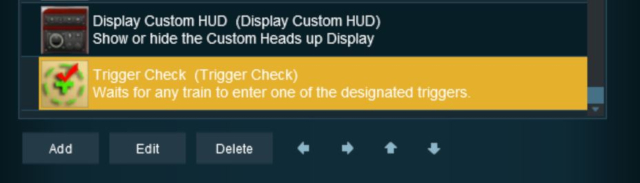
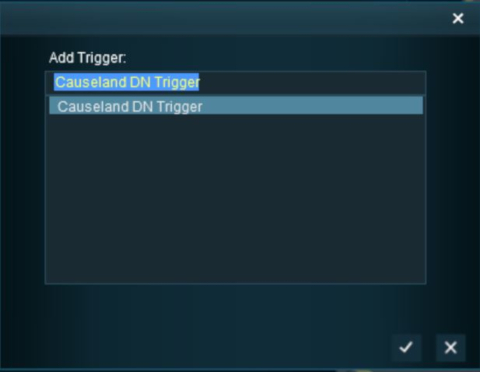
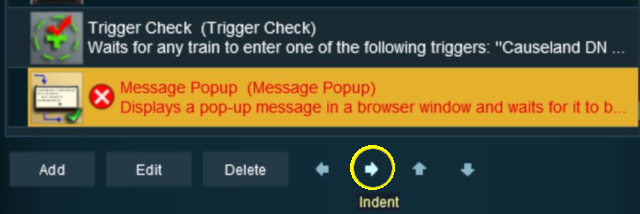
Adding an Instruction to the Trigger Event
To test your trigger event you will need to add at least one rule.
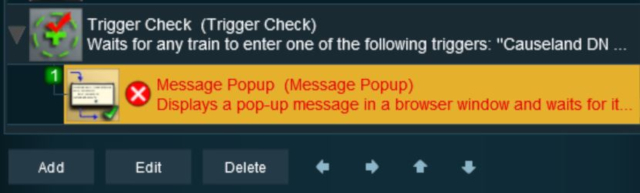
Adding a Child Rule
Steps |
|
|||||
|
||||||
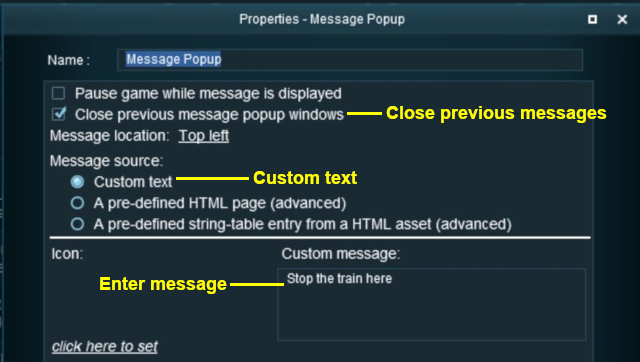
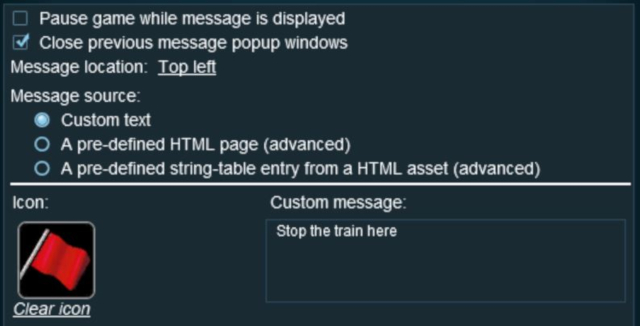
Configuring the Message and Testing
Steps |
|
|||||||
|
||||||||
|
||||||||
Another example of using the Trigger Check Rule can be found in the Trainz Wiki Page |
||||||||
Alternatives to the Trigger Check Rule
 |
There are other rules that can be used in place of the Trigger Check Rule and triggers. A few possibilities are listed below:- |
- Directional Trigger Check Rule - identical to the Trigger Check Rule but adds the ability to test the train direction. Requires the use of a special Directional Trigger. For an example of its use see the Trainz Wiki Page
 Controlling Signals in Sessions.
- Trackside Check Rule - very similar to the Trigger Check Rule but provides some different options.
- Navigation Points (see the How to Guides link below) are more complex but provide more advanced controls and options.
- Multiple Resource Check Rule - monitors and acts on changes in multiple industry or multiple wagon resource (commodity) levels.
- Resource Verify Rule - monitors and acts on changes in a single industry or wagon resource (commodity) level.
- Timecheck Rule - triggers an event at a set time.
 |
There is a driver command that can be used in place of the Trigger Check Rule. |
- Wait For Trigger - forces an AI controlled train to wait until a specified trigger has been activated by another train.
Related Links
|
Trainz Wiki
 |
More Tutorials and Guides to Using Trainz |
This page was created by Trainz user pware in May 2018 and was last updated as shown below.