SAR Gladstone V2
(Created page with "<!-- V2.0 (seperate V1.0 file) --> <table> <tr valign="top"> <td width=750> <table width=750> <tr valign="top"> <td align="center">link=</td> </tr> <tr ...") |
m |
||
| (5 intermediate revisions by one user not shown) | |||
| Line 35: | Line 35: | ||
</tr> | </tr> | ||
<tr valign="top"> | <tr valign="top"> | ||
| − | <td align="center"><span style="font-weight: 700;"> | + | <td align="center"><span style="font-weight: 700;">For <span style="color: blue;">SAR Peterborough Narrow Gauge Division v2.0</span>. For the original <span style="color: blue;">V1.0</span> click <span style="background-color: yellow;">[[SAR_Gladstone_V1|here]]</span></span></td> |
| − | < | + | </tr> |
| − | [[Image:line740.png|link=]]</td> | + | </table> |
| + | |||
| + | <table width=750> | ||
| + | <tr valign="top"> | ||
| + | <td align="center">[[Image:line740.png|link=]]</td> | ||
</tr> | </tr> | ||
</table> | </table> | ||
| Line 46: | Line 50: | ||
<td><span style="font-weight: 700; background-color: black; color: white;"> Commodities: </span> | <td><span style="font-weight: 700; background-color: black; color: white;"> Commodities: </span> | ||
| − | <table width= | + | <table width=250> |
<tr valign="top"> | <tr valign="top"> | ||
| Line 61: | Line 65: | ||
<td style="background-color: black;"><span style="color: white; font-weight: 700;"> Loco Services: </span> | <td style="background-color: black;"><span style="color: white; font-weight: 700;"> Loco Services: </span> | ||
| − | <table width= | + | <table width=250> |
<tr valign="top"> | <tr valign="top"> | ||
<td align="center" width=50>[[image:Bunker_Oil_Icon.png|link=|alt=Fuel]]<br><span style="font-size: 10px; color: white; font-weight: 700;">Bunker Oil</span><br>[[image:Loco_Label.png|link=]]</td> | <td align="center" width=50>[[image:Bunker_Oil_Icon.png|link=|alt=Fuel]]<br><span style="font-size: 10px; color: white; font-weight: 700;">Bunker Oil</span><br>[[image:Loco_Label.png|link=]]</td> | ||
<td align="center" width=50>[[Image:Coal_Icon.png|link=|alt=Coal]]<br><span style="font-size: 10px; color: white; font-weight: 700;">Coal</span><br>[[image:Loco_Label.png|link=]]</td> | <td align="center" width=50>[[Image:Coal_Icon.png|link=|alt=Coal]]<br><span style="font-size: 10px; color: white; font-weight: 700;">Coal</span><br>[[image:Loco_Label.png|link=]]</td> | ||
| − | <td align="center" width=50>[[Image:Water_Icon.png|link=|alt=Water]]<br><span style="font-size: 10px; color: white; font-weight: 700;">Water</span><br>[[image:Loco_Label.png|link=]]<br>[[image: | + | <td align="center" width=50>[[Image:Water_Icon.png|link=|alt=Water]]<br><span style="font-size: 10px; color: white; font-weight: 700;">Water</span><br>[[image:Loco_Label.png|link=]]<br>[[image:Station_Label.png|link=]]<br>[[image:Relief_Label.png|link=]]</td> |
| + | <td align="center" width=50>[[Image:Water_Icon.png|link=|alt=Water]]<br><span style="font-size: 10px; color: white; font-weight: 700;">Water</span><br>[[image:Loop_Label.png|link=]]<br>[[image:Main_Label.png|link=]]</td> | ||
</tr> | </tr> | ||
| Line 74: | Line 79: | ||
<td><span style="font-weight: 700;"><span style="background-color: black; color: white;"> Facilities: </span></span> | <td><span style="font-weight: 700;"><span style="background-color: black; color: white;"> Facilities: </span></span> | ||
| − | <table width= | + | <table width=200> |
<tr valign="top"> | <tr valign="top"> | ||
| Line 98: | Line 103: | ||
</tr> | </tr> | ||
<tr valign="top"> | <tr valign="top"> | ||
| − | <td>[[image:No_4.png|link=|alt=4]] '''[[SAR Scenario Gladstone-Terowie Passenger_V2| | + | <td>[[image:No_4.png|link=|alt=4]] '''[[SAR Scenario Gladstone-Terowie Passenger_V2|Gladstone to Terowie Passenger]]'''</td> |
<td>[[image:No_6.png|link=|alt=6]] '''[[SAR Scenario Paratoo Empty Ore_V2|Paratoo Empty Ore]]'''</td> | <td>[[image:No_6.png|link=|alt=6]] '''[[SAR Scenario Paratoo Empty Ore_V2|Paratoo Empty Ore]]'''</td> | ||
</tr> | </tr> | ||
| Line 123: | Line 128: | ||
<span style="font-weight: 700;"><span style="color: white; background-color: black;"> Distance from Port Pirie: </span> 52 kms, 32¼ miles <span style="color: white; background-color: black;"> from Peterborough: </span> 65½ kms, 40¾ miles</span><br> | <span style="font-weight: 700;"><span style="color: white; background-color: black;"> Distance from Port Pirie: </span> 52 kms, 32¼ miles <span style="color: white; background-color: black;"> from Peterborough: </span> 65½ kms, 40¾ miles</span><br> | ||
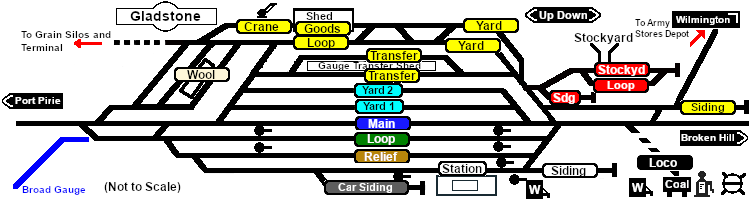
| − | A major manned station, junction and a break-of-gauge location on the narrow gauge (3ft6in - 1067mm) <span style="font-weight: 700; color: white; background-color: black;"> Port Pirie-Broken Hill Line </span> and <span style="font-weight: 700; color: white; background-color: black;"> Gladstone-Wilmington Line </span>, and the broad gauge (5ft3in - 1600mm) <span style="font-weight: 700; color: white; background-color: blue;"> Gladstone-Hamley Bridge-Adelaide Line </span>.<br> | + | A major manned station, junction and a break-of-gauge location on the narrow gauge (3ft6in - 1067mm) <span style="font-weight: 700; color: white; background-color: black;"> Port Pirie-Broken Hill Line </span> and <span style="font-weight: 700; color: white; background-color: black;"> Gladstone-Wilmington Line </span>, and the broad gauge (5ft3in - 1600mm) <span style="font-weight: 700; color: white; background-color: blue;"> Gladstone-Hamley Bridge-Adelaide Line </span>. To keep things simple, only a few dual narrow and broad gauge tracks, and no dual gauge switches, are used in the layout.<br> |
Multiple loops, yards and sidings for goods, grain, livestock, station, transfer platforms and loco servicing facilities.<br> | Multiple loops, yards and sidings for goods, grain, livestock, station, transfer platforms and loco servicing facilities.<br> | ||
| − | The '''Port Pirie-Broken Hill Line''' was converted to standard gauge (4ft8½in - 1435mm) during 1969-1970 and '''Gladstone''' then became a triple gauge location (narrow, standard and broad gauges) until the closure of the narrow and broad gauge lines by 1990 | + | The '''Port Pirie-Broken Hill Line''' was converted to standard gauge (4ft8½in - 1435mm) during 1969-1970 and '''Gladstone''' then became a triple gauge location (narrow, standard and broad gauges) until the closure of the narrow and broad gauge lines by 1990.<br> |
At its peak, before standardisation, '''Gladstone''' employed over 1,000 workers in servicing locomotives and the break-of-gauge facilities.<br> | At its peak, before standardisation, '''Gladstone''' employed over 1,000 workers in servicing locomotives and the break-of-gauge facilities.<br> | ||
| Line 143: | Line 148: | ||
</td> | </td> | ||
<td> | <td> | ||
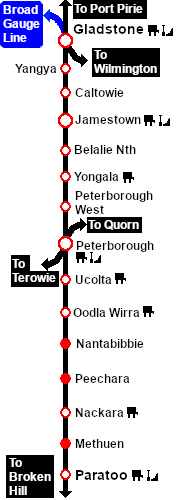
| − | [[Image:SAR_PortPirie-BrokenHill Line.png|link=SAR Port Pirie-Broken Hill_V2|alt=Port Pirie-Broken Hill Line|Show Port Pirie-Broken Hill Line]]<br>[[Image:SAR_Gladstone-Paratoo Strip Map.png|link=|alt=Gladstone-Paratoo Strip Map]]<br><br> | + | [[Image:SAR_PortPirie-BrokenHill Line.png|link=SAR Port Pirie-Broken Hill_V2|alt=Port Pirie-Broken Hill Line|Show Port Pirie-Broken Hill Line]]<br>[[Image:SAR_Gladstone-Paratoo Strip Map V2.png|link=|alt=Gladstone-Paratoo Strip Map]]<br><br> |
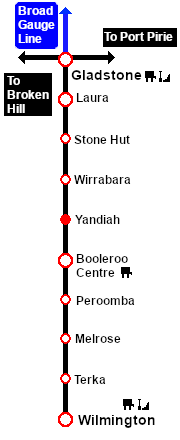
[[Image:SAR_Gladstone-Wilmington_Line.png|link=SAR Gladstone-Wilmington_V2|alt=Gladstone-Wilmington|Show Gladstone-Wilmington]]<br>[[Image:SAR_Gladstone-Wilmington Strip Map V2.png|link=|alt=Gladstone-Wilmington Strip Map]]</td> | [[Image:SAR_Gladstone-Wilmington_Line.png|link=SAR Gladstone-Wilmington_V2|alt=Gladstone-Wilmington|Show Gladstone-Wilmington]]<br>[[Image:SAR_Gladstone-Wilmington Strip Map V2.png|link=|alt=Gladstone-Wilmington Strip Map]]</td> | ||
</tr> | </tr> | ||
</table> | </table> | ||
Latest revision as of 11:23, 22 January 2026
|
 |
