How to Use Track Markers
m |
m |
||
| Line 2: | Line 2: | ||
__TOC__ | __TOC__ | ||
| + | <table> <!-- BEGIN Nav Buttons Table --> | ||
| + | <tr valign="top"> | ||
| + | <td width=729><span id="stepWhat"></span> </td> | ||
| + | <td width=46>[[file:BackToTop.png|link=#top|alt=Top|Top]]</td> | ||
| + | <td width=75> </td> | ||
| + | <td width=75>[[file:NextDown.png|link=#stepAdding|alt=Next Down|Next Down]]</td> | ||
| + | <td width=75>[[file:BackToBottom.png|link=#bottom|alt=Bottom|Bottom]]</td> | ||
| + | </tr> | ||
| + | </table> <!-- END Nav Buttons Table --> | ||
='''What are Track Markers?'''= | ='''What are Track Markers?'''= | ||
<table cellpadding="4" bgcolor=#c1e7e7> | <table cellpadding="4" bgcolor=#c1e7e7> | ||
| Line 22: | Line 31: | ||
<br> | <br> | ||
Trainz relies heavily on '''Track Markers''' to direct trains around a layout under the control of the '''AI system'''.<br> | Trainz relies heavily on '''Track Markers''' to direct trains around a layout under the control of the '''AI system'''.<br> | ||
| − | |||
| − | |||
| − | |||
| − | |||
| − | |||
| − | |||
='''Route or Session?'''= | ='''Route or Session?'''= | ||
| Line 56: | Line 59: | ||
</table> | </table> | ||
| − | <table | + | <table> <!-- BEGIN Nav Buttons Table --> |
<tr valign="top"> | <tr valign="top"> | ||
| − | <td | + | <td width=729><span id="stepAdding"></span> </td> |
| + | <td width=46>[[file:BackToTop.png|link=#top|alt=Top|Top]]</td> | ||
| + | <td width=75>[[file:NextUp.png|link=#stepWhat|alt=Next Up|Top]]</td> | ||
| + | <td width=75>[[file:NextDown.png|link=#stepOperation|alt=Next Down|Next Down]]</td> | ||
| + | <td width=75>[[file:BackToBottom.png|link=#bottom|alt=Bottom|Bottom]]</td> | ||
</tr> | </tr> | ||
| − | </table> | + | </table> <!-- END Nav Buttons Table --> |
| − | + | ||
='''Adding a Track Marker'''= | ='''Adding a Track Marker'''= | ||
| Line 166: | Line 172: | ||
<table width="100%"> | <table width="100%"> | ||
| + | <table> <!-- BEGIN Nav Buttons Table --> | ||
<tr valign="top"> | <tr valign="top"> | ||
| − | <td | + | <td width=729><span id="stepOperation"></span> </td> |
| + | <td width=46>[[file:BackToTop.png|link=#top|alt=Top|Top]]</td> | ||
| + | <td width=75>[[file:NextUp.png|link=#stepAdding|alt=Next Up|Top]]</td> | ||
| + | <td width=75> </td> | ||
| + | <td width=75>[[file:BackToBottom.png|link=#bottom|alt=Bottom|Bottom]]</td> | ||
</tr> | </tr> | ||
| − | </table> | + | </table> <!-- END Nav Buttons Table --> |
='''Track Marker Operation'''= | ='''Track Marker Operation'''= | ||
| Line 260: | Line 271: | ||
</tr> | </tr> | ||
</table> | </table> | ||
| − | |||
| − | |||
| − | |||
| − | |||
| − | |||
| − | |||
| − | |||
='''Related Links'''= | ='''Related Links'''= | ||
| Line 279: | Line 283: | ||
</tr> | </tr> | ||
</table> | </table> | ||
| − | + | <table> <!-- BEGIN Nav Buttons Table --> | |
| − | <table | + | |
<tr valign="top"> | <tr valign="top"> | ||
| − | <td | + | <td width=729><span id="bottom"></span> </td> |
| + | <td width=46>[[file:BackToTop.png|link=#top|alt=Top|Top]]</td> | ||
| + | <td width=75>[[file:NextUp.png|link=#stepOperation|alt=Next Up|Top]]</td> | ||
| + | <td width=75> </td> | ||
| + | <td width=75> </td> | ||
</tr> | </tr> | ||
| − | </table> | + | </table> <!-- END Nav Buttons Table --> |
---- | ---- | ||
---- | ---- | ||
Revision as of 15:57, 17 August 2021
The information in this Wiki Page applies to TANE, TRS19 and Trainz Plus.
Contents |
What are Track Markers?
| In Summary: | |
| Track Markers are red coloured track objects that are invisible in Driver Mode but visible in Surveyor Mode. They are used as destinations or waypoints for AI driver commands | |
| Track Markers only work on AI controlled trains. They have no effect on manually controlled trains | |
| The direction that the marker is pointing has absolutely NO EFFECT on its operation | |
Trainz relies heavily on Track Markers to direct trains around a layout under the control of the AI system.
Route or Session?
| Track Markers can be placed in a Route layer or in a Session layer |
Notes:
|
 |
Information on Route and Session layers can be found at:- |
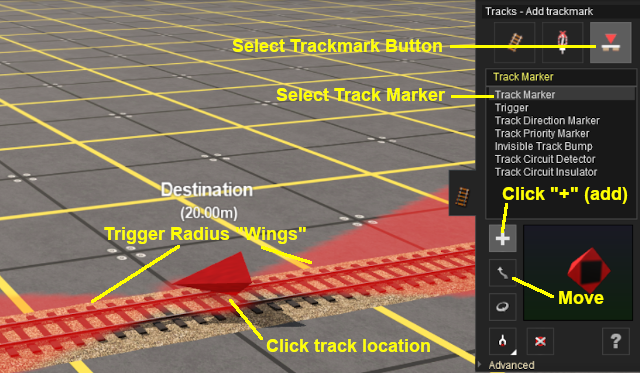
Adding a Track Marker
| Notes: A Track Marker has two important properties:-
|
 |
When placed, the properties window for the Track Marker will appear. |
||||||
| Enter a useful name for each Track Marker - the name will be needed for driver commands. Most creators base the name on the location (e.g. "Maintown Track 1 North") |
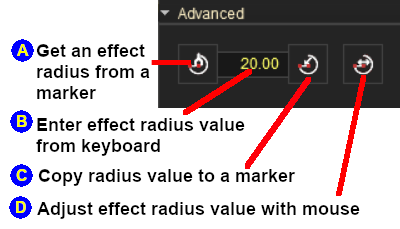
Setting the Trigger Radius
At the bottom of the Track Tools flyout menu is an Advanced button. Click this button to open the Track Marker advanced tool set.
 |
|
||||||
| Once you have a Trigger Radius entered in the value box, you can apply it to any number of Track Markers by using method |
Track Marker Operation
The most common use for Track Markers is as destinations for driver commands or as "way points" to direct a train to a destination via one or more intermediate places. They can also be used as the targets for Navigation Points and coupling operations.
 |
Information on adding driver commands can be found at:- |
| Drive To Trackmark and Drive Via Trackmark commands will NOT force the AI to find a clear path to the Track Marker if the shortest path is blocked | |
| Navigate To Trackmark and Navigate Via Trackmark commands will force the AI to find a clear path to the Track Marker if the shortest path is blocked. The path chosen may not be prototypical |
Navigation Points can be attached to Track Markers to provide users with session instructions.
 |
Information on navigation points can be found at:- |
Coupling Operations
An AI controlled train can be issued with a driver command to couple with the consist located at a specified Track Marker.
 |
The AI driver moves the train (or just the locomotive if it is by itself) to couple with the wagon that is closest to a specified trackmark. More information on this command can be found at This command must be downloaded from the DLS and installed in Trainz |
 |
Information on adding driver commands can be found at:- |
Related Links
 |
Trainz Wiki
 |
More Tutorials and Guides to Using Trainz |
This page was created by Trainz user pware in September 2019 and was last updated as shown below.


