HowTo/WagonX - Browser Properties Examples and Basic Tutorials
Please note: Much of this page still needs some validation. If you find issues then please contact PCAS1986 in the Trainz Forums or in the Trainz Discord Server.
Document Structure
- HowTo/Use the WagonX Library
- HowTo/WagonX - Technical Reference
- HowTo/WagonX - Locomotive Tutorial
- HowTo/WagonX - Traincar Tutorial
- The asset author's documentation
General Comments
Most of the notes and examples here are for Version 1 but WagonX continues to be developed. Features and/or changes for versions later than V1 are identified in the text.
Contents
|
Browser property tutorials
This tutorial takes you each step of creating a simple mesh toggle example. It is for a handbrake mesh, including animation, that the user may want to show (make visible) or hide (make invisible). We will add each property tag and explain its purpose. It may be useful to have the WagonX Technical Reference page open in a browser to examine details of the various tags.
Creating a basic mesh toggle
browser-properties
{
}
browser-properties
{
 0
 {
 }
}
The first tag to add is enabled. This determines whether or not the property is activated. Set it to 1, since we want our property to work in-game. browser-properties
{
0
{
enabled 1
}
}
browser-properties
{
 0
 {
  enabled                    1
  property-visibility        1
 }
}
browser-properties
{
 0
 {
  enabled                    1
  property-visibility        1
  name                       "Toggle Mesh: "
 }
}
browser-properties
{
 0
 {
  enabled                    1
  property-visibility        1
  name                       "Toggle Mesh: "
  property-id                "p_meshToggle"
 }
}
browser-properties
{
 0
 {
  enabled                    1
  property-visibility        1
  name                       "Toggle Mesh: "
  property-id                "p_meshToggle"
  description                "Toggles the mesh"
 }
}
browser-properties
{
 0
 {
  enabled                    1
  property-visibility        1
  name                       "Toggle Mesh: "
  property-id                "p_meshToggle"
  description                "Toggles the mesh"
  kind                       "mesh-attachment"
  mesh-attachment-type       "mesh-toggle"
 }
}
Here is part of the config mesh-table: handbrake-lever
{
mesh "mesh/handbrake.lm"
anim "mesh/handbrake_scene.kin"
auto-create 1
att-parent "default"
}
browser-properties
{
 0
 {
  enabled                    1
  property-visibility        1
  name                       "Toggle Mesh: "
  property-id                "p_handbrakeMeshToggle"
  description                "Toggles the handbrake mesh"
  kind                       "mesh-attachment"
  mesh-attachment-type       "mesh-toggle"
  meshes                     "handbrake-lever"
 }
}
browser-properties
{
 0
 {
  enabled                    1
  property-visibility        1
  name                       "Toggle Mesh: "
  property-id                "p_handbrakeMeshToggle"
  description                "Toggles the handbrake mesh"
  kind                       "mesh-attachment"
  mesh-attachment-type       "mesh-toggle"
  meshes                     "handbrake-lever"
  values                     "1,0"
 }
}
browser-properties
{
 0
 {
  enabled                    1
  property-visibility        1
  name                       "Toggle Mesh: "
  property-id                "p_handbrakeMeshToggle"
  description                "Toggles the handbrake mesh"
  kind                       "mesh-attachment"
  mesh-attachment-type       "mesh-toggle"
  meshes                     "handbrake-lever"
  values                     "1,0"
  default-index              0
 }
}
browser-properties
{
 0
 {
  enabled                    1
  property-visibility        1
  name                       "Toggle Mesh: "
  property-id                "p_handbrakeMeshToggle"
  description                "Toggles the handbrake mesh"
  kind                       "mesh-attachment"
  mesh-attachment-type       "mesh-toggle"
  meshes                     "handbrake-lever"
  values                     "1,0"
  default-index              0
  trigger                    "user"
 }
}
browser-properties
{
 0
 {
  enabled                    1
  property-visibility        1
  name                       "Toggle Mesh: "
  property-id                "p_handbrakeMeshToggle"
  description                "Toggles the handbrake mesh"
  kind                       "mesh-attachment"
  mesh-attachment-type       "mesh-toggle"
  meshes                     "handbrake-lever"
  values                     "1,0"
  default-index              0
  trigger                    "user"
  display-type               "link"
 }
}
browser-properties
{
 0
 {
  enabled                    1
  property-visibility        1
  name                       "Toggle Mesh: "
  property-id                "p_handbrakeMeshToggle"
  description                "Toggles the handbrake mesh"
  kind                       "mesh-attachment"
  mesh-attachment-type       "mesh-toggle"
  meshes                     "handbrake-lever"
  values                     "1,0"
  default-index              0
  trigger                    "user"
  display-type               "link"
  display-values             "Enabled,Hidden"
 }
}
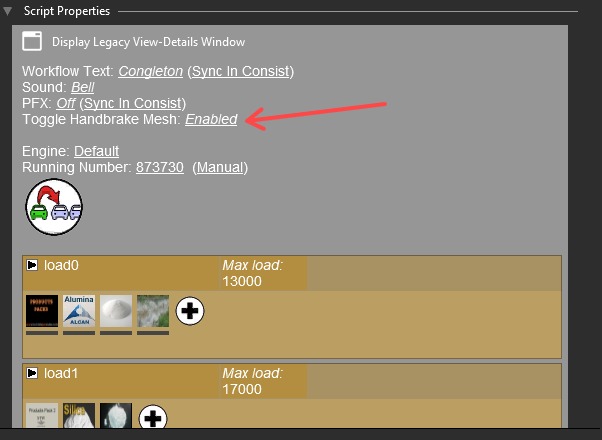
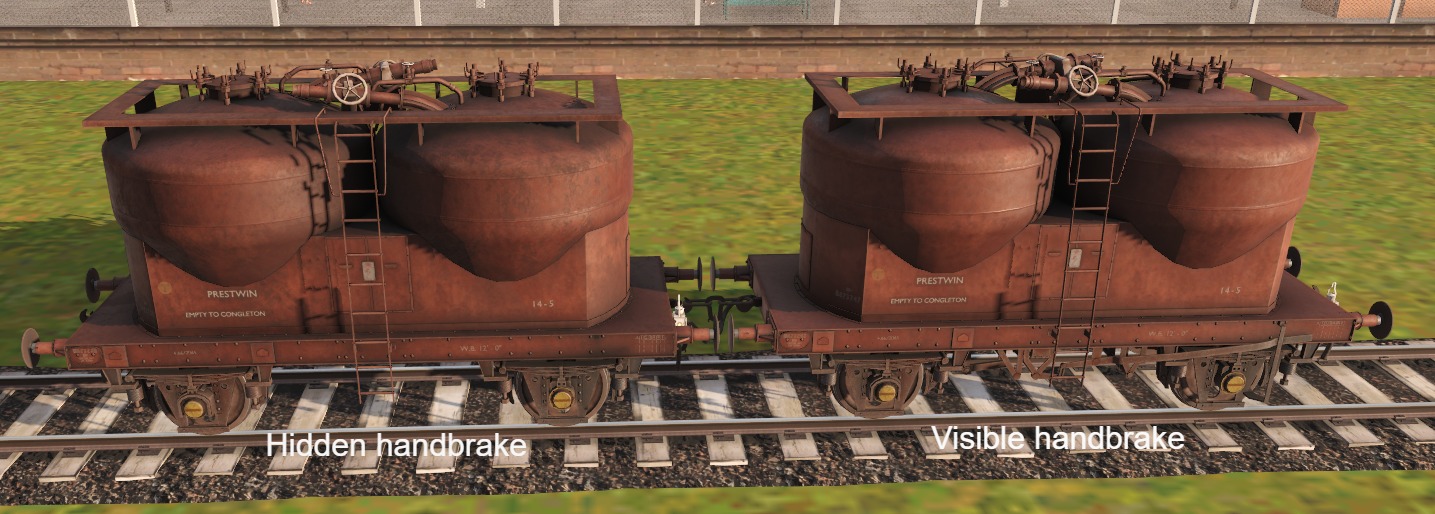
And that's it! Run the asset into trainz, and when you view the properties, you should see your property appear: And when you click on the underlined part of your property, the property should change to “Hidden”, as we specified, and the handbrake on the underframe should disappear. |
Browser-Property Examples
User-Triggered Properties
Here are a number of examples for user triggering - i.e. in the View Details property browser. Detailed information on the property browser tags can be found on the WagonX Reference page.
Mesh-toggle propertyThis property allows you to show or hide a mesh that is in the config mesh-table. The values are 0 and 1 to represent false and true. The default is 0 or hidden when first placed. {
enabled 1
property-visibility 1
name "Toggle: "
property-id "p_toggle"
description "Hide or display the roof mesh"
kind "mesh-attachment"
mesh-attachment-type "mesh-toggle"
meshes "roof"
values "0,1"
duration 3
default-index 0
trigger "user"
display-type "link"
display-values "Hidden,Visible"
}
|
texture-replacement propertyThis allows the choice of a texture from either local texture files (i.e. contained within the asset), or from a texture group asset, to retexture or reskin a mesh. You could use it for swapping between clean, dirty or weathered textures, logos and also entire liveries. |
Texture replacement using local texture filesFor fx-replacement-type texture-replacement-texture, the comma and/or semicolon-separated values are the names of the files (ideally without the path or extension) to be referenced at that index. The values tag will contain a list of texture(.txt) files including a folder name if used. This is an example of three textures. values "images/congleton.texture,images/burntisland.texture,images/buxton.texture,images/none.texture" If you have the same path (and same extension) for all your files, you can greatly reduce the clutter by just specifying the path and extension once using the files-path tag. See the files-path and values usage below. Note that the display-values tag contains similar information but that is for the user to see. 0
{
enabled 1
property-visibility 1
name "Workflow Text: "
property-id "p_workflow"
description "Sets the Workflow"
kind "fx-replacement"
fx-replacement-type "texture-replacement-texture"
consist-property-sync 1
meshes "null"
effects "texture-extra"
asset "null"
files-path "images/,.texture"
values "congleton,burntisland,buxton,none"
default-index 0
trigger "user"
display-type "list"
display-values "Congleton,Burntisland,Buxton,None"
}
|
Texture replacement using a texture-group library assetYou will need to specify the texture group asset in the kuid-table and give it a name such as "texturelib" or "gwrtexturelib", The name should not have any spaces or other special characters.
This property container is set up to allow for three different variations of the the material used for the asset. They are named in the "display-values" tag as Skin 1, Skin 2, and Skin 3.
Since it is a PBR material there are three textures used in the materail: the albedo, parameters, and normal. The normal texture is common to all three versions so it need not be changed.
The "values" tag contains six numbers which are the numbers of the textures in the texture-group asset. For Skin 1 the "12" refers to the albedo texture, and the "15" refers to the parameter texture. "13" and "16" are the pair for Skin2, and "14" and "17" are the pair for Skin 3.
The "effects" tag contains the texture effect names for meshes in the mesh-table.
{
  enabled             1
  property-visibility 1
  name                "Weathering: "
  property-id         "p_skin"
  description         "Sets the weathering type"
  kind                "fx-replacement"
  fx-replacement-type "texture-replacement"
  meshes              "null"
  effects             "texture-albedo,texture-parameter"
  asset               "texturelib"
  files-path          "null"
  values              "12;15,13;16,14;17"
  default-index       -1
  trigger             "user"
  display-type        "link"
  display-values      "Skin 1,Skin 2,Skin 3"
}
|
User-Triggered Properties with Child Properties
In some situations it isn't possible to make changes with just one property. WagonX can achieve multiple related changes using a child property. A parent can have one or more children but a child cannot have another child property. The parent child relationship works by the parent passing the choice made by either the user or an event to the child. So, if a user has chosen option 2 in the parent then the value 2 is passed to the child.
Here are a number of examples:
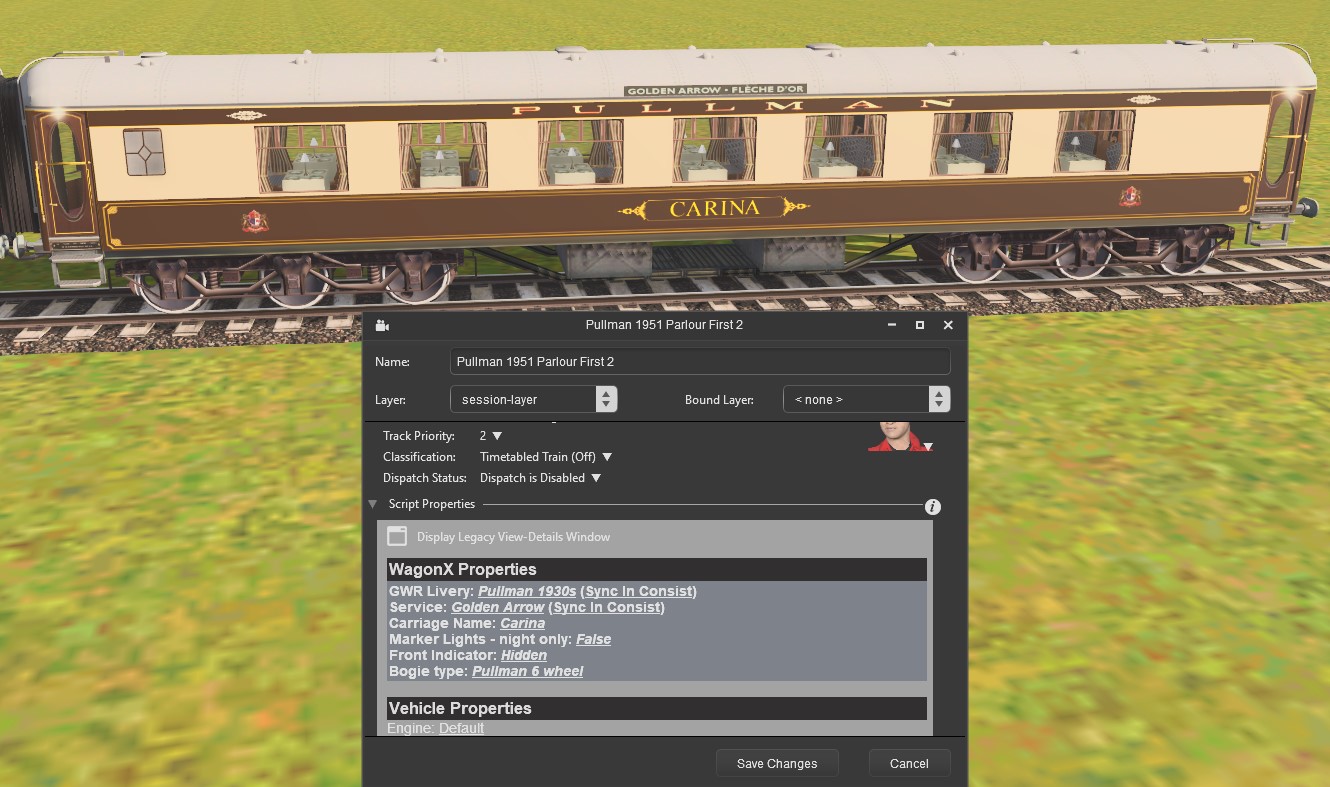
Mesh-toggle property with child propertyIn this instance a car has the option of three different bogies: two "4 wheel" bogies and a "6 wheel bogie". For this to work all the relevant bogie meshes must be contained in the one bogie asset. This is the parent property: 7 {
enabled 1
property-visibility 1
name "Bogie type: "
description "Swap between Gresley, Wolverton and Pullman bogies"
property-id "p_bogey0"
child-properties "8"
kind "mesh-attachment"
mesh-attachment-type "mesh-toggle"
target-asset "bogey-1"
meshes "frame-0,axle0-0,axle0-1,axle0-1,frame-1,axle1-0,axle1-1,axle1-1,frame-2,axle2-0,axle2-1,axle2-2"
values "1;1;1;1;0;0;0;0;0;0;0;0, 0;0;0;0;1;1;1;1;0;0;0;0, 0;0;0;0;0;0;0;0;1;1;1;1"
default-index 0
duration 0
trigger "user"
display-type "link"
display-values "Gresley 4 wheel,Wolverton 4 wheel,Pullman 6 wheel"
}
The three choices are in the "display-values" tag. This is the child property. It is virtually the same as the parent except for the target-asset, that identifies the second bogie, the trigger that uses the "parent" option, and the removal of several tags that are not needed for a child property. 8 {
enabled 1
property-visibility 0
property-id "p_bogey1"
kind "mesh-attachment"
mesh-attachment-type "mesh-toggle"
target-asset "bogey-0"
meshes "frame-0,axle0-0,axle0-1,axle0-1,frame-1,axle1-0,axle1-1,axle1-1,frame-2,axle2-0,axle2-1,axle2-2"
values "1;1;1;1;0;0;0;0;0;0;0;0, 0;0;0;0;1;1;1;1;0;0;0;0, 0;0;0;0;0;0;0;0;1;1;1;1"
default-index 0
duration 0
trigger "parent"
}
|
Event-Triggered Properties
loading-doorsPropertyThe ‘meshes’ tag references a mesh-table asset named ‘loading-doors’, and sets the frame to 30 when begin-load is called (to open the doors), and 0 when end-load is called (to close the door). The default index is 0 (the animation frame will be at 0), and the animation duration is 1.5 seconds. {
enabled 0
property-visibility 0
property-id "p_doors"
kind "mesh-attachment"
mesh-attachment-type "mesh-animation-frame"
meshes "loading-doors"
values "0,30"
trigger "event"
events "end-load,begin-load"
duration 1.5
default-index 0
}
An alternate way to do it is use mesh-attachment-type "mesh-animation-state", and set a bool int (0 or 1) for the values tag. {
enabled 0
property-visibility 0
property-id "p_doors"
kind "mesh-attachment"
mesh-attachment-type "mesh-animation-state"
meshes "loading-doors"
values "0,1"
trigger "event"
events "end-load,begin-load"
default-index 0
}
If you want two doors to open at the same time, instead of creating another property, you can use a semicolon split in the values tag to change two in a single property: {
enabled 1
property-visibility 0
name "Handbrake State: "
property-id "p_handbrake"
description "Toggle the handbrake"
kind "mesh-attachment"
mesh-attachment-type "mesh-animation-frame"
meshes "door-1,door-2"
values "0;0,30;30"
events "handbrake-release,handbrake-apply"
duration 3.0
default-index 0
trigger "both"
display-type "link"
display-values "release,apply"
}
|
Weather-Based Texture ReplacementThe texture effect will change based on the weather. It will display a snowy texture when the weather type is 6 (medium snow), a wet, rainy texture when the weather type is 3 (rain), and a dry texture when the weather type is 0. {
enabled 1
property-visibility 0
property-id "p_weather_skin"
kind "fx-replacement"
fx-replacement-type "texture-replacement-texture"
effects "texture-weather"
files-path "images/,.texture"
values "texture-snow,texture-rain,texture-dry"
default-index 0
trigger "event"
events "weather-6,weather-3,weather-0"
}
|
Day and Night Light ControlWagonX Version 1.2 or greater only. {
enabled 1
property-visibility 0
property-id "p_exterior_lights"
kind "fx-replacement"
fx-replacement-type "corona"
duration 0
effects "leftlight-0,leftlight-1,leftlight-2,leftlight-3,rightlight-0,rightlight-1,rightlight-2,rightlight-3"
values "nl;nl;nl;nl;nl;nl;nl;nl,exla;exla;exla;exla;exla;exla;exla;exla"
trigger "multiple"
conditions "tra_frontmost-locomotive|==|0,tra_frontmost-locomotive|==|1"
events "world-day,world-night
}
...
kuid-table {
...
exla <kuid:104722:100> // a white corona
nl <kuid:217537:100812> // an invisible mesh
}
|
Day and Night Interior ControlWagonX Version 1.2 or greater only. {
enabled 1
property-visibility 0
property-id "p_interior_lighting"
kind "mesh-attachment"
mesh-attachment-type "mesh-toggle"
meshes "day-interior,night-interior"
values "1;0,0;1"
default-index 0
duration 0
trigger "multiple"
conditions "tra_frontmost-locomotive|==|0,tra_frontmost-locomotive|==|1"
events "world-day,world-night"
}
|
Using semicolons to set multiple values in one propertyWhen assigning values for a certain property, you will specify the mesh/effect/sound, etc that needs to be edited, and specify how you want to manipulate it (fx-replacement-type, mesh-attachment-type, etc), and set the value for a certain index. For example, In a texture replacement where a texture is being replaced by an external texture-group asset, the property would look something like this. 0
{
enabled 1
property-visibility 1
name "Skin: "
property-id "p_skin_parameter"
description "Sets The Texture"
kind "fx-replacement"
fx-replacement-type "texture-replacement"
effects "texture-albedo"
asset "texturelib"
values "1,2,3,4"
default-index -1
trigger "user"
display-type "link"
display-values "Skin1,Skin2,Skin3,Skin"
}
As you can see, the comma-separated numbers in the “values” tag indicate the index in the texture-group asset to find the texture; here are the first few lines for that. Texture indexes 0, 1, 2, and 3 are referenced for the albedo texture types, since we have 4 weathering types. kuid <kuid2:661805:500009:0>
username "BR GrainHop Texture Group"
kind "texture-group"
trainz-build 5.0
category-class "JO"
author "dundun92"
contact-email "jbvector93@outlook.com"
description "A texture group for my GrainHop wagons"
textures
{
0 "270cgo/0albedo.texture"
1 "270cgo/1albedo.texture"
2 "270cgo/2albedo.texture"
3 "270cgo/2albedo.texture"
4 "270cgo/0parameter.texture"
5 "270cgo/1parameter.texture"
6 "270cgo/2parameter.texture"
.........
}
We specified the texture-group library in the kuid table, and referenced it in the “asset” tag. kuid-table
{
acslib <kuid2:60850:89100>
meshlib <kuid2:661805:500002>
texturelib <kuid2:661805:500009>
lamp <kuid2:661805:500003>
enginespec <kuid2:368699:50064>
bogie <kuid2:661805:400003>
}
And then we specified the effect we wanted to change, (currently just the texture-albedo), inside the “effects” tag (this is not the effects tag below in this mesh table asset, but rather the one in the browser-properties at the top of this section!). body
{
mesh "mesh/body.lm"
auto-create 1
att-parent "default"
effects
{
texture-albedo
{
kind "texture-replacement"
texture "covhopp-1_albedo.texture"
}
texture-normal
{
kind "texture-replacement"
texture "covhopp-1_normal.texture"
}
texture-parameter
{
kind "texture-replacement"
texture "covhopp-1_parameter.texture"
}
}
}
But say you want to replace the normal map as well. You would probably just create another browser property and specify the proper index for the normals. 0
{
enabled 1
property-visibility 1
name "Skin: "
property-id "p_skin_parameter"
description "Sets The Paramenter Texture"
kind "fx-replacement"
fx-replacement-type "texture-replacement"
effects "texture-albedo"
asset "texturelib"
values "1,2,3,4"
default-index -1
trigger "user"
display-type "link"
display-values "Skin1,Skin2,Skin3,Skin4"
}
1
{
enabled 1
property-visibility 1
name "Skin: "
property-id "p_skin_normal"
description "Sets The Normal Texture"
kind "fx-replacement"
fx-replacement-type "texture-replacement"
effects "texture-normal"
asset "texturelib"
values "7,8,9,10"
default-index -1
trigger "user"
display-type "link"
display-values "Skin1,Skin2,Skin3,Skin4"
}
But we can't forget the parameter map… that will require a third property. What's worse, we will now have three different properties in the view details page that will each have to be clicked on to change each map! Assigning properties this way can get tedious and create extra clutter in the config. Thankfully, for properties that share the same kind and type, it can all be done in a single property using semicolons: 0
{
enabled 1
property-visibility 1
name "Skin: "
property-id "p_skin"
description "Sets the weathering type"
kind "fx-replacement"
fx-replacement-type "texture-replacement"
meshes "null"
effects "texture-albedo,texture-parameter,texture-normal"
asset "texturelib"
files-path "null"
values "0;4;8,1;5;9,2;6;10,3;7;11"
default-index -1
trigger "user"
display-type "link"
display-values "Clean,Weathered,Dirty,Rusty"
}
Take note of the three tag entries above: the effects, values and display-values tags. The display-values tag is what the user sees and can choose from. Our interest is in the remaining two tags as shown below: effects "texture-albedo,texture-parameter,texture-normal" values "0;4;8,1;5;9,2;6;9,3;7;11" There are four user options and, since each option requires three textures, the total number of textures is 12. The values tag contains a string of four groups of texture numbers separated by a comma. Within each texture group the texture numbers are delimited by a semi colon. To clarify, we can list the three textures associated with each user choice: 0;4;8 -> Clean 1;5;9 -> Weathered 2;6;10 -> Dirty 3;7;11 -> Rusty The first column of 0,1,2,3 identify the albedo textures. The second column of 4,5,6,7 identify the parameters textures, The third column of 8,9,10,11 identify the normal textures. Note that the numbers do not need to be in sequence or even consecutive. All those numbers do is to identify the correct texture in the texture-group asset.
 1
 {
  enabled                    1
  property-visibility        0
  name                       "Handbrake State: "
  property-id                "p_handbrake"
  description                "Toggle the handbrake"
  kind                       "mesh-attachment"
  mesh-attachment-type       "mesh-animation-frame"
  meshes                     "handbrake-lever,braking-system"
  values                     "0;0,30;30"
  events                     "handbrake-release,handbrake-apply"
  duration                   3.2
  default-index              0
  trigger                    "both"
  display-type               "link"
  display-values             "release,apply"
}
|
Naming ACS mesh-table attachmentsPlease refer to this page on the ACS coupling system for setting up the “active-coupling-standard-60850” extensions container (which will be required for the ACS coupling to work): ACS Coupling System These are the mesh-table naming conventions you must use for the beginning of the name of each ACS attachment mesh. The others will vary depending on the “animated” property above. You must spell them exactly as shown below.
If the “animated” tag in the acs container (see acs) is set to 1, then the naming is quite simple. It's one of the 7 callbacks above + a dash + “front” or “back”. The anim tag must be present to specify the animation for it. Frame 0 is the uncoupled state, and the last frame is the coupled state. This setup is shown below: coupler-front
{
mesh-asset <kuid2:661805:500002>
mesh "coupler-screwlink-animated.lm"
anim "coupler-screwlink-animated_scene.kin"
auto-create 1
att "a.couple0"
att-parent "default"
}
coupler-back
{
mesh-asset <kuid2:661805:500002>
mesh "coupler-screwlink-animated.lm"
anim "coupler-screwlink-animated_scene.kin"
auto-create 1
att "a.couple1"
att-parent "default"
}
vacbrake-front
{
mesh-asset <kuid2:661805:500002>
mesh "vacbrake-single-animated.lm"
anim "vacbrake-single-animated_scene.kin"
auto-create 1
att "a.couple0"
att-parent "default"
}
vacbrake-back
{
mesh-asset <kuid2:661805:500002>
mesh "vacbrake-single-animated.lm"
anim "vacbrake-single-animated_scene.kin"
auto-create 1
att "a.couple1"
att-parent "default"
}
If, however, you do not want to use animations, but want to use separate meshes for each state (coupled and uncoupled), it gets a bit more complicated. The naming will follow the same as above at first, but you must add a third piece to it to specify the exact type of ACS attachment this is. The information on what to put there is originally from the ACS page, but the 7 callbacks have been added plus the sub-callback here to make it easier (the third callback options are the ones with a delta symbol Δ ). And for the uncoupled state, the third callback is “non” (e.g. coupler-front-screwlink, and coupler-front-none).
And an example how it would look inside a config.txt. The back attachments have been omitted for brevity. coupler-front-screwlink
{
mesh-asset <kuid2:661805:500002>
mesh "coupler-screwlink-coupled.lm"
auto-create 1
att "a.couple0"
att-parent "default"
}
coupler-front-none
{
mesh-asset <kuid2:661805:500002>
mesh "coupler-screwlink-retracted.lm"
auto-create 1
att "a.couple0"
att-parent "default"
}
vacbrake-front-single
{
mesh-asset <kuid2:661805:500002>
mesh "vacbrake-single-coupled.lm"
auto-create 1
att "a.couple0"
att-parent "default"
}
vacbrake-front-none
{
mesh-asset <kuid2:661805:500002>
mesh "vacbrake-single-retracted.lm"
auto-create 1
att "a.couple0"
att-parent "default"
}
|


