Normal map
The normal map uses three channels of texture data to allow per-pixel lighting control. An overview of the normal mapping technique can be found on Wikipedia here.
A normal map is stored in an image file, but it is not an image: rather than defining the red, green and blue colors of an image, the normal map RGB values determine the X, Y, and Z values for the texel's normal in tangent space.
This information is not considered directly human-editable, and you should not attempt to manipulate these channels directly. Specifically, do not adjust the dimensions or contrast of an existing normal map. If you need to adjust the size of a normal map, you will need to rebuild the normal map using the original tools. If you need to adjust the bump height in a normal map, you will need to adjust the source geometry and rebuild the normal map using the original tools. Editing the normal map in photoshop or similar will cause undefined behavior in-game. Additionally, any form of lossy compression (such as .JPG format) will destroy a significant amount of the information contained in a normal map. Do not use lossy formats for storing normal maps even as an intermediate step.
The normal data is most commonly encoded in the RGB channels of a texture file. The specific material type in use should be consulted to determine the use of the alpha channel in the same texture- it may be unused or may be used for an unrelated purpose.
Contents |
How a Normal Map works
Normal maps work by modifying the normal used when rendering a fragment. By default, the normal will stick straight up from the geometric surface. A normal map will rotate that normal on either the (tangent space) X or Y axes.
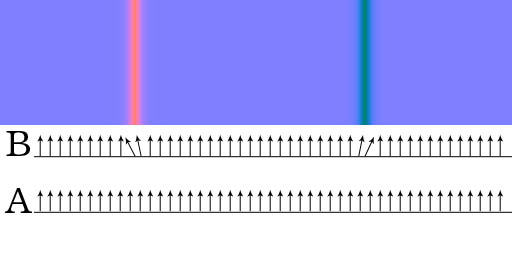
In the following example we look strictly at the red channel; which controls the X axis of the normal. The arrows represent the normals. In example A there would be no normal map applied so all the normals would point straight away from the surface. In example B a normal map would be applied, modifying the normals in the appropriate areas.
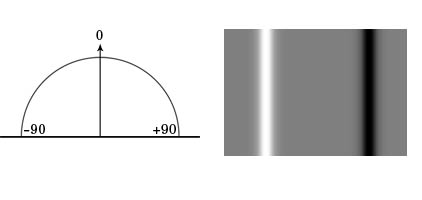
There are a couple of important things to note about this example. Let’s take a look at the red channel of the above example. On a given axis a normal can be rotated 90 degrees in any direction. The R values for the pixels in the normal map represent the amount of rotation that will be applied along the X-axis. In our example a value of 0 would rotate the normal to -90 degrees, a value of 128 for the R value would rotate the normal 0 degrees, and a value of 255 would rotate the normal to +90 degrees. The green channel works in the same way for the Y-axis. The use of both the R and G channel values means that the normal can be rotated to any direction.
Examples
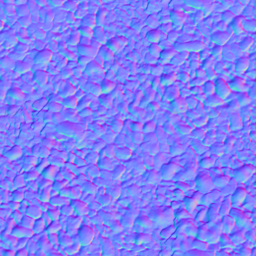
A typical normal map will look similar to the following image.
Note that this image is for illustration purposes only - jpg format is not appropriate for normal maps.
Displaying Normal maps in 3D Studio Max
Displaying normal maps in 3D Studio Max
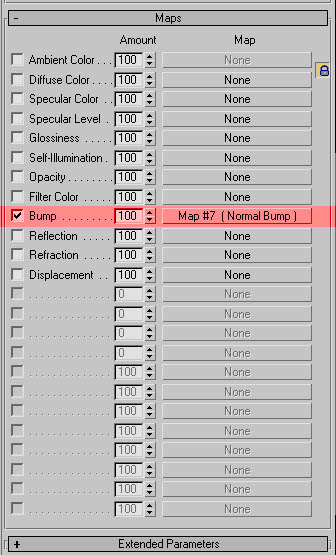
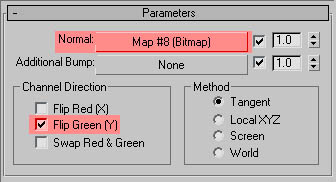
The appropriate way to display a normal map in 3D Studio Max is to use a “Normal Bump” map in the bump slot of the material. If you load a map directly into this slot it will display/render, but is viewing the map as a bump map and will not display correctly.
To display Trainz normal maps from within max we need to flip the Green channel to display the map correctly. This can be done within the material editor without having to actually modify the map.
In the properties for the Normal Bump under Channel Direction you need to check “Flip Green(Y)”. Lastly, load your normal map into the “Normal:” Slot.
There’s one last step to displaying your normal maps within Max. There is a different way of previewing the normal map depending on which version of max you are using.
3D Studio Max 9 and below:
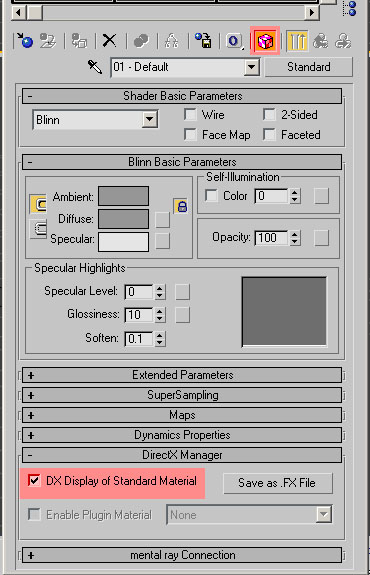
In the material editor for the material you want to display under the DirectX Manager rollout make sure to check “DX Display of Standard Material” In the upper right hand of the material editor there is a blue checkered box which will turn pink, indicating that you are using DX display of the material. Click that button to show the maps in the viewport.
3D Studio Max 2008 and Above:
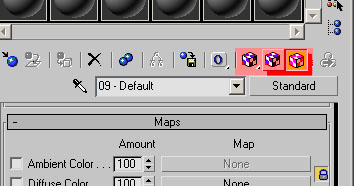
Click and hold on the blue and white checked box in the material editor. A popup will open with two options, a blue and white checked box and a pink and white checked box. Select the pink and white checked box to display the material as a DirectX shader in the viewport.
Getting Started with Normal Mapping
Refer to this page for notes on setting up an asset to illustrate these techniques.
Baking Normal Maps Using Max
Baking Normal Maps in 3D Studio Max
Note that normal maps produced by Max typically have a reversed green (Y) channel. At the current time, this must be fixed after export by manually opening the resultant normal map in photoshop, selecting only the Green channel, and using the Invert (ctrl-I) tool. Failure to correct the green channel results in incorrect lighting effects within the game environment, destroying the effectiveness of the normal map.
Note: The ModifyMap token, with a setting of flipgreen, can be used in the texture file to flip the green (Y) channel for a normal map.
Creating a Normal Map for a Ground Texture
A normal map used for a 3D model is created in a 3D editing program such as Blender or 3D Studio Max using the 3D information in the mesh. This is known as Baking. Most ground textures do not use a 3D mesh, so if you want to use a normal map with ground texture that has no mesh you need to create it for yourself. This can be done using software that interprets the 3D information in a texture image using colors or brightness, or it can be done using a drawing program where you actually edit the images that make up the normal map.
NVidia provides a plugin for Photoshop the can create a normal map from an image: NVidia Texture Tools for Adobe Photoshop
GIMP has a similar plugin available: normalmap
Paint.Net has several plugins. There is one that creates the map from an image: Paint.Net Normal Map Renderer plugin
and another that allows you to edit the bump map, the specularity, the reflectivity and the reversal as separate images: Paint.Net The Normal Tools plugin
Other graphics editing programs may have similar features, either built-in or available as a plugin.
