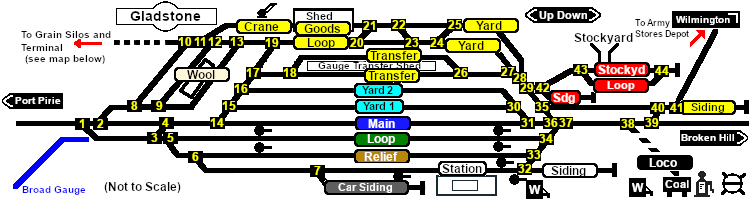
|
| Switches |
| No. |
Name |
Facing and L/R Directions
(default direction first) |
No. |
Name |
Facing and L/R Directions
(default direction first) |
|
 |
GS 1 |
Down (L) Main, (R) Loop |
 |
GS 2 |
Down (R) Main, (L) Goods Sidings |
 |
GS 3 |
Down (R) Loop, (L) Main |
 |
GS 4 |
Up (R) Main, (L) Loop |
 |
GS 5 |
Down (L) Loop, (R) Relief/Station |
 |
GS 6 |
Down (L) Relief, (R) Station |
 |
GS 7 |
Down (L) Station, (R) Car Siding |
 |
GS 8 |
Down (L) Goods Shed/Goods Loop, (R) Wool Transfer |
 |
GS 9 |
Down (L) Wool Transfer NG/Goods Loop, (R) Wool Transfer NG/BG/Goods Loop |
 |
GS 10 |
Up (L) Port Pirie, (R) Grain Yards |
 |
GS 11 |
Down (R) Goods Shed, (L) Goods Loop |
 |
GS 12 |
Up (R) Port Pirie/Grain Yards, (L) Wool Transfer NG |
 |
GS 13 |
Down (R) Wool Transfer NG/Port Pirie/Grain Yards, (L) Wool Transfer NG/BG |
 |
GS 14 |
Up (R) Main, (L) Goods Yards |
 |
GS 15 |
Down (L) Goods Yards, (R) Yard 1 |
 |
GS 16 |
Down (L) Goods Yards, (R) Yard 2 |
 |
GS 17 |
Down (L) Goods Loop, (R) Goods Transfer |
 |
GS 18 |
Up (R) Goods Transfer NG/BG, (L) Goods Transfer NG |
 |
GS 19 |
Up (L) Port Pirie, (R) Wool Transfer/Grain Yards |
 |
GS 20 |
Down (R) Goods Loop Yard, (L) Goods Shed Yard |
 |
GS 21 |
Up (R) Goods Shed, (L) Goods Loop |
 |
GS 22 |
Down (L) Goods Shed Yard, (R) Goods Loop Yard |
 |
GS 23 |
Up (L) Goods Loop, (R) Goods Shed |
 |
GS 24 |
Down (R) Goods Loop Yard, (L) Goods Shed Yard |
 |
GS 25 |
Up (R) Goods Shed, (L) Goods Loop |
 |
GS 26 |
Up (L) Goods Transfer NG/BG, (R) Goods Transfer NG |
 |
GS 27 |
Up (R) Goods Shed/Loop, (L) Goods Transfer |
 |
GS 28 |
Up (R) Broken Hill/Wilmington, (L) Stockyard |
 |
GS 29 |
Up (R) Goods Shed, (L) Goods Loop/Transfers |
 |
GS 30 |
Up (L) Yard 1, (R) Yard 2 |
 |
GS 31 |
Up (L) Main, (R) Yards 1/2 |
 |
GS 32 |
Down (R) Car Siding, (L) Main |
 |
GS 33 |
Up (R) Relief, (L) Station |
 |
GS 34 |
Up (L) Relief/Station, (R) Loop |
 |
GS 35 |
Down (L) Wilmington, (R) Broken Hill |
 |
GS 36 |
Up (L) Main, (R) Goods Loop/Sheds |
 |
GS 37 |
Up (R) Main, (L) Loop/Relief/Station |
 |
GS 38 |
Down (L) Broken Hill/Wilmington, (R) Loco Depot |
 |
GS 39 |
Down (R) Broken Hill, (L) Wilmington |
 |
GS 40 |
Up (R) Goods Yard, (L) Main & Yards |
 |
GS 41 |
Down (R) Siding, (L) Wilmington |
 |
GS 42 |
Down (L) Stockyard, (R) Stockyard Siding |
 |
GS 43 |
Down (L) Stockyard, (R) Stockyard Loop |
 |
GS 44 |
Up (R) Stockyard, (L) Stockyard Loop |
 |
GS 45 |
Up (R) Silos, (L) Silos Siding |
 |
GS 46 |
Up (L) Silos Loop, (R) Silos |
 |
GS 47 |
Dn (R) Silos Loop, (L) Silos |
 |
GS 48 |
Up (L) Port Pirie, (R) Terminal/Terminal Loop |
 |
GS 49 |
Dn (L) Silos/Silos Loop, (R) Main Gladstone |
 |
GS 50 |
Up (L) Terminal Loop, (R) Terminal |
 |
GS 51 |
Up (R) Terminal Siding 2/Port Pirie, (L) Terminal Siding 1 |
|
GS 52 |
Dn (R) Terminal Loop, (R) Terminal |
 |
GS 53 |
Up (L) Terminal Siding 2/Port Pirie, (R) Terminal Siding 1 |
 |
GS 54 |
Dn (L) Terminal, (R) Terminal Loop |
 |
GS 55 |
Up (R) Terminal Siding 2, (L) Port Pirie |
 |
GS 56 |
Dn (R) Gladstone, (R) Terminal/Terminal Loop |
|
| Switch Sets |
| Station - Broken Hill |
32 -L 33 -L 34 -L 37 -L 38 -L 39 -R |
Station - Wilmington |
32 -L 33 -L 34 -L 37 -L 38 -L 39 -L 40 -L 41 -L |
| Relief - Broken Hill |
33 -R 34 -L 37 -L 38 -L 39 -R |
Relief - Wilmington |
33 -R 34 -L 37 -L 38 -L 39 -L 40 -L 41 -L |
| Loop - Broken Hill |
34 -R 37 -L 38 -L 39 -R |
Loop - Wilmington |
34 -R 37 -L 38 -L 39 -L 40 -L 41 -L |
| Main - Broken Hill |
31 -L 36 -L 37 -R 38 -L 39 -R |
Main - Wilmington |
31 -L 36 -L 37 -R 38 -L 39 -L 40 -L 41 -L |
| Yard 1 - Broken Hill |
30 -L 31 -R 36 -L 37 -R 38 -L 39 -R |
Yard 1 - Wilmington |
30 -L 31 -R 36 -L 37 -R 38 -L 39 -L 40 -L 41 -L |
| Yard 2 - Broken Hill |
30 -R 31 -R 36 -L 37 -R 38 -L 39 -R |
Yard 2 - Wilmington |
30 -R 31 -R 36 -L 37 -R 38 -L 39 -L 40 -L 41 -L |
| Transfer - Broken Hill |
26 -L 27 -L 29 -L 35 -R 36 -R 37 -R 38 -L 39 -R |
Transfer - Wilmington |
26 -L 27 -L 29 -L 35 -L 40 -R 41 -L |
| Goods Loop - Broken Hill |
20 -R 23 -L 24 -R 27 -R 29 -L 35 -R 36 -R 37 -R 38 -L 39 -R |
Goods - Wilmington |
21 -R 22 -R 25 -R 28 -R 29 -R 35 -L 40 -R 41 -L |
| Goods Loop - Broken Hill |
20 -R 23 -L 24 -R 27 -R 29 -L 35 -R 36 -R 37 -R 38 -L 39 -R |
Goods Loop - Wilmington |
20 -R 23 -L 24 -R 27 -R 29 -L 35 -L 40 -R 41 -L |
| Goods Loop - Grain |
21 -R 19 -R 13 -R 12 -R 11 -R 10 -R 43 -R 44 -L |
Goods Loop - Stockyard |
23 -R 24 -L 25 -L 28 -L 42 -L 43 -L 44 -R |
|