|
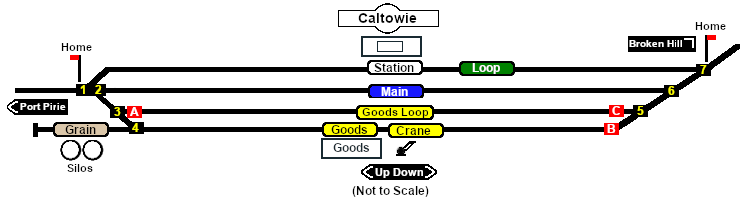
Main Line with Station, Passing and Goods Loops. Manned station on the Gladstone to Peterborough section of the Port Pirie to Broken Hill line.

| 
 |
 |

 |
|
Commodities: (load and/or unload)
   |
|
 |
| Switches |
| No. |
Name |
Facing and L/R Directions
(default direction first) |
No. |
Name |
Facing and L/R Directions
(default direction first) |
|
 |
CT 1 |
Down (R) Main, (L) Station |
 |
CT 2 |
Down (L) Main, (R) Loop/Goods Shed |
 |
CT 3 |
Down (R) Goods Shed, (L) Loop |
 |
CT 3S |
Up (L) Grain, (R) Port Pirie |
 |
CTCP 1 |
Up (L) Catchpoint , (R) Port Pirie |
 |
CTCP 3 |
Down (R) Catchpoint , (L) Broken Hill |
 |
CTCP 2 |
Down (R) Catchpoint , (L) Broken Hill |
 |
CT 4 |
Up (L) Goods Shed, (R) Loop |
 |
CT 5 |
Up (R) Main, (L) Loop & Goods Shed |
 |
CT 6 |
Up (L) Main, (R) Station |
|
|
 |