HowTo/Export Blender FBX Animation
This page describes a process for exporting animated meshes from Blender to the FBX file format. Currently, it only describes Blender 2.79 and Blender 2.80 will be added later.
You should be familiar with Blender FBX export as described here HowTo/Export from Blender using FBX
This tutorial is for Trainz Build 4.6.
Contents |
Overview
Trainz will not animate a mesh without the use of helper points using the "b.r" notation. For Blender, those helper points can be armatures or empties, or both. Lattices are not supported by the FBX exporter. An animation must have a root helper normally called "b.r.main" although "b.r.root" will also work. Using such names helps identify the overall parent of the animation. Other animation helpers are called "b.r.xxx", where "xxx" can be any name. These helpers must be children of the main/root helper.
Exporting in Blender 2.79b
Set up the source files. They can be found here File:Mycube animated.zip
- Load the provided Blender sources files into a Trainz asset project folder (directory). The source files include a Blender model file (mycube_animated_279.blend), three images (textures) for the material, the texture description files, and an incomplete config.txt.
- Using a plain ASCII text editor, edit the config.txt and add your own asset kuid.
Loading the Blender Source Model
- Start Blender 2.79.
- Open the provided Blender source file. The model has one mesh: mycube_lod0 in layer 0 and an empty called “b.r.main” as an animation helper.
- The model is set up for Blender Render mode.
- The mesh is UV mapped and has a material called mycube.m.pbrmetal. There is no need to change the material or textures.
Animation
We will now animate the cube to rotate in the Z axis.
- Set the 3D View Window display to wireframe. This isn’t necessary but makes things easier to see.
- In the Timeline Window at the bottom of the screen, change the start frame to 1 and the end frame to 60. This makes the animation sequence run for 60 frames and, given the standard Trainz frame rate is 30 frames per second, the animation will run for 2 seconds.
- Select the empty b.r.main.
- Ensure the current frame is 1 and press the I key to bring up the Keyframe Menu. Select Rotation.
- If you look at the 3D Windows Properties Panel, the Transform->Rotation values should have a coloured background usually yellow. This signifies that a keyframe exists for the selected object at this frame position.
- In the TimeLine Window, change the current frame to the last frame which is 60. You can use the jump to last frame icon >>I or just manually set the value to 60.
- In the 3D Windows ->Properties panel Transform->Rotation panel, set the Z value to -360.
- Press the I key to bring up the Keyframe Menu and select rotation.
Let’s recap what we have done. We have set the animation playback range to operate between frame 1 and frame 60. This equates to a 2 second animation. We then added a start animation rotation keyframe to the object b.r.main while the object had a Z axis rotation of 0. We then added an end rotation keyframe to b.r.main with a Z axis rotation of -360. 360 degrees is the same as 0 degrees, but we can’t use 0 for the endframe as this will not cause any rotation. A value of -360 causes the rotation to be clockwise and 360 will make it anti-clockwise.
- Press the Play icon in the TimeLine Window. You will see the empty rotating.
- Press the Stop icon and the Go to Beginning icon so that the current frame is 1.
Now we will animate the cube mesh. We do this by making the mesh a child of the animation helper so there is a parent->child relationship.
- Select the mesh (mycube_lod0).
- Hold the shift key and select the empty (b.r.main).
- Press Ctrl P and then Set Parent To -> Object (Keep Transform).
If you press the Play icon in the TimeLine Window, the cube should rotate with the empty. The parent->child relationship means the mesh must follow the empty.
Exporting to FBX
The Main FBX Export Menu
- Select all objects in the 3D window (A key toggle)
- Select File->Export->Export FBX and the FBX export panel will show in the bottom left hand corner of the window.
- Select Empty and Mesh. The empty has the animation so it must be selected along with the mesh for animation to be included in the FBX file.
- Select the other options as shown in the following image. These options are described here HowTo/Export from Blender using FBX.
The Animation Menu
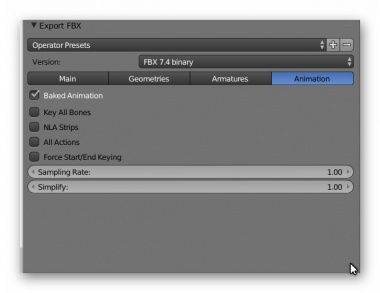
- Select the Animation option in the Export FBX panel.
- Select Baked Animation and disable the other options.
Authors note: This is completely different from the process described in the 3DS Max FBX animation export. If Baked Animation is not ticked, then none of the other animation options are available. So far, none of those other options have been found useful.
Export to FBX
The animated model is now ready for export.
- Change the export filename to be “mycube.fbx”.
- Click on the Export FBX button at the top right. The mesh and animation will be exported.
Setting up the Asset
The FBX file contains both the mesh and the b.r.main empty plus the animation data. When the FBX file is imported into Trainz, an animation file (KIN) is created in addition to the Trainzmesh file. The name of the kin file depends on the options chosen within the Export FBX->Animation panel. If you choose the Baked Animation option, then the kin filename will be the mesh name plus “_scene.kin”. In this instance, the kin filename will be “mycube_scene.kin”.
:Warning: Not choosing the Baked Animation option can result in several KIN files being created.  These files will be named for the animation channel names within Blender.
 This option is not recommended.
Config.txt
The names of mesh and KIN files may not be obvious so you may need to create some dummy names for your mesh and KIN files. After importing into Trainz, open the asset for editing and look for the files created. Then go back and correct entries in the config.txt. You can always rename the kin file to a simpler name. For this asset the mesh table will look like this:
mesh-table {
 lod_0 {
   mesh                                  "mycube.trainzmesh"
   auto-create                           1
   lod-level                             0
   anim                                  "mycube_scene.kin"
   animation-loop-speed                  1.00
 }
}
Correcting the Rotation (optional)
You may have noticed that the animation of this sample asset is not constant in either Blender or within Trainz. i.e. it rotates and then pauses before continuing. This is caused by the default extrapolation mode applied to the animation before the first and after the last keyframes. In some cases, such as loco drivers, this doesn’t matter because Trainz controls the animation. However, in animations such as the sample asset this may need correcting.
- Within Blender, change the view of one window to the Graph Editor.
- Select Channel at the bottom of the window, then Extrapolation Mode, then Linear Extrapolation as shown in the following image.
Animation warnings and errors
| Warning/Error | Help/Explanation |
|---|---|
| ! ... T14120: Simplified dummy tracks with just one key. | Not sure what this warning is about but the animation is OK. |
| ! ... Skipping one or more lines with the same contents | This is an ASSIMP message and can be ignored. |
Sample Animations
The following samples are provided to demonstrate different types of Blender FBX animations. You are free to use them for any purpose - i.e. no copyright!
Simple Animations
Simple Animation 1 - Uses an empty as animated parent
File:890045 fbx anim1 - empty.zip
This animation rotates a coloured cube around the X axis using an empty as parent b.r.main. The animation action, within Blender, is called b.r.mainAction. The channel has been set to linear interpolation.
When exporting, you must select Empty and Mesh.
Exported names: The Blender FBX exporter creates a file called box.fbx. On commit, Trainz creates a mesh file called box.trainzmesh and an animation file called box_scene.kin.
Simple Animation 2 - Uses an armature as animated parent
File:890044 fbx anim1 - armatures.zip
This animation rotates a coloured cube around the X axis using an armature with a single bone as parent b.r.main. The animation rotates anti-clockwise.
This is much the same as Sample 1 but demonstrates that you can use either an empty or an armature for simple animations.
When exporting, you must select Armature and Mesh.
Exported names: The Blender FBX exporter creates a file called box.fbx. On commit, Trainz creates a mesh file called box.trainzmesh and an animation file called box_scene.kin.
Simple Animation 3 - Four animated cogs - LOD model
File:4000110 - FBX - anim test 4 - four cogs.zip
This animation simulates four rotating cogs. There are two LOD levels. LOD0 (the high poly version) is in layer 1 and LOD1 (the low poly version) is in layer 2. Layer 11 contains the animated armatures. There are four animation tracks.
To export LOD0, select all the objects in layers 1 and 11 so the LOD0 meshes and the armatures are all selected. On export, ensure Empty, Armature and Mesh are selected and use the name "4cogs-lod0.fbx". b.r.main is an empty so Empty must be selected.
To export LOD1, select all the objects in layers 2 and 11 so the LOD1 meshes and the armatures are all selected. On export, ensure Empty, Armature and Mesh are selected and use the name "4cogs-lod1.fbx".
You can choose any names you want but a meaningful name is useful.
This is the relevant section of config.txt:
mesh-table {
 gears-lod0 {
   auto-create                           1
   mesh                                  "4cogs-lod0.trainzmesh"
   lod-level                             0
   anim                                  "4cogs-lod0_scene.kin"
   animation-loop-speed                  1.00
 }
 gears-lod1 {
   auto-create                           1
   mesh                                  "4cogs-lod1.trainzmesh"
   lod-level                             1
   anim                                  "4cogs-lod1_scene.kin"
   animation-loop-speed                  1.00
 }
} mesh-detail-level-count 2
Note that the transition from LOD0 to LOD1 is obvious.
More complex animations
A Sample Steam Piston Animation
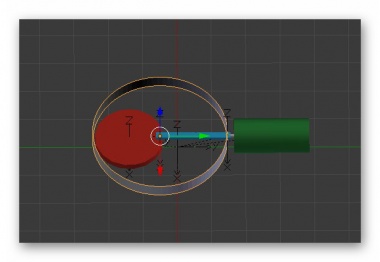
This example shows how to animate a steam piston and crankshaft using a circle to guide the location of the piston shaft. This is a variation of Torsten's sample for the XML exporter. General instructions for export are contained in the Blender file as a text object.
![400px]left](/mediaWiki/images/4/4a/B279_animation_timeline_panel.jpg)


