HowTo/Build a Car for Traffic (mesh library version)
Contents |
Build the Texture
One way to make a mesh library involves pasting existing textures from single assets together to make one big texture and then re-mapping the one texture on to multiple meshes.
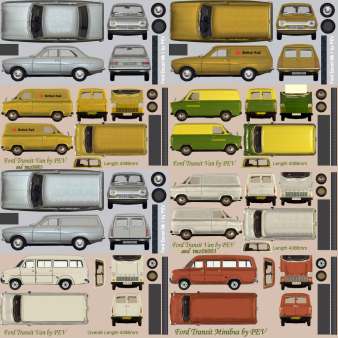
Take, for example, this texture for some Ford vehicles.
 misc_fords1.tga 1024x1024 pixels 24 bit colour. (no alpha channel)
As you can see there are eight (8) vehicles pictured on the one texture. Out of these we have managed to get 12 separate models into the game; some by variations in mesh (short or long wheelbase) and some by combining mapping from two colours of the one vehicle to get a two tone effect.
Re-mapping may seem to be tedious, but once one car type is done, the subsequent ones are easy. Just move the mapping to the next image on the texture.
It is also possible to get some dark colours by duplicating a light coloured model and setting the diffuse and ambient colour settings to a lower level.
Mesh Library
All the meshes and textures are put together in the one mesh library asset. So, in the example, we have 12 meshes referencing the one texture, all in the one asset. Separate textures and meshes for night lighting effects are included as well.
To get the game to display each car individually, separate assets are created for each one. These assets only contain a config.txt file and a thumbnail image. They call the mesh library to display the correct model, with any night light effects.
Our mesh library asset contains all the IM meshes, texture.txt's, and texture images as well as a thumbnail and, of course, its config.txt file.
Mesh Library Config.txt
The mesh library asset's config.txt should look like the following:-
kuid               <kuid:XXXXXX:ZZZZ>   ...........kuid set by CCP
username           "Ford Transits and Escorts"  ...name entered by me into CCP
kind               "mesh"       ...................must be kind mesh, set by me in CCP
trainz-build       3.3          ...................trainz build set by CCP
mesh-table            .............................must have a mesh table with any mesh in the asset as default
{
  default
  {
    mesh           "escort10.im"
    auto-create    1
  }
}
category-class     "HM"           .................sets catagory-class as mesh asset
category-era       "1970s;1980s"
category-region    "AU;UK"
description        "Ford Carz for Traffic etc."
author             "MyName"
license            "Blah blah"
contact-email      "me@braenet.com.au"
thumbnails
{
  0
  {
    image          "screenie.jpg"   ...............thumbnail image of one or more of the models
    width          240
    height         180
  }
}
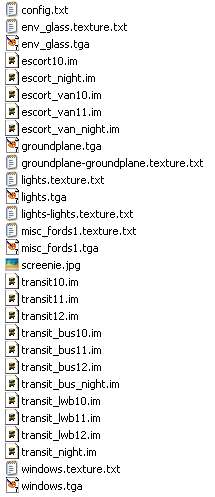
Mesh Library Asset File List
The list below shows all of the files that are included in this mesh library asset
The Car Assets
As already stated, we use separate assets to call each of the cars from the mesh library. This way we have an asset that can be placed into a route or region to act as traffic on the roads.
Each car asset is a simple "stub" with no active bits in it. All that's needed is the config.txt file and an identifying thumbnail image, plus optional sound file.
Car Asset Config.txt
Each car has its own config.txt which calls the appropriate meshes from the library.
Example config.txt:-
kuid                    <kuid:XXXXX:YYYY> ...........kuid set by CCP for a new asset
username                "Carz Ford Escort Van"    ...name entered by me into CCP
kind                    "scenery"    ................must be kind scenery, entered by me in CCP
trainz-build            3.3      ....................trainz build set by CCP
mesh-table   ........................................seeing as there is no mesh in the "stub" asset, the
                                                      mesh-table must be populated by editing in NotePad
{
  default
  {
    mesh-asset          <kuid:XXXXX:ZZZZ>    ........the kuid of the mesh library asset
    auto-create         1
    mesh                "escort_van.im"      ........the mesh in the library asset for this car
  }
  default-night      ................................add this container if you have a night lighting mesh
  {
    mesh                "escort_van_night.im"   .....night lights mesh
    night-mesh-base     "default"
    mesh-asset          <kuid:XXXXX:ZZZZ>    ........the kuid of the mesh library asset
  }
}
height-range            -10,50    ...................this tag is recommended
nightmode               "car"     ...................the new nightmode tag value for traffic
trackside               0.01      ...................new tag for asset to run on roads
category-class          "VL"      ...................for Land Vehicle
category-era            "1970s;1980s"
category-region         "AU;UK"
description             "Ford Escort Van for Traffic etc"
author                  "MyName"
license                 "Blah blah etc"
contact-email           "me@braenet.com.au"

soundscript                    ......................optional soundscript container
{
  daysingle
  {
    trigger             "carz"    ...................the "car spawn" trigger
    repeat-delay        0,0       ...................repeat-delay now has two values
    distance            1,50      ...................determines the volume and fade distance

    sound
    {
      0                 "car_4.wav"  ................the car sound file must be this asset folder
    }
  }
}

thumbnails
{
  0
  {
    image               "$screenshot$.jpg"
    width               240
    height              180
  }
}
kuid-table
{
  0                     <kuid:XXXXX:ZZZZ>  ...........the kuid of the mesh library asset
}
Commit the car and mesh library into the game and ensure there are no errors.
This mesh library based car is now ready to be added to a route or region to become live traffic. Refer to HowTo/Add Carz Traffic to a Route.
