Help:Surveyor Track Trackside Mode
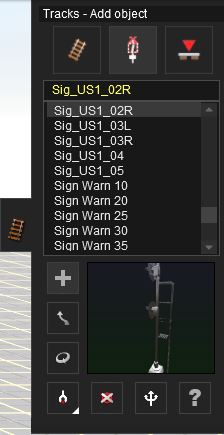
The second mode in the Track Menu is Trackside
Mode. Click LMB on Trackside Mode (Y) to
change the Track Tab menu to the Trackside
Mode menu.

Contents |
 Add Object
To add a trackside object Click LMB on the Add Object (A) button. The select the object you wish to place from the list. Click LMB at one or the other side at some point of the track. Your object will be placed beside the track and will be “attached” to it. So if you move the track it will move with it.
 Move Object
Click LMB on Move Object (M). Then Click LMB+H on a Trackside Object on your track. Drag your mouse along the track to move the object to a different position.
 Rotate
Click on the Rotate tool (R) and Click LMB on the object. It will switch sides of the track and rotate 180 degrees. The direction that a trackside object faces is controlled by the selection of Geographic region for the route.
 Get Object
Click on the Get Object (G) tool and then Click LMB on an object already placed at the trackside. The object selected now appears in the selection window. Change the mode to Add Object (A) and Click LMB again at another point on the track where you wish to place another copy of the newly selected object.
 Delete Object
Select Delete Object (D) then Click LMB to delete a trackside object. Continue Clicking LMB to delete a number of objects. If you click on the wrong object, click on Undo (Ctrl-Z) to undo the last action and replace the last deleted object.
 Junction Direction
To change the default direction of travel (for when you drive on this track in the Driver module), Click LMB on the Junction Direction (J) tool and then Click LMB once on the green and red arrows. The direction of travel will be changed (green denoting the default direction). You can also make 3-way turnouts by simply adding a third track to the turnout. There are now three direction arrows.
 Define Name
Click the Define Name (N) tool and click again on the turnout. A dialogue box opens allowing you to type a name for the turnout in the box. Click the Check (proceed) icon to save the name and proceed.