The information in this Wiki Page applies to TANE, TRS19 and Trainz Plus.
What is a Portal?
 |
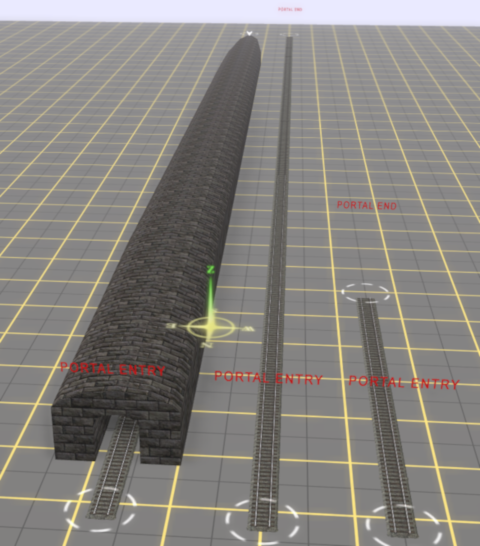
Portals are track objects that can add and remove trains during the running of a Session |
 |
 |
Notes:
Portals come in a variety of forms - some resemble tunnels and others look like a section of normal track.
The basic portals supplied with Trainz can be configured to:-
- remove trains that are sent to them or pass through them (the portals that look like track can be used to let certain trains pass through while "swallowing" others). The removed trains can be:-
- removed permanently, or
- returned to the Session through the same portal or another portal after a set time delay
- add new trains to the Session. The new trains:-
- will have drivers with orders to follow
- can be randomly selected from available consists
 |
Portals can be "enhanced" by using Session Rules that add additional features and capabilities |
Enhanced portals can have features such as:-
- adding new trains to the Session according to a set schedule ranging from once only, once per day or at set clock times
- varying the drivers of added trains and their commands according to a set schedule
- varying the consists of added trains
|
|
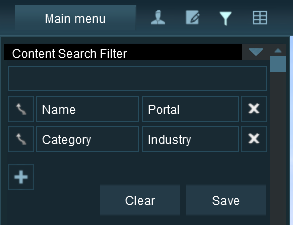 |
The quickest way to find all the train producing and consuming portals in the Surveyor Object Tool window is to set up a search filter. This will sort the portals you want from all the objects named "portal" such as tunnel portals.
|
 |
Steps:
Set an advanced search filter by:-
- Pressing Ctrl Shift F
- Enter Name portal (upper/lower case is not important)
- Select Category Industry
The Objects selection window will now show only those objects that match your search criteria. |
|
|
 |
In TRS19 the portals will not work correctly if the Trainz Settings - Dev Tab - Compatibility mode: from the TRS19 Launcher is set to Maximize performance. This setting should be left at Maximize compatibility.
|
|
Configuring a Basic Portal
Open the properties window of a portal in the route.
 |
|
 |
Settings:
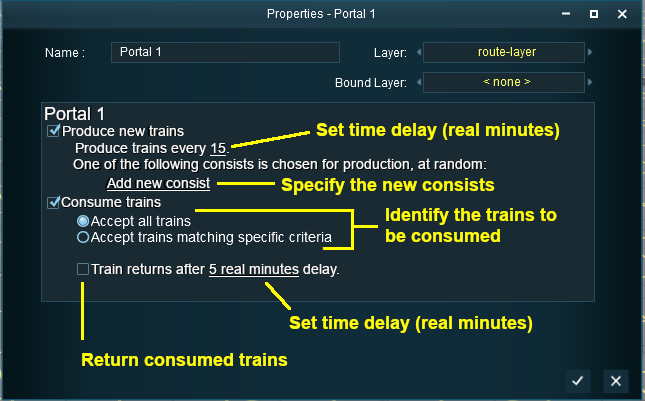
This portal is set to:-
- Produce a train every 15 minutes (but the train consist has not yet been specified)
- Consume all trains that are sent to the portal or pass through the portal
- The consumed trains will not be returned to the Session
|
|
 |
Notes:
The difference between the two time setting shown is:-
- Trainz Minutes refers to the "virtual" minutes as shown on the Session clock in the Heads Up Display in Driver. For example: If you have set the Session time to run at 2x normal speed then 10 minutes of Session time will be 5 minutes according to your watch
- Real Minutes refers to the actual minutes as shown on your watch or computer date/time display, which may not be the same as shown on the Session clock as described above
|
|
Produce Trains
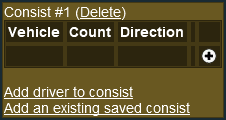
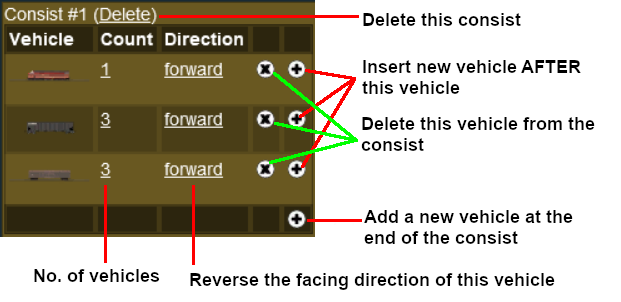
Construct a Consist
 |
|
 |
Settings:
For each vehicle in the consist you can specify:-
- how many to add (they will be coupled together)
- the direction the vehicle(s) will face
You can also:-
- delete vehicles or the entire consist
- insert additional vehicles inside the consist
- add additional vehicles at the end of the consist
|
|
 |
Notes:
- The first vehicle in the list will be the first vehicle produced by the portal
- It is NOT possible to easily reorder the vehicles in a consist
- To add more of the same vehicles in a different location in the consist, add the vehicles as a separate entry in the list
- Add another consist and driver by clicking the Add new consist link again
|
|
Add a Saved Consist
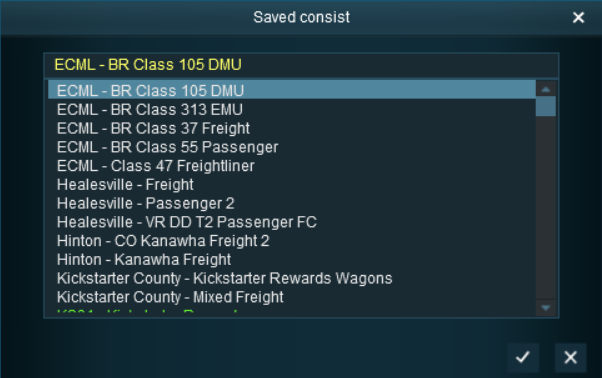
If you have already saved your consists in Trainz using the Trainz Tool then those consists can be quickly and easily added to the portal consist list.
 |
|
 |
Steps:
- Scroll through the list to find the saved consist
- Select the consist, then either:-
- Click the
 icon to accept the selection and load it into the portal consist list, or icon to accept the selection and load it into the portal consist list, or
- Click the
 icon to reject the selection and return to the previous screen icon to reject the selection and return to the previous screen
|
|
|
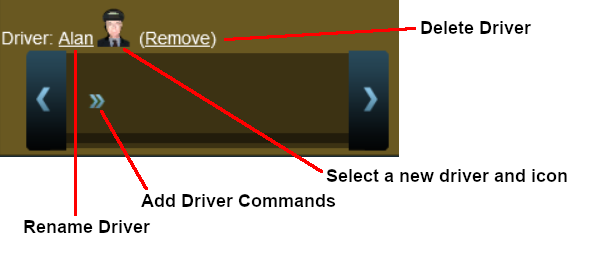
Add a Driver
 |
|
 |
Settings:
You can:-
- Select a new driver and icon
- Rename the driver
- Add driver commands
- Delete the driver
|
|
|
 |
For information on adding driver commands see the Trainz Wiki Page at:-
|
Consume Trains
To remove trains from the Session
 |
For "dead end" portals (those that have no exit) the Accept all trains option is the option that should be used |
Consume Only Specific Trains
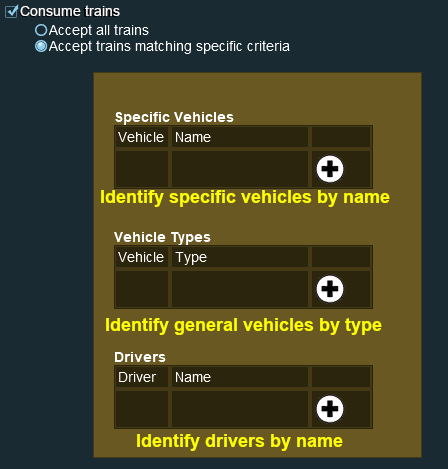
After selecting the option Accept trains matching specific criteria a new set of controls will appear
 |
|
 |
Settings:
 Accept trains matching specific criteria Accept trains matching specific criteria
- You can set any one, any two or all three of the consist selection criteria
- Any train that matches the entered settings will be removed from the Session as it enters the portal, other trains will be ignored
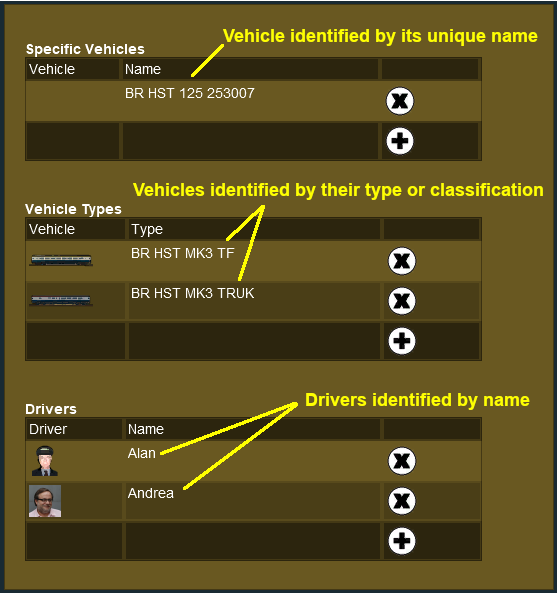
Specific Vehicles - normally used to specify just one particular train in the Session
- You must select, from the Session list, the exact name given to a vehicle. This is the name that has been entered into the property window of that vehicle
- The order of the vehicles, if there is more than one, is not important
- You only need to select enough names to correctly identify the consist that contains the vehicle or vehicles (the locomotive name is usually sufficient)
Vehicles Types - normally used to specify a number of different trains in the session e.g. all trains with a particular type of coal wagon
- You must select, from the Session list, the general name of the type of vehicle or vehicles - this is the name shown in the Trains Tool when the vehicle is added to a layout
- If you have identified Specific Vehicles (above) then you would normally not need to set this option
Drivers - used to specify trains driven by particular drivers
- Select the driver or drivers from the Session driver list
- If your drivers change trains or consists during a Session then it may be useful to combine this with one of the other two options
|
|
|
An example:-
 |
 |
Notes:
This will remove any train that:-
- contains locomotive BR HST 125 with the running number 253007
or has any of the following vehicles:-
- BR HST MK3 TF with any running numbers
- BR HST MK3 TRUK with any running numbers
or is driven by any of the following drivers:-
|
|
Return Consumed Trains
To return consumed trains back into the Session
 |
A train that has been returned after entering a portal will return to the Session with any remaining driver commands still in its Driver Schedule. It will then immediately start obeying those commands. |
 |
If the driver command that sent a train to the consuming portal was the final command in its schedule, then it will emerge from the portal with an empty Driver Schedule. It will come to a halt immediately after leaving the portal. |
Configuring an Enhanced Portal
There are a number of portals available on the DLS that have additional features or capabilities that are not found in the basic portals built into Trainz. There are also Session Rules available on the DLS that will give additional features or capabilities to the basic portals.
Quick Portal Manager Standard Edition Rule (SP2 and later)
This is a Session Rule, by pguy, that manages the portals and adds flexible timetables to their operations. It is available on the DLS.
- <kuid2:61392:5011:45> - correct at the time this document was written
This is still a work in progress - more to come
Trainz Wiki
 |
More Tutorials and Guides to Using Trainz
|
This page was created by Trainz user pware in July 2018 and was last updated as shown below.


