How to Use S20 Tools
m |
m |
||
| Line 147: | Line 147: | ||
</table> | </table> | ||
<br> | <br> | ||
| − | ==''' | + | =='''Ground Height'''== |
This brush tool uses the '''Tool Options Palette'''. If this palette is not visible on the screen then refer to [[image:PageLink.PNG|link=]] '''[[#Notes_Palettes|Notes: Palettes]]''' at the top of this document.<br> | This brush tool uses the '''Tool Options Palette'''. If this palette is not visible on the screen then refer to [[image:PageLink.PNG|link=]] '''[[#Notes_Palettes|Notes: Palettes]]''' at the top of this document.<br> | ||
| Line 286: | Line 286: | ||
</table> | </table> | ||
<br> | <br> | ||
| − | ==''' | + | =='''Ground Texture'''== |
This brush tool uses the '''Tool Options Palette'''. If this palette is not visible on the screen then refer to [[image:PageLink.PNG|link=]] '''[[#Notes_Palettes|Notes: Palettes]]''' at the top of this document.<br> | This brush tool uses the '''Tool Options Palette'''. If this palette is not visible on the screen then refer to [[image:PageLink.PNG|link=]] '''[[#Notes_Palettes|Notes: Palettes]]''' at the top of this document.<br> | ||
| Line 406: | Line 406: | ||
</table> | </table> | ||
<br> | <br> | ||
| − | ==''' | + | =='''Scrapbook Data'''== |
This brush tool uses both the '''Tool Options Palette''' and the '''Scrapbook Palette'''. If these palettes are not visible on the screen then refer to [[image:PageLink.PNG|link=]] '''[[#Notes_Palettes|Notes: Palettes]]''' at the top of this document.<br> | This brush tool uses both the '''Tool Options Palette''' and the '''Scrapbook Palette'''. If these palettes are not visible on the screen then refer to [[image:PageLink.PNG|link=]] '''[[#Notes_Palettes|Notes: Palettes]]''' at the top of this document.<br> | ||
| Line 582: | Line 582: | ||
<td>  </td> | <td>  </td> | ||
<td><span style="font-size: 15px; font-weight: 700; color: white; background-color: black;"> Meshes </span></td> | <td><span style="font-size: 15px; font-weight: 700; color: white; background-color: black;"> Meshes </span></td> | ||
| − | <td>scenery | + | <td>scenery objects (e.g. trees, buildings) used in the scrapbook</td> |
</tr> | </tr> | ||
<tr valign="top"> | <tr valign="top"> | ||
<td>  </td> | <td>  </td> | ||
<td><span style="font-size: 15px; font-weight: 700; color: white; background-color: black;"> Splines </span></td> | <td><span style="font-size: 15px; font-weight: 700; color: white; background-color: black;"> Splines </span></td> | ||
| − | <td>spline | + | <td>spline objects used in the scrapbook</td> |
</tr> | </tr> | ||
<tr valign="top"> | <tr valign="top"> | ||
| Line 633: | Line 633: | ||
</table> | </table> | ||
<br> | <br> | ||
| − | ==''' | + | =='''Edit Effect Layers...'''== |
When this '''Target''' is selected, the '''Edit Effect Layers''' options will appear. This is the same as selecting '''Edit Effect Layers ...''' from the '''Trainz Edit Menu'''. | When this '''Target''' is selected, the '''Edit Effect Layers''' options will appear. This is the same as selecting '''Edit Effect Layers ...''' from the '''Trainz Edit Menu'''. | ||
| Line 682: | Line 682: | ||
</table> | </table> | ||
| − | The '''Placement Tool''' is used to add | + | The '''Placement Tool''' is used to add objects to the route. |
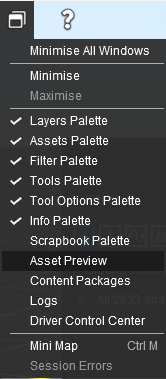
This tool uses the '''Assets Palette'''. If this palette is not visible on the screen then refer to [[image:PageLink.PNG|link=]] '''[[#Notes_Palettes|Notes: Palettes]]''' at the top of this document.<br> | This tool uses the '''Assets Palette'''. If this palette is not visible on the screen then refer to [[image:PageLink.PNG|link=]] '''[[#Notes_Palettes|Notes: Palettes]]''' at the top of this document.<br> | ||
| − | The first step is to identify and select the particular | + | The first step is to identify and select the particular object that you want to add to the route.<br> |
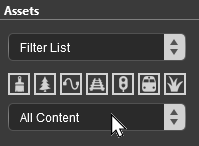
[[image:DotPoint1.JPG|link=]] In the '''Asset Palette''' either:- | [[image:DotPoint1.JPG|link=]] In the '''Asset Palette''' either:- | ||
| Line 694: | Line 694: | ||
<table border=1> | <table border=1> | ||
<tr valign="top"> | <tr valign="top"> | ||
| − | <td width=250 align="center">[[image:Ablue.png|link=]] '''Left''' click on an | + | <td width=250 align="center">[[image:Ablue.png|link=]] '''Left''' click on an object selection icon<br> |
[[image:FilterSelectIcons.png|link=|alt=Filter Icons]] | [[image:FilterSelectIcons.png|link=|alt=Filter Icons]] | ||
<table> | <table> | ||
| Line 749: | Line 749: | ||
<tr valign="top"> | <tr valign="top"> | ||
<td>[[image:PencilTips.PNG|link=]] <span style="font-size: 15px; font-weight: 700; color: white; background-color: blue;"> Shortcut </span><br> | <td>[[image:PencilTips.PNG|link=]] <span style="font-size: 15px; font-weight: 700; color: white; background-color: blue;"> Shortcut </span><br> | ||
| − | If you already have the same | + | If you already have the same object placed in your route then:- |
# select the '''Eyedropper Tool''' in the '''Tools Palette''' (or press the <span style="font-weight: 700; font-size: 17px; color: white; background-color: black;"> R </span> key) | # select the '''Eyedropper Tool''' in the '''Tools Palette''' (or press the <span style="font-weight: 700; font-size: 17px; color: white; background-color: black;"> R </span> key) | ||
| − | # '''Left''' click on the existing | + | # '''Left''' click on the existing object object |
| − | This will instantly select that particular | + | This will instantly select that particular object in the filter list.<br> |
Jump to '''Step [[image:DotPoint5.JPG|link=]]''' below.</td> | Jump to '''Step [[image:DotPoint5.JPG|link=]]''' below.</td> | ||
| Line 764: | Line 764: | ||
</table> | </table> | ||
<br> | <br> | ||
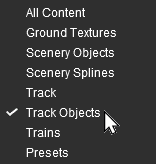
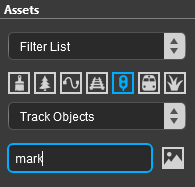
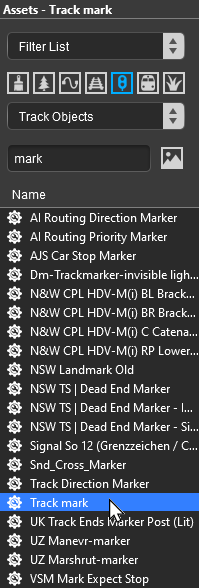
| − | [[image:DotPoint2.JPG|link=]] To narrow down the filter list type part of the | + | [[image:DotPoint2.JPG|link=]] To narrow down the filter list type part of the object name into the '''Search Text Box'''. For example if you have selected '''Track Objects''' and want to find "Trackmarks", then type "mark" ('''UPPER/lower''' case does not matter).<br> |
<table width=1000> | <table width=1000> | ||
<tr valign="top"> | <tr valign="top"> | ||
| Line 773: | Line 773: | ||
<td>[[image:FilterSelectTrackMark.png|link=|alt=Filtered list]]</td> | <td>[[image:FilterSelectTrackMark.png|link=|alt=Filtered list]]</td> | ||
<td valign="middle">[[image:DotPoint4.JPG|link=]] Select the item '''Track Mark'''.<br><br> | <td valign="middle">[[image:DotPoint4.JPG|link=]] Select the item '''Track Mark'''.<br><br> | ||
| − | If you are not sure about an | + | If you are not sure about an object then '''double-click''' on the name to bring up its image and description.</td> |
</tr> | </tr> | ||
</table> | </table> | ||
| Line 791: | Line 791: | ||
<tr valign="top"> | <tr valign="top"> | ||
<td>[[image:NotePad.PNG|link=]]</td> | <td>[[image:NotePad.PNG|link=]]</td> | ||
| − | <td>The '''Placement Tool''' will remain on and active until another tool has been selected. So everytime you click another copy of the | + | <td>The '''Placement Tool''' will remain on and active until another tool has been selected. So everytime you click another copy of the object (or another object if you change your selection) will be added to the route.</td> |
</tr> | </tr> | ||
</table> | </table> | ||
| Line 809: | Line 809: | ||
<td><span style="font-size: 17px; font-weight: 700;">Notes:'''</span><br> | <td><span style="font-size: 17px; font-weight: 700;">Notes:'''</span><br> | ||
---- | ---- | ||
| − | To delete an | + | To delete an object:- |
| − | * if the | + | * if the object is not already selected (highlighted in green) then:- |
*# select either the:- | *# select either the:- | ||
*#* '''Free Move Tool''' (or press <span style="font-weight: 700; font-size: 17px; color: white; background-color: black;"> S </span>) or | *#* '''Free Move Tool''' (or press <span style="font-weight: 700; font-size: 17px; color: white; background-color: black;"> S </span>) or | ||
*#* '''Fine Adjustment Tool''' (or press <span style="font-weight: 700; font-size: 17px; color: white; background-color: black;"> D </span>) | *#* '''Fine Adjustment Tool''' (or press <span style="font-weight: 700; font-size: 17px; color: white; background-color: black;"> D </span>) | ||
| − | *# '''Left''' click on the | + | *# '''Left''' click on the object to be deleted |
* press the <span style="font-weight: 700; font-size: 17px; color: white; background-color: black;"> Delete </span> key | * press the <span style="font-weight: 700; font-size: 17px; color: white; background-color: black;"> Delete </span> key | ||
</td> | </td> | ||
| Line 863: | Line 863: | ||
<tr valign="top"> | <tr valign="top"> | ||
<td> | <td> | ||
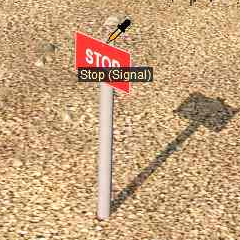
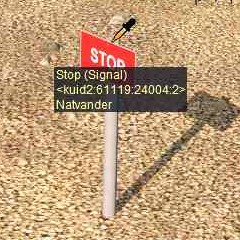
| − | The object will be identified by its | + | The object will be identified by its object name appearing in a <span style="font-weight: 700; font-size: 15px; color: white; background-color: black;"> ToolTip </span> below the mouse pointer (image shown left).<br> |
<br> | <br> | ||
| − | Leave the mouse pointer in place for a few seconds and additional information about the | + | Leave the mouse pointer in place for a few seconds and additional information about the object will be shown, its '''<kuid>''' code and '''Author''' (image shown below left). |
</td> | </td> | ||
</tr> | </tr> | ||
| Line 873: | Line 873: | ||
</table> | </table> | ||
<br> | <br> | ||
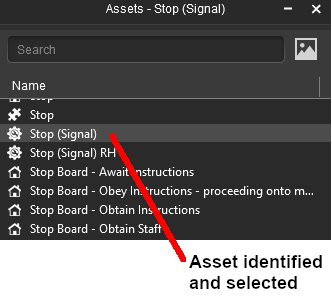
| − | [[image:DotPoint2.JPG|link=]] '''Left''' click on the | + | [[image:DotPoint2.JPG|link=]] '''Left''' click on the object to select it in the '''Filter List'''.<br> |
<table> | <table> | ||
<tr valign="top"> | <tr valign="top"> | ||
| Line 883: | Line 883: | ||
<table bgcolor=#ffffb0 width=356 cellpadding=2> | <table bgcolor=#ffffb0 width=356 cellpadding=2> | ||
<tr valign="top"> | <tr valign="top"> | ||
| − | <td>The type of | + | <td>The type of object and its name will be automatically selected in all the '''Asset Palette''' filters as shown in the image left.<br> |
<br> | <br> | ||
| − | The | + | The object is now ready for use by the '''Placement Tool'''</td> |
</tr> | </tr> | ||
</table> | </table> | ||
| Line 900: | Line 900: | ||
=='''Narrowing the Search'''== | =='''Narrowing the Search'''== | ||
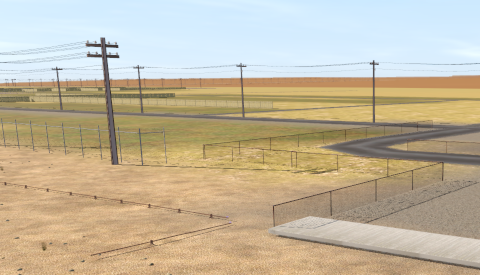
| − | Sometimes (or often) a scene will be too crowded with different scenery | + | Sometimes (or often) a scene will be too crowded with different scenery objects to be able to use the '''Eyedropper Tool''' to easily select a single object. In these cases additional options are available to help "remove the clutter".<br> |
At the top of the '''Assets Palette''' is a drop down box which controls how the '''Eyedropper Tool''' works with the filters that you set.<br> | At the top of the '''Assets Palette''' is a drop down box which controls how the '''Eyedropper Tool''' works with the filters that you set.<br> | ||
| Line 923: | Line 923: | ||
</table> | </table> | ||
<br> | <br> | ||
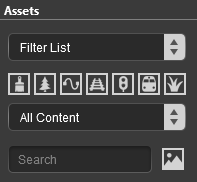
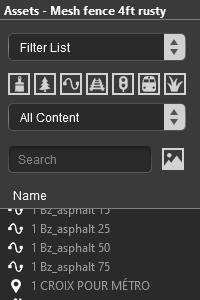
| − | These options work with the '''Asset Filters''' to help narrow the search for a specific | + | These options work with the '''Asset Filters''' to help narrow the search for a specific object or type of object that is in the route.<br> |
<table width=900 bgcolor=#000000> | <table width=900 bgcolor=#000000> | ||
| Line 931: | Line 931: | ||
<tr valign="top"> | <tr valign="top"> | ||
<td width=120><span style="font-weight: 700; font-size: 15ps; color: white; background-color: black;"> Filter List </span></td> | <td width=120><span style="font-weight: 700; font-size: 15ps; color: white; background-color: black;"> Filter List </span></td> | ||
| − | <td>this option will have no effect on the operation of the '''Eyedropper Tool''' or on the | + | <td>this option will have no effect on the operation of the '''Eyedropper Tool''' or on the objects displayed on the screen. It is the default setting and any selections made with the eyedropper will be shown in the '''Assets Palette''' as described in the section '''Quick Steps''' above.</td> |
</tr> | </tr> | ||
<tr valign="top"> | <tr valign="top"> | ||
<td><span style="font-weight: 700; font-size: 15ps; color: white; background-color: black;"> Filter Selection </span></td> | <td><span style="font-weight: 700; font-size: 15ps; color: white; background-color: black;"> Filter Selection </span></td> | ||
| − | <td>this option will restrict the '''Eyedropper Tool''' to only working on those | + | <td>this option will restrict the '''Eyedropper Tool''' to only working on those objects that are in the filtered list. Objects that are not in the filtered list cannot be selected and will not have their details (name, <kuid>, author) displayed on the screen. </td> |
</tr> | </tr> | ||
<tr valign="top"> | <tr valign="top"> | ||
<td><span style="font-weight: 700; font-size: 15ps; color: white; background-color: black;"> Filter Visibility </span></td> | <td><span style="font-weight: 700; font-size: 15ps; color: white; background-color: black;"> Filter Visibility </span></td> | ||
| − | <td>this option will '''hide''' all | + | <td>this option will '''hide''' all objects that are not in the filtered list. The only exceptions are '''Ground Textures''' and '''Effect Layers''' which will be visible but, unless they are also in the filtered list, cannot be selected.</td> |
</tr> | </tr> | ||
</table> | </table> | ||
| Line 955: | Line 955: | ||
[[image:DotPoint1Blue.png|link=]] No filter has been applied.<br> | [[image:DotPoint1Blue.png|link=]] No filter has been applied.<br> | ||
<br> | <br> | ||
| − | All the | + | All the objects are visible on the Surveyor screen.<br> |
<br> | <br> | ||
| − | '''ALL''' | + | '''ALL''' objects can be selected by the '''Eyedropper Tool''' |
</td> | </td> | ||
</tr> | </tr> | ||
| Line 966: | Line 966: | ||
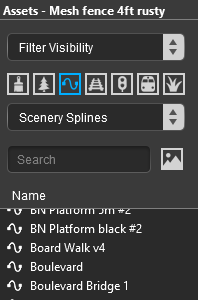
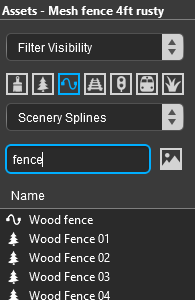
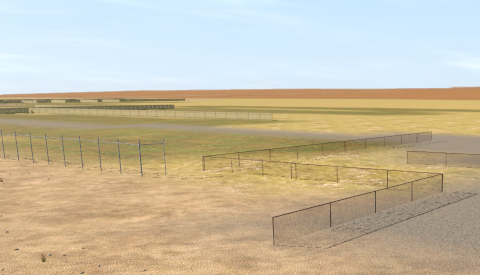
[[image:DotPoint2Blue.png|link=]] The '''Visibility Filter''' option has been applied and the filtered list has been set to display only '''Scenery Splines'''.<br> | [[image:DotPoint2Blue.png|link=]] The '''Visibility Filter''' option has been applied and the filtered list has been set to display only '''Scenery Splines'''.<br> | ||
<br> | <br> | ||
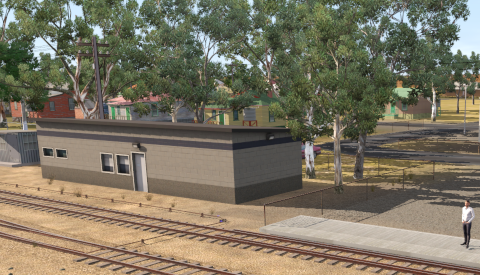
| − | All | + | All objects except '''Scenery Splines''', '''Ground Textures''' and '''Effect Layers''' are now hidden.<br> |
<br> | <br> | ||
Only '''Scenery Splines''' can be selected by the '''Eyedropper Tool'''. | Only '''Scenery Splines''' can be selected by the '''Eyedropper Tool'''. | ||
| Line 1,011: | Line 1,011: | ||
This tool uses the '''Tool Options Palette''' and the '''Info Palette''' (to display data only). None of the controls in the '''Tool Options Palette''' are active. If these palettes are not visible on the screen then refer to [[image:PageLink.PNG|link=]] '''[[#Notes_Palettes|Notes: Palettes]]''' at the top of this document.<br> | This tool uses the '''Tool Options Palette''' and the '''Info Palette''' (to display data only). None of the controls in the '''Tool Options Palette''' are active. If these palettes are not visible on the screen then refer to [[image:PageLink.PNG|link=]] '''[[#Notes_Palettes|Notes: Palettes]]''' at the top of this document.<br> | ||
| + | <br> | ||
| + | <span style="font-weight: 700; font-size: 17px; color: white; background-color: black;"> For Scenery Mesh Objects </span><br> | ||
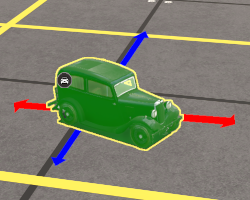
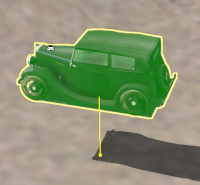
| − | + | Individual "non-spline" scenery objects that are not attached to track are often referred to in '''Trainz''' terminology as '''Scenery Mesh Objects'''.<br> | |
| − | <table width= | + | <span style="font-weight: 700; font-size: 15px; color: white; background-color: blue;"> Moving a Scenery Mesh Object </span><br> |
| + | |||
| + | <table width=900> | ||
<tr valign="top"> | <tr valign="top"> | ||
<td width=250>[[image:FreeMoveToolCar_S20.png|link=]]</td> | <td width=250>[[image:FreeMoveToolCar_S20.png|link=]]</td> | ||
| − | <td width= | + | <td width=650> |
<table> | <table> | ||
<tr valign="top"> | <tr valign="top"> | ||
| Line 1,039: | Line 1,043: | ||
<tr valign="top"> | <tr valign="top"> | ||
<td>[[image:NotePad.PNG|link=]]</td> | <td>[[image:NotePad.PNG|link=]]</td> | ||
| − | <td>When moving a scenery | + | <td>When moving a scenery object, its height will be '''fixed''' to the terrain height.</td> |
</tr> | </tr> | ||
</table> | </table> | ||
| Line 1,049: | Line 1,053: | ||
</table> | </table> | ||
| − | <span style="font-weight: 700; font-size: 15px; color: white; background-color: blue;"> Set the Height for a Scenery | + | <span style="font-weight: 700; font-size: 15px; color: white; background-color: blue;"> Set the Height for a Scenery Object </span><br> |
| − | When placed in a route by the '''Placement Tool''' a scenery | + | When placed in a route by the '''Placement Tool''' a scenery object will take the height of the terrain as its set height. It will be '''fixed''' to the terrain so when you move it around it will always be at the same height as the terrain it is over.<br> |
This can be changed to '''fix''' the object to a set height above or below the terrain.<br> | This can be changed to '''fix''' the object to a set height above or below the terrain.<br> | ||
| − | <table> | + | <table width=900> |
<tr valign="top"> | <tr valign="top"> | ||
<td>[[image:FreeMoveMeshObjectSetAboveGround_S20.png|link=]]</td> | <td>[[image:FreeMoveMeshObjectSetAboveGround_S20.png|link=]]</td> | ||
| Line 1,069: | Line 1,073: | ||
</tr> | </tr> | ||
<tr valign="top"> | <tr valign="top"> | ||
| − | <td colspan=2>The scenery | + | <td colspan=2>The scenery object will now be '''fixed''' at the entered height above (or below) the terrain as it is moved around</td> |
</tr> | </tr> | ||
</table> | </table> | ||
| Line 1,076: | Line 1,080: | ||
</table> | </table> | ||
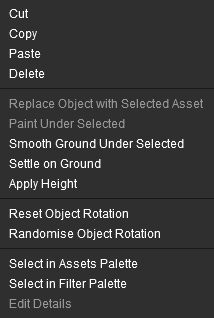
| − | <span style="font-weight: 700; font-size: 15px; color: white; background-color: blue;">  | + | <span style="font-weight: 700; font-size: 15px; color: white; background-color: blue;"> Object Context Menu </span><br> |
| − | A selected scenery | + | A selected scenery object, or a group of selected scenery objects, will have a '''Context Icon''' with a '''Context Menu'''. The icon design will vary between object types. Multiple objects can be selected by holding down the <span style="font-weight: 700; font-size: 15px; color: white; background-color: black;"> Shift </span> key while '''Left''' clicking on each object.<br> |
| − | To open an | + | To open an objects '''Context menu''' either:- |
* '''Left''' click the '''Context Icon''', or | * '''Left''' click the '''Context Icon''', or | ||
* Press the <span style="color: white; background-color: black; font-weight: 700; font-size: 15px;"> T </span> key | * Press the <span style="color: white; background-color: black; font-weight: 700; font-size: 15px;"> T </span> key | ||
| Line 1,094: | Line 1,098: | ||
<tr valign="top"> | <tr valign="top"> | ||
<td><span style="font-weight: 700; color: white; background-color: black;"> Cut </span></td> | <td><span style="font-weight: 700; color: white; background-color: black;"> Cut </span></td> | ||
| − | <td>remove the selected | + | <td>remove the selected object or objects and move them into the '''Scrapbook'''</td> |
</tr> | </tr> | ||
<tr valign="top"> | <tr valign="top"> | ||
<td><span style="font-weight: 700; color: white; background-color: black;"> Copy </span></td> | <td><span style="font-weight: 700; color: white; background-color: black;"> Copy </span></td> | ||
| − | <td>copy the selected | + | <td>copy the selected object or objects and place them into the '''Scrapbook'''</td> |
</tr> | </tr> | ||
<tr valign="top"> | <tr valign="top"> | ||
<td><span style="font-weight: 700; color: white; background-color: black;"> Paste </span></td> | <td><span style="font-weight: 700; color: white; background-color: black;"> Paste </span></td> | ||
| − | <td>paste the contents of the current '''Scrapbook''' next to the selected | + | <td>paste the contents of the current '''Scrapbook''' next to the selected object</td> |
</tr> | </tr> | ||
<tr valign="top"> | <tr valign="top"> | ||
<td><span style="font-weight: 700; color: white; background-color: black;"> Delete </span></td> | <td><span style="font-weight: 700; color: white; background-color: black;"> Delete </span></td> | ||
| − | <td>delete the selected | + | <td>delete the selected objects. It has the same effect as pressing the <span style="font-weight: 700; font-size: 15px; color: white; background-color: black;"> Delete </span> key</td> |
</tr> | </tr> | ||
<tr valign="top"> | <tr valign="top"> | ||
<td><span style="font-weight: 700; color: white; background-color: black;"> Smooth Ground Under Selected </span></td> | <td><span style="font-weight: 700; color: white; background-color: black;"> Smooth Ground Under Selected </span></td> | ||
| − | <td>changes the height of the terrain under the | + | <td>changes the height of the terrain under the object to match the set height of the object. If multiple objects at different heights have been selected then the terrain height will be set to match the height of the lowest object</td> |
</tr> | </tr> | ||
<tr valign="top"> | <tr valign="top"> | ||
<td><span style="font-weight: 700; color: white; background-color: black;"> Settle on Ground </span></td> | <td><span style="font-weight: 700; color: white; background-color: black;"> Settle on Ground </span></td> | ||
| − | <td>sets the height of the | + | <td>sets the height of the objects to match the height of the terrain beneath them ("drops them back to earth")</td> |
</tr> | </tr> | ||
<tr valign="top"> | <tr valign="top"> | ||
<td><span style="font-weight: 700; color: white; background-color: black;"> Apply Height </span></td> | <td><span style="font-weight: 700; color: white; background-color: black;"> Apply Height </span></td> | ||
| − | <td>sets the height of the | + | <td>sets the height of the objects to the value in the '''Tool Options''' <span style="font-weight: 700; font-size: 15px; color: white; background-color: black;"> Height </span> text box</td> |
</tr> | </tr> | ||
<tr valign="top"> | <tr valign="top"> | ||
<td><span style="font-weight: 700; color: white; background-color: black;"> Reset Object Rotation </span></td> | <td><span style="font-weight: 700; color: white; background-color: black;"> Reset Object Rotation </span></td> | ||
| − | <td>resets the rotation angle of the | + | <td>resets the rotation angle of the objects to their default values</td> |
</tr> | </tr> | ||
<tr valign="top"> | <tr valign="top"> | ||
<td><span style="font-weight: 700; color: white; background-color: black;"> Randomise Object Rotation </span></td> | <td><span style="font-weight: 700; color: white; background-color: black;"> Randomise Object Rotation </span></td> | ||
| − | <td>applies a random rotation angle to each | + | <td>applies a random rotation angle to each object</td> |
</tr> | </tr> | ||
<tr valign="top"> | <tr valign="top"> | ||
<td><span style="font-weight: 700; color: white; background-color: black;"> Select in Assets Palette </span></td> | <td><span style="font-weight: 700; color: white; background-color: black;"> Select in Assets Palette </span></td> | ||
| − | <td>identifies the selected | + | <td>identifies the selected object in the '''Asset Palette''' like the '''Eyedropper Tool'''. If multiple different objects have been selected then the object with the '''Context Icon''' will be identified</td> |
</tr> | </tr> | ||
<tr valign="top"> | <tr valign="top"> | ||
<td><span style="font-weight: 700; color: white; background-color: black;"> Edit Properties </span></td> | <td><span style="font-weight: 700; color: white; background-color: black;"> Edit Properties </span></td> | ||
| − | <td>opens the '''Properties''' window of the selected | + | <td>opens the '''Properties''' window of the selected object</td> |
</tr> | </tr> | ||
</table> | </table> | ||
| Line 1,238: | Line 1,242: | ||
<td>[[image:PencilTips.PNG|link=]]</td> | <td>[[image:PencilTips.PNG|link=]]</td> | ||
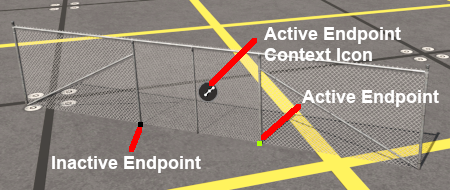
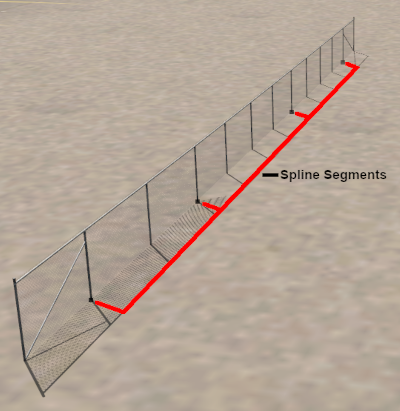
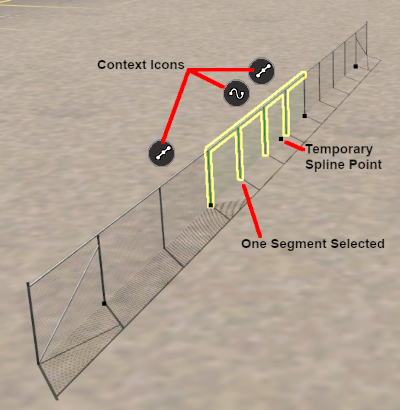
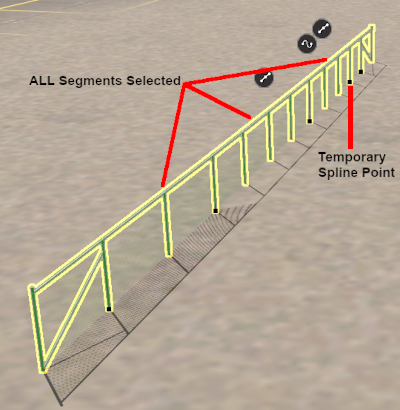
<td>To select '''ALL''' the segments in a scenery spline, '''Dbl-Left''' click on a segment<br> | <td>To select '''ALL''' the segments in a scenery spline, '''Dbl-Left''' click on a segment<br> | ||
| + | <br> | ||
The segment you clicked on will have the '''Temporary Spline Point'''</td> | The segment you clicked on will have the '''Temporary Spline Point'''</td> | ||
</tr> | </tr> | ||
Revision as of 09:58, 10 January 2023
The information in this Wiki Page applies to Surveyor 2.0 (S20) as found in Trainz Plus.
This document is under development
|
|
|||||||||
The Tools Palette
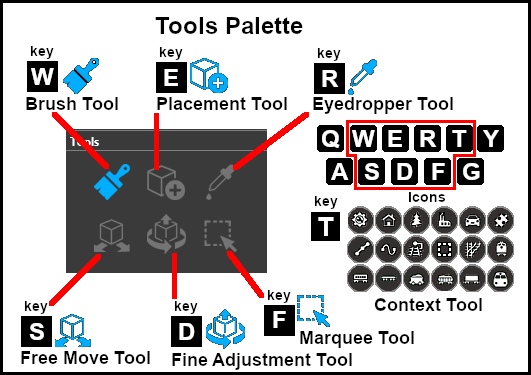 |
|
|||||||||||||||||
The Brush Tool
The Brush Tool is used for painting the route. It can:-
When selected, the Brush Tool will show two drop down menu lists. |
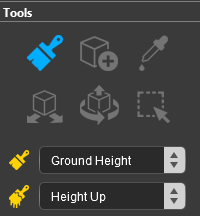 |
| The first drop down menu will set the Brush Target, the type of brush. The Targets are:- |
|||||
|
 |
|
|||
Ground Height
This brush tool uses the Tool Options Palette. If this palette is not visible on the screen then refer to Notes: Palettes at the top of this document.
| When the Ground Height Target is selected, the second drop down box will give a choice of several Ground Height tools. The choices are:- |
|
|
 |
| The available brush tool options are shown in the Tool Options Palette with a Gold coloured icon next to their names. Those options that have their icon greyed out will be ignored, but they can still be edited. | ||||||||||||||||||||||||||||||||||||
Height Up/Height Down 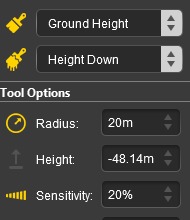 |
Set Height 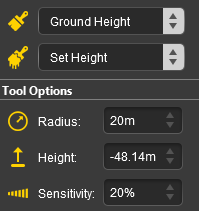 |
Grade 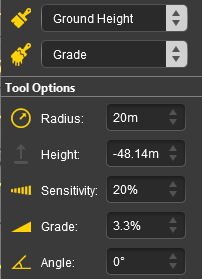 |
|
|||||||||||||||||||||||||||||||||
|
Ground Texture
This brush tool uses the Tool Options Palette. If this palette is not visible on the screen then refer to Notes: Palettes at the top of this document.
When the Ground Texture Target is selected, the second drop down box will be disabled - there are no brush texture tool choices.
The available brush tool options are shown in the Tool Options Palette with a Gold coloured icon next to their names. Those options that have their icon greyed out will be ignored, but they can still be edited.
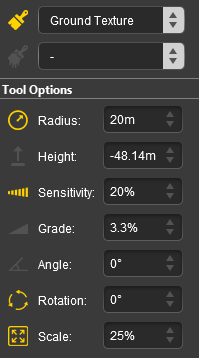 |
|
||||||||||||||||||||||||||||
|
Scrapbook Data
This brush tool uses both the Tool Options Palette and the Scrapbook Palette. If these palettes are not visible on the screen then refer to Notes: Palettes at the top of this document.
| The Scrapbook Brush When the Scrapbook Data Target is selected, the second drop down box will give a choice of two Scrapbook Data tools. |
|
|
|
|
| The available brush tool options are shown in the Tool Options Palette with a Gold coloured icon next to their names. Those options that have their icon greyed out will be ignored, but they can still be edited. | |||||||||||||||||||||||||||||||
Scrapbook Brush 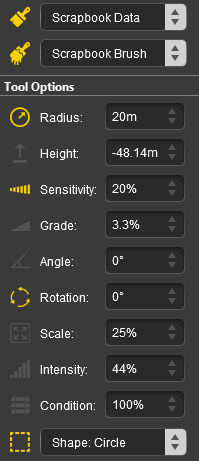 |
Scrapbook Clone 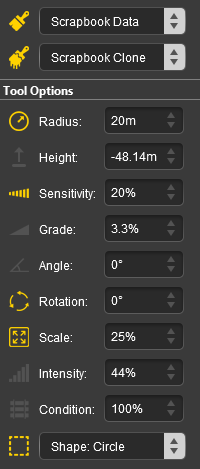 |
|
|||||||||||||||||||||||||||||
|
The Scrapbook Palette 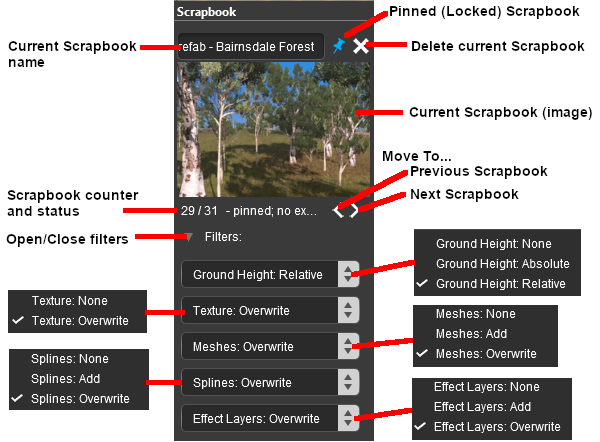 |
|
|||||||||||||||||||||||||||||||||||||||||||
Edit Effect Layers...
When this Target is selected, the Edit Effect Layers options will appear. This is the same as selecting Edit Effect Layers ... from the Trainz Edit Menu.
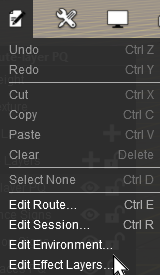 |
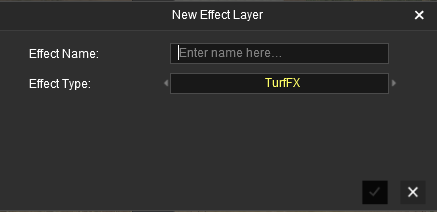 |
 |
 |
More information on creating and editing Effect Layers can be found on the Trainz Wiki at:- |
The Placement Tool
The Placement Tool is used to add objects to the route. This tool uses the Assets Palette. If this palette is not visible on the screen then refer to The first step is to identify and select the particular object that you want to add to the route.
The Eyedropper Tool
|
|||||||||||||||||||||||||||||||||||||||||||||||||||||||||||||||||||||||||||||||||||||||||||||||||||||||||||||||||||||||||||||||||||||||||||||||||||||||||||||||||||||||||||||||||
