SAR Scenarios Tutorial
m |
m |
||
| Line 220: | Line 220: | ||
<td>[[image:Semaphore_LQ_Diverging_Upper_Proceed.jpg|link=|alt=Dual Arm Upper Proceed|60px]]</td> | <td>[[image:Semaphore_LQ_Diverging_Upper_Proceed.jpg|link=|alt=Dual Arm Upper Proceed|60px]]</td> | ||
<td>Diverging Traffic Semaphore on a mast showing | <td>Diverging Traffic Semaphore on a mast showing | ||
| − | *<span style="font-weight: 700; font-size: 15px; color: white; background-color: green;"> PROCEED </span> for the '''Main''' path | + | *<span style="font-weight: 700; font-size: 15px; color: white; background-color: green;"> PROCEED </span> for the '''Main'''† path |
| − | *<span style="font-weight: 700; font-size: 15px; color: white; background-color: red;"> STOP </span> for the '''Diverging''' path | + | *<span style="font-weight: 700; font-size: 15px; color: white; background-color: red;"> STOP </span> for the '''Diverging'''‡ path</td> |
<td>[[image:Semaphore_LQ_Diverging_Lower_Proceed.jpg|link=|alt=Dual Arm Lower Proceed|60px]]</td> | <td>[[image:Semaphore_LQ_Diverging_Lower_Proceed.jpg|link=|alt=Dual Arm Lower Proceed|60px]]</td> | ||
<td>Diverging Traffic Semaphore on a mast showing | <td>Diverging Traffic Semaphore on a mast showing | ||
| − | *<span style="font-weight: 700; font-size: 15px; color: white; background-color: red;"> STOP </span> for the '''Main''' path | + | *<span style="font-weight: 700; font-size: 15px; color: white; background-color: red;"> STOP </span> for the '''Main'''† path |
| − | *<span style="font-weight: 700; font-size: 15px; color: white; background-color: green;"> PROCEED </span> for the '''Diverging''' path | + | *<span style="font-weight: 700; font-size: 15px; color: white; background-color: green;"> PROCEED </span> for the '''Diverging'''‡ path</td> |
</tr> | </tr> | ||
<tr valign="top"> | <tr valign="top"> | ||
| Line 236: | Line 236: | ||
<td>[[image:Shunt_Lever_Diverging_Upper_Proceed.jpg|link=|alt=Dual Lever Shunt Upper Proceed|60px]]</td> | <td>[[image:Shunt_Lever_Diverging_Upper_Proceed.jpg|link=|alt=Dual Lever Shunt Upper Proceed|60px]]</td> | ||
<td>Diverging Shunting Semaphore showing | <td>Diverging Shunting Semaphore showing | ||
| − | *<span style="font-weight: 700; font-size: 15px; color: white; background-color: green;"> PROCEED </span> for the '''Main''' path | + | *<span style="font-weight: 700; font-size: 15px; color: white; background-color: green;"> PROCEED </span> for the '''Main'''† path |
| − | *<span style="font-weight: 700; font-size: 15px; color: white; background-color: red;"> STOP </span> for the '''Diverging''' path | + | *<span style="font-weight: 700; font-size: 15px; color: white; background-color: red;"> STOP </span> for the '''Diverging'''‡ path</td> |
<td>[[image:Shunt_Lever_Diverging_Lower_Proceed.jpg|link=|alt=Dual Lever Shunt Lower Proceed|60px]]</td> | <td>[[image:Shunt_Lever_Diverging_Lower_Proceed.jpg|link=|alt=Dual Lever Shunt Lower Proceed|60px]]</td> | ||
<td>Diverging Shunting Semaphore showing | <td>Diverging Shunting Semaphore showing | ||
| − | *<span style="font-weight: 700; font-size: 15px; color: white; background-color: red;"> STOP </span> for the '''Main''' path | + | *<span style="font-weight: 700; font-size: 15px; color: white; background-color: red;"> STOP </span> for the '''Main'''† path |
| − | *<span style="font-weight: 700; font-size: 15px; color: white; background-color: green;"> PROCEED </span> for the '''Diverging''' path | + | *<span style="font-weight: 700; font-size: 15px; color: white; background-color: green;"> PROCEED </span> for the '''Diverging'''‡ path</td> |
| + | <tr valign="top"> | ||
| + | <td colspan=4> | ||
| + | :† The '''Main''' path represents the continuation of the current path which may not be straight ahead<br> | ||
| + | :‡ The '''Diverging''' path represent a path into a siding, a branch line or a turnout to an adjacent track. This will normally be to the left or right, but may, in some circumstances, be straight ahead</td> | ||
</tr> | </tr> | ||
</table> <!-- END Signal Table --> | </table> <!-- END Signal Table --> | ||
Revision as of 11:49, 14 August 2022
 SAR Peterborough Narrow Gauge Scenarios Tutorial SAR Peterborough Narrow Gauge Scenarios Tutorial |
| A part of the SAR Peterborough Base Session |
| A tutorial guide to using the Scenarios for the DLS SAR Peterborough Base Session and SAR Peterborough Narrow Gauge Division (TRS19 SP3) route. |
|
The Tutorial Scenario Tutorial Updated July 29th, 2022. The scenario used in this tutorial is The task in this tutorial scenario is to drive the coal and fuel oil train out of Gladstone yard and onto the Port Pirie to Broken Hill main line. Continue through Caltowie yard and into Jamestown yard. |
||||||||||||||||
|
|
|||||||||||||||
|
| |||||||||||||||||||||||
Step |
Caltowie to Jamestown |
|
|||||||||||||||||||||
|
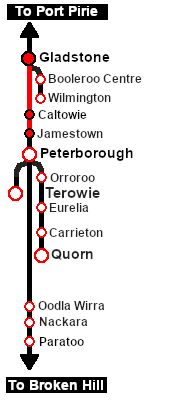
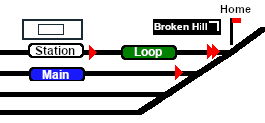
Caltowie does not have a coal stage or a fuel oil store in need of a refill so the consist will not be stopping here. A through path is the best option. A Manual Control To manually drive the train through Caltowie to Jamestown you will have to set all the switches yourself using the information on the Caltowie
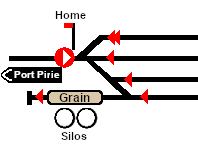
Notice that the Switch Track Diagram above shows three switches in red with letters as IDs - A B C .
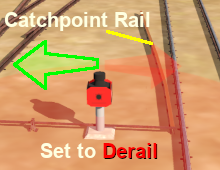
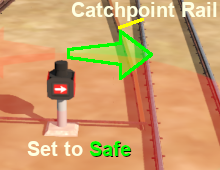
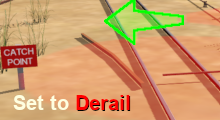
The information above shows that the default position of the Catchpoints, the first direction setting shown as an (L) or an (R), is set to Catchpoint which is the derail position.
B AI Control After reaching Caltowie you can use the Track Marks placed in the yard to navigate your way through. The track marks are shown on the Caltowie
All stations on the route, including the passenger enabled stations, have track marks on both their Up and Down sides. This allows you to use the Drive To Trackmark command to reach any passenger station. The track marks are named using the name of the station (e.g. Caltowie), the word Station and the direction of travel, Up or Dn. So Caltowie has the station track marks Caltowie Station Dn and Caltowie Station Up (not shown above).
If you prefer to travel through Caltowie via, for example the Station, then use the AI Drive Via Trackmark Driver Command, select the required Track Mark (e.g. Caltowie Station Dn ) followed by Drive To Trackmark Jamestown Main Approach Dn |
|||||||||||||||||||||||
|
| |||||||
Step |
Jamestown |
|
|||||
| We will be using the Loop Yard road as the destination in Jamestown. Using this road instead of the Station Yard road will allow the loco to be moved from the front of the train to the rear for shunting the Jamestown coal wagons without passing the Jamestown Home Up signal and entering the Jamestown - Belalie North section. A Manual Control As at Caltowie, to drive into Jamestown you will have to set all the switches manually. The Jamestown
The Jamestown Switch Set is identified on the Jamestown
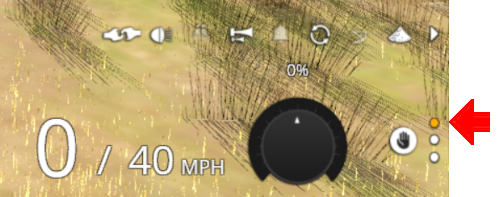
Because we will be driving beyond the Loop and into the Loop Yard the Optional switches 7 and 10 will also have to be correctly set. Use the Driver Speed Dial, the keyboard controls ( W S X ) or the advanced on screen controls to drive the train into Jamestown Loop Yard and halt once the rear wagon is safely clear of switch junction 10 . B AI Control The Jamestown
The important Track Marks for this tutorial scenario are identified on the Jamestown From the open Driver Command Menu select the Drive To Trackmark command which will open up a long alphabetical list of track marks. Find and select the track mark Jamestown Loop Yard Dn . |
|||||||
|
| ||||||||||||
Step |
Shunting Jamestown Yard |
|
||||||||||
|
Jamestown Loco Depot will be receiving two CCC wagons loaded with coal. Both wagons have been marshalled at the rear of the consist in front of the Guard Van. This operation could be done entirely using the AI but the process would be more complex than needed so only Manual Driving, or a mixture of manual and AI, will be used. The task will involve moving the loco to the rear of the consist, uncouplng the two coal wagons (plus the Guard Van) from the train and then shunting them into the Loco Depot and Sidings. You will have two options at the Depot:-
|
||||||||||||
| Links: All links will open in this window | |||||||||
 Session Scenarios |
 Location Index |
 Rolling Stock |
 Loco Roster |
 Active Industries |
|
||||
This page was created by Trainz user pware in March 2021 and was last updated as shown below.
