How to Use Session Editor
m (→The "Button Bar") |
m (→The "Button Bar") |
||
| Line 84: | Line 84: | ||
<td>[[file:SessionEditButtonsSP1.png|link=]]</td> | <td>[[file:SessionEditButtonsSP1.png|link=]]</td> | ||
<td> | <td> | ||
| − | + | *the <span style="background-color: black; color: white; font-weight: 700;"> Add </span> button will insert a new Rule below the selected (highlighted) Rule or at the end of the list if no Rule has been selected | |
| − | *the <span style="background-color: black; color: white; font-weight: 700;"> Add </span> button will insert a new Rule below the selected (highlighted) Rule | + | To use the other buttons, select a Rule first by clicking on it |
| − | To use the other buttons, select a Rule first | + | |
*the <span style="background-color: black; color: white; font-weight: 700;"> Edit </span> button will open the selected (highlighted) Rule for editing | *the <span style="background-color: black; color: white; font-weight: 700;"> Edit </span> button will open the selected (highlighted) Rule for editing | ||
*the <span style="background-color: black; color: white; font-weight: 700;"> Delete </span> button will delete the selected Rule | *the <span style="background-color: black; color: white; font-weight: 700;"> Delete </span> button will delete the selected Rule | ||
| Line 92: | Line 91: | ||
*the <span style="background-color: black; color: white; font-weight: 700;"> Up/Down </span> buttons will move the selected Rule Up or Down</td> | *the <span style="background-color: black; color: white; font-weight: 700;"> Up/Down </span> buttons will move the selected Rule Up or Down</td> | ||
</tr> | </tr> | ||
| − | </table | + | </table> |
| − | + | <table cellpadding="4" bgcolor=#c1e7e7> | |
| + | <tr valign="top"> | ||
| + | <td>[[file:DotPoint.JPG|link=]]</td> | ||
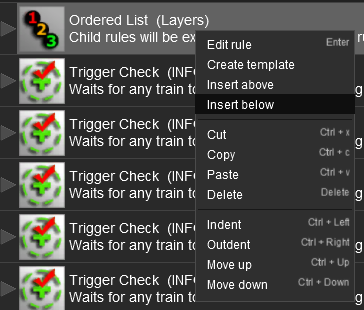
| + | <td>The above operations, and more, can also be found by right mouse clicking on a Rule to open up a menu</td> | ||
| + | </tr> | ||
| + | </table> | ||
<table> | <table> | ||
| Line 116: | Line 120: | ||
<tr valign="top"> | <tr valign="top"> | ||
<td>[[file:Stop.PNG|link=]]</td> | <td>[[file:Stop.PNG|link=]]</td> | ||
| − | <td>The <span style="background-color: black; color: white; font-weight: 700;"> Cut | + | <td>The <span style="background-color: black; color: white; font-weight: 700;"> Cut </span> and <span style="background-color: black; color: white; font-weight: 700;"> Copy </span> operations will '''NOT''' copy ALL the settings in some rules, for example the '''Navigation Display Rule'''. It is a good idea to check the settings of each rule that you paste into the Session Editor</td> |
</tr> | </tr> | ||
</table> | </table> | ||
Revision as of 08:43, 28 October 2019
The information in this Wiki Page applies to both TANE and TRS19.
Contents |
What is the Session Editor
| The Session Editor allows you to add, delete and edit the Rules in a Session | |
| The Rules control the operation of the Session |
The Rules added and edited by the Session Editor control:-
- behaviour of drivers (and their trains)
- weather conditions
- time of day
- signals and switches
- display of information and instructions to the player
- train timetables
- decisions on what has to happen next
to name just a few.
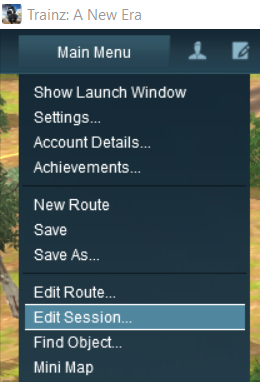
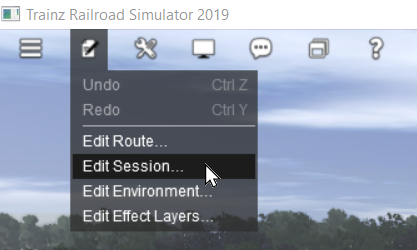
In TANE and TRS19 the Session Editor is found in the Surveyor Main Menu. In TRS19 SP1 it has been moved to the Surveyor Edit Menu. In either case select Edit Session from the menu.
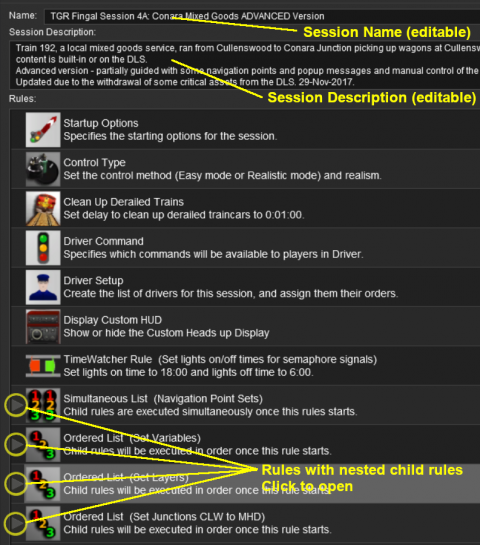
When loaded, the Session Editor will show all the Rules that have been added to the Session. If you have just opened the Editor on a Route without a Session then it will show a very basic set of Rules. The Editor will allow you to add additional Rules, and delete or edit those shown. Links to extensive lists of Rules can be found at the end of this document.
 |
|
 |
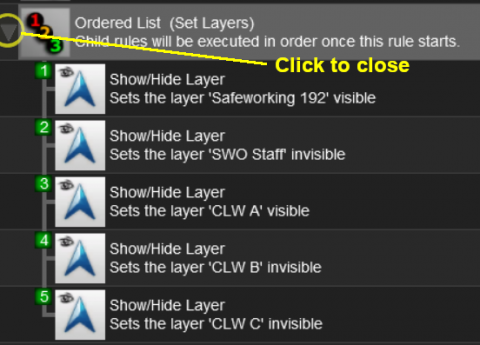
More information on the various types of List Rules and how to create Nested Rules can be found on the Trainz Wiki Page at:- |
The "Button Bar"
At the bottom of the Session Editor is the "button Bar".
 |
To use the other buttons, select a Rule first by clicking on it
|
| The above operations, and more, can also be found by right mouse clicking on a Rule to open up a menu |
 |
|
||||
Trainz Wiki
 |
More Tutorials and Guides to Using Trainz |
