How to Use Portals
(Updated to include S2.0 Filter Palette) |
|||
| Line 34: | Line 34: | ||
<td>[[image:PortalTypeScreenShot.PNG|link=]]</td> | <td>[[image:PortalTypeScreenShot.PNG|link=]]</td> | ||
<td> | <td> | ||
| − | Portals come in a variety of forms - some resemble tunnels and others look like a section of normal track.<br><br> | + | Portals come in a variety of forms - some resemble tunnels and others look like a section of normal track. One portal is a '''Track Marker'''.<br><br> |
The basic portals supplied with Trainz can be configured to:- | The basic portals supplied with Trainz can be configured to:- | ||
<table> | <table> | ||
| Line 123: | Line 123: | ||
<tr valign="top"> | <tr valign="top"> | ||
<td>[[image:DotPoint2.JPG|link=]]</td> | <td>[[image:DotPoint2.JPG|link=]]</td> | ||
| − | <td><span style="font-weight: 700; font-size: 15px; background-color: lightcyan;">Left Click</span> <span style="color: white; background-color: black; font-weight: 700; font-size: 15px; color: white; background-color: black;"> + </span> and add the filter <span style="color: white; background-color: black; font-weight: 700; font-size: 15px; color: white; background-color: black;"> Name </span> and enter '''Portal''' (upper/lower case is not important) in its text entry box</td> | + | <td><span style="font-weight: 700; font-size: 15px; background-color: lightcyan;"> Left Click </span> <span style="color: white; background-color: black; font-weight: 700; font-size: 15px; color: white; background-color: black;"> + </span> and add the filter <span style="color: white; background-color: black; font-weight: 700; font-size: 15px; color: white; background-color: black;"> Name </span> and enter '''Portal''' (upper/lower case is not important) in its text entry box</td> |
</tr> | </tr> | ||
<tr valign="top"> | <tr valign="top"> | ||
<td>[[image:DotPoint3.JPG|link=]]</td> | <td>[[image:DotPoint3.JPG|link=]]</td> | ||
| − | <td><span style="font-weight: 700; font-size: 15px; background-color: lightcyan;">Left Click</span> <span style="color: white; background-color: black; font-weight: 700; font-size: 15px; color: white; background-color: black;"> + </span> and add the filter <span style="color: white; background-color: black; font-weight: 700; font-size: 15px; color: white; background-color: black;"> Category </span> and its sub-category '''Industry'''<br> | + | <td><span style="font-weight: 700; font-size: 15px; background-color: lightcyan;"> Left Click </span> <span style="color: white; background-color: black; font-weight: 700; font-size: 15px; color: white; background-color: black;"> + </span> and add the filter <span style="color: white; background-color: black; font-weight: 700; font-size: 15px; color: white; background-color: black;"> Category </span> and its sub-category '''Industry'''<br> |
:The '''Objects''' selection window will now show only those objects that match your search criteria.</td> | :The '''Objects''' selection window will now show only those objects that match your search criteria.</td> | ||
</tr> | </tr> | ||
| Line 180: | Line 180: | ||
<tr valign="top"> | <tr valign="top"> | ||
<td width=25>[[image:DotPoint1.JPG|link=]]</td> | <td width=25>[[image:DotPoint1.JPG|link=]]</td> | ||
| − | <td>In the ''' | + | <td>In the '''Filter Palette''' <span style="font-weight: 700; font-size: 15px; background-color: lightcyan;"> Left Click </span> on the '''Scenery Objects''' icon or select '''Scenery Objects''' from the '''Content Drop Down''' box</td> |
</tr> | </tr> | ||
<tr valign="top"> | <tr valign="top"> | ||
| Line 186: | Line 186: | ||
<table> | <table> | ||
<tr valign="top"> | <tr valign="top"> | ||
| − | <td width= | + | <td width=210>[[image:FilterAssetsPaletteSearchPortals_S20.png|link=]]</td> |
| − | + | ||
<td> | <td> | ||
| − | <table bgcolor=#000000 | + | <table width=786 bgcolor=#000000 cellpadding=2> |
<tr valign="top"> | <tr valign="top"> | ||
<td> | <td> | ||
| − | <table bgcolor=#ffffb0 | + | <table width=782 bgcolor=#ffffb0 cellpadding=2> |
<tr valign="top"> | <tr valign="top"> | ||
<td width=22>[[image:NotePad.PNG|link=]]</td> | <td width=22>[[image:NotePad.PNG|link=]]</td> | ||
| Line 201: | Line 200: | ||
<tr valign="top"> | <tr valign="top"> | ||
<td colspan=2> | <td colspan=2> | ||
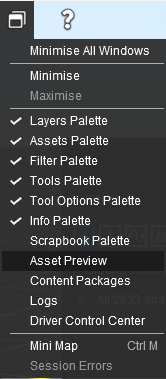
| − | If the '''Assets Palette''' | + | If both the '''Filter Palette''' and '''Assets Palette''' are not shown on the screen, then:- |
<table> | <table> | ||
<tr valign="top"> | <tr valign="top"> | ||
| Line 209: | Line 208: | ||
<tr valign="top"> | <tr valign="top"> | ||
<td width=25>[[image:DotPoint1Blue.png|link=]]</td> | <td width=25>[[image:DotPoint1Blue.png|link=]]</td> | ||
| − | <td>open the '''Window Menu''' from the menu icons at the top of the screen</td> | + | <td>open the [[image:SurveyorWindowIcon.png|link=]] '''Window Menu''' from the menu icons at the top of the screen</td> |
</tr> | </tr> | ||
<tr valign="top"> | <tr valign="top"> | ||
<td>[[image:DotPoint2Blue.png|link=]]</td> | <td>[[image:DotPoint2Blue.png|link=]]</td> | ||
| − | <td><span style="font-weight: 700; font-size: 15px; background-color: lightcyan;">Left Click</span> on the | + | <td>If either palette does not have a [[image:Tick.PNG|link=]] next to its name then <span style="font-weight: 700; font-size: 15px; background-color: lightcyan;"> Left Click </span> on the palette name to add a [[image:Tick.PNG|link=]] and make it visible</td> |
</tr> | </tr> | ||
<tr valign="top"> | <tr valign="top"> | ||
| − | <td | + | <td>[[image:DotPoint3Blue.png|link=]]</td> |
| + | <td>If the palettes have ticks but are not visible then check the minimised area at the bottom of the list where '''Mini Map''' is located. If their names appear there then they have been minimised. To restore the palettes to the screen <span style="font-weight: 700; font-size: 15px; background-color: lightcyan;"> Left Click </span> on the palette names in '''the minimised area''', '''NOT''' in the palette area above.</td> | ||
</tr> | </tr> | ||
</table> | </table> | ||
| Line 228: | Line 228: | ||
</tr> | </tr> | ||
</table> | </table> | ||
| − | + | </td> | |
| − | <table> | + | </tr> |
| + | </table> | ||
| + | </td> | ||
| + | </tr> | ||
| + | </table> | ||
| + | <br> | ||
| + | <table width=1000> | ||
<tr valign="top"> | <tr valign="top"> | ||
<td width=25>[[image:DotPoint2.JPG|link=]]</td> | <td width=25>[[image:DotPoint2.JPG|link=]]</td> | ||
| − | <td> | + | <td>In the '''Assets Palette''' enter the text "portal" ('''UPPER/lower case''' does not matter) into the <span style="font-weight: 700; font-size: 15px; color: white; background-color: black;"> Search </span> text box</td> |
</tr> | </tr> | ||
<tr valign="top"> | <tr valign="top"> | ||
<td>[[image:DotPoint3.JPG|link=]]</td> | <td>[[image:DotPoint3.JPG|link=]]</td> | ||
| − | <td><span style="font-weight: 700; font-size: 15px; background-color: lightcyan;">Left Click</span> on an entry to select it. If you are not sure about an asset then <span style="font-weight: 700; font-size: 15px; background-color: lightcyan;">Double Left Click</span> on the name to bring up its image and description</td> | + | <td><span style="font-weight: 700; font-size: 15px; background-color: lightcyan;"> Left Click </span> on an entry to select it. If you are not sure about an asset then <span style="font-weight: 700; font-size: 15px; background-color: lightcyan;"> Double Left Click </span> on the name to bring up its image and description</td> |
</tr> | </tr> | ||
| − | </ | + | <tr valign="top"> |
| − | </td> | + | <td>[[image:DotPoint4.JPG|link=]]</td> |
| + | <td><span style="font-weight: 700; font-size: 15px; background-color: lightcyan;"> Left Click </span> in your '''Trainz World''' to add the portal to the scene</td> | ||
</tr> | </tr> | ||
</table> | </table> | ||
| − | < | + | <br> |
| − | + | ||
| − | + | ||
| − | + | ||
<table width=1000> | <table width=1000> | ||
<tr valign="top"> | <tr valign="top"> | ||
| Line 259: | Line 263: | ||
<tr valign="top"> | <tr valign="top"> | ||
<td width=25>[[image:DotPoint1.JPG|link=]]</td> | <td width=25>[[image:DotPoint1.JPG|link=]]</td> | ||
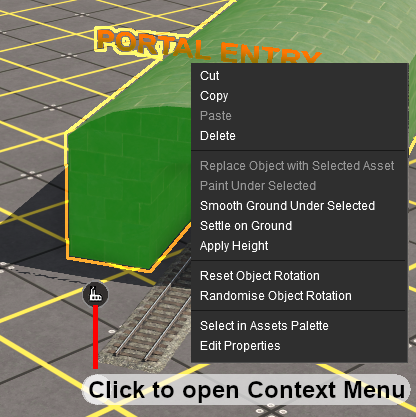
| − | <td><span style="font-weight: 700; font-size: 15px; background-color: lightcyan;">Left Click</span> on its '''Context Icon''' as shown in the image left</td> | + | <td><span style="font-weight: 700; font-size: 15px; background-color: lightcyan;"> Left Click </span> on its '''Context Icon''' as shown in the image left</td> |
</tr> | </tr> | ||
<tr valign="top"> | <tr valign="top"> | ||
<td>[[image:DotPoint2.JPG|link=]]</td> | <td>[[image:DotPoint2.JPG|link=]]</td> | ||
| − | <td><span style="font-weight: 700; font-size: 15px; background-color: lightcyan;">Left Click</span> on <span style="Font-weight: 700; font-size: 15px; color: white; background-color: black;"> Edit Properties </span> to configure the portal</td> | + | <td><span style="font-weight: 700; font-size: 15px; background-color: lightcyan;"> Left Click </span> on <span style="Font-weight: 700; font-size: 15px; color: white; background-color: black;"> Edit Properties </span> to configure the portal</td> |
</tr> | </tr> | ||
</table> | </table> | ||
| Line 366: | Line 370: | ||
<tr valign="top"> | <tr valign="top"> | ||
<td>[[image:DotPoint3.JPG|link=]]</td> | <td>[[image:DotPoint3.JPG|link=]]</td> | ||
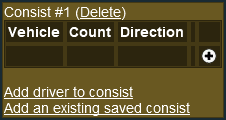
| − | <td><span style="font-weight: 700; font-size: 15px; background-color: lightcyan;">Left Click</span> the | + | <td><span style="font-weight: 700; font-size: 15px; background-color: lightcyan;"> Left Click </span> the ; '''<span style="text-decoration: underline;">Add new consist</span>'''</td> |
</tr> | </tr> | ||
</table> | </table> | ||
| Line 390: | Line 394: | ||
<tr valign="top"> | <tr valign="top"> | ||
<td width=25>[[image:DotPoint1.JPG|link=]]</td> | <td width=25>[[image:DotPoint1.JPG|link=]]</td> | ||
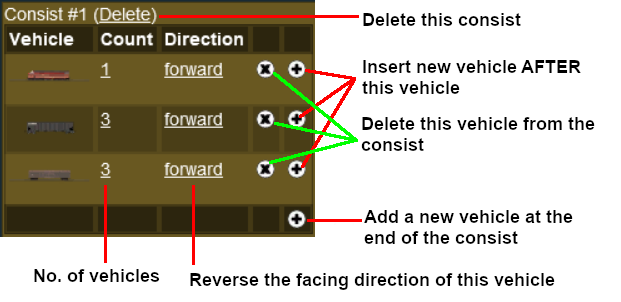
| − | <td><span style="font-weight: 700; font-size: 15px; background-color: lightcyan;">Left Click</span> [[image:PortalPlusIcon.PNG|link=]] to manually '''construct a consist''' from the Session rolling stock list</td> | + | <td><span style="font-weight: 700; font-size: 15px; background-color: lightcyan;"> Left Click </span> [[image:PortalPlusIcon.PNG|link=]] to manually '''construct a consist''' from the Session rolling stock list</td> |
</tr> | </tr> | ||
<tr valign="top"> | <tr valign="top"> | ||
<td>[[image:DotPoint2.JPG|link=]]</td> | <td>[[image:DotPoint2.JPG|link=]]</td> | ||
| − | <td><span style="font-weight: 700; font-size: 15px; background-color: lightcyan;">Left Click</span> '''<span style="text-decoration: underline;">Add driver to consist</span>''' to '''add a driver''' from the Session list</td> | + | <td><span style="font-weight: 700; font-size: 15px; background-color: lightcyan;"> Left Click </span> '''<span style="text-decoration: underline;">Add driver to consist</span>''' to '''add a driver''' from the Session list</td> |
</tr> | </tr> | ||
<tr valign="top"> | <tr valign="top"> | ||
<td>[[image:DotPoint3.JPG|link=]]</td> | <td>[[image:DotPoint3.JPG|link=]]</td> | ||
| − | <td><span style="font-weight: 700; font-size: 15px; background-color: lightcyan;">Left Click</span> '''<span style="text-decoration: underline;">Add an existing saved consist</span>''' to '''add a saved consist''' from those that you have already saved as '''Train Consist Assets'''</td> | + | <td><span style="font-weight: 700; font-size: 15px; background-color: lightcyan;"> Left Click </span> '''<span style="text-decoration: underline;">Add an existing saved consist</span>''' to '''add a saved consist''' from those that you have already saved as '''Train Consist Assets'''</td> |
</tr> | </tr> | ||
</table> | </table> | ||
| Line 477: | Line 481: | ||
<tr valign="top"> | <tr valign="top"> | ||
<td>[[image:DotPoint.JPG|10px|link=]]</td> | <td>[[image:DotPoint.JPG|10px|link=]]</td> | ||
| − | <td>add another consist and driver by a <span style="font-weight: 700; font-size: 15px; background-color: lightcyan;">Left Click</span> on the '''<span style="text-decoration: underline;">Add new consist</span>''' | + | <td>add another consist and driver by a <span style="font-weight: 700; font-size: 15px; background-color: lightcyan;"> Left Click </span> on the '''<span style="text-decoration: underline;">Add new consist</span>''' ; again</td> |
</tr> | </tr> | ||
</table> | </table> | ||
| Line 516: | Line 520: | ||
<tr valign="top"> | <tr valign="top"> | ||
<td width=25>[[image:Ablue.png|link=]]</td> | <td width=25>[[image:Ablue.png|link=]]</td> | ||
| − | <td><span style="font-weight: 700; font-size: 15px; background-color: lightcyan;">Left Click</span> the [[image:Tick.PNG|link=]] icon to accept the selection and load it into the portal consist list, <span style="font-weight: 700; font-size: 15px;">OR</span></td> | + | <td><span style="font-weight: 700; font-size: 15px; background-color: lightcyan;"> Left Click </span> the [[image:Tick.PNG|link=]] icon to accept the selection and load it into the portal consist list, <span style="font-weight: 700; font-size: 15px;">OR</span></td> |
</tr> | </tr> | ||
<tr valign="top"> | <tr valign="top"> | ||
<td>[[image:Bblue.png|link=]]</td> | <td>[[image:Bblue.png|link=]]</td> | ||
| − | <td><span style="font-weight: 700; font-size: 15px; background-color: lightcyan;">Left Click</span> the [[image:Cross.PNG|link=]] icon to reject the selection and return to the previous screen</td> | + | <td><span style="font-weight: 700; font-size: 15px; background-color: lightcyan;"> Left Click </span> the [[image:Cross.PNG|link=]] icon to reject the selection and return to the previous screen</td> |
</tr> | </tr> | ||
</table> | </table> | ||
| Line 600: | Line 604: | ||
<td><span style="font-size: 17px;">'''Choices:'''</span><br> | <td><span style="font-size: 17px;">'''Choices:'''</span><br> | ||
[[image:CheckBox.PNG|link=]] '''Consume trains''' then either | [[image:CheckBox.PNG|link=]] '''Consume trains''' then either | ||
| − | :[[image:PortalOptionButtonEmpty.PNG|link=]] '''Accept all trains''' to remove any and all trains that enter the portal, | + | :[[image:PortalOptionButtonEmpty.PNG|link=]] '''Accept all trains''' to remove any and all trains that enter the portal, <span style="font-weight: 700; font-size: 15px;">OR</span> |
:[[image:PortalOptionButtonEmpty.PNG|link=]] '''Accept trains matching specific criteria''' to only remove certain trains that enter the portal</td> | :[[image:PortalOptionButtonEmpty.PNG|link=]] '''Accept trains matching specific criteria''' to only remove certain trains that enter the portal</td> | ||
</tr> | </tr> | ||
| Line 774: | Line 778: | ||
==='''Return Consumed Trains'''=== | ==='''Return Consumed Trains'''=== | ||
| + | <table width=1000 bgcolor="lightcyan" cellpadding=2> | ||
| + | <tr valign="top"> | ||
| + | <td width=10>[[image:BlueDot10x10.png|link=]]</td> | ||
| + | <td>A train that has been returned after entering a portal will return to the Session with any remaining driver commands still in its Driver Schedule. It will then immediately start obeying those commands</td> | ||
| + | </tr> | ||
| + | </table> | ||
| + | <br> | ||
To return consumed trains back into the Session<br> | To return consumed trains back into the Session<br> | ||
<table width=1000> | <table width=1000> | ||
| Line 787: | Line 798: | ||
<td><span style="font-size: 17px;">'''Settings:'''</span><br> | <td><span style="font-size: 17px;">'''Settings:'''</span><br> | ||
To return the train from a different portal:- | To return the train from a different portal:- | ||
| − | + | <table> | |
| − | + | <tr valign="top"> | |
| + | <td width=10>[[image:BlackDot10x10.png|link=]]</td> | ||
| + | <td>Set [[image:CheckBox.PNG|link=]] '''Train returns through alternate portal''', and</td> | ||
| + | </tr> | ||
| + | <tr valign="top"> | ||
| + | <td>[[image:BlackDot10x10.png|link=]]</td> | ||
| + | <td>Enter the exact name of the alternate portal</td> | ||
| + | </tr> | ||
| + | </table> | ||
| + | </td> | ||
</tr> | </tr> | ||
<tr valign="top"> | <tr valign="top"> | ||
| Line 803: | Line 823: | ||
<tr valign="top"> | <tr valign="top"> | ||
<td>[[image:Gears.PNG|link=]]</td> | <td>[[image:Gears.PNG|link=]]</td> | ||
| − | <td><span style="font-size: 17px;">'''Settings:'''</span>< | + | <td><span style="font-size: 17px;">'''Settings:'''</span> |
| − | + | <table> | |
| − | # | + | <tr valign="top"> |
| + | <td width=10>[[image:BlackDot10x10.png|link=]]</td> | ||
| + | <td>Set [[image:CheckBox.PNG|link=]] '''Train returns after ...''' and</td> | ||
| + | </tr> | ||
| + | <tr valign="top"> | ||
| + | <td>[[image:BlackDot10x10.png|link=]]</td> | ||
| + | <td><span style="font-weight: 700; font-size: 15px; background-color: lightcyan;"> Double Left Click </span> on '''<u>5 real minutes</u>''' to set the time delay (in '''real minutes''', not '''Trainz Clock minutes''') between the train being consumed and produced, then select '''one option''' from:-</td> | ||
| + | </tr> | ||
| + | </table> | ||
| + | </td> | ||
</tr> | </tr> | ||
</table> | </table> | ||
| Line 822: | Line 851: | ||
</tr> | </tr> | ||
</table></td> | </table></td> | ||
| − | |||
| − | |||
| − | |||
| − | |||
| − | |||
| − | |||
| − | |||
</tr> | </tr> | ||
</table> | </table> | ||
| Line 905: | Line 927: | ||
<td> | <td> | ||
<span style="font-size: 17px;">'''More Tutorials and Guides to Using Trainz'''</span><br> | <span style="font-size: 17px;">'''More Tutorials and Guides to Using Trainz'''</span><br> | ||
| − | *'''<span class=" | + | *'''<span class="plain;s">[http://online.ts2009.com/mediaWiki/index.php/HowTo How to Guides]</span>''' |
*'''[[Driver Commands List]]''' | *'''[[Driver Commands List]]''' | ||
*'''[[Session Rule List with Parameters|Session Rules List (Alphabetical) with Parameters]]''' | *'''[[Session Rule List with Parameters|Session Rules List (Alphabetical) with Parameters]]''' | ||
| Line 913: | Line 935: | ||
</table> | </table> | ||
---- | ---- | ||
| − | This page was created by Trainz user '''<span class=" | + | This page was created by Trainz user '''<span class="plain;s">[http://online.ts2009.com/mediaWiki/index.php/User:Pware pware]</span>''' in July 2018 and was last updated as shown below. |
---- | ---- | ||
[[Category:How-to guides]] | [[Category:How-to guides]] | ||
Revision as of 14:41, 27 July 2024
The information in this Wiki Page applies to TANE, TRS19, Trainz Plus and TRS22.
|
|
What is a Portal?
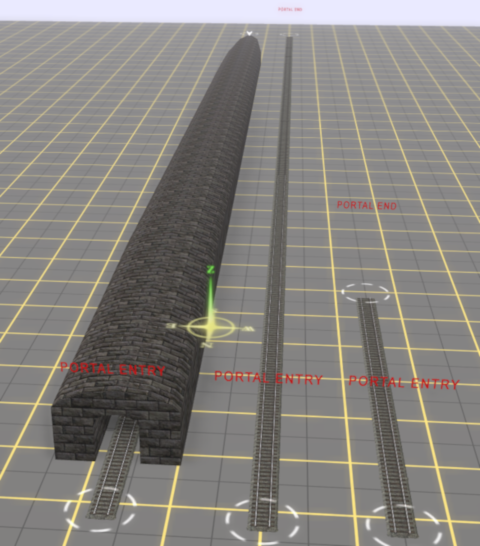 |
Portals come in a variety of forms - some resemble tunnels and others look like a section of normal track. One portal is a Track Marker.
|
Adding a Portal
In Surveyor Classic (S10)
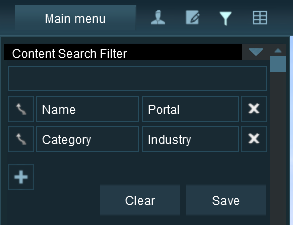 |
The quickest way to find all the train producing and consuming portals in the Surveyor Object Tool window is to set up a search filter. This will sort the portals you want from all the objects named "portal" such as tunnel portals.
|
|||||||||||||
|
In Surveyor 2.0 (S20)
|
| Steps: To find a Portal in the Assets Palette:- | ||||||||||||||||
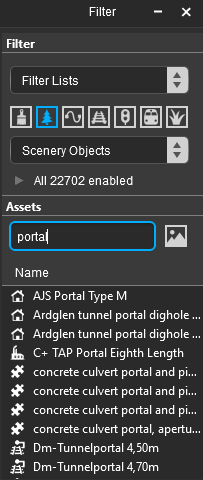
| In the Filter Palette Left Click on the Scenery Objects icon or select Scenery Objects from the Content Drop Down box | ||||||||||||||||
|
||||||||||||||||
| In the Assets Palette enter the text "portal" (UPPER/lower case does not matter) into the Search text box | |
| Left Click on an entry to select it. If you are not sure about an asset then Double Left Click on the name to bring up its image and description | |
| Left Click in your Trainz World to add the portal to the scene |
 |
|
|||||||
Configuring a Basic Portal
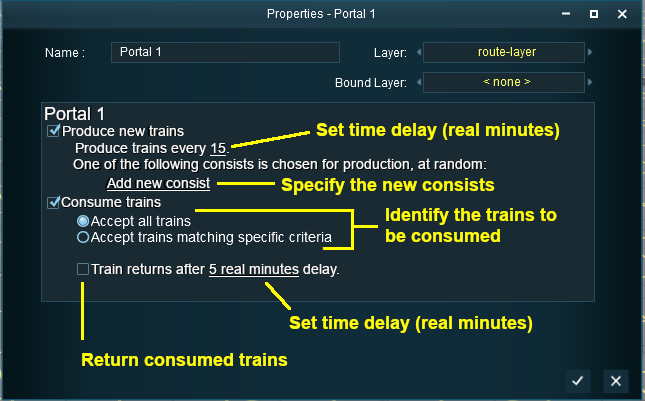
Open the properties window of a portal in the route.
 |
|
|||||||||||||||
Produce Trains
 |
|
|||||||||
 |
|
|||||||||
Construct a Consist
 |
|
|||||||||||||||||||||||||||
Add a Saved Consist
If you have already saved your consists in Trainz using the Trainz Tool then those consists can be quickly and easily added to the portal consist list.
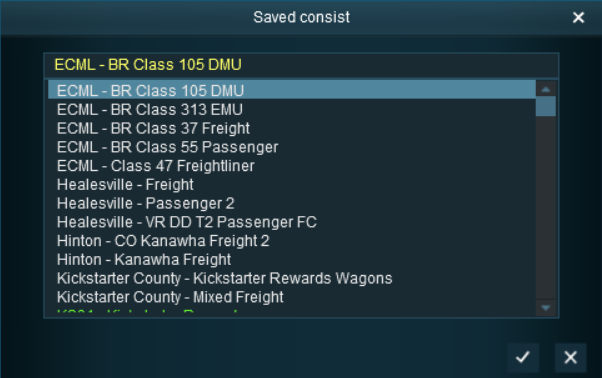 |
|
|||||||||||
Add a Driver
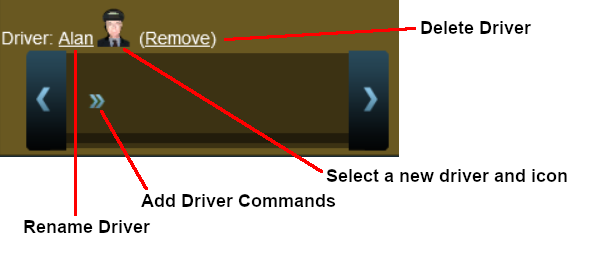 |
|
||||||||||||||
 |
For information on adding driver commands see the Trainz Wiki Page at:- |
Consume Trains
To remove trains from the Session
 |
|
||||||
|
Consume Only Specific Trains
After selecting the option Accept trains matching specific criteria a new set of controls will appear
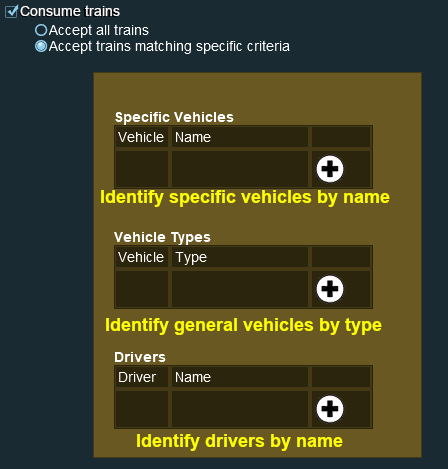 |
|
||||||||||||||||||||||||||||||
An example:-
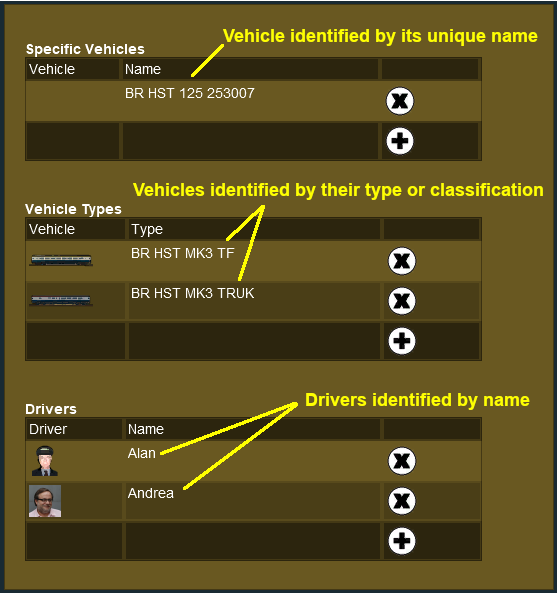 |
|
|||||||||||||||||
Return Consumed Trains
| A train that has been returned after entering a portal will return to the Session with any remaining driver commands still in its Driver Schedule. It will then immediately start obeying those commands |
To return consumed trains back into the Session

|
|
||||||||||||||||||||||
|
Configuring an Enhanced Portal
| There are a number of portals available on the DLS that have additional features or capabilities that are not found in the basic portals built into Trainz. There are also Session Rules available on the DLS that will give additional features or capabilities to the basic portals. |
Quick Portal Manager Standard Edition Rule (SP2 and later)
This is a Session Rule, by pguy, that manages the portals and adds flexible timetables to their operations. It is available on the DLS.
|
Portals and the UDS (Unified Driver Surveyor) Interface
| The UDS is an option for rapid switching, in both directions, between Driver and Surveyor. It is available in TRS19 Platinum Edition and later versions of Trainz. The UDS does not affect the operation of portals but it has revealed one previously unnoticed property of portals. A train that is driven into a portal and later returned to the layout will be returned in the same layer as the portal and not in the trains originally assigned layer. Trains that are produced by a portal will be assigned to the same layer as the portal. This has possibly always been the case with portals but was probably unnoticed until the arrival of the UDS. It seems to have no other noticeable effect on trains. |
Trainz Wiki
 |
More Tutorials and Guides to Using Trainz |
This page was created by Trainz user pware in July 2018 and was last updated as shown below.
