How to Use Message Popup Rule
m |
|||
| Line 40: | Line 40: | ||
<br> | <br> | ||
The '''Message Popup Rule''' is added to a Session and configured using the [[image:WikiLink.PNG|link=]] '''[[How to Use Session Editor|Session Editor]]''' in Surveyor. The rule will open a browser window on the screen in Driver Mode that will remain on the screen until it is closed by the user or by another rule.<br> | The '''Message Popup Rule''' is added to a Session and configured using the [[image:WikiLink.PNG|link=]] '''[[How to Use Session Editor|Session Editor]]''' in Surveyor. The rule will open a browser window on the screen in Driver Mode that will remain on the screen until it is closed by the user or by another rule.<br> | ||
| − | There are three ways the message window can be created:- | + | |
| − | :[[image:Ablue.png|link=]] | + | <table bgcolor=#000000 cellpadding=2> |
| − | :[[image:Bblue.png|link=]] | + | <tr valign="top"> |
| − | :[[image:Cblue.png|link=]] | + | <td> |
| + | <table bgcolor=#ffffff cellpadding=2> | ||
| + | <tr valign="top"> | ||
| + | <td colspan=2>There are three ways the message window can be created:-<br> | ||
| + | <span style="font-weight: 700; font-size: 15px;">Options:</span> Choose one of:-</td> | ||
| + | </tr> | ||
| + | <tr valign="top"> | ||
| + | <td width=25>[[image:Ablue.png|link=]]</td> | ||
| + | <td>with a '''Custom Message''' - the quickest and easiest method, <span style="font-weight: 700; font-size: 15px;">OR</span></td> | ||
| + | </tr> | ||
| + | <tr valign="top"> | ||
| + | <td>[[image:Bblue.png|link=]]</td> | ||
| + | <td>with a '''HTML (Web) Page''' - the most complicated method but it often gives the best results, <span style="font-weight: 700; font-size: 15px;">OR</span></td> | ||
| + | </tr> | ||
| + | <tr valign="top"> | ||
| + | <td>[[image:Cblue.png|link=]]</td> | ||
| + | <td>with a '''String Table Message'''</td> | ||
| + | </tr> | ||
| + | </table> | ||
| + | </td> | ||
| + | </tr> | ||
| + | </table> | ||
<br> | <br> | ||
<table> <!-- BEGIN Nav Buttons Table --> | <table> <!-- BEGIN Nav Buttons Table --> | ||
| Line 89: | Line 110: | ||
<tr valign="top"> | <tr valign="top"> | ||
<td> | <td> | ||
| − | <table | + | <table bgcolor=#ffffb0 cellpadding=2> |
<tr valign="top"> | <tr valign="top"> | ||
| − | <td>[[image:NotePad.PNG|link=]]</td> | + | <td width=25>[[image:NotePad.PNG|link=]]</td> |
<td><span style="font-size: 17px;">'''Notes:'''</span><br> | <td><span style="font-size: 17px;">'''Notes:'''</span><br> | ||
---- | ---- | ||
| − | + | </td> | |
| − | + | </tr> | |
| − | + | <tr valign="top"> | |
| − | + | <td colspan=2> | |
| + | <table> | ||
| + | <tr valign="top"> | ||
| + | <td>[[image:DotPoint.JPG|10px|link=]]</td> | ||
| + | <td>No knowledge of HTML is required for this option</td> | ||
| + | </tr> | ||
| + | <tr valign="top"> | ||
| + | <td>[[image:DotPoint.JPG|10px|link=]]</td> | ||
| + | <td>You can select and display an optional icon with the message</td> | ||
| + | </tr> | ||
| + | <tr valign="top"> | ||
| + | <td>[[image:DotPoint.JPG|10px|link=]]</td> | ||
| + | <td>You are no longer limited in the number of lines of text you can add. Although the popup window will only show 7 lines, a vertical scroll bar will appear for longer messages</td> | ||
| + | </tr> | ||
| + | <tr valign="top"> | ||
| + | <td>[[image:DotPoint.JPG|10px|link=]]</td> | ||
| + | <td>Text only can be entered (box cannot be left blank). Some HTML markup is acceptable, for example <i>italic</i> and <b>bold</b> tags</td> | ||
</tr> | </tr> | ||
</table> | </table> | ||
</td> | </td> | ||
</tr> | </tr> | ||
| − | </table><br> | + | </table> |
| + | </td> | ||
| + | </tr> | ||
| + | </table> | ||
| + | <br> | ||
<table cellpadding=4 bgcolor="Aquamarine"> | <table cellpadding=4 bgcolor="Aquamarine"> | ||
<tr valign="top"> | <tr valign="top"> | ||
| Line 110: | Line 151: | ||
* '''[[How to Create a HTML Asset]]'''</td> | * '''[[How to Create a HTML Asset]]'''</td> | ||
</tr> | </tr> | ||
| − | </table></td> | + | </table> |
| + | </td> | ||
</tr> | </tr> | ||
</table> | </table> | ||
| + | <br> | ||
<table> | <table> | ||
<tr> | <tr> | ||
| Line 127: | Line 170: | ||
<td>[[image:PencilTips.PNG|link=]]</td> | <td>[[image:PencilTips.PNG|link=]]</td> | ||
<td>To find additional graphic icons that can be added to the '''Message Popup''' window, use '''Content Manager''' and set a '''Custom Filter''' to search for:- | <td>To find additional graphic icons that can be added to the '''Message Popup''' window, use '''Content Manager''' and set a '''Custom Filter''' to search for:- | ||
| − | + | <table> | |
| − | + | <tr valign="top"> | |
| − | + | <td width=10>[[image:DotPoint.JPG|10px|link=]]</td> | |
| − | Not all those shown will be suitable. <span style="font-weight: 700; font-size: 15px; background-color: lightcyan;">Double Left Click</span> on a possible icon to display its details before downloading | + | <td>'''Category''' select '''Texture- Not Environmental'''</td> |
| + | </tr> | ||
| + | <tr valign="top"> | ||
| + | <td>[[image:DotPoint.JPG|10px|link=]]</td> | ||
| + | <td>'''Name''' type '''icon'''</td> | ||
| + | </tr> | ||
| + | <tr valign="top"> | ||
| + | <td>[[image:DotPoint.JPG|10px|link=]]</td> | ||
| + | <td>'''On Download Station''' select '''True'''</td> | ||
| + | </tr> | ||
| + | <tr valign="top"> | ||
| + | <td colspan=2>Not all those shown will be suitable. <span style="font-weight: 700; font-size: 15px; background-color: lightcyan;">Double Left Click</span> on a possible icon to display its details before downloading</td> | ||
| + | </tr> | ||
| + | </table> | ||
</td> | </td> | ||
</tr> | </tr> | ||
Revision as of 23:45, 19 September 2023
The information in this Wiki Page applies to TANE, TRS19, Trainz Plus and TRS22. This page describes how to configure the Message Popup Rule.
 |
For examples of how to use this rule in Sessions see the Trainz Wiki Page at:- |
|
Workflow Diagram 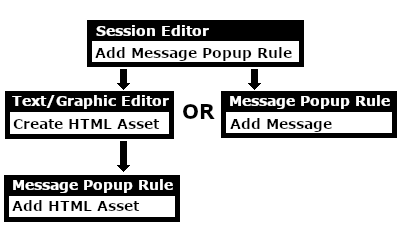 |
Add a Message Popup Rule
| The Message Popup Rule is a Trainz Session Rule that creates onscreen messages for users in Driver Mode. |
The Message Popup Rule is added to a Session and configured using the ![]() Session Editor in Surveyor. The rule will open a browser window on the screen in Driver Mode that will remain on the screen until it is closed by the user or by another rule.
Session Editor in Surveyor. The rule will open a browser window on the screen in Driver Mode that will remain on the screen until it is closed by the user or by another rule.
|
||||||||
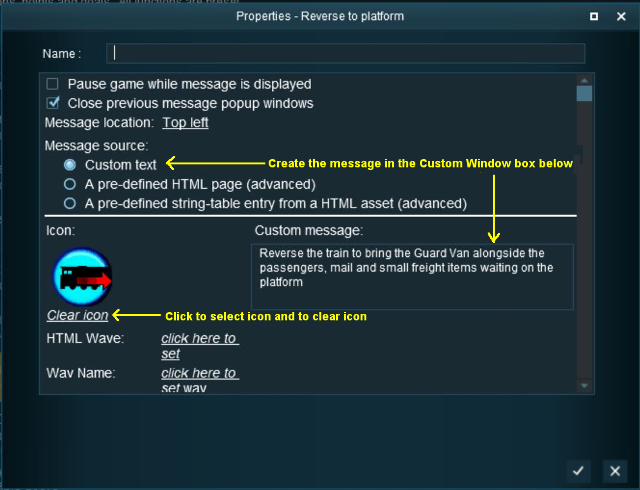
Using a Custom Message
The settings shown in this example will direct Trainz to load the message from text entered in the Custom Message box.
 |
|
|||||||||||||||||||||
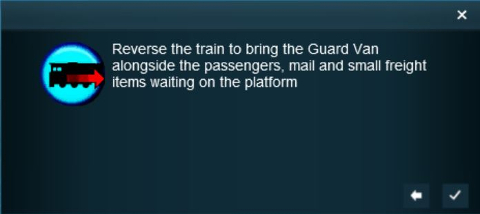 |
The custom message popup created by the example shown above |
|
||||||||||
|
For information on how to create your own Message Popup Icons, see the Trainz Wiki Page at:- |
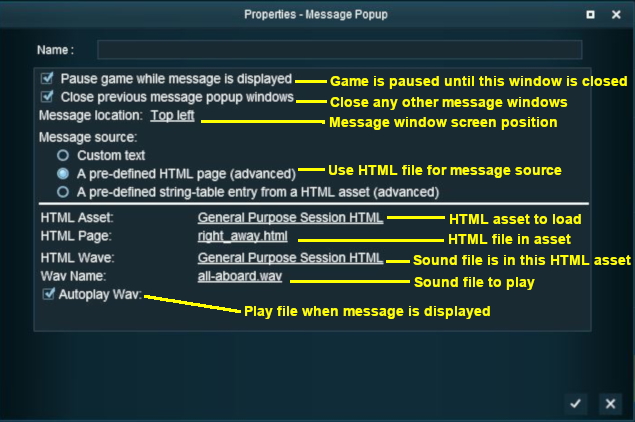
Using a HTML Page
The settings shown in this example will direct Trainz to load the message from a HTML file in a HTML asset.
|
|
|||||||||||
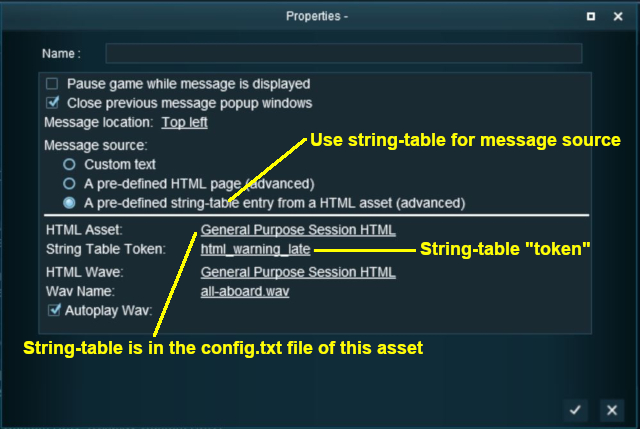
Using a String-Table Message
The settings shown in this example will direct Trainz to load the message from text stored in the config.txt string table of a specified HTML asset.
 |
|
|||||||||
For example, the config.txt file of the asset General Purpose Session HTML contains the following:-
string-table
    {
        html_warning_late       "You are running late!"
    }
...which will produce the message "You are running late!" from the Message Popup Rule settings shown above.
|
For more information, see the Trainz Wiki Page at:- |
Alternatives to the Message Popup Rule
 |
There are other HTML message window rules that are alternatives to the Message Popup rule. A few possibilities are:- |
Related Links
|
Trainz Wiki
 |
More Tutorials and Guides to Using Trainz |
This page was created by Trainz user pware in April 2018 and was last updated as shown below.