SAR Scenario Paratoo Mixed Passenger Freight
From TrainzOnline
(Difference between revisions)
m |
m |
||
| Line 27: | Line 27: | ||
<tr valign="top"> | <tr valign="top"> | ||
<td><span style="font-size: 15px; font-weight: 700; color: white; background-color: black;"> Loco: </span></td> | <td><span style="font-size: 15px; font-weight: 700; color: white; background-color: black;"> Loco: </span></td> | ||
| − | <td>'''SAR T 202''' on | + | <td>'''SAR T 202''' on <span style="font-weight: 700;">Peterborough Depot <span style="color: white; background-color: black;"> Car Siding </span></span> |
'''Other Unrostered Locos:''' | '''Other Unrostered Locos:''' | ||
| − | + | *'''SAR T 233''' on <span style="font-weight: 700;">Peterborough Depot <span style="color: white; background-color: black;"> Loco Road 1 </span></span> | |
| − | *'''SAR T 233''' on | + | *'''SAR 407''' on <span style="font-weight: 700;">Peterborough Depot <span style="color: white; background-color: black;"> Repair Shop Road 4 </span></span></td> |
| − | *'''SAR 407''' on | + | |
</tr> | </tr> | ||
<tr valign="top"> | <tr valign="top"> | ||
| Line 100: | Line 99: | ||
<td> | <td> | ||
<span style="font-size: 15px; font-weight: 700; color: white; background-color: black;"> Tasks: </span><br> | <span style="font-size: 15px; font-weight: 700; color: white; background-color: black;"> Tasks: </span><br> | ||
| − | # Reverse the train out of the siding and onto the station line. Pull the train forward into <span style="font-weight: 700;">Peterborough <span style="color: black; background-color: white;"> Station </span></span> stopping with the passenger car alongside the station building | + | # Reverse the train out of the siding and onto the station line. Pull the train forward into <span style="font-weight: 700;">Peterborough <span style="color: black; background-color: white;"> Station </span></span> stopping with the passenger car alongside the station building. |
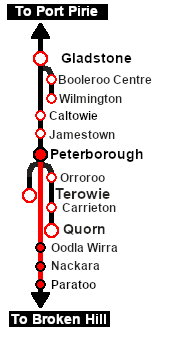
# Depart '''Peterborough''' at 08:06 and proceed to '''Paratoo''' stopping at '''Ucolta''', '''Oodla Wirra''' and '''Nackara'''. At each stop place the passenger car alongside the station building. | # Depart '''Peterborough''' at 08:06 and proceed to '''Paratoo''' stopping at '''Ucolta''', '''Oodla Wirra''' and '''Nackara'''. At each stop place the passenger car alongside the station building. | ||
# Detach and shunt wagons at each location as required. '''QLX''' wagons to the <span style="font-weight: 700;"><span style="color: black; background-color: yellow;"> Goods Sheds </span></span>, '''MTW''' flat wagons to the <span style="font-weight: 700;"><span style="color: black; background-color: yellow;"> Goods Cranes </span></span>. Leave each wagon at its unloading point. | # Detach and shunt wagons at each location as required. '''QLX''' wagons to the <span style="font-weight: 700;"><span style="color: black; background-color: yellow;"> Goods Sheds </span></span>, '''MTW''' flat wagons to the <span style="font-weight: 700;"><span style="color: black; background-color: yellow;"> Goods Cranes </span></span>. Leave each wagon at its unloading point. | ||
| Line 117: | Line 116: | ||
*The approaches to all locations are protected by invisible signals to prevent the '''AI Half Speed Slowdown Problem''' when approaching a signal at stop. | *The approaches to all locations are protected by invisible signals to prevent the '''AI Half Speed Slowdown Problem''' when approaching a signal at stop. | ||
*Trackmarks and industries have been provided for AI '''Drive To Trackmark''', '''Drive via Trackmark''' and '''Drive to <span style="background-color: yellow;"> Industry </span>''' commands. Click [[image:Line_Index_Label.png|link=SAR_Index|Location Index]] for details. | *Trackmarks and industries have been provided for AI '''Drive To Trackmark''', '''Drive via Trackmark''' and '''Drive to <span style="background-color: yellow;"> Industry </span>''' commands. Click [[image:Line_Index_Label.png|link=SAR_Index|Location Index]] for details. | ||
| + | *An industry active station (where you can use the '''Drive To''' industry command) is at '''Peterborough'''. Industry active stations will have a longer than expected wait time. | ||
*Manual (no AI) driving is possible. As a visual driving aid, a '''Caution''' warning sign has been placed at the location of the '''Main Approach Dn''' and '''Main Approach Up''' trackmarks. Click [[image:Line_Index_Label.png|link=SAR_Index|Location Index]] for details. | *Manual (no AI) driving is possible. As a visual driving aid, a '''Caution''' warning sign has been placed at the location of the '''Main Approach Dn''' and '''Main Approach Up''' trackmarks. Click [[image:Line_Index_Label.png|link=SAR_Index|Location Index]] for details. | ||
</td> | </td> | ||
Revision as of 08:42, 17 April 2021
| 9 Peterborough to Paratoo Mixed Passenger Freight | ||
| A scenario in the SAR Peterborough Base Session | ||
| Mixed passenger and freight run from Peterborough to Paratoo. |
 |
|
||||||||||
Getting Started:
|
Tutorial:
|

|
|
| Links: All links will open in this window | ||||||
 Session Scenarios List |
 Location List |
 Rolling Stock |
 Active Industries |
|||
This page was created by Trainz user pware in February 2021 and was last updated as shown below.