|
|
| Line 59: |
Line 59: |
| | </table> <!-- END Information Table --> | | </table> <!-- END Information Table --> |
| | | | |
| − | <table width=700> <!-- BEGIN Track Markers Title Link --> | + | <table width=750> <!-- BEGIN Track Markers Title Link --> |
| | <tr valign="top"> | | <tr valign="top"> |
| − | <td width=500>{{Anchor|TMData}}<span style="font-weight: 700; font-size: 18px; background-color: blue; color: white;"> Track Markers </span></td> | + | <td width=450>{{Anchor|TMData}}<span style="font-weight: 700; font-size: 18px; background-color: blue; color: white;"> Track Markers </span></td> |
| − | <td align=right width=200>[[image:ToPathsDown.png|link=#PathData]] [[image:ToTracksDown.png|link=#TrackData]] [[file:BackToTop.png|link=#top]]</td> | + | <td align="right" width=300>[[image:ToPathsDown.png|link=#PathData]] [[image:ToTracksDown.png|link=#TrackData]] [[file:BackToTop.png|link=#top]] [[file:BackToBottom.png|link=#BaseData]]</td> |
| | </tr> | | </tr> |
| | </table> <!-- END Track Markers Title Link --> | | </table> <!-- END Track Markers Title Link --> |
| Line 150: |
Line 150: |
| | <td width=750> | | <td width=750> |
| | | | |
| − | <table width=700> <!-- BEGIN Path Title Link --> | + | <table width=750> <!-- BEGIN Path Title Link --> |
| | <tr valign="top"> | | <tr valign="top"> |
| − | <td width=500>{{Anchor|PathData}}<span style="font-weight: 700; font-size: 18px; background-color: blue; color: white;"> Path Diagrams </span></td> | + | <td width=450>{{Anchor|PathData}}<span style="font-weight: 700; font-size: 18px; background-color: blue; color: white;"> Path Diagrams </span></td> |
| − | <td align=right width=200>[[image:ToTMsUp.png|link=#TMData]] [[image:ToTracksDown.png|link=#TrackData]] [[file:BackToTop.png|link=#top]]</td> | + | <td align=right width=300>[[image:ToTMsUp.png|link=#TMData]] [[image:ToTracksDown.png|link=#TrackData]] [[file:BackToTop.png|link=#top]] [[file:BackToBottom.png|link=#BaseData]]</td> |
| | </tr> | | </tr> |
| − | </table> <!-- END Track Title Link --> | + | </table> <!-- END Path Title Link --> |
| | | | |
| | [[Image:SAR_Gladstone.png|link=|alt=Gladstone EIT Paths]]<br> <!-- Path map --> | | [[Image:SAR_Gladstone.png|link=|alt=Gladstone EIT Paths]]<br> <!-- Path map --> |
| Line 221: |
Line 221: |
| | </table> <!-- END Paths Table --> | | </table> <!-- END Paths Table --> |
| | | | |
| − | <table width=700> <!-- BEGIN Track Title Link --> | + | <table width=750> <!-- BEGIN Track Title Link --> |
| | <tr valign="top"> | | <tr valign="top"> |
| − | <td width=500>{{Anchor|TrackData}}<span style="font-weight: 700; font-size: 18px; background-color: blue; color: white;"> Track Diagram </span></td> | + | <td width=450>{{Anchor|TrackData}}<span style="font-weight: 700; font-size: 18px; background-color: blue; color: white;"> Track Diagram </span></td> |
| − | <td align=right width=200>[[image:ToPathsUp.png|link=#PathData]] [[image:ToTMsUp.png|link=#TMData]] [[file:BackToTop.png|link=#top]]</td> | + | <td align=right width=300>[[image:ToPathsUp.png|link=#PathData]] [[image:ToTMsUp.png|link=#TMData]] [[file:BackToTop.png|link=#top]] [[file:BackToBottom.png|link=#BaseData]]</td> |
| | </tr> | | </tr> |
| | </table> <!-- END Track Title Link --> | | </table> <!-- END Track Title Link --> |
| Line 567: |
Line 567: |
| | </tr> | | </tr> |
| | </table> <!-- END TOP TABLE --> | | </table> <!-- END TOP TABLE --> |
| | + | {{Anchor|BaseData}} |

 |
|
 |


 |
 |
Commodities: (load and/or unload)

Passengers
 |

Goods
 |

Grain
 |

Livestock
 |
|
Loco:
|
Facilities:
|
|
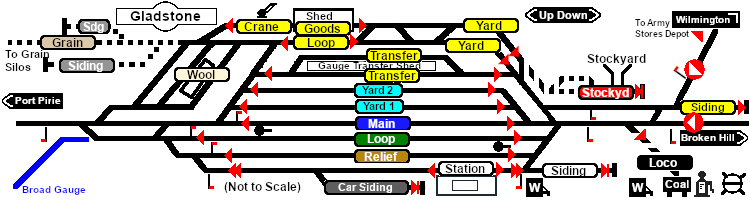
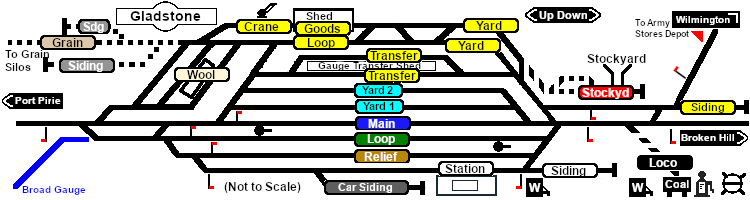
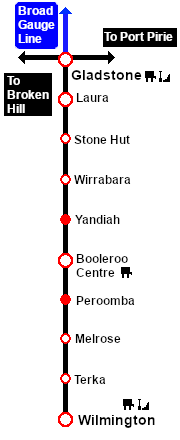
Multiple loops, yards and sidings for goods, grain, livestock, station and loco servicing facilities. A major manned station, junction and a break-of-gauge location on the Port Pirie-Broken Hill line and the Gladstone-Wilmington Line . The Port Pirie-Broken Hill Line was converted to standard gauge in 1969 and Gladstone then became a triple gauge location.
|
 |
| Track Markers |
| Destinations for "Drive To Trackmark ..." commands |
| Approach from Broken Hill |
 Gladstone Main Approach Up Gladstone Main Approach Up |
| Approach from Wilmington |
Gladstone Branch Approach Up |
| |
Gladstone Station Up |
 Gladstone Station Dn Gladstone Station Dn |
 |
Gladstone Relief Up |
Gladstone Relief Dn |
 |
Gladstone Loop Up |
Gladstone Loop Dn |
 |
Gladstone Main Up |
Gladstone Main Dn |
 |
Gladstone Yard 1 Up |
Gladstone Yard 1 Dn |
 |
Gladstone Yard 2 Up |
Gladstone Yard 2 Dn |
 |
Gladstone Transfer Up |
Gladstone Transfer Dn |
 |
Gladstone Goods Loop Up |
Gladstone Goods Loop Dn |
 |
|
Gladstone Goods Loop Yard Dn |
| |
Gladstone Goods Up |
Gladstone Goods Dn |
| |
|
Gladstone Goods Yard Dn |
|
|
|
|
| From |
To |
EIT Paths |
Descriptions |
  |
Station to Broken Hill |
Departing service to Jamestown or Peterborough from station |
 |
Station to Wilmington |
Departing service to Wilmington from station |
 |
Loop to Broken Hill |
Departing service to Jamestown or Peterborough from loop |
| |
Loop to Wilmington |
Departing service to Wilmington from loop |
 |
Yard 2 to Broken Hill |
Departing service to Jamestown or Peterborough from yard 2 |
| |
Yard 2 to Wilmington |
Departing service to Wilmington from yard 2 |
 |
Goods Loop to Broken Hill |
Departing service to Jamestown or Peterborough from goods loop |
| |
Goods Loop to Wilmington |
Departing service to Wilmington from goods loop |
| All reverse paths (e.g. to ) are also available |
|
|
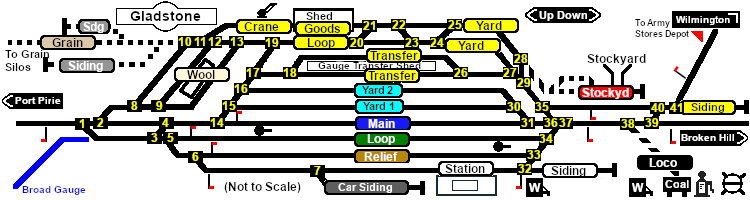
| Switches |
| No. |
Name |
Facing and L/R Directions
(default direction first) |
No. |
Name |
Facing and L/R Directions
(default direction first) |
|
 |
GS 1 |
Down (R) Main, (L) Goods Sidings |
 |
GS 2 |
Down (L) Main, (R) Loop |
 |
GS 3 |
Down (R) Loop, (L) Main |
 |
GS 4 |
Up (R) Main, (L) Loop |
 |
GS 5 |
Down (L) Loop, (R) Relief |
 |
GS 6 |
Down (L) Relief, (R) Station |
 |
GS 7 |
Down (R) Main, (L) Yards |
 |
GS 8 |
Down (L) Yards, (R) Yard 1 |
 |
GS 9 |
Down (L) Yards, (R) Yard 2 |
 |
GS 10 |
Down (L) Goods Yards, (R) Goods Transfer |
 |
GS 11 |
Down (R) Transfer 1, (L) Transfer 2 |
 |
GS 12 |
Down (L) Station, (R) Car Siding |
 |
GS 13 |
Down (L) Goods 1, (R) Goods 2/3 |
 |
GS 14 |
Up (L) Goods 1, (R) Siding/Grain |
 |
GS 15 |
Down (R) Goods Loop, (L) Goods Shed |
 |
GS 16 |
Down (R) Goods 3, (L) Goods 2 |
 |
GS 17 |
Up (R) Goods Loop, (L) Goods 2 |
 |
GS 18 |
Up (R) Goods Loop, (L) Goods 3 |
 |
GS 19 |
Up (R) Goods Loop, (L) Main |
 |
GS 20 |
Down (R) Goods Loop, (L) Goods Shed |
 |
GS 21 |
Up (R) Goods Shed, (L) Goods Loop |
 |
GS 22 |
Down (L) Goods Shed, (R) Goods Loop |
 |
GS 23 |
Up (L) Goods Loop, (R) Goods Shed |
 |
GS 24 |
Down (R) Goods Loop, (L) Goods Shed |
 |
GS 25 |
Up (R) Goods Shed, (L) Goods Loop |
 |
GS 26 |
Down (L) Stockyard, (R) Yards/Main |
 |
GS 27 |
Up (L) Goods Transfer 1, (R) Goods Transfer 2 |
 |
GS 28 |
Up (L) Goods Transfer Shed, (R) Goods Loop/Shed |
 |
GS 29 |
Up (L) Goods Loop/Transfers, (R) Goods Shed |
 |
GS 30 |
Up (L) Yard 1, (R) Yard 2 |
 |
GS 31 |
Up (L) Main, (R) Yards 1/2 |
 |
GS 32 |
Down (R) Car Siding, (L) Main Yard |
 |
GS 33 |
Up (R) Relief, (L) Station |
 |
GS 34 |
Up (L) Relief/Station, (R) Loop |
 |
GS 35 |
Down (L) Goods Yard, (R) Main Yard |
 |
GS 36 |
Up (L) Main, (R) Goods Loop/Sheds |
 |
GS 37 |
Up (R) Main, (L) Loop/Relief/Station |
 |
GS 38 |
Down (L) Main Yard, (R) Loco Depot |
 |
GS 39 |
Down (R) Broken Hill, (L) Goods Yard |
 |
GS 40 |
Up (R) Goods Yard, (L) Main Yard |
 |
GS 41 |
Down (R) Goods Siding, (L) Wilmington |
|
|
| Switch Sets |
| Station - Broken Hill |
32 -L 33 -L 34 -L 37 -L 38 -L 39 -R |
Station - Wilmington |
32 -L 33 -L 34 -L 37 -L 38 -L 39 -L 40 -L 41 -L |
| Relief - Broken Hill |
33 -R 34 -L 37 -L 38 -L 39 -R |
Relief - Wilmington |
33 -R 34 -L 37 -L 38 -L 39 -L 40 -L 41 -L |
| Loop - Broken Hill |
34 -R 37 -L 38 -L 39 -R |
Loop - Wilmington |
34 -R 37 -L 38 -L 39 -L 40 -L 41 -L |
| Main - Broken Hill |
31 -L 36 -L 37 -R 38 -L 39 -R |
Main - Wilmington |
31 -L 36 -L 37 -R 38 -L 39 -L 40 -L 41 -L |
| Yard 1 - Broken Hill |
30 -L 31 -R 36 -L 37 -R 38 -L 39 -R |
Yard 1 - Wilmington |
30 -L 31 -R 36 -L 37 -R 38 -L 39 -L 40 -L 41 -L |
| Yard 2 - Broken Hill |
30 -R 31 -R 36 -L 37 -R 38 -L 39 -R |
Yard 2 - Wilmington |
30 -R 31 -R 36 -L 37 -R 38 -L 39 -L 40 -L 41 -L |
| Transfer - Broken Hill |
26 -L 27 -L 29 -L 35 -R 36 -R 37 -R 38 -L 39 -R |
Transfer - Wilmington |
26 -L 27 -L 29 -L 35 -L 40 -R 41 -L |
| Goods Loop - Broken Hill |
20 -R 23 -L 24 -R 27 -R 29 -L 35 -R 36 -R 37 -R 38 -L 39 -R |
Goods Loop - Wilmington |
20 -R 23 -L 24 -R 27 -R 29 -L 35 -L 40 -R 41 -L |
| Goods - Broken Hill |
21 -R 22 -R 25 -R 28 -R 29 -R 35 -R 36 -R 37 -R 38 -L 39 -R |
Goods - Wilmington |
21 -R 22 -R 25 -R 28 -R 29 -R 35 -L 40 -R 41 -L |
|
|
|
 |