HowTo/Tune a Diesel EngineSpec
From TrainzOnline
< HowTo(Difference between revisions)
Tonyhilliam (Talk | contribs) (Created page with "Test Track is a module designed to allow users to customise and tweak enginespecs. This How To Guide will walk you through the main steps to get you tweaking. From that poin...") |
Tonyhilliam (Talk | contribs) |
||
| Line 1: | Line 1: | ||
Test Track is a module designed to allow users to customise and tweak enginespecs. | Test Track is a module designed to allow users to customise and tweak enginespecs. | ||
| − | This How To Guide will walk you through the main steps to get you tweaking. | + | This How To Guide will walk you through the main steps to get you tweaking. One you understad the "how, it then comes down to finding the right data to ensure that your power cruves and braking curves match realistic expectations. |
| − | + | =Test Track Module= | |
| + | This module allows you to use a time slider to rapidly move through your testing cycle without having to wait until your train gets up to speed. | ||
| + | |||
| + | Start the module from the Launcher > File > Visit Test Track. | ||
| + | |||
| + | == Setting up your Track== | ||
| + | * Click System Menu > New Test | ||
| + | * Click Add Section and add as many sections as you require. | ||
| + | * Adjust the section length, gradient and curve radius | ||
| + | * Once you've set up a tick, click the tick to apply and save your changes. | ||
| + | * Your track is drawn off into the distance. | ||
| + | Note: We recommend you go uphill before you go downhill so that your track is "above ground". | ||
| + | |||
| + | == Placing your Consist== | ||
| + | * Click the Train tab and place trains as you would normally | ||
| + | * Use the Consist tab and Get tool to Get then save your consist for future testing | ||
| + | |||
| + | == Conducting a Test== | ||
| + | * Expand the graph and choose which elements you wish to test. | ||
| + | * Click Add to add, for example, Train speed, and Tractive Effort. | ||
| + | * The graph will begin drawing. This graph is over time, so think of it like a recorder. | ||
| + | * To get your train moving, release the brakes, increase the throttle as you would normally. | ||
| + | * Notice that the graph lines change over time. | ||
| + | * Click pause to stop the train motion, but notice the graph continues to "buffer". | ||
| + | * Drag the time slider to the right to rapidly get further down the track (for example to the bottom of a hill you are testing your train on). | ||
| + | * Click Pause again for the motion to continue. | ||
| + | |||
| + | ==Editing an Engine Spec== | ||
| + | * Click System Menu > Edit Engine Spec | ||
| + | * To adjust the power curve, click the "click here to edit power curve" link. | ||
| + | * The power curve indicates how many kiloNewtons (kN) of power is applied at various speeds (in m/s). | ||
| + | * Click the tick to save your changes and follow the prompts to save in memory or to save a new version of the engine spec. | ||
| + | |||
| + | View your power curves here: | ||
| + | |||
| + | [[File:2018-08-28 133447.png|700px]] | ||
| + | |||
| + | |||
| + | Change the m/s and Kn values here: | ||
| + | |||
| + | [[File:2018-08-28 124312.png|700px]] | ||
See Also: | See Also: | ||
Revision as of 13:57, 28 August 2018
Test Track is a module designed to allow users to customise and tweak enginespecs.
This How To Guide will walk you through the main steps to get you tweaking. One you understad the "how, it then comes down to finding the right data to ensure that your power cruves and braking curves match realistic expectations.
Contents |
Test Track Module
This module allows you to use a time slider to rapidly move through your testing cycle without having to wait until your train gets up to speed.
Start the module from the Launcher > File > Visit Test Track.
Setting up your Track
- Click System Menu > New Test
- Click Add Section and add as many sections as you require.
- Adjust the section length, gradient and curve radius
- Once you've set up a tick, click the tick to apply and save your changes.
- Your track is drawn off into the distance.
Note: We recommend you go uphill before you go downhill so that your track is "above ground".
Placing your Consist
- Click the Train tab and place trains as you would normally
- Use the Consist tab and Get tool to Get then save your consist for future testing
Conducting a Test
- Expand the graph and choose which elements you wish to test.
- Click Add to add, for example, Train speed, and Tractive Effort.
- The graph will begin drawing. This graph is over time, so think of it like a recorder.
- To get your train moving, release the brakes, increase the throttle as you would normally.
- Notice that the graph lines change over time.
- Click pause to stop the train motion, but notice the graph continues to "buffer".
- Drag the time slider to the right to rapidly get further down the track (for example to the bottom of a hill you are testing your train on).
- Click Pause again for the motion to continue.
Editing an Engine Spec
- Click System Menu > Edit Engine Spec
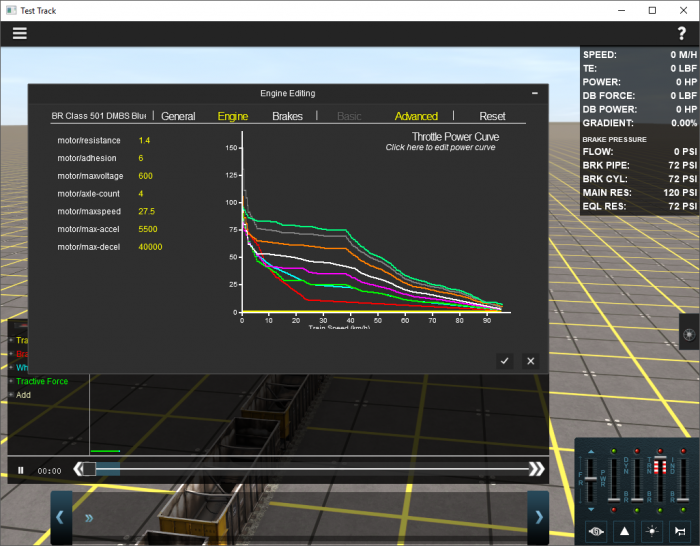
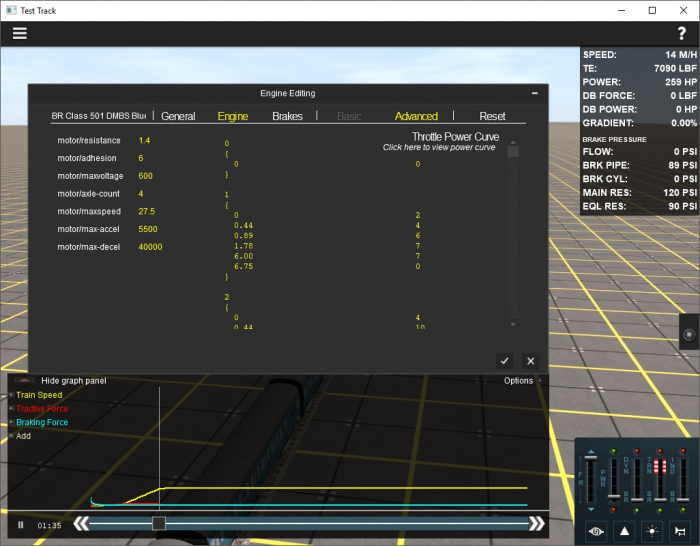
- To adjust the power curve, click the "click here to edit power curve" link.
- The power curve indicates how many kiloNewtons (kN) of power is applied at various speeds (in m/s).
- Click the tick to save your changes and follow the prompts to save in memory or to save a new version of the engine spec.
View your power curves here:
Change the m/s and Kn values here:
See Also:

