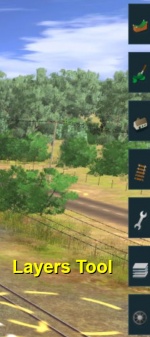
How to Use Layers
| Line 30: | Line 30: | ||
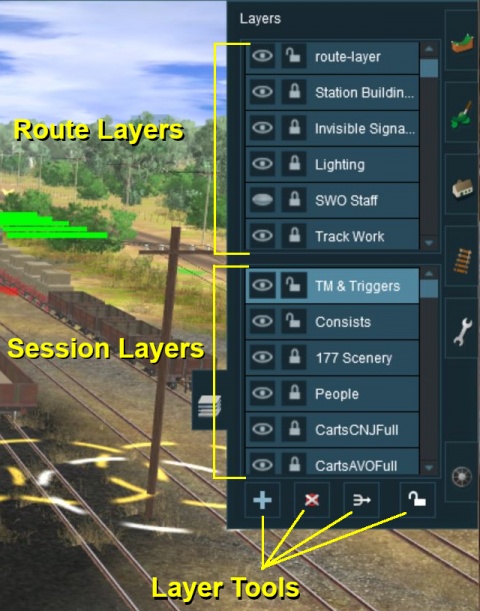
*'''Route Layers''' in the top group, and | *'''Route Layers''' in the top group, and | ||
*'''Session Layers''' in the lower group. | *'''Session Layers''' in the lower group. | ||
| − | |||
Each group can contain multiple layers - the scroll bars next to the layer names shown on the left indicate that there are more layers in each group than can fit into the display window area.</td> | Each group can contain multiple layers - the scroll bars next to the layer names shown on the left indicate that there are more layers in each group than can fit into the display window area.</td> | ||
</tr> | </tr> | ||
Revision as of 12:44, 11 July 2018
Contents |
What Are Layers?
Layers can contain any scenery objects that can be placed into a layout using the Surveyor scenery tools. The layers and their contents can be hidden from view or locked against alteration whenever required. Their main use is in the development of a Route and a Session but they can also be used as a way of providing some additional novelty during a Driver session.
The Layers Tool
Route Layers vs Session Layers
This topic has filled endless threads in the Trainz Forums with arguments raging on both sides.
| There are no "cast iron" rules that dictate what should be placed in the Route Layers Group and what should be placed in the Session Layers Group. Each Route and Session will be different and different creators have different ways of working. The main question to be asked is how many different Sessions will be created using a particular Route? |
Notes:
|
The Route Layers Group
| The Route Layer Group should be used for everything that will always appear in Driver Mode regardless of which Session is playing. |
There is nothing stopping you from placing everything in the "route-layer" of the Route Layers Group and never having to worry about dealing with layers ever again - some creators prefer to work this way. However, layers do provide you with a way of organising your scenery objects to make them more manageable, particularly in more complicated layouts. Some examples:-
- A Special Objects layer or layers that can be used to hold certain scenery objects. For example all the trees or a particular building. This can be very useful when you need to hide those objects to locate or place other objects. Trackside cameras in particular can be very difficult to find when placed in a forest.
- A Platform Objects layer can be used to hold all platform items such as seats, luggage, luggage trolleys, people, lamp posts, etc. Because these items are placed on top of a platform object they can be very difficult to move or delete without first moving the platform. The layer containing the platform can be locked allowing these objects to be easily moved or deleted.
- Hiding and Showing Objects in Driver Mode. There is a Session Rule that can hide and show layers during the running of a Session. For example: a rail worker can be shown standing next to a track lever while shunting operations are underway but can be removed by hiding that layer when shunting has been completed.
- A Test Layer for experimenting. Not sure if a particular object is right for your layout? Place it in a temporary layer which you can hide and show to see any differences it makes. This is particularly useful if you are deciding between different types of grasses, for example, placed throughout the layout. If the objects prove to be unsuitable then they can all be deleted by deleting the layer. If they are suitable then the layer can be merged with another or left as a new layer.
The "route-layer"
While all layers are equal, the "route-layer" is special.
It is recommended that the following objects should be placed in the "route-layer":-
|
| To avoid any confusion over which layer is the original "route-layer", this is one layer that should not be renamed or moved from the top position. |
Track objects, such as signals, junctions and track signs, cannot be placed in any layer that is higher than the layer containing the track. If the "route-layer" is used for all the track and track objects and this layer is left as the top layer then this will never be a problem.
The Session Layers Group
| The Session Layers Group should be used for everything that will only be seen in the currently loaded Session. |
If you are creating more than one Session based around a particular Route, then you will probably make use of the Session Layers.
Session Layers can contain:-
- Scenery objects that will only appear in one or some of the Sessions.
- For example: If you have placed human figures and equipment for a track work crew alongside the track and want them to be seen in a daylight Session but not in a night Session, then place them in one of the Session Layers of the daylight Session only. Likewise, station staff holding lamps would be placed in one of the Session Layers of the night Session only.
- Consists used in a Session. It is a good idea to place ALL consists in the same Session Layer.
| It is a good idea to place all your consists into the same layer particularly if they are going to be coupled together during the running of a Session. |
Adding Objects To Layers
When an object (such as a scenery item, consist, track or track object) is added to the layout it is automatically placed in the currently Active Layer. Unfortunately, TANE does not indicate which layer is the Active Layer unless you open the Layers Tool to look. This can lead to objects being placed into the wrong layers and while these objects can later be moved to another layer (see Moving Objects To Other Layers below) it would be better to correctly set the Active Layer first.
| It is good practice to LOCK ALL LAYERS that you are not currently editing. This will avoid the all too common problem of accidentally adding objects to the wrong layer. |
| You cannot add objects to a layer that is LOCKED. |
If you attempt to add a scenery object to a locked layer you will receive the following message:-
 Clicking the Tick button will UNLOCK the layer. |
| When adding track objects (signals, speed signs, etc) to a track, the track must be in the same layer or in a higher layer than the object that is being added. For more information, see The "route-layer" above. |
| Notes: There are many features of TANE Routes and Sessions that are NOT stored in layers. These include:-
Landforms and textures are saved as part of the Route while all the others are saved as part of a Session. |
Deleting Objects From Layers
| It is good practice to LOCK ALL LAYERS that you are not currently editing. This will avoid the all too common problem of accidentally deleting objects from the wrong layer. |
| You cannot delete objects from a layer that is LOCKED. |
Unfortunately TANE does not give you a warning message when you attempt to delete an object from a locked layer, the object just refuses to be deleted.
If you cannot delete an object then check:-
|
Moving Objects To Other Layers
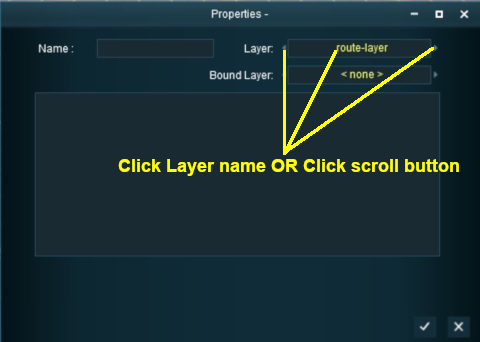 |
|
||||
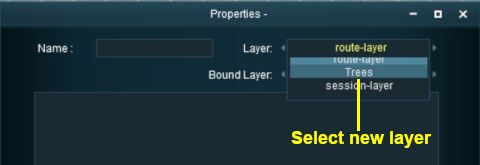 |
|
The Bound Layer
This is a little used and probably little understood layer feature. It allows you to attach an object to two different layers so it can have the properties (locked/unlocked and show/hide) of both layers. Its main use is during the building of a layout.
| An object will be LOCKED and cannot be deleted or moved if its layer OR its bound layer is locked. | |
| An object will be HIDDEN if its layer OR its bound layer is hidden. |
Some applications:-
- Temporarily locking an object by binding it to a locked layer while allowing other objects in the same unlocked layer to be moved or deleted. A simple but very effective development technique is to create a Route layer called "Locked" and then lock it. If you need to temporarily stop an object from being deleted or moved then it can be bound to the "Locked" layer.
- Temporarily hiding an object by binding it to a hidden layer (this will require the hidden layer to be made visible so the object can be unbound).
 |
|
| When a layer is deleted any objects bound to that layer will have their Bound Layer reset to <none> |
If you are going to be working with multiple objects that will be bound to a locked or hidden layer then a simple strategy is to:-
|
Layers in Driver Mode
During the running of a Session in Driver Mode visible layers can be hidden and invisible layers revealled according to the events that occur during the Session.
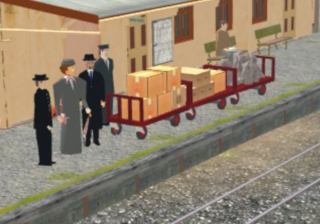 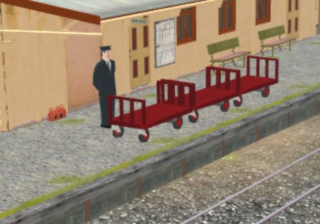 |
The two Driver Mode scenes shown on the left illustrate this feature.
|
This effect is created by using Session Rules in the Surveyor Session Editor. A section of the editor is shown below.
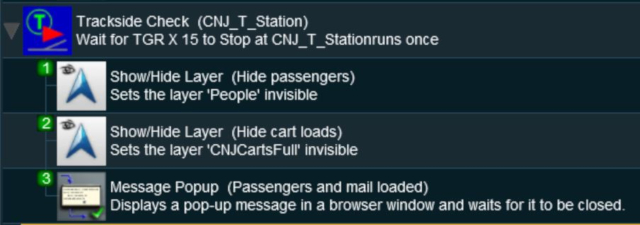 |
In this example:-
- The Trackside Check Rule is triggered when a specific train comes to a stop at a trackmark. This then executes the following rules:-
- The Show/Hide Layer Rule is used to hide the layer named "People". Four passengers (three standing and one seated) are hidden.
- The Show/Hide Layer Rule is used to hide the layer named "CNJCartsFull". The boxes and mail bags on the three platform trolleys are hidden.
- A message is placed on the screen informing the player that the passengers and mail have been loaded.
Trainz Wiki
- How to Guides
- Session Rules List (Alphabetical) with Parameters
- Session Rules List (Categories) With Parameters
Route Creation Tutorials:
Session Creation Tutorials:
- Adding Message Popups
- Adding Message Popups - Applications
- Adding Navigation Points
- Adding Navigation Points - Applications
- Configuring the Driver Setup Rule
- Controlling Junctions in Sessions
- Controlling Signals in Sessions
- Creating a HTML Asset (Session Introduction Page and In Game Messages)
- List of Parent Rules
- Parent and Child Rules
- Using Track Triggers
- Using Variables in Sessions - Examples
