SAR Nantabibbie TrackMarks
From TrainzOnline
(Difference between revisions)
(Blanked the page) |
m |
||
| (16 intermediate revisions by one user not shown) | |||
| Line 1: | Line 1: | ||
| + | <table> <!-- BEGIN TOP TABLE --> | ||
| + | <tr valign="top"> | ||
| + | <td width=750> | ||
| + | <table width=750> <!-- BEGIN TABBED link list with Track Marks page active--> | ||
| + | <tr valign="top"> | ||
| + | <td align="center">[[Image:line740.png|link=]]</td> | ||
| + | </tr> | ||
| + | <tr valign="top"> | ||
| + | <td align="center">[[image:Tab_HM_Grey.png|link=SAR_Nantabibbie]] [[image:Tab_Blank_Grey.png|link=]] [[image:Tab_TM_White.png|link=]] [[image:Tab_SW_Grey.png|link=SAR_Nantabibbie_Switches]] [[image:Tab_Blank_Grey.png|link=]]</td> | ||
| + | </tr> | ||
| + | <tr valign="top"> | ||
| + | <td align="center">[[Image:line740.png|link=]]</td> | ||
| + | </tr> | ||
| + | </table> <!-- END TABBED link list --> | ||
| + | |||
| + | <table bgcolor="lightgrey" bordercolor="lightgrey" width=750> <!-- BEGIN Location link table with LINE and STATION NAMES --> | ||
| + | |||
| + | <tr valign="middle"> | ||
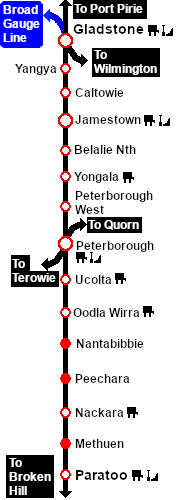
| + | <td width=220 align="right">[[Image:SAR_PortPirie-BrokenHill_Line.png|link=SAR_Port_Pirie-Broken_Hill|alt=PortPirie-BrokenHill|Show Port Pirie-Broken Hill]]</td> | ||
| + | <td width=110 align="center">[[Image:Next Left.png|link=|alt=]]<br>[[Image:SAR_Oodla_Wirra_Name.png|link=SAR Oodla_Wirra|alt=Oodla Wirra|Next Up Location]]</td> | ||
| + | <td width=90 align="center">[[Image:Location Index.png|link=SAR Index|alt=Location Index|Location Index]]<br>[[image:Scenario Index.png|link=SAR Peterborough Base Session|alt=Scenarios|Scenario Index]]</td> | ||
| + | <td width=110 align="center">[[Image:Next Right.png|link=|alt=]]<br>[[Image:SAR_Peechara_Name.png|link=SAR Peechara|alt=Peechara|Next Down Location]]</td> | ||
| + | <td width=220 align="left">[[Image:SAR_PortPirie-BrokenHill_Line.png|link=SAR_Port_Pirie-Broken_Hill|alt=PortPirie-BrokenHill|Show Port Pirie-Broken Hill]]</td> | ||
| + | </tr> | ||
| + | |||
| + | </table> <!-- END Location link table with LINE and STATION NAMES --> | ||
| + | |||
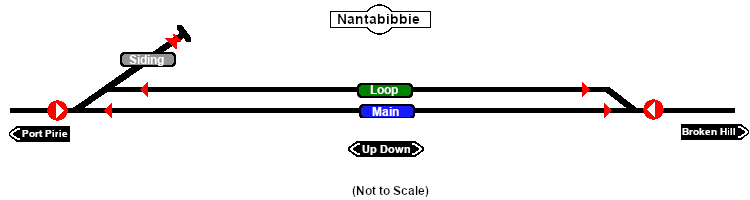
| + | [[image:SAR_Nantabibbie_TM.png|link=|alt=Nantabibbie Track Marks map]] | ||
| + | |||
| + | <table bgcolor="Honeydew" width=750> <!-- BEGIN Track Markers table --> | ||
| + | |||
| + | <tr valign="top"> | ||
| + | <td colspan=3 align="center">[[Image:line740.png|link=]]</td> | ||
| + | </tr> | ||
| + | |||
| + | <tr valign="middle"> | ||
| + | <td colspan=3 align="center"><span style="font-weight: 700;font-size: 17px; background-color: red; color: white;"> Track Marks </span></td> | ||
| + | </tr> | ||
| + | <tr valign="middle"> | ||
| + | <td colspan=3><span style="font-weight: 700;">Destinations for "Drive Via Trackmark <span style="background-color: yellow; color: black;"> NAME </span>" or "Drive To Trackmark <span style="background-color: yellow; color: black;"> NAME </span>" AI commands. The direction that a track mark points has no effect on its operation.</span></td> | ||
| + | </tr> | ||
| + | <tr valign="top"> | ||
| + | <td colspan=3 align="center">[[Image:line740.png|link=]]</td> | ||
| + | </tr> | ||
| + | |||
| + | <tr valign="middle"> | ||
| + | <td width=200><span style="font-weight: 700; background-color: black; color: white;"> Approach from Port Pirie </span> </td> | ||
| + | <td> </td> | ||
| + | <td>[[image:Trackmark_Invert_Right.png|link=|alt=TM|21px]] <span style="font-weight: 700;">Nantabibbie Main Approach Dn</span></td> | ||
| + | </tr> | ||
| + | <tr valign="middle"> | ||
| + | <td width=200><span style="font-weight: 700; background-color: black; color: white;"> Approach from Broken Hill </span> </td> | ||
| + | <td colspan=2>[[image:Trackmark_Invert_Left.png|link=|alt=TM|21px]] <span style="font-weight: 700;">Nantabibbie Main Approach Up</span></td> | ||
| + | </tr> | ||
| + | <tr valign="middle"> | ||
| + | <td width=200>[[image:Main_Label.png|link=|alt=Main]] </td> | ||
| + | <td>[[image:Trackmark_Left.png|link=|alt=TM|10px]] <span style="font-weight: 700;">Nantabibbie Main Up</span></td> | ||
| + | <td>[[image:Trackmark_Right.png|link=|alt=TM|10px]] <span style="font-weight: 700;">Nantabibbie Main Dn</span></td> | ||
| + | </tr> | ||
| + | <tr valign="middle"> | ||
| + | <td width=200>[[image:Loop_Label.png|link=|alt=Loop]] </td> | ||
| + | <td>[[image:Trackmark_Left.png|link=|alt=TM|10px]] <span style="font-weight: 700;">Nantabibbie Loop Up</span></td> | ||
| + | <td>[[image:Trackmark_Right.png|link=|alt=TM|10px]] <span style="font-weight: 700;">Nantabibbie Loop Dn</span></td> | ||
| + | </tr> | ||
| + | <tr valign="middle"> | ||
| + | <td width=200>[[image:Siding_Label.png|link=|alt=Siding]] </td> | ||
| + | <td> </td> | ||
| + | <td>[[image:Trackmark_UpRightDE.png|link=|alt=TM|16px]] <span style="font-weight: 700;">Nantabibbie MOW Siding <span style="background-color: red; color: white;"> DE </span></span></td> | ||
| + | |||
| + | <tr valign="top"> | ||
| + | <td colspan=3 align="center">[[Image:line740.png|link=]]</td> | ||
| + | </tr> | ||
| + | |||
| + | </table> <!-- END Track Markers table --> | ||
| + | |||
| + | </td> | ||
| + | <td> | ||
| + | [[Image:SAR_PortPirie-BrokenHill_Line.png|link=SAR_Port_Pirie-Broken_Hill|alt=PortPirie-BrokenHill|Show Port Pirie-Broken Hill]]<br> | ||
| + | [[Image:SAR_Gladstone-Paratoo Strip Map.png|link=|alt=Gladstone-Paratoo Strip Map]]</td> | ||
| + | </tr> | ||
| + | </table> <!-- END TOP TABLE --> | ||
Latest revision as of 17:17, 1 April 2022
|
 |
||||||||||||||||||||||||||||||||||||||