How to Use Portals
(→Add a Saved Consist) |
|||
| (44 intermediate revisions by one user not shown) | |||
| Line 1: | Line 1: | ||
| + | The information in this Wiki Page applies to '''TANE''', '''TRS19''', '''Trainz Plus''' and '''TRS22'''. | ||
| + | <table> | ||
| + | <tr valign="top"> | ||
| + | <td> | ||
__TOC__ | __TOC__ | ||
| + | </td> | ||
| + | <td width=700> | ||
| + | <table bgcolor="lightcyan" cellpadding=2> | ||
| + | <tr valign="top"> | ||
| + | <td width=10>[[image:BlueDot10x10.png|link=]]</td> | ||
| + | <td>'''Portals''' are track objects that can add and remove trains during the running of a Session</td> | ||
| + | </tr> | ||
| + | <tr valign="top"> | ||
| + | <td>[[image:BlueDot10x10.png|link=]]</td> | ||
| + | <td>'''Portals''' can be used to move trains from one part of a Route to another</td> | ||
| + | </tr> | ||
| + | </table> | ||
| + | </td> | ||
| + | </tr> | ||
| + | </table> | ||
| + | <br> | ||
| + | <table width=1000> <!-- BEGIN Nav Buttons Table --> | ||
| + | <tr valign="top"> | ||
| + | <td width=729><span id="stepWhat"></span> </td> | ||
| + | <td width=46>[[image:BackToTop.png|link=#top|alt=Top|Top]]</td> | ||
| + | <td width=75> </td> | ||
| + | <td width=75>[[image:NextDown.png|link=#stepConfiguring|alt=Next Down|Next Down]]</td> | ||
| + | <td width=75>[[image:BackToBottom.png|link=#bottom|alt=Bottom|Bottom]]</td> | ||
| + | </tr> | ||
| + | </table> <!-- END Nav Buttons Table --> | ||
='''What is a Portal?'''= | ='''What is a Portal?'''= | ||
| − | <table | + | <table width=1000> |
<tr valign="top"> | <tr valign="top"> | ||
| − | <td>[[ | + | <td>[[image:PortalTypeScreenShot.PNG|link=]]</td> |
| − | <td> | + | <td> |
| + | Portals come in a variety of forms - some resemble tunnels and others look like a section of normal track.<br><br> | ||
| + | The basic portals supplied with Trainz can be configured to:- | ||
| + | <table> | ||
| + | <tr valign="top"> | ||
| + | <td width=10>[[image:BlueDot10x10.png|link=]]</td> | ||
| + | <td>remove trains that are sent to them or pass through them (the portals that look like track can be used to let certain trains pass through while "swallowing" others).<br> | ||
| + | The removed trains can be:- | ||
| + | <table> | ||
| + | <tr valign="top"> | ||
| + | <td width=10>[[image:BlueDot10x10.png|link=]]</td> | ||
| + | <td>removed permanently, or</td> | ||
| + | </tr> | ||
| + | <tr valign="top"> | ||
| + | <td>[[image:BlueDot10x10.png|link=]]</td> | ||
| + | <td>returned to the Session through the same portal or another portal after a set time delay</td> | ||
| + | </tr> | ||
| + | </table> | ||
| + | </td> | ||
| + | </tr> | ||
| + | <tr valign="top"> | ||
| + | <td>[[image:BlueDot10x10.png|link=]]</td> | ||
| + | <td>add new trains to the Session. The new trains:- | ||
| + | <table> | ||
| + | <tr valign="top"> | ||
| + | <td>[[image:BlueDot10x10.png|link=]]</td> | ||
| + | <td>will have drivers with orders to follow</td> | ||
| + | </tr> | ||
| + | <tr valign="top"> | ||
| + | <td>[[image:BlueDot10x10.png|link=]]</td> | ||
| + | <td>can be randomly selected from available consists</td> | ||
| + | </tr> | ||
| + | </table> | ||
| + | </td> | ||
| + | </tr> | ||
| + | </table> | ||
| + | <br> | ||
| + | <table bgcolor="lightcyan" cellpadding=2> | ||
| + | <tr valign="top"> | ||
| + | <td width=10>[[image:BlueDot10x10.png|link=]]</td> | ||
| + | <td>Portals can be "enhanced" by using '''Session Rules''' that add additional features and capabilities | ||
| + | </td> | ||
</tr> | </tr> | ||
</table> | </table> | ||
| Line 10: | Line 80: | ||
<table> | <table> | ||
<tr valign="top"> | <tr valign="top"> | ||
| − | <td>[[ | + | <td>Enhanced portals can have features such as:- |
| + | <table> | ||
| + | <tr valign="top"> | ||
| + | <td width=10>[[image:BlueDot10x10.png|link=]]</td> | ||
| + | <td>adding new trains to the Session according to a set schedule ranging from ''once only'', ''once per day'' or at ''set clock times''</td> | ||
| + | </tr> | ||
| + | <tr valign="top"> | ||
| + | <td>[[image:BlueDot10x10.png|link=]]</td> | ||
| + | <td>varying the drivers of added trains and their commands according to a set schedule</td> | ||
| + | </tr> | ||
| + | <tr valign="top"> | ||
| + | <td>[[image:BlueDot10x10.png|link=]]</td> | ||
| + | <td>varying the consists of added trains</td> | ||
| + | </tr> | ||
| + | </table> | ||
| + | </td> | ||
| + | </tr> | ||
| + | </table> | ||
| + | </td> | ||
| + | </tr> | ||
| + | </table> | ||
| + | <br> | ||
| + | ='''Adding a Portal'''= | ||
| + | =='''<span style="color: black; background-color: cyan;"> In Surveyor Classic (S10) </span>'''== | ||
| + | |||
| + | <table width=1000> | ||
| + | <tr valign="top"> | ||
| + | <td>[[image:PortalSearchSettings.PNG|link=]]</td> | ||
| + | <td>The quickest way to find all the train producing and consuming portals in the '''Surveyor Object Tool''' window is to set up a search filter. This will sort the portals you want from all the objects named "portal" such as tunnel portals. | ||
| + | <table bgcolor=#000000 cellpadding=2> | ||
| + | <tr valign="top"> | ||
<td> | <td> | ||
| − | <table | + | <table bgcolor=#ffffff cellpadding=2> |
<tr valign="top"> | <tr valign="top"> | ||
| − | <td>[[ | + | <td colspan=2><span style="font-weight: 700; font-size: 17px;">Steps:</span> To find a '''Portal''' in '''Content Manager''':-<br> |
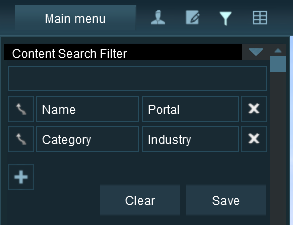
| − | <td><font size=" | + | Set an advanced search filter by:-</td> |
| − | + | </tr> | |
| − | + | <tr valign="top"> | |
| − | + | <td width=25>[[image:DotPoint1.JPG|link=]]</td> | |
| − | + | <td>Pressing <span style="font-weight: 700; font-size: 15px;"><span style="color: white; background-color: black;"> Ctrl </span> + <span style="color: white; background-color: black;"> Shift </span> + <span style="color: white; background-color: black;"> F </span></span></td> | |
| − | + | </tr> | |
| − | + | <tr valign="top"> | |
| − | + | <td>[[image:DotPoint2.JPG|link=]]</td> | |
| − | + | <td><span style="font-weight: 700; font-size: 15px; background-color: lightcyan;">Left Click</span> <span style="color: white; background-color: black; font-weight: 700; font-size: 15px; color: white; background-color: black;"> + </span> and add the filter <span style="color: white; background-color: black; font-weight: 700; font-size: 15px; color: white; background-color: black;"> Name </span> and enter '''Portal''' (upper/lower case is not important) in its text entry box</td> | |
| + | </tr> | ||
| + | <tr valign="top"> | ||
| + | <td>[[image:DotPoint3.JPG|link=]]</td> | ||
| + | <td><span style="font-weight: 700; font-size: 15px; background-color: lightcyan;">Left Click</span> <span style="color: white; background-color: black; font-weight: 700; font-size: 15px; color: white; background-color: black;"> + </span> and add the filter <span style="color: white; background-color: black; font-weight: 700; font-size: 15px; color: white; background-color: black;"> Category </span> and its sub-category '''Industry'''<br> | ||
| + | :The '''Objects''' selection window will now show only those objects that match your search criteria.</td> | ||
| + | </tr> | ||
| + | <tr valign="top"> | ||
| + | <td>[[image:DotPoint4.JPG|link=]]</td> | ||
| + | <td>Open the '''Object Tools''' "fly-out" (or press the <span style="font-weight: 700; font-size: 15px; color: white; background-color: black;"> F3 </span> key)</td> | ||
| + | </tr> | ||
| + | <tr valign="top"> | ||
| + | <td colspan=2>The objects list will show all scenery assets that meet your entered search</td> | ||
| + | </tr> | ||
| + | </table> | ||
| + | </td> | ||
| + | </tr> | ||
| + | </table> | ||
| + | </td> | ||
| + | </tr> | ||
| + | </table> | ||
<br> | <br> | ||
| − | <table | + | <table bgcolor=#ff0000 width=1000> |
<tr valign="top"> | <tr valign="top"> | ||
| − | <td>[[ | + | <td> |
| − | <td> | + | <table bgcolor=#fcbcbc> |
| + | <tr valign="top"> | ||
| + | <td>[[image:Stop.PNG|link=]]</td> | ||
| + | <td> | ||
| + | The portals will '''NOT''' work correctly if the '''Trainz Settings - Dev Tab - Compatibility mode:''' from the '''Trainz Launcher''' is set to '''Maximize performance'''. This setting should be left at '''Maximize compatibility''' | ||
| + | </td> | ||
</tr> | </tr> | ||
| − | </table | + | </table> |
| − | + | </td> | |
| − | + | ||
| − | + | ||
| − | + | ||
</tr> | </tr> | ||
| − | </table></td> | + | </table> |
| + | |||
| + | =='''<span style="color: white; background-color: blue;"> In Surveyor 2.0 (S20) </span>'''== | ||
| + | |||
| + | <table width=1000 bgcolor=#000000 cellpadding=2> | ||
| + | <tr valign="top"> | ||
| + | <td> | ||
| + | <table width=996 bgcolor=#ffffff cellpadding=2> | ||
| + | <tr valign="top"> | ||
| + | <td><span style="font-size: 15px;">'''Surveyor 2.0''' is currently only available for '''Trainz Plus''' and '''TRS22 Platinum Edition'''</span></td> | ||
| + | </tr> | ||
| + | </table> | ||
| + | </td> | ||
</tr> | </tr> | ||
</table> | </table> | ||
<br> | <br> | ||
| + | <table width=1000> | ||
| + | <tr valign="top"> | ||
| + | <td colspan=2><span style="font-weight: 700; font-size: 17px;">Steps:</span> To find a '''Portal''' in the '''Assets Palette''':-</td> | ||
| + | </tr> | ||
| + | <tr valign="top"> | ||
| + | <td width=25>[[image:DotPoint1.JPG|link=]]</td> | ||
| + | <td>In the '''Asset Palette''' <span style="font-weight: 700; font-size: 15px; background-color: lightcyan;">Left Click</span> on the '''Content Drop-down Box'''</td> | ||
| + | </tr> | ||
| + | <tr valign="top"> | ||
| + | <td colspan=2> | ||
| + | <table> | ||
| + | <tr valign="top"> | ||
| + | <td width=220>[[image:FilterSelect.png|link=|alt=Filter List]]<br><br> | ||
| + | [[image:PortalFilterList_S20.png|link=|alt=Portal Filter]]</td> | ||
| + | <td> | ||
| + | <table bgcolor=#000000 width=500 cellpadding=2> | ||
| + | <tr valign="top"> | ||
| + | <td> | ||
| + | <table bgcolor=#ffffb0 width=496 cellpadding=2> | ||
| + | <tr valign="top"> | ||
| + | <td width=22>[[image:NotePad.PNG|link=]]</td> | ||
| + | <td width=374><span style="font-size: 17px; font-weight: 700;">Notes:'''</span><br> | ||
| + | ---- | ||
| + | </td> | ||
| + | </tr> | ||
| + | <tr valign="top"> | ||
| + | <td colspan=2> | ||
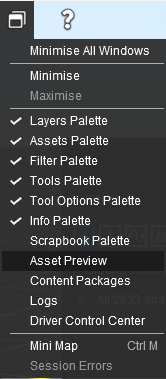
| + | If the '''Assets Palette''' is not shown on the screen, then:- | ||
| + | <table> | ||
| + | <tr valign="top"> | ||
| + | <td width=175>[[image:WindowsMenu_S20.png|link=|alt=Windows Menu]]</td> | ||
| + | <td> | ||
| + | <table> | ||
| + | <tr valign="top"> | ||
| + | <td width=25>[[image:DotPoint1Blue.png|link=]]</td> | ||
| + | <td>open the '''Window Menu''' from the menu icons at the top of the screen</td> | ||
| + | </tr> | ||
| + | <tr valign="top"> | ||
| + | <td>[[image:DotPoint2Blue.png|link=]]</td> | ||
| + | <td><span style="font-weight: 700; font-size: 15px; background-color: lightcyan;">Left Click</span> on the '''Assets Palette''' name</td> | ||
| + | </tr> | ||
| + | <tr valign="top"> | ||
| + | <td colspan=2>to add a [[image:Tick.PNG|link=]] and make it visible.</td> | ||
| + | </tr> | ||
| + | </table> | ||
| + | </td> | ||
| + | </tr> | ||
| + | </table> | ||
| + | </td> | ||
| + | </tr> | ||
| + | </table> | ||
| + | </td> | ||
| + | </tr> | ||
| + | </table> | ||
| + | |||
| + | <table> | ||
| + | <tr valign="top"> | ||
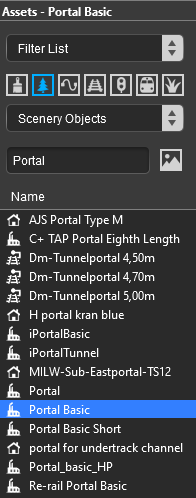
| + | <td width=25>[[image:DotPoint2.JPG|link=]]</td> | ||
| + | <td>select '''Scenery Objects''' and enter the text '''Portal''' into the text box</td> | ||
| + | </tr> | ||
| + | <tr valign="top"> | ||
| + | <td>[[image:DotPoint3.JPG|link=]]</td> | ||
| + | <td><span style="font-weight: 700; font-size: 15px; background-color: lightcyan;">Left Click</span> on an entry to select it. If you are not sure about an asset then <span style="font-weight: 700; font-size: 15px; background-color: lightcyan;">Double Left Click</span> on the name to bring up its image and description</td> | ||
| + | </tr> | ||
| + | </table> | ||
| + | </td> | ||
| + | </tr> | ||
| + | </table> | ||
| + | </td> | ||
| + | </tr> | ||
| + | </table> | ||
| + | |||
| + | <table width=1000> | ||
| + | <tr valign="top"> | ||
| + | <td>[[image:PortalObject_S20.png|link=|alt=Portal Context menu S20]]</td> | ||
| + | <td> | ||
| + | <table bgcolor=#000000 cellpadding=2> | ||
| + | <tr valign="top"> | ||
| + | <td> | ||
| + | <table bgcolor=#ffffff cellpadding=2> | ||
| + | <tr valign="top"> | ||
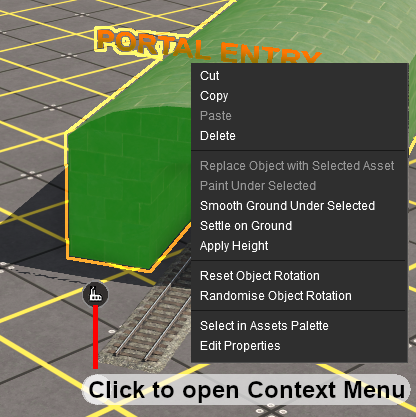
| + | <td colspan=2><span style="font-weight: 700; font-size: 17px;">Steps:</span> To open the '''Properties''' window of an asset, including a Portal, in '''Surveyor 2.0'''</td> | ||
| + | </tr> | ||
| + | <tr valign="top"> | ||
| + | <td width=25>[[image:DotPoint1.JPG|link=]]</td> | ||
| + | <td><span style="font-weight: 700; font-size: 15px; background-color: lightcyan;">Left Click</span> on its '''Context Icon''' as shown in the image left</td> | ||
| + | </tr> | ||
| + | <tr valign="top"> | ||
| + | <td>[[image:DotPoint2.JPG|link=]]</td> | ||
| + | <td><span style="font-weight: 700; font-size: 15px; background-color: lightcyan;">Left Click</span> on <span style="Font-weight: 700; font-size: 15px; color: white; background-color: black;"> Edit Properties </span> to configure the portal</td> | ||
| + | </tr> | ||
| + | </table> | ||
| + | </td> | ||
| + | </tr> | ||
| + | </table> | ||
| + | </td> | ||
| + | </tr> | ||
| + | </table> | ||
| + | |||
| + | <table> <!-- BEGIN Nav Buttons Table --> | ||
| + | <tr valign="top"> | ||
| + | <td width=729><span id="stepConfiguring"></span> </td> | ||
| + | <td width=46>[[image:BackToTop.png|link=#top|alt=Top|Top]]</td> | ||
| + | <td width=75>[[image:NextUp.png|link=#stepWhat|alt=Next Up|Top]]</td> | ||
| + | <td width=75>[[image:NextDown.png|link=#stepEnhanced|alt=Next Down|Next Down]]</td> | ||
| + | <td width=75>[[image:BackToBottom.png|link=#bottom|alt=Bottom|Bottom]]</td> | ||
| + | </tr> | ||
| + | </table> <!-- END Nav Buttons Table --> | ||
='''Configuring a Basic Portal'''= | ='''Configuring a Basic Portal'''= | ||
| Line 47: | Line 289: | ||
<table> | <table> | ||
<tr valign="top"> | <tr valign="top"> | ||
| − | <td>[[ | + | <td>[[image:PortalProperties01.PNG|link=]]</td> |
<td> | <td> | ||
| − | <table cellpadding= | + | <table cellpadding=4 bgcolor=#eeeeee> |
<tr> | <tr> | ||
<td colspan="2"> | <td colspan="2"> | ||
| Line 55: | Line 297: | ||
</tr> | </tr> | ||
<tr valign="top"> | <tr valign="top"> | ||
| − | <td>[[ | + | <td>[[image:Gears.PNG|link=]]</td> |
| − | <td>< | + | <td><span style="font-size: 17px;">'''Settings:'''</span><br> |
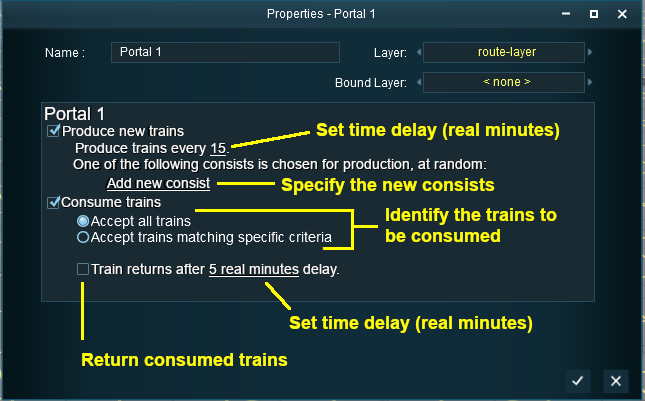
| − | This portal is set to:-< | + | This portal is set to:- |
| − | + | <table> | |
| − | + | <tr valign="top"> | |
| − | + | <td width=10>[[image:BlackDot10x10.png|link=]]</td> | |
| + | <td>Produce a train every 15 minutes (but the train consist has not yet been specified)</td> | ||
| + | </tr> | ||
| + | <tr valign="top"> | ||
| + | <td>[[image:BlackDot10x10.png|link=]]</td> | ||
| + | <td>Consume all trains that are sent to the portal or pass through the portal</td> | ||
| + | </tr> | ||
| + | <tr valign="top"> | ||
| + | <td>[[image:BlackDot10x10.png|link=]]</td> | ||
| + | <td>The consumed trains will not be returned to the Session</td> | ||
| + | </tr> | ||
| + | </table> | ||
| + | </td> | ||
</tr> | </tr> | ||
<tr> | <tr> | ||
| Line 68: | Line 322: | ||
</table> | </table> | ||
| − | <table | + | <table bgcolor=#000000 width=550> |
<tr valign="top"> | <tr valign="top"> | ||
| − | <td>[[ | + | <td> |
| − | <td>< | + | <table bgcolor=#ffffb0 width=546> |
| − | + | <tr valign="top"> | |
| − | + | <td>[[image:NotePad.PNG|link=]]</td> | |
| − | + | <td><span style="font-size: 17px;">'''Notes:'''</span><br> | |
| + | ---- | ||
| + | In '''TRS19''', '''Trainz Plus''' and '''TRS22''' the time entered is in '''real minutes''' as determined by an external clock and not according to the '''Trainz Clock Time''' which may be set to run at a higher speed (e.g. 10X normal). | ||
| + | </td> | ||
</tr> | </tr> | ||
| − | </table></td> | + | </table> |
| + | </td> | ||
| + | </tr> | ||
| + | </table> | ||
| + | </td> | ||
</tr> | </tr> | ||
</table> | </table> | ||
<br> | <br> | ||
| − | ==Produce Trains== | + | =='''Produce Trains'''== |
<table> | <table> | ||
<tr> | <tr> | ||
| − | <td>[[ | + | <td>[[image:PortalProduceNewTrains.PNG|link=]]</td> |
<td> | <td> | ||
| − | <table cellpadding=" | + | |
| − | <tr> | + | <table bgcolor=#000000 cellpadding=2> |
| − | <td colspan= | + | <tr valign="top"> |
| − | + | <td> | |
| + | <table bgcolor=#ffffff cellpadding=2> | ||
| + | <tr valign="top"> | ||
| + | <td colspan=2><span style="font-weight: 700; font-size: 17px;">Steps:</span> To add consists to be produced by the portal:-</td> | ||
</tr> | </tr> | ||
<tr valign="top"> | <tr valign="top"> | ||
| − | <td>[[ | + | <td width=25>[[image:DotPoint1.JPG|link=]]</td> |
| − | <td> | + | <td>[[image:CheckBox.PNG|link=]] '''Produce new trains'''</td> |
| − | + | ||
| − | + | ||
| − | + | ||
| − | + | ||
</tr> | </tr> | ||
| − | <tr> | + | <tr valign="top"> |
| − | <td | + | <td>[[image:DotPoint2.JPG|link=]]</td> |
| − | + | <td>set the desired time interval (in minutes) between the trains</td> | |
</tr> | </tr> | ||
| − | </table></td> | + | <tr valign="top"> |
| + | <td>[[image:DotPoint3.JPG|link=]]</td> | ||
| + | <td><span style="font-weight: 700; font-size: 15px; background-color: lightcyan;">Left Click</span> the link '''<span style="text-decoration: underline;">Add new consist</span>'''</td> | ||
| + | </tr> | ||
| + | </table> | ||
| + | </td> | ||
| + | </tr> | ||
| + | </table> | ||
| + | </td> | ||
</tr> | </tr> | ||
</table> | </table> | ||
<table> | <table> | ||
<tr> | <tr> | ||
| − | <td>[[ | + | <td>[[image:PortalProperties02.PNG|link=]]</td> |
<td> | <td> | ||
| − | <table cellpadding=" | + | |
| − | <tr> | + | |
| − | <td colspan= | + | <table bgcolor=#000000 cellpadding=2> |
| − | + | <tr valign="top"> | |
| + | <td> | ||
| + | <table bgcolor=#ffffff cellpadding=2> | ||
| + | <tr valign="top"> | ||
| + | <td colspan=2><span style="font-weight: 700; font-size: 17px;">Steps:</span> To manually add rolling stock objects:-</td> | ||
</tr> | </tr> | ||
<tr valign="top"> | <tr valign="top"> | ||
| − | <td>[[ | + | <td width=25>[[image:DotPoint1.JPG|link=]]</td> |
| − | <td><font size | + | <td><span style="font-weight: 700; font-size: 15px; background-color: lightcyan;">Left Click</span> [[image:PortalPlusIcon.PNG|link=]] to manually '''construct a consist''' from the Session rolling stock list</td> |
| − | + | ||
| − | + | ||
| − | + | ||
| − | + | ||
</tr> | </tr> | ||
<tr valign="top"> | <tr valign="top"> | ||
| − | <td | + | <td>[[image:DotPoint2.JPG|link=]]</td> |
| − | ----</td> | + | <td><span style="font-weight: 700; font-size: 15px; background-color: lightcyan;">Left Click</span> '''<span style="text-decoration: underline;">Add driver to consist</span>''' to '''add a driver''' from the Session list</td> |
</tr> | </tr> | ||
| − | </table></td> | + | <tr valign="top"> |
| + | <td>[[image:DotPoint3.JPG|link=]]</td> | ||
| + | <td><span style="font-weight: 700; font-size: 15px; background-color: lightcyan;">Left Click</span> '''<span style="text-decoration: underline;">Add an existing saved consist</span>''' to '''add a saved consist''' from those that you have already saved as '''Train Consist Assets'''</td> | ||
| + | </tr> | ||
| + | </table> | ||
| + | </td> | ||
| + | </tr> | ||
| + | </table> | ||
| + | </td> | ||
</tr> | </tr> | ||
</table> | </table> | ||
| Line 135: | Line 411: | ||
<table> | <table> | ||
<tr valign="top"> | <tr valign="top"> | ||
| − | <td>[[ | + | <td>[[image:PortalProperties04.PNG|link=]]</td> |
<td> | <td> | ||
| − | <table cellpadding= | + | <table cellpadding=4 bgcolor=#eeeeee> |
<tr> | <tr> | ||
<td colspan="2"> | <td colspan="2"> | ||
| Line 143: | Line 419: | ||
</tr> | </tr> | ||
<tr valign="top"> | <tr valign="top"> | ||
| − | <td>[[ | + | <td>[[image:Gears.PNG|link=]]</td> |
| − | <td><font size | + | <td><span style="font-size: 17px;">'''Settings:'''</span><br> |
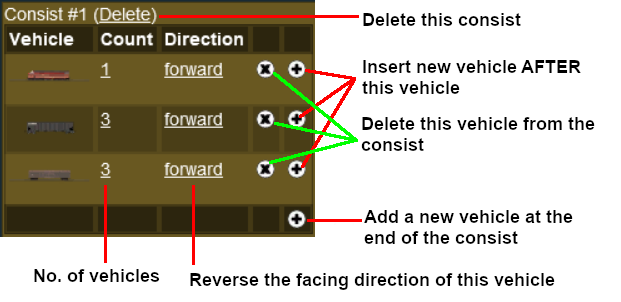
For each vehicle in the consist you can specify:- | For each vehicle in the consist you can specify:- | ||
| − | + | <table> | |
| − | + | <tr valign="top"> | |
| + | <td width=10>[[image:BlackDot10x10.png|link=]]</td> | ||
| + | <td>how many to add (they will be coupled together)</td> | ||
| + | </tr> | ||
| + | <tr valign="top"> | ||
| + | <td>[[image:BlackDot10x10.png|link=]]</td> | ||
| + | <td>the direction the vehicle(s) will face</td> | ||
| + | </tr> | ||
| + | </table> | ||
You can also:- | You can also:- | ||
| − | + | <table> | |
| − | + | <tr valign="top"> | |
| − | + | <td width=10>[[image:BlackDot10x10.png|link=]]</td> | |
| + | <td>delete vehicles or the entire consist</td> | ||
</tr> | </tr> | ||
<tr valign="top"> | <tr valign="top"> | ||
| − | <td | + | <td>[[image:BlackDot10x10.png|link=]]</td> |
| − | + | <td>insert additional vehicles ''inside'' the consist</td> | |
| + | </tr> | ||
| + | <tr valign="top"> | ||
| + | <td>[[image:BlackDot10x10.png|link=]]</td> | ||
| + | <td>add additional vehicles at the end of the consist</td> | ||
</tr> | </tr> | ||
</table> | </table> | ||
| − | <table | + | </td> |
| + | </tr> | ||
| + | </table> | ||
| + | <table bgcolor=#000000 width=550> | ||
<tr valign="top"> | <tr valign="top"> | ||
| − | <td>[[ | + | <td> |
| − | <td>< | + | <table bgcolor=#ffffb0 width=546> |
| − | + | <tr valign="top"> | |
| − | + | <td width=25>[[image:NotePad.PNG|link=]]</td> | |
| − | + | <td><span style="font-size: 17px;">'''Notes:'''</span><br> | |
| + | ---- | ||
| + | </td> | ||
</tr> | </tr> | ||
| − | </table></td> | + | <tr valign="top"> |
| + | <td colspan=2> | ||
| + | <table> | ||
| + | <tr valign="top"> | ||
| + | <td width=10>[[image:DotPoint.JPG|10px|link=]]</td> | ||
| + | <td>the first vehicle in the list will be the first vehicle produced by the portal</td> | ||
| + | </tr> | ||
| + | <tr valign="top"> | ||
| + | <td>[[image:DotPoint.JPG|10px|link=]]</td> | ||
| + | <td>it is NOT possible to easily reorder the vehicles in a consist</td> | ||
| + | </tr> | ||
| + | <tr valign="top"> | ||
| + | <td>[[image:DotPoint.JPG|10px|link=]]</td> | ||
| + | <td>to add more of the same vehicles in a different location in the consist, add the vehicles as a separate entry in the list</td> | ||
| + | </tr> | ||
| + | <tr valign="top"> | ||
| + | <td>[[image:DotPoint.JPG|10px|link=]]</td> | ||
| + | <td>add another consist and driver by a <span style="font-weight: 700; font-size: 15px; background-color: lightcyan;">Left Click</span> on the '''<span style="text-decoration: underline;">Add new consist</span>''' link again</td> | ||
| + | </tr> | ||
| + | </table> | ||
| + | </td> | ||
| + | </tr> | ||
| + | </table> | ||
| + | </td> | ||
| + | </tr> | ||
| + | </table> | ||
| + | </td> | ||
</tr> | </tr> | ||
</table> | </table> | ||
<br> | <br> | ||
| + | |||
==='''Add a Saved Consist'''=== | ==='''Add a Saved Consist'''=== | ||
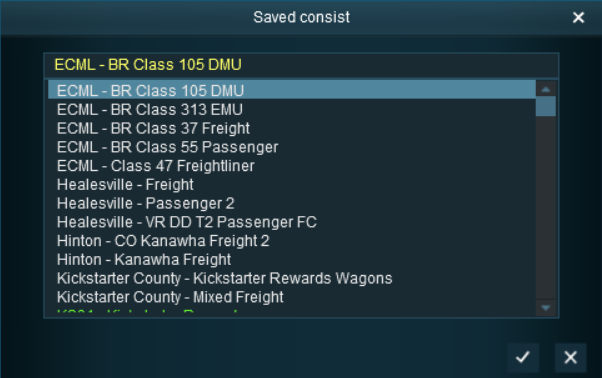
| − | If you have already saved your consists in | + | If you have already saved your consists in Trainz using the '''Trainz Tool''' then those consists can be quickly and easily added to the portal consist list. |
<br> | <br> | ||
<table> | <table> | ||
<tr valign="top"> | <tr valign="top"> | ||
| − | <td>[[ | + | <td>[[image:PortalExitingConsist.PNG|link=]]</td> |
<td> | <td> | ||
| − | <table cellpadding=" | + | |
| − | <tr> | + | <table bgcolor=#000000 cellpadding=2> |
| − | <td colspan= | + | <tr valign="top"> |
| − | + | <td> | |
| + | <table bgcolor=#ffffff cellpadding=2> | ||
| + | <tr valign="top"> | ||
| + | <td colspan=2><span style="font-weight: 700; font-size: 17px;">Steps:</span> To add a saved consist to a portal:-</td> | ||
</tr> | </tr> | ||
<tr valign="top"> | <tr valign="top"> | ||
| − | <td>[[ | + | <td width=25>[[image:DotPoint1.JPG|link=]]</td> |
| − | <td> | + | <td>Scroll through the list to find the saved consist</td> |
| − | + | ||
| − | + | ||
| − | + | ||
| − | + | ||
</tr> | </tr> | ||
| − | <tr> | + | <tr valign="top"> |
| − | <td | + | <td>[[image:DotPoint2.JPG|link=]]</td> |
| − | ----</td> | + | <td>Select the consist, then either:- |
| + | <table> | ||
| + | <tr valign="top"> | ||
| + | <td width=25>[[image:Ablue.png|link=]]</td> | ||
| + | <td><span style="font-weight: 700; font-size: 15px; background-color: lightcyan;">Left Click</span> the [[image:Tick.PNG|link=]] icon to accept the selection and load it into the portal consist list, <span style="font-weight: 700; font-size: 15px;">OR</span></td> | ||
</tr> | </tr> | ||
| − | </table></td> | + | <tr valign="top"> |
| + | <td>[[image:Bblue.png|link=]]</td> | ||
| + | <td><span style="font-weight: 700; font-size: 15px; background-color: lightcyan;">Left Click</span> the [[image:Cross.PNG|link=]] icon to reject the selection and return to the previous screen</td> | ||
| + | </tr> | ||
| + | </table> | ||
| + | </td> | ||
| + | </tr> | ||
| + | </table> | ||
| + | </td> | ||
| + | </tr> | ||
| + | </table> | ||
| + | </td> | ||
</tr> | </tr> | ||
</table> | </table> | ||
| Line 202: | Line 537: | ||
<table> | <table> | ||
<tr valign="top"> | <tr valign="top"> | ||
| − | <td>[[ | + | <td>[[image:PortalProperties03.PNG|link=]]</td> |
<td> | <td> | ||
| − | <table cellpadding= | + | <table cellpadding=4 bgcolor=#eeeeee> |
<tr> | <tr> | ||
<td colspan="2"> | <td colspan="2"> | ||
| Line 210: | Line 545: | ||
</tr> | </tr> | ||
<tr valign="top"> | <tr valign="top"> | ||
| − | <td>[[ | + | <td>[[image:Gears.PNG|link=]]</td> |
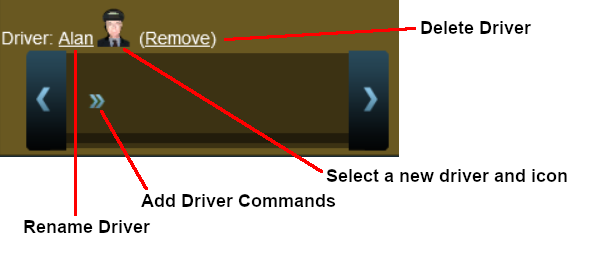
| − | <td><font size | + | <td><span style="font-size: 17px;">'''Settings:'''</span><br> |
You can:- | You can:- | ||
| − | + | <table> | |
| − | + | <tr valign="top"> | |
| − | + | <td width=10>[[image:BlackDot10x10.png|link=]]</td> | |
| − | + | <td>Select a new driver and icon</td> | |
</tr> | </tr> | ||
<tr valign="top"> | <tr valign="top"> | ||
| − | <td | + | <td>[[image:BlackDot10x10.png|link=]]</td> |
| − | + | <td>Rename the driver</td> | |
| + | </tr> | ||
| + | <tr valign="top"> | ||
| + | <td>[[image:BlackDot10x10.png|link=]]</td> | ||
| + | <td>Add driver commands</td> | ||
| + | </tr> | ||
| + | <tr valign="top"> | ||
| + | <td>[[image:BlackDot10x10.png|link=]]</td> | ||
| + | <td>Delete the driver</td> | ||
</tr> | </tr> | ||
</table> | </table> | ||
| − | < | + | </td> |
| + | </tr> | ||
<tr valign="top"> | <tr valign="top"> | ||
| − | <td | + | <td colspan="2"> |
| − | + | ----</td> | |
| − | + | ||
</tr> | </tr> | ||
</table></td> | </table></td> | ||
</tr> | </tr> | ||
</table> | </table> | ||
| − | |||
| − | ==Consume Trains== | + | <table cellpadding=4 bgcolor="Aquamarine"> |
| + | <tr valign="top"> | ||
| + | <td>[[image:LinkWiki.PNG|link=]]</td> | ||
| + | <td> | ||
| + | For information on adding driver commands see the '''Trainz Wiki Page''' at:- | ||
| + | * '''[[How to Use Driver Setup Rule|Driver Setup Rule]]'''</td> | ||
| + | </tr> | ||
| + | </table> | ||
| + | <br> | ||
| + | =='''Consume Trains'''== | ||
To remove trains from the Session<br> | To remove trains from the Session<br> | ||
<table> | <table> | ||
<tr valign="top"> | <tr valign="top"> | ||
| − | <td>[[ | + | <td>[[image:PortalAcceptAllTrains.PNG|link=]]</td> |
<td> | <td> | ||
| − | <table cellpadding= | + | <table cellpadding=4 bgcolor=#ffffff> |
<tr> | <tr> | ||
<td colspan="2"> | <td colspan="2"> | ||
| Line 246: | Line 597: | ||
</tr> | </tr> | ||
<tr valign="top"> | <tr valign="top"> | ||
| − | <td>[[ | + | <td>[[image:Choices.PNG|link=]]</td> |
| − | <td>< | + | <td><span style="font-size: 17px;">'''Choices:'''</span><br> |
| − | + | [[image:CheckBox.PNG|link=]] '''Consume trains''' then either | |
| − | + | :[[image:PortalOptionButtonEmpty.PNG|link=]] '''Accept all trains''' to remove any and all trains that enter the portal, or | |
| − | + | :[[image:PortalOptionButtonEmpty.PNG|link=]] '''Accept trains matching specific criteria''' to only remove certain trains that enter the portal</td> | |
</tr> | </tr> | ||
<tr> | <tr> | ||
| Line 256: | Line 607: | ||
----</td> | ----</td> | ||
</tr> | </tr> | ||
| − | </table></td> | + | </table> |
| + | </td> | ||
</tr> | </tr> | ||
</table> | </table> | ||
| − | <table | + | <table bgcolor=#000000 width=800> |
<tr valign="top"> | <tr valign="top"> | ||
| − | <td>[[ | + | <td> |
| − | <td>For "dead end" portals (those that have no exit) the '''Accept all trains''' option is the option that ''should'' be used</td> | + | <table bgcolor=#ffffe0 width=796> |
| + | <tr valign="top"> | ||
| + | <td>[[image:PencilTips.PNG|link=]]</td> | ||
| + | <td>For "dead end" portals (those that have no exit) the '''Accept all trains''' option is the option that ''should'' be used | ||
| + | </td> | ||
| + | </tr> | ||
| + | </table> | ||
| + | </td> | ||
</tr> | </tr> | ||
</table> | </table> | ||
| Line 268: | Line 627: | ||
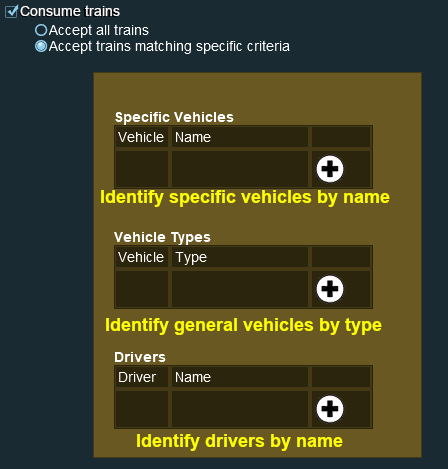
==='''Consume Only Specific Trains'''=== | ==='''Consume Only Specific Trains'''=== | ||
After selecting the option '''Accept trains matching specific criteria''' a new set of controls will appear<br> | After selecting the option '''Accept trains matching specific criteria''' a new set of controls will appear<br> | ||
| − | <table> | + | <table width=1000> |
<tr valign="top"> | <tr valign="top"> | ||
| − | <td>[[ | + | <td>[[image:PortalAcceptAllTrainsOpen.PNG|link=]]</td> |
<td> | <td> | ||
| − | <table cellpadding= | + | <table cellpadding=4 bgcolor=#eeeeee> |
<tr> | <tr> | ||
<td colspan="2"> | <td colspan="2"> | ||
| Line 278: | Line 637: | ||
</tr> | </tr> | ||
<tr valign="top"> | <tr valign="top"> | ||
| − | <td>[[ | + | <td>[[image:Gears.PNG|link=]]</td> |
| − | <td><font size | + | <td><span style="font-size: 17px;">'''Settings:'''</span><br> |
| − | + | [[image:PortalOptionButtonFilled.PNG|link=]] '''Accept trains matching specific criteria''' | |
| − | + | <table> | |
| − | < | + | <tr valign="top"> |
| − | '''Specific Vehicles''' - normally used to specify just ''one'' particular train in the Session | + | <td width=10>[[image:BlackDot10x10.png|link=]]</td> |
| − | + | <td>You can set any one, any two or all three of the '''consist selection criteria'''</td> | |
| − | + | </tr> | |
| − | + | <tr valign="top"> | |
| − | < | + | <td>[[image:BlackDot10x10.png|link=]]</td> |
| − | '''Vehicles Types''' - normally used to specify a number of different trains in the session e.g. all trains with a particular type of coal wagon | + | <td>Any train that matches the entered settings will be removed from the Session as it enters the portal, other trains will be ignored</td> |
| − | + | </tr> | |
| − | + | </table> | |
| − | < | + | <span style="font-weight: 700; font-size: 15px;">Control Options:-</span> |
| − | '''Drivers''' - used to specify trains driven by particular drivers | + | <table> |
| − | + | <tr valign="top"> | |
| − | + | <td width=10>[[image:DotPointBlack.JPG|10px|link=]]</td> | |
| + | <td>'''Specific Vehicles''' - normally used to specify just ''one'' particular train in the Session | ||
| + | <table> | ||
| + | <tr valign="top"> | ||
| + | <td width=10>[[image:BlackDot10x10.png|link=]]</td> | ||
| + | <td>You must select, from the Session list, the '''exact name''' given to a vehicle. This is the name that has been entered into the property window of that vehicle</td> | ||
| + | </tr> | ||
| + | <tr valign="top"> | ||
| + | <td>[[image:BlackDot10x10.png|link=]]</td> | ||
| + | <td>The order of the vehicles, if there is more than one, is not important</td> | ||
| + | </tr> | ||
| + | <tr valign="top"> | ||
| + | <td>[[image:BlackDot10x10.png|link=]]</td> | ||
| + | <td>You only need to select enough names to correctly identify the consist that contains the vehicle or vehicles (the locomotive name is ''usually'' sufficient)</td> | ||
| + | </tr> | ||
| + | </table> | ||
| + | </td> | ||
| + | </tr> | ||
| + | </table> | ||
| + | |||
| + | <table> | ||
| + | <tr valign="top"> | ||
| + | <td width=10>[[image:DotPointBlack.JPG|10px|link=]]</td> | ||
| + | <td>'''Vehicles Types''' - normally used to specify a number of different trains in the session e.g. all trains with a particular type of coal wagon | ||
| + | <table> | ||
| + | <tr valign="top"> | ||
| + | <td>[[image:BlackDot10x10.png|link=]]</td> | ||
| + | <td>You must select, from the Session list, the '''general name''' of the type of vehicle or vehicles - this is the name shown in the Trains Tool when the vehicle is added to a layout</td> | ||
| + | </tr> | ||
| + | <tr valign="top"> | ||
| + | <td>[[image:BlackDot10x10.png|link=]]</td> | ||
| + | <td>If you have identified '''Specific Vehicles''' (above) then you would normally not need to set this option</td> | ||
| + | </tr> | ||
| + | </table> | ||
| + | </td> | ||
| + | </tr> | ||
| + | </table> | ||
| + | |||
| + | <table> | ||
| + | <tr valign="top"> | ||
| + | <td width=10>[[image:DotPointBlack.JPG|10px|link=]]</td> | ||
| + | <td>'''Drivers''' - used to specify trains driven by particular drivers | ||
| + | <table> | ||
| + | <tr valign="top"> | ||
| + | <td>[[image:BlackDot10x10.png|link=]]</td> | ||
| + | <td>Select the driver or drivers from the Session driver list</td> | ||
| + | </tr> | ||
| + | <tr valign="top"> | ||
| + | <td>[[image:BlackDot10x10.png|link=]]</td> | ||
| + | <td>If your drivers change trains or consists during a Session then it '''may''' be useful to combine this with one of the other two options</td> | ||
| + | </tr> | ||
| + | </table> | ||
| + | </td> | ||
| + | </tr> | ||
| + | </table> | ||
</td> | </td> | ||
</tr> | </tr> | ||
| Line 301: | Line 714: | ||
----</td> | ----</td> | ||
</tr> | </tr> | ||
| − | </table></td> | + | </table> |
| + | </td> | ||
</tr> | </tr> | ||
</table> | </table> | ||
<br> | <br> | ||
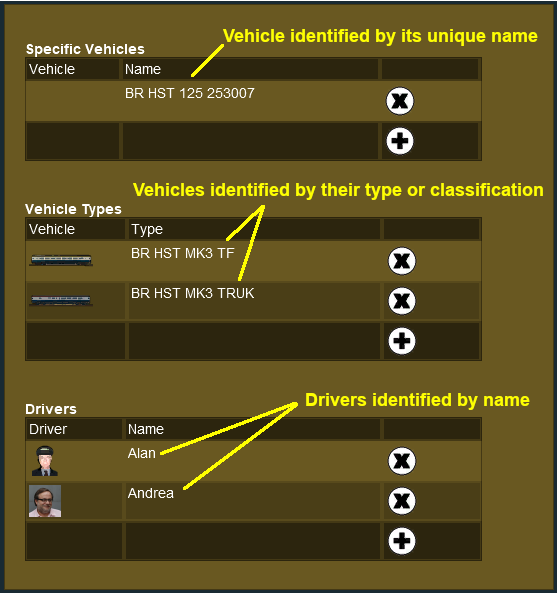
| − | An example:- | + | '''An example:-''' |
| + | <table width=1000> | ||
| + | <tr valign="top"> | ||
| + | <td>[[image:PortalAcceptAllTrainsSpecifics.PNG|link=]]</td> | ||
| + | <td> | ||
| + | <table bgcolor=#000000 width=500> | ||
| + | <tr valign="top"> | ||
| + | <td> | ||
| + | <table bgcolor=#ffffb0 width=496> | ||
| + | <tr valign="top"> | ||
| + | <td>[[image:NotePad.PNG|link=]]</td> | ||
| + | <td><span style="font-size: 17px;">'''Notes:'''</span><br> | ||
| + | ---- | ||
| + | In this example, the portal will remove ''any'' train that:- | ||
<table> | <table> | ||
<tr valign="top"> | <tr valign="top"> | ||
| − | <td>[[ | + | <td width=10>[[image:DotPoint.JPG|10px|link=]]</td> |
| + | <td>contains locomotive '''BR HST 125''' with the running number '''253007'''</td> | ||
| + | </tr> | ||
| + | <tr valign="top"> | ||
| + | <td colspan=2><span style="font-weight: 700; font-size: 15px;">OR</span> has ''any of'' the following vehicles:-</td> | ||
| + | </tr> | ||
| + | <tr valign="top"> | ||
| + | <td>[[image:DotPoint.JPG|10px|link=]]</td> | ||
| + | <td>'''BR HST MK3 TF''' with ''any'' running numbers</td> | ||
| + | </tr> | ||
| + | <tr valign="top"> | ||
| + | <td>[[image:DotPoint.JPG|10px|link=]]</td> | ||
| + | <td>'''BR HST MK3 TRUK''' with ''any'' running numbers</td> | ||
| + | </tr> | ||
| + | <tr valign="top"> | ||
| + | <td colspan=2> | ||
| + | <span style="font-weight: 700; font-size: 15px;">OR</span> is driven by ''any of'' the following drivers:-</td> | ||
| + | </tr> | ||
| + | <tr valign="top"> | ||
| + | <td>[[image:DotPoint.JPG|10px|link=]]</td> | ||
| + | <td>'''Alan'''</td> | ||
| + | </tr> | ||
| + | <tr valign="top"> | ||
| + | <td>[[image:DotPoint.JPG|10px|link=]]</td> | ||
| + | <td>'''Andrea'''</td> | ||
| + | </tr> | ||
| + | </table> | ||
| + | </td> | ||
| + | </tr> | ||
| + | </table> | ||
| + | </td> | ||
| + | </tr> | ||
| + | </table> | ||
| + | </td> | ||
</tr> | </tr> | ||
</table> | </table> | ||
| Line 315: | Line 775: | ||
==='''Return Consumed Trains'''=== | ==='''Return Consumed Trains'''=== | ||
To return consumed trains back into the Session<br> | To return consumed trains back into the Session<br> | ||
| − | <table> | + | <table width=1000> |
<tr valign="top"> | <tr valign="top"> | ||
| − | <td>[[ | + | <td>[[image:PortalAcceptTrainReturns.PNG|link=]]<br><br> |
| − | <table cellpadding= | + | <table cellpadding=4 bgcolor=#eeeeee> |
<tr> | <tr> | ||
<td colspan="2"> | <td colspan="2"> | ||
| Line 324: | Line 784: | ||
</tr> | </tr> | ||
<tr valign="top"> | <tr valign="top"> | ||
| − | <td>[[ | + | <td>[[image:Gears.PNG|link=]]</td> |
| − | <td><font size | + | <td><span style="font-size: 17px;">'''Settings:'''</span><br> |
To return the train from a different portal:- | To return the train from a different portal:- | ||
| − | #[[ | + | #Set [[image:CheckBox.PNG|link=]] '''Train returns through alternate portal''' and |
#Enter the exact name of the alternate portal</td> | #Enter the exact name of the alternate portal</td> | ||
</tr> | </tr> | ||
| Line 336: | Line 796: | ||
</table></td> | </table></td> | ||
<td> | <td> | ||
| − | <table cellpadding= | + | <table cellpadding=4 bgcolor=#eeeeee> |
<tr> | <tr> | ||
<td colspan="2"> | <td colspan="2"> | ||
| Line 342: | Line 802: | ||
</tr> | </tr> | ||
<tr valign="top"> | <tr valign="top"> | ||
| − | <td>[[ | + | <td>[[image:Gears.PNG|link=]]</td> |
| − | <td><font size | + | <td><span style="font-size: 17px;">'''Settings:'''</span><br> |
| − | #[[ | + | #Set [[image:CheckBox.PNG|link=]] '''Train returns after ...''' |
#Set the time delay (in '''real minutes''') between the train being consumed and produced, then select '''one option''' from:-</td> | #Set the time delay (in '''real minutes''') between the train being consumed and produced, then select '''one option''' from:-</td> | ||
</tr> | </tr> | ||
</table> | </table> | ||
| − | <table cellpadding= | + | <table cellpadding=4 bgcolor=#ffffff> |
<tr valign="top"> | <tr valign="top"> | ||
| − | <td>[[ | + | <td>[[image:Choices.PNG|link=]]</td> |
| − | <td><font size | + | <td><span style="font-size: 17px;">'''Choices:'''</span><br> |
| − | : | + | :[[image:PortalOptionButtonEmpty.PNG|link=]] '''Train is not loaded or unloaded''' - no changes will be made to the loads carried in each vehicle |
| − | : | + | :[[image:PortalOptionButtonEmpty.PNG|link=]] '''Train is loaded only''' - each vehicle will be loaded when it exits the portal |
| − | : | + | :[[image:PortalOptionButtonEmpty.PNG|link=]] '''Train is unloaded only''' - each vehicle will be unloaded when it exits the portal |
| − | : | + | :[[image:PortalOptionButtonEmpty.PNG|link=]] '''Empty trains are loaded, other trains are unloaded''' - vehicles that are empty when entering the portal will be loaded when they exit the portal, all other vehicles will be unloaded</td> |
</tr> | </tr> | ||
<tr> | <tr> | ||
| Line 365: | Line 825: | ||
</table> | </table> | ||
<br> | <br> | ||
| + | <table width=1000 bgcolor="lightcyan" cellpadding=2> | ||
| + | <tr valign="top"> | ||
| + | <td width=10>[[image:BlueDot10x10.png|link=]]</td> | ||
| + | <td>A train that has been returned after entering a portal will return to the Session with any remaining driver commands still in its Driver Schedule. It will then immediately start obeying those commands</td> | ||
| + | </tr> | ||
| + | </table> | ||
| + | <br> | ||
| + | <table bgcolor="red" width=900> | ||
| + | <tr valign="top"> | ||
| + | <td> | ||
| + | <table bgcolor=#fcbcbc width=896> | ||
| + | <tr valign="top"> | ||
| + | <td>[[image:Stop.PNG|link=]]</td> | ||
| + | <td> | ||
| + | If the driver command that sent a train to the consuming portal was the '''final command''' in its schedule, then it will emerge from the portal with an '''empty Driver Schedule'''. It will come to a halt immediately after leaving the portal. | ||
| + | </td> | ||
| + | </tr> | ||
| + | </table> | ||
| + | </td> | ||
| + | </tr> | ||
| + | </table> | ||
| + | <br> | ||
| + | <table> <!-- BEGIN Nav Buttons Table --> | ||
| + | <tr valign="top"> | ||
| + | <td width=729><span id="stepEnhanced"></span> </td> | ||
| + | <td width=46>[[image:BackToTop.png|link=#top|alt=Top|Top]]</td> | ||
| + | <td width=75>[[image:NextUp.png|link=#stepConfiguring|alt=Next Up|Top]]</td> | ||
| + | <td width=75> </td> | ||
| + | <td width=75>[[image:BackToBottom.png|link=#bottom|alt=Bottom|Bottom]]</td> | ||
| + | </tr> | ||
| + | </table> <!-- END Nav Buttons Table --> | ||
='''Configuring an Enhanced Portal'''= | ='''Configuring an Enhanced Portal'''= | ||
| − | There are a number of portals available on the DLS that have additional features or capabilities that are not found in the basic portals built into | + | <table width=1000> |
| + | <tr valign="top"> | ||
| + | <td>There are a number of portals available on the DLS that have additional features or capabilities that are not found in the basic portals built into Trainz. There are also Session Rules available on the DLS that will give additional features or capabilities to the basic portals.</td> | ||
| + | </tr> | ||
| + | </table> | ||
=='''Quick Portal Manager Standard Edition Rule (SP2 and later)'''== | =='''Quick Portal Manager Standard Edition Rule (SP2 and later)'''== | ||
| − | This is a Session Rule, by '''pguy''', that manages the portals and adds flexible timetables to their operations. It is available on the DLS. | + | <table width=1000> |
| + | <tr valign="top"> | ||
| + | <td>This is a Session Rule, by '''pguy''', that manages the portals and adds flexible timetables to their operations. It is available on the DLS. | ||
| − | *''' | + | *'''<kuid2:61392:5011:45>''' - correct at the time this document was written</td> |
| + | </tr> | ||
| + | </table> | ||
| + | ='''Portals and the UDS (Unified Driver Surveyor) Interface'''= | ||
| + | <table width=1000> | ||
| + | <tr valign="top"> | ||
| + | <td>The '''UDS''' is an option for rapid switching, in both directions, between '''Driver''' and '''Surveyor'''. It is available in '''TRS19 Platinum Edition''' and later versions of '''Trainz'''. The '''UDS''' does not affect the operation of portals but it has revealed one previously unnoticed property of portals.<br> | ||
| + | |||
| + | A train that is driven into a portal and later returned to the layout will be returned in the same layer as the portal and not in the trains originally assigned layer. Trains that are produced by a portal will be assigned to the same layer as the portal. This has <span style="background-color: yellow; font-weight: 700;"> possibly always been the case with portals </span> but was probably unnoticed until the arrival of the '''UDS'''. It seems to have no other noticeable effect on trains.<br> | ||
| + | |||
| + | This could become an issue if you make the switch from '''Driver''' to '''Surveyor''' after a train has been '''returned''' to the layout from a portal. For example, if a train is originally in a '''Session Layer''' then it is part of a '''Session'''. If it is returned from a portal then it will now be in a '''Route Layer''' and will be part of the '''Route'''. If you then switch from '''Driver''' to '''Surveyor''' and save the '''Route''' then the train will be saved in the '''Route''' not in the '''Session'''. If this is an issue then the remedy is to open the property dialogue window of any wagon in the train after it has left the portal and change its assigned layer to the correct one. This will set all vehicles in that train to the same correct layer.</td> | ||
| + | </tr> | ||
| + | </table> | ||
| + | <br> | ||
| + | <table> <!-- BEGIN Nav Buttons Table --> | ||
| + | <tr valign="top"> | ||
| + | <td width=729><span id="bottom"></span> </td> | ||
| + | <td width=46>[[image:BackToTop.png|link=#top|alt=Top|Top]]</td> | ||
| + | <td width=75>[[image:NextUp.png|link=#stepEnhanced|alt=Next Up|Top]]</td> | ||
| + | <td width=75> </td> | ||
| + | <td width=75> </td> | ||
| + | </tr> | ||
| + | </table> <!-- END Nav Buttons Table --> | ||
---- | ---- | ||
---- | ---- | ||
| − | |||
='''Trainz Wiki'''= | ='''Trainz Wiki'''= | ||
| − | <table cellpadding= | + | <table cellpadding=4 bgcolor=#ffffff> |
<tr valign="top"> | <tr valign="top"> | ||
| − | <td>[[ | + | <td>[[image:TrainzWiki.png|link=]]</td> |
<td> | <td> | ||
| − | <font size | + | <span style="font-size: 17px;">'''More Tutorials and Guides to Using Trainz'''</span><br> |
*'''<span class="plainlinks">[http://online.ts2009.com/mediaWiki/index.php/HowTo How to Guides]</span>''' | *'''<span class="plainlinks">[http://online.ts2009.com/mediaWiki/index.php/HowTo How to Guides]</span>''' | ||
| + | *'''[[Driver Commands List]]''' | ||
*'''[[Session Rule List with Parameters|Session Rules List (Alphabetical) with Parameters]]''' | *'''[[Session Rule List with Parameters|Session Rules List (Alphabetical) with Parameters]]''' | ||
*'''[[Session Rules By Categories With Properties|Session Rules List (Categories) With Parameters]]''' | *'''[[Session Rules By Categories With Properties|Session Rules List (Categories) With Parameters]]''' | ||
| Line 393: | Line 912: | ||
</tr> | </tr> | ||
</table> | </table> | ||
| + | ---- | ||
| + | This page was created by Trainz user '''<span class="plainlinks">[http://online.ts2009.com/mediaWiki/index.php/User:Pware pware]</span>''' in July 2018 and was last updated as shown below. | ||
| + | ---- | ||
| + | [[Category:How-to guides]] | ||
Revision as of 15:20, 25 November 2023
The information in this Wiki Page applies to TANE, TRS19, Trainz Plus and TRS22.
|
|
What is a Portal?
 |
Portals come in a variety of forms - some resemble tunnels and others look like a section of normal track.
|
Adding a Portal
In Surveyor Classic (S10)
 |
The quickest way to find all the train producing and consuming portals in the Surveyor Object Tool window is to set up a search filter. This will sort the portals you want from all the objects named "portal" such as tunnel portals.
|
|||||||||||||
|
In Surveyor 2.0 (S20)
|
| Steps: To find a Portal in the Assets Palette:- | ||||||||||||||||||||
| In the Asset Palette Left Click on the Content Drop-down Box | ||||||||||||||||||||
|
||||||||||||||||||||

 |
|
|||||||
Configuring a Basic Portal
Open the properties window of a portal in the route.
 |
|
|||||||||||||||
Produce Trains
 |
|
|||||||||
 |
|
|||||||||
Construct a Consist
 |
|
|||||||||||||||||||||||||||
Add a Saved Consist
If you have already saved your consists in Trainz using the Trainz Tool then those consists can be quickly and easily added to the portal consist list.
 |
|
|||||||||||
Add a Driver
 |
|
||||||||||||||
 |
For information on adding driver commands see the Trainz Wiki Page at:- |
Consume Trains
To remove trains from the Session
 |
|
||||||
|
Consume Only Specific Trains
After selecting the option Accept trains matching specific criteria a new set of controls will appear
 |
|
||||||||||||||||||||||||||||||
An example:-
 |
|
|||||||||||||||||
Return Consumed Trains
To return consumed trains back into the Session
|
|
||||||||||||||
| A train that has been returned after entering a portal will return to the Session with any remaining driver commands still in its Driver Schedule. It will then immediately start obeying those commands |
|
Configuring an Enhanced Portal
| There are a number of portals available on the DLS that have additional features or capabilities that are not found in the basic portals built into Trainz. There are also Session Rules available on the DLS that will give additional features or capabilities to the basic portals. |
Quick Portal Manager Standard Edition Rule (SP2 and later)
This is a Session Rule, by pguy, that manages the portals and adds flexible timetables to their operations. It is available on the DLS.
|
Portals and the UDS (Unified Driver Surveyor) Interface
| The UDS is an option for rapid switching, in both directions, between Driver and Surveyor. It is available in TRS19 Platinum Edition and later versions of Trainz. The UDS does not affect the operation of portals but it has revealed one previously unnoticed property of portals. A train that is driven into a portal and later returned to the layout will be returned in the same layer as the portal and not in the trains originally assigned layer. Trains that are produced by a portal will be assigned to the same layer as the portal. This has possibly always been the case with portals but was probably unnoticed until the arrival of the UDS. It seems to have no other noticeable effect on trains. |
Trainz Wiki
 |
More Tutorials and Guides to Using Trainz |
This page was created by Trainz user pware in July 2018 and was last updated as shown below.