How to Use Driver Setup Rule
m (fixed HTML tag errors) |
m |
||
| Line 61: | Line 61: | ||
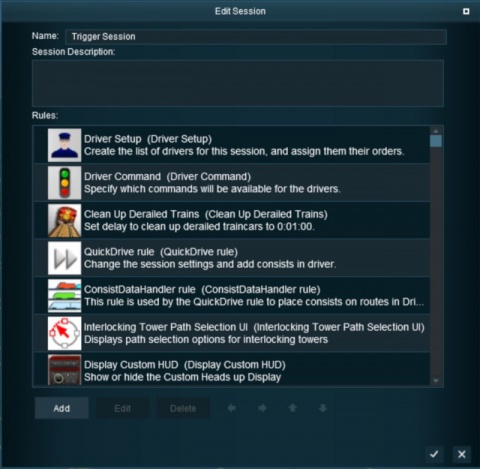
#Open the [[file:WikiLink.PNG|link=]] '''[[How to Use Session Editor|Session Editor]]''' by selecting '''Edit Session''' from the '''Surveyor Main Menu''' in '''TANE''' or the '''Surveyor Edit Menu''' in '''TRS19''' and later versions | #Open the [[file:WikiLink.PNG|link=]] '''[[How to Use Session Editor|Session Editor]]''' by selecting '''Edit Session''' from the '''Surveyor Main Menu''' in '''TANE''' or the '''Surveyor Edit Menu''' in '''TRS19''' and later versions | ||
#Select the '''Driver Setup Rule''' shown left (it is usually the rule at the top of the list) | #Select the '''Driver Setup Rule''' shown left (it is usually the rule at the top of the list) | ||
| − | #Click the '''Edit''' button at the bottom of the '''Session Editor''' window</td> | + | #<span style="font-weight: 700; font-size: 15px; background-color: lightcyan;">Left Click</span> the '''Edit''' button at the bottom of the '''Session Editor''' window</td> |
</tr> | </tr> | ||
<tr> | <tr> | ||
| Line 76: | Line 76: | ||
<td>[[file:Stop.PNG|link=]]</td> | <td>[[file:Stop.PNG|link=]]</td> | ||
<td>If the '''Driver Setup Rule''' is not shown in the list then... | <td>If the '''Driver Setup Rule''' is not shown in the list then... | ||
| − | #Click the '''Add''' button at the bottom of the Session Editor window | + | #<span style="font-weight: 700; font-size: 15px; background-color: lightcyan;">Left Click</span> the '''Add''' button at the bottom of the Session Editor window |
#Scroll through the list of rules to locate and select the '''Driver Setup Rule''' | #Scroll through the list of rules to locate and select the '''Driver Setup Rule''' | ||
| − | #Click the [[file:Tick.PNG|link=]] icon on the rule list window | + | #<span style="font-weight: 700; font-size: 15px; background-color: lightcyan;">Left Click</span> the [[file:Tick.PNG|link=]] icon on the rule list window |
</td> | </td> | ||
</tr> | </tr> | ||
| Line 102: | Line 102: | ||
<table width=1000> | <table width=1000> | ||
<tr valign="top"> | <tr valign="top"> | ||
| − | <td>After opening the '''Driver Setup Rule''' | + | <td>After opening the '''Driver Setup Rule''' <span style="font-weight: 700; font-size: 15px; background-color: lightcyan;">Left Click</span> the link:- <br> |
[[file:DriverSetupAddAnotherDriver.JPG|link=]]<br> | [[file:DriverSetupAddAnotherDriver.JPG|link=]]<br> | ||
<table bgcolor=#000000> | <table bgcolor=#000000> | ||
| Line 123: | Line 123: | ||
This will open the '''Add New Driver''' window.<br> | This will open the '''Add New Driver''' window.<br> | ||
| − | Select a driver from the list and | + | Select a driver from the list and <span style="font-weight: 700; font-size: 15px; background-color: lightcyan;">Left Click</span> the '''Tick''' button. |
</td> | </td> | ||
<td>[[file:DriverSetupAddDriver.JPG|link=|alt=Add Driver]]</td> | <td>[[file:DriverSetupAddDriver.JPG|link=|alt=Add Driver]]</td> | ||
| Line 166: | Line 166: | ||
===Remove Existing Drivers First=== | ===Remove Existing Drivers First=== | ||
| − | After selecting the '''Driver Setup Rule''' | + | After selecting the '''Driver Setup Rule''' <span style="font-weight: 700; font-size: 15px; background-color: lightcyan;">Left Click</span> the '''Edit''' button, the Driver Setup Properties Window will be shown. The image below shows the properties window if it is opened with no drivers placed in the layout. |
<table> | <table> | ||
<tr valign="top"> | <tr valign="top"> | ||
| Line 236: | Line 236: | ||
<td><span style="font-size: 17px;">'''Settings:'''</span><br> | <td><span style="font-size: 17px;">'''Settings:'''</span><br> | ||
*If '''Checked [[file:CheckBox.PNG|link=]]''' randomly selected drivers will be assigned to all newly added ''driveable'' trains. Existing drivers will not be affected unless the '''Remove all existing Drivers first''' option has been selected. | *If '''Checked [[file:CheckBox.PNG|link=]]''' randomly selected drivers will be assigned to all newly added ''driveable'' trains. Existing drivers will not be affected unless the '''Remove all existing Drivers first''' option has been selected. | ||
| − | *If '''Unchecked [[file:CheckBoxOff.PNG|link=]]''' then you will have to manually assign drivers to trains by | + | *If '''Unchecked [[file:CheckBoxOff.PNG|link=]]''' then you will have to manually assign drivers to trains by a <span style="font-weight: 700; font-size: 15px; background-color: lightcyan;">Left Click</span> on the '''<span style="text-decoration: underline;">Add another Driver</span>''' link</td> |
</tr> | </tr> | ||
<tr> | <tr> | ||
| Line 302: | Line 302: | ||
<td>[[file:Steps.PNG|link=]]</td> | <td>[[file:Steps.PNG|link=]]</td> | ||
<td><span style="font-size: 17px;">'''Steps:'''</span><br> | <td><span style="font-size: 17px;">'''Steps:'''</span><br> | ||
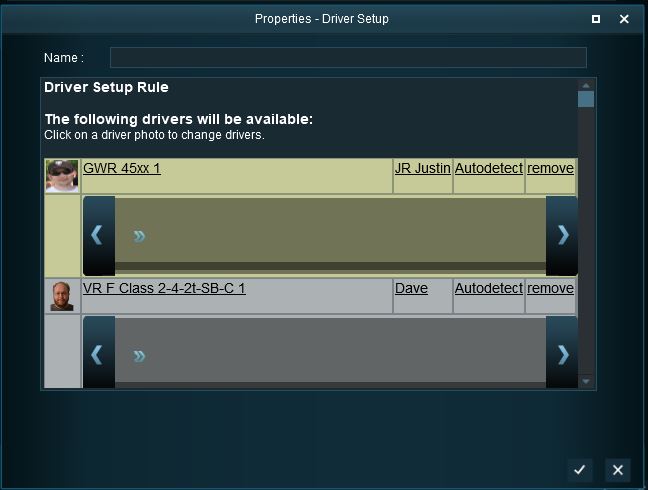
| − | *Click on the driver '''icon''' to select a different driver from the Session list. | + | *<span style="font-weight: 700; font-size: 15px; background-color: lightcyan;">Left Click</span> on the driver '''icon''' to select a different driver from the Session list. |
| − | *Click on the '''loco name''' to select a different loco from the Session list (an empty loco list means no unassigned locos are available). | + | *<span style="font-weight: 700; font-size: 15px; background-color: lightcyan;">Left Click</span> on the '''loco name''' to select a different loco from the Session list (an empty loco list means no unassigned locos are available). |
| − | *Click on the '''driver name''' to type in a new name for this driver (this will '''not''' change the driver icon). | + | *<span style="font-weight: 700; font-size: 15px; background-color: lightcyan;">Left Click</span> on the '''driver name''' to type in a new name for this driver (this will '''not''' change the driver icon). |
| − | *Click on '''Autodetect''' to select a new owner for this driver and loco. There are four "owner" options:- | + | *<span style="font-weight: 700; font-size: 15px; background-color: lightcyan;">Left Click</span> on '''Autodetect''' to select a new owner for this driver and loco. There are four "owner" options:- |
#'''AI driver''' - this train will be under AI control even if it has no '''Driver Command Bar''' orders to follow. This can be used to prevent a user from taking control of the train. | #'''AI driver''' - this train will be under AI control even if it has no '''Driver Command Bar''' orders to follow. This can be used to prevent a user from taking control of the train. | ||
#'''Autodetect''' - if the train has '''Driver Command Bar''' orders then it will be under AI control. If it has no '''Driver Command Bar''' orders then it will be under user control. | #'''Autodetect''' - if the train has '''Driver Command Bar''' orders then it will be under AI control. If it has no '''Driver Command Bar''' orders then it will be under user control. | ||
| Line 311: | Line 311: | ||
#'''Multiplayer Driver''' - the train will be assigned to a multiplayer. | #'''Multiplayer Driver''' - the train will be assigned to a multiplayer. | ||
If you need to remove a driver:- | If you need to remove a driver:- | ||
| − | *Click '''remove''' to delete this driver from the rule. | + | *<span style="font-weight: 700; font-size: 15px; background-color: lightcyan;">Left Click</span> '''remove''' to delete this driver from the rule. |
</td> | </td> | ||
</tr> | </tr> | ||
| Line 341: | Line 341: | ||
<td>[[file:Steps.PNG|link=]]</td> | <td>[[file:Steps.PNG|link=]]</td> | ||
<td><span style="font-size: 17px;">'''Steps:'''</span><br> | <td><span style="font-size: 17px;">'''Steps:'''</span><br> | ||
| − | #Click the small "double chevron" icon shown in the image on the left. This will open a Command List menu which will show the driver commands that can be added to this drivers '''Command Bar'''. | + | #<span style="font-weight: 700; font-size: 15px; background-color: lightcyan;">Left Click</span> the small "double chevron" icon shown in the image on the left. This will open a Command List menu which will show the driver commands that can be added to this drivers '''Command Bar'''. |
| − | #Click on a command to add it to the '''Driver Command Bar'''.</td> | + | #<span style="font-weight: 700; font-size: 15px; background-color: lightcyan;">Left Click</span> on a command to add it to the '''Driver Command Bar'''.</td> |
</tr> | </tr> | ||
<tr> | <tr> | ||
| Line 407: | Line 407: | ||
<td>[[file:Steps.PNG|link=]]</td> | <td>[[file:Steps.PNG|link=]]</td> | ||
<td><span style="font-size: 17px;">'''Steps:'''</span><br> | <td><span style="font-size: 17px;">'''Steps:'''</span><br> | ||
| − | + | *<span style="font-weight: 700; font-size: 15px; background-color: lightcyan;">Left Click and Drag</span> the command out of the '''Driver Command Bar''' area</td> | |
| − | + | ||
</tr> | </tr> | ||
<tr> | <tr> | ||
| Line 445: | Line 444: | ||
<td>[[file:Steps.PNG|link=]]</td> | <td>[[file:Steps.PNG|link=]]</td> | ||
<td><span style="font-size: 17px;">'''Steps:'''</span><br> | <td><span style="font-size: 17px;">'''Steps:'''</span><br> | ||
| − | #Click the '''Add Command''' button on the '''Driver Command Bar''' | + | #<span style="font-weight: 700; font-size: 15px; background-color: lightcyan;">Left Click</span> the '''Add Command''' button on the '''Driver Command Bar''' |
#Select the '''Repeat''' option | #Select the '''Repeat''' option | ||
</td> | </td> | ||
| Line 546: | Line 545: | ||
<td>[[file:Steps.PNG|link=]]</td> | <td>[[file:Steps.PNG|link=]]</td> | ||
<td><span style="font-size: 17px; font-weight: 700;">Steps:'''</span><br> | <td><span style="font-size: 17px; font-weight: 700;">Steps:'''</span><br> | ||
| − | #in the Session Editor | + | #in the '''Session Editor''' <span style="font-weight: 700; font-size: 15px; background-color: lightcyan;">Right Click</span> on the '''Driver Setup Rule''' |
#select '''Copy''' from the popup menu | #select '''Copy''' from the popup menu | ||
#exit the Session | #exit the Session | ||
#load the second Session (where the Rule is to be copied to) into Surveyor and open the '''Session Editor''' | #load the second Session (where the Rule is to be copied to) into Surveyor and open the '''Session Editor''' | ||
| − | # | + | #<span style="font-weight: 700; font-size: 15px; background-color: lightcyan;">Right Click</span> after the last rule entry and select '''Paste'''</td> |
</tr> | </tr> | ||
<tr> | <tr> | ||
| Line 633: | Line 632: | ||
<td><span style="font-size: 17px;">'''Steps:'''</span><br> | <td><span style="font-size: 17px;">'''Steps:'''</span><br> | ||
#Select the '''Driver Command Rule''' shown left (it is usually the rule near the top of the list) | #Select the '''Driver Command Rule''' shown left (it is usually the rule near the top of the list) | ||
| − | #Click the '''Edit''' button at the bottom of the Session Editor window</td> | + | #<span style="font-weight: 700; font-size: 15px; background-color: lightcyan;">Left Click</span> the '''Edit''' button at the bottom of the Session Editor window</td> |
</tr> | </tr> | ||
</table> | </table> | ||
| Line 644: | Line 643: | ||
<td>[[file:Stop.PNG|link=]]</td> | <td>[[file:Stop.PNG|link=]]</td> | ||
<td>If the '''Driver Command Rule''' is not shown in the list then... | <td>If the '''Driver Command Rule''' is not shown in the list then... | ||
| − | #Click the '''Add''' button at the bottom of the Session Editor window | + | #<span style="font-weight: 700; font-size: 15px; background-color: lightcyan;">Left Click</span> the '''Add''' button at the bottom of the Session Editor window |
#Scroll through the list of rules to locate and select the '''Driver Command Rule''' | #Scroll through the list of rules to locate and select the '''Driver Command Rule''' | ||
| − | #Click the [[file:Tick.PNG|link=]] icon on the rule list window | + | #<span style="font-weight: 700; font-size: 15px; background-color: lightcyan;">Left Click</span> the [[file:Tick.PNG|link=]] icon on the rule list window |
This will add the rule to the Session Editor. | This will add the rule to the Session Editor. | ||
</td> | </td> | ||
Revision as of 18:18, 22 April 2023
The information in this Wiki Page applies to TANE, TRS19, Trainz Plus and TRS22.
|
|
|||||||
Driver Setup Rule
 |
A list of available Driver Commands can be found on the Trainz Wiki Page at:- |
The Driver Setup Rule is automatically added to the Session Editor of every Session.
 |
|
|||||||||||
Adding New Drivers
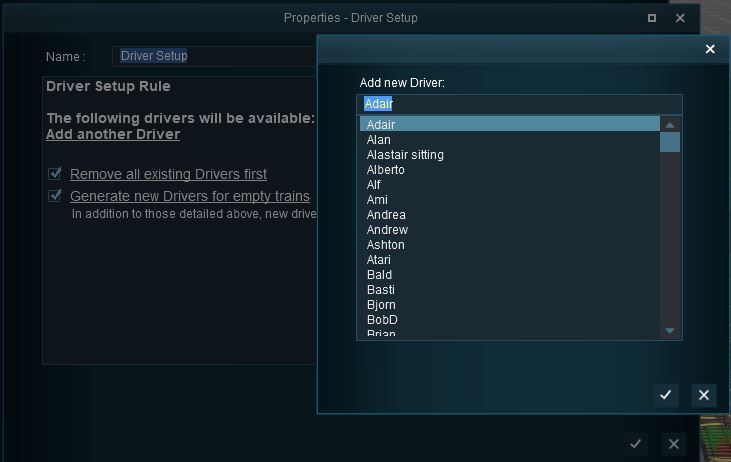
| After opening the Driver Setup Rule Left Click the link:-
The image on the right shows the properties window if it is opened with no drivers placed in the layout. This will open the Add New Driver window. Select a driver from the list and Left Click the Tick button. |
 |
|
Remove Existing Drivers First
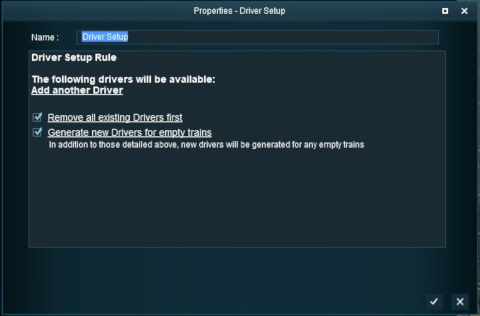
After selecting the Driver Setup Rule Left Click the Edit button, the Driver Setup Properties Window will be shown. The image below shows the properties window if it is opened with no drivers placed in the layout.
 |
|
|||||||||
|
Generate New Drivers for Empty Trains
| When using the Driver Setup Rule for the first time with no drivers assigned to existing trains, the Generate new Drivers for empty trains option will immediately assign drivers to each train. Each time a new train is added to the layout, it will be automatically assigned a driver. |
|
|
|
Settings:
|
|
|
|
|
Wait For Schedule Completion

|
|
|
Settings:
|
|
|
|
|
Focus Camera on First Driver

|
|
|
Settings:
|
|
|
|
|
Editing the Driver List
When drivers and trains have been added to the rule, it will appear as shown below.
 |
|
||||||||
Adding Driver Commands
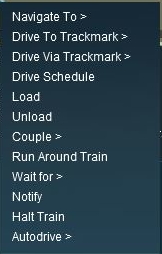
The grey area below the driver details (name, loco, owner) is the Driver Command Bar. This is where the driving instructions (the "train orders") used by the Trainz AI system are given to the driver.
 Shown below is a Driver Command Bar after two driver commands have been added. Each command has its own icon. Move the mouse pointer onto a command icon to reveal a tooltip showing the contents of the command, as shown in the image. |
|
|||||||||||
|
Deleting Driver Commands
To remove a command from the Driver Command Bar...
 |
|
||||||
The "Repeat" Command
| The "Repeat" command is a special built in command that allows all the driver commands to be repeated endlessly. |
 |
|
||||||||
|
 |
|
|
Copying the Driver Setup Rule
| The Driver Setup Rule (and other rules) can be copied between Sessions |
|
|
|
 |
Steps:
|
|
|
|
|
Driver Command Rule
| Main Points: | |
The
|
|
| Removing commands such as Navigate To will force players to manually drive trains when in Driver Mode instead of allowing them to use the Trainz AI system to do all the work. | |
The Driver Command Rule is automatically added to the Session Editor of every Session.
 |
|
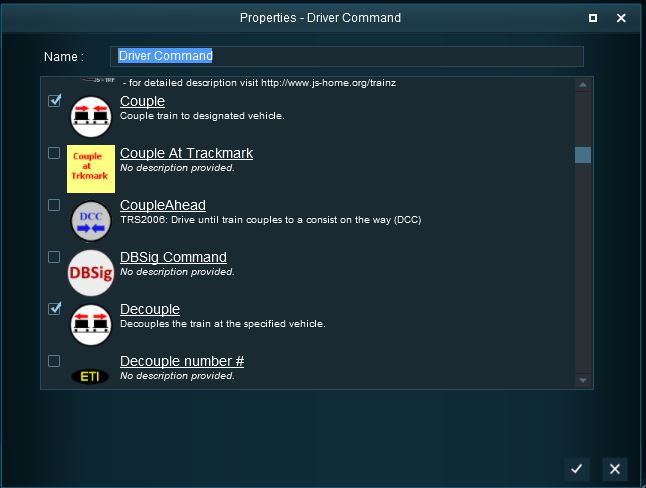
The Rule properties window will open to show all the Driver Commands that have been installed in Trainz on your system. This list includes the commands that are built in and those that have been downloaded from the DLS.
 |
|
|||||||||||||
Trainz Wiki
 |
More Tutorials and Guides to Using Trainz |
This page was created by Trainz user pware in June 2018 and was last updated as shown below.


