From TrainzOnline
(Difference between revisions)
|
|
| Line 97: |
Line 97: |
| | <td>[[image:Trackmark_Left.png|link=|alt=TM|10px]] <span style="font-weight: 700;">Belalie Nth Goods Up</span></td> | | <td>[[image:Trackmark_Left.png|link=|alt=TM|10px]] <span style="font-weight: 700;">Belalie Nth Goods Up</span></td> |
| | <td>[[image:Trackmark_Right.png|link=|alt=TM|10px]] <span style="font-weight: 700;">Belalie Nth Goods Dn</span></td> | | <td>[[image:Trackmark_Right.png|link=|alt=TM|10px]] <span style="font-weight: 700;">Belalie Nth Goods Dn</span></td> |
| | + | </tr> |
| | + | <tr valign="middle"> |
| | + | <td width=200>[[image:GoodsSiding_Label.png|link=|alt=GoodsSd]] </td> |
| | + | <td>[[image:Trackmark_Left.png|link=|alt=TM|10px]] <span style="font-weight: 700;">Belalie Nth Goods Up DE</span></td> |
| | + | <td> </td> |
| | + | </tr> |
| | + | <tr valign="middle"> |
| | + | <td width=200>[[image:GoodsSiding_Label.png|link=|alt=GoodsSd]] </td> |
| | + | <td> </td> |
| | + | <td>[[image:Trackmark_Left.png|link=|alt=TM|10px]] <span style="font-weight: 700;">Belalie Nth Goods Dn DE</span></td> |
| | + | </tr> |
| | + | <tr valign="middle"> |
| | + | <td width=200>[[image:Siding_Label.png|link=|alt=Siding]] </td> |
| | + | <td>[[image:Trackmark_Left.png|link=|alt=TM|10px]] <span style="font-weight: 700;">Belalie Nth Neck DE</span></td> |
| | + | <td> </td> |
| | </tr> | | </tr> |
| | | | |
Revision as of 09:17, 17 November 2020
 |

 |
 |

 |
|
| Commodities: (load and/or unload)
|
Facilities:

Loop |
|
|
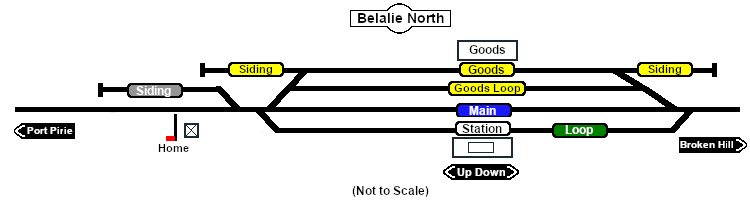
Station, goods and passing loops with sidings. Unmanned station on the Port Pirie-Broken Hill Line . This location was bypassed when the line was converted to standard gauge in 1969.
|
 |
|
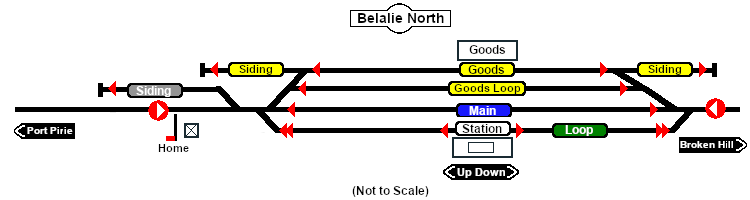
| Track Markers |
| Destinations for "Drive To Trackmark ..." commands |
| Approach from Port Pirie |
|
 Belalie Nth Main Approach Dn Belalie Nth Main Approach Dn |
| Approach from Broken Hill |
 Belalie Nth Main Approach Up Belalie Nth Main Approach Up |
 |
Belalie Nth Station Up |
Belalie Nth Station Dn |
 |
Belalie Nth Main Up |
Belalie Nth Main Dn |
 |
Belalie Nth Loop Up |
Belalie Nth Loop Dn |
 |
Belalie Nth Goods Up |
Belalie Nth Goods Dn |
 |
Belalie Nth Goods Up DE |
|
| |
|
Belalie Nth Goods Dn DE |
 |
Belalie Nth Neck DE |
|
|
|
| From |
To |
EIT Paths |
Descriptions |
  |
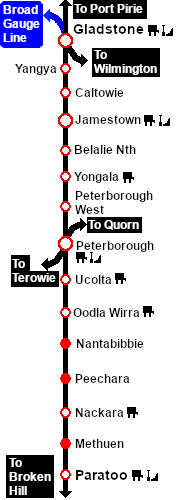
Port Pirie to Broken Hill |
Through (non stopping) service from Gladstone or Jamestown to Peterborough |
 |
Port Pirie to Station to Broken Hill |
Through service from Gladstone or Jamestown to Peterborough stopping at station |
 |
Port Pirie to Loop |
Arriving service from Gladstone or Jamestown to loop |
 |
Port Pirie to Goods |
Arriving service from Gladstone or Jamestown to goods |
 |
Loop to Broken Hill |
Departing service to Peterborough from loop |
 |
Goods to Broken Hill |
Departing service to Peterborough from goods |
| All reverse paths (e.g. to ) are also available |
|
|
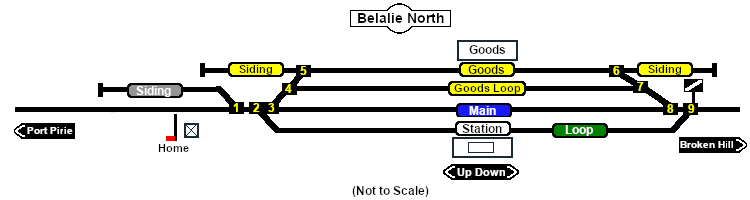
| Switches |
| No. |
Name |
Facing and L/R Directions
(default direction first) |
No. |
Name |
Facing and L/R Directions
(default direction first) |
|
 |
BN 1 |
Up (L) Port Pirie, (R) Siding 1 |
 |
BN 2 |
Down (L) Main, (R) Station |
 |
BN 3 |
Down (R) Main, (L) Loop/Goods Shed |
 |
BN 4 |
Down (R) Loop, (L) Goods Shed |
 |
BN 5 |
Up (L) Port Pirie, (R) Siding 2 |
 |
BN 6 |
Down (L) Siding 3, (R) Broken Hill |
 |
BN 7 |
Up (L) Loop, (R) Goods Shed |
 |
BN 8 |
Up (R) Main, (L) Station |
 |
BN 9 |
Up (L) Main, (R) Loop/Goods Shed |
|
|
| Switch Sets |
| Port Pirie - Station |
1 -L 2 -R |
Broken Hill - Station |
9 -L 8 -L |
| Port Pirie - Main |
1 -L 2 -L 3 -R |
Broken Hill - Main |
9 -L 8 -R |
| Port Pirie - Loop |
1 -L 2 -L 3 -L 4 -R |
Broken Hill - Loop |
9 -R 7 -L |
| Port Pirie - Goods |
1 -L 2 -L 3 -L 4 -L 5 -L |
Broken Hill - Goods |
9 -R 7 -R 6 -R |
|
|
|
 |