How to Create a Picklist
From TrainzOnline
(Difference between revisions)
(→Using Surveyor: reorganised steps) |
m (→Using Surveyor) |
||
| Line 163: | Line 163: | ||
<tr valign="top"> | <tr valign="top"> | ||
<td width=20>[[file:DotPoint1Blue.JPG|link=]]</td> | <td width=20>[[file:DotPoint1Blue.JPG|link=]]</td> | ||
| − | <td width=480>[[file:PickList_Surveyor02.png|link=]]<br> | + | <td width=480> |
| + | <table width=480 border=2> | ||
| + | <tr valign="top"> | ||
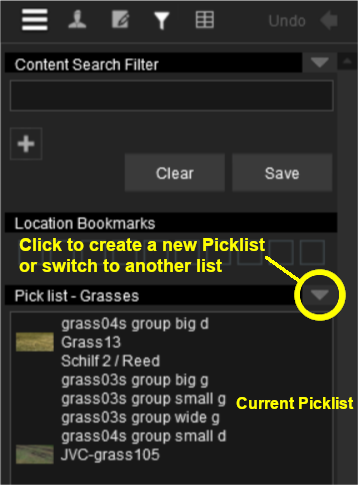
| + | <td>[[file:PickList_Surveyor02.png|link=]]<br> | ||
#Open the tool selection window for the types of assets to be added. For example: the Object Tool Window ('''F3''' key) | #Open the tool selection window for the types of assets to be added. For example: the Object Tool Window ('''F3''' key) | ||
#Scroll down the selection window to an asset that is to be added to the Picklist | #Scroll down the selection window to an asset that is to be added to the Picklist | ||
#'''Drag & Drop''' the asset from the selection window to the Picklist window | #'''Drag & Drop''' the asset from the selection window to the Picklist window | ||
#Repeat as required</td> | #Repeat as required</td> | ||
| + | </tr> | ||
| + | </table> | ||
| + | </td> | ||
<td width=20>[[file:DotPoint2Blue.JPG|link=]]</td> | <td width=20>[[file:DotPoint2Blue.JPG|link=]]</td> | ||
| + | <td width=480> | ||
| + | <table width=480 border=2> | ||
| + | <tr valign="top"> | ||
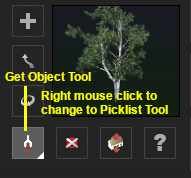
<td>[[file:PickObjectGetTool.png|link=]]<br> | <td>[[file:PickObjectGetTool.png|link=]]<br> | ||
#Open the tool selection window for the types of assets to be added. For example: the Object Tool Window ('''F3''' key) | #Open the tool selection window for the types of assets to be added. For example: the Object Tool Window ('''F3''' key) | ||
#Right mouse click the '''Get Object''' tool to change it to a '''Picklist''' tool ... | #Right mouse click the '''Get Object''' tool to change it to a '''Picklist''' tool ... | ||
#[[file:PickListGetTool.png|link=]] and then simply click on each object in the Surveyor Map to add it to the current Picklist | #[[file:PickListGetTool.png|link=]] and then simply click on each object in the Surveyor Map to add it to the current Picklist | ||
| − | <br>When finished, right mouse click on the tool again to restore it to | + | <br>When finished, right mouse click on the tool again to restore it to its '''Get Object''' state.</td> |
| + | </tr> | ||
| + | </table> | ||
| + | </td> | ||
</tr> | </tr> | ||
</table> <!-- END Step 2 Alternatives Table --> | </table> <!-- END Step 2 Alternatives Table --> | ||
Revision as of 22:27, 9 February 2020
The information in this Wiki Page applies to TANE, TRS19 and Trainz Plus.
 |
|
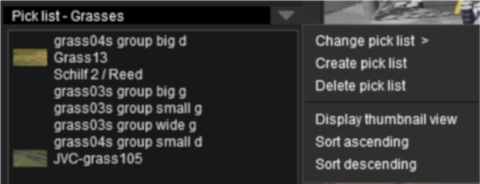
| In Summary: | |
| A Picklist is a user created list of commonly used assets (scenery, track objects, splines, textures, rolling stock - anything that you can add to a layout) | |
| You can create multiple picklists of related items (e.g. Bushes, Buildings, Trees, 4 wheel wagons, etc) that will be grouped together for easier selection | |
Trainz provides you with two different methods of creating Picklists, using either Content Manager (or Manage Content from the Trainz Launcher) or in Surveyor.
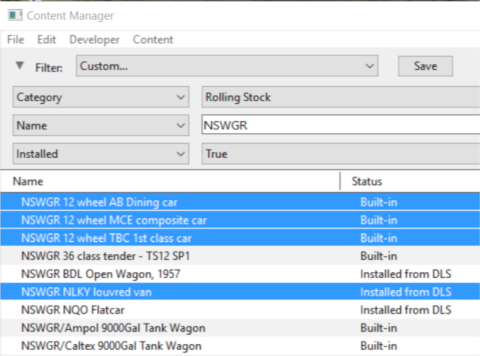
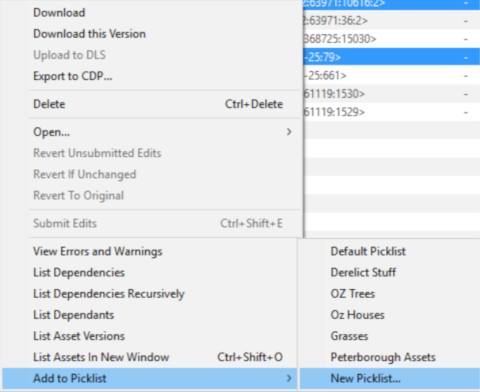
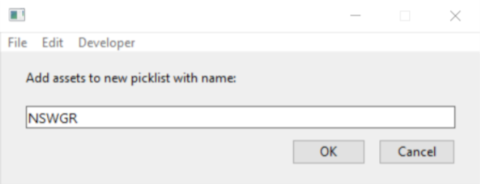
Using Content Manager (CM)
 Steps |
|
|||||
|
|
||||||
|
||||||
|
|
||||||
|
||||||
|
|
||||||
Using Surveyor
Steps |
|
|||||||||||||||
|
|
||||||||||||||||
|
||||||||||||||||
 Choose from one of two alternative methods
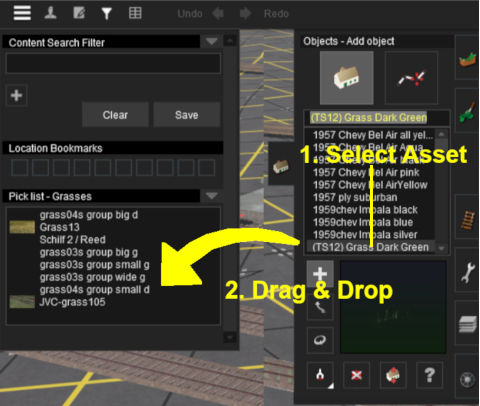
Trainz Wiki
 |
More Tutorials and Guides to Using Trainz |
This page was created by Trainz user pware in January 2019 and was last updated as shown below.