How to Backup a Picklist
From TrainzOnline
(Difference between revisions)
m (→Transfer the List to Notepad (or any text editor)) |
(→Transfer the List to Notepad (or any text editor)) |
||
| Line 112: | Line 112: | ||
#select a suitable backup location for the backup file | #select a suitable backup location for the backup file | ||
#enter a filename - the same name as the Picklist would be a good idea - then save</td> | #enter a filename - the same name as the Picklist would be a good idea - then save</td> | ||
| + | </tr> | ||
| + | </table></td> | ||
| + | </tr> | ||
| + | </table> | ||
| + | <br> | ||
| + | |||
| + | ='''How to Restore a Picklist'''= | ||
| + | |||
| + | Restoring a Picklist basically involves reversing the above steps. | ||
| + | |||
| + | <table cellpadding="4" bgcolor=#ffffff> | ||
| + | <tr valign="top"> | ||
| + | <td>[[file:Steps.PNG]]</td> | ||
| + | <td><font size="3">'''Step 1: Open Notepad or any other suitable text editor program'''</font><br> | ||
| + | <table> | ||
| + | <tr valign="top"> | ||
| + | <td> | ||
| + | #load the saved Picklist text file, from Step 2 of '''Transfer the List to Notepad''' process explained above, into Notepad | ||
| + | #select all the text - press '''Ctrl-A''' | ||
| + | #copy the text to the clipboard - press '''Ctrl-C'''</td> | ||
| + | </tr> | ||
| + | </table></td> | ||
| + | </tr> | ||
| + | </table> | ||
| + | <br> | ||
| + | <table cellpadding="4" bgcolor=#ffffff> | ||
| + | <tr valign="top"> | ||
| + | <td>[[file:Steps.PNG]]</td> | ||
| + | <td><font size="3">'''Step 2: Open CM in the Destination Trainz and Create a New Filter'''</font><br> | ||
| + | <table> | ||
| + | <tr valign="top"> | ||
| + | <td> | ||
| + | #in the copy of Trainz where the Picklist is being transferred, open '''Content Manager''' | ||
| + | #start a new filter | ||
| + | #paste ('''Ctrl-V''') the asset list into the '''Asset KUID''' box<br><br> | ||
| + | [[file:PickListSelectListofAssets.png]]<br><br></td> | ||
| + | </tr> | ||
| + | </table></td> | ||
| + | </tr> | ||
| + | </table> | ||
| + | <br> | ||
| + | <table cellpadding="4" bgcolor=#ffffff> | ||
| + | <tr valign="top"> | ||
| + | <td>[[file:Steps.PNG]]</td> | ||
| + | <td><font size="3">'''Step 3: Create a New Picklist'''</font><br><br> | ||
| + | The pasted asset list will appear in the CM display window, as shown below.<table> | ||
| + | <tr valign="top"> | ||
| + | <td> | ||
| + | [[file:PickListTRS19Paste.png]]<br><br> | ||
| + | #select an entry and then select all ('''Ctrl-A''') | ||
| + | #right mouse click on any entry and select '''Add to Picklist''' and then '''New Picklist''' from the popup menus<br><br> | ||
| + | [[file:PickListTRS19NewList.png]]<br><br></td> | ||
| + | </tr> | ||
| + | </table></td> | ||
| + | </tr> | ||
| + | </table> | ||
| + | <br> | ||
| + | <table cellpadding="4" bgcolor=#ffffff> | ||
| + | <tr valign="top"> | ||
| + | <td>[[file:Steps.PNG]]</td> | ||
| + | <td><font size="3">'''Step 4: Enter a Name for the Picklist'''</font><br> | ||
| + | <table> | ||
| + | <tr valign="top"> | ||
| + | <td> | ||
| + | [[file:PickListTRS19NewListName.png]]<br><br> | ||
| + | Enter a name for the Picklist and click '''Ok'''</td> | ||
</tr> | </tr> | ||
</table></td> | </table></td> | ||
Revision as of 16:45, 12 January 2019
Picklists cannot be saved as .cdp files so they cannot be backed up using that method. This guide will show you how to backup a Picklist in TRS19 or TANE (both programs use identical methods).
- For instructions on how to create a Picklist, see the wiki page How to Create a Picklist
- For instructions on how to move a Picklist, see the wiki page How to Move a Picklist
Contents |
Access Your Current Picklists
 |
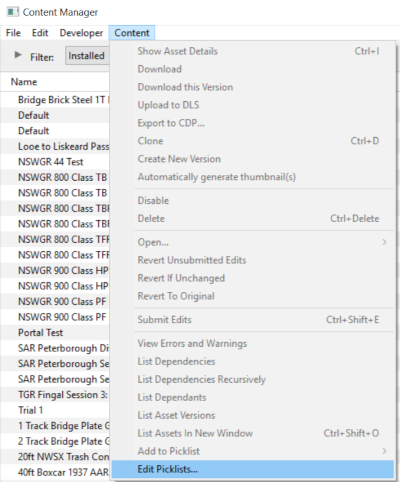
Step 1: Open CM and Your Picklists
|
 |
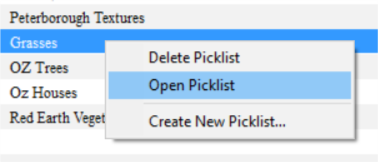
Step 2: Select the Picklist to be backed up
|
 |
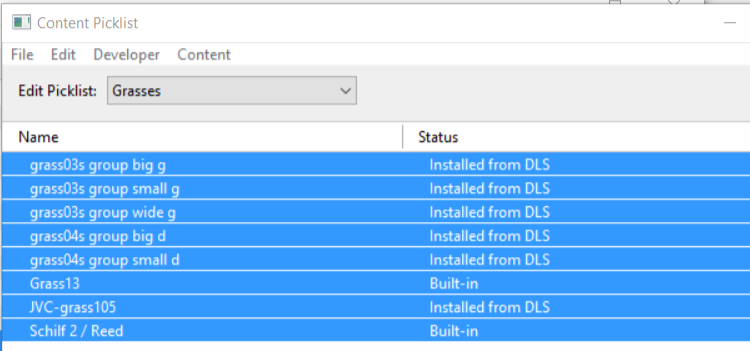
Step 3: Select Picklist Contents
|
 |
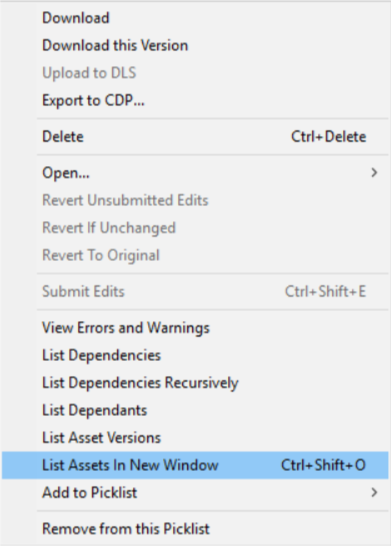
Step 4: Transfer List to a New Window
|
Transfer the List to Notepad (or any text editor)
 |
Step 1: Open Notepad or any other suitable text editor program
|
 |
Step 2: Save the Picklist as a text (.txt) file
|
How to Restore a Picklist
Restoring a Picklist basically involves reversing the above steps.
 |
Step 1: Open Notepad or any other suitable text editor program
|
 |
Step 2: Open CM in the Destination Trainz and Create a New Filter
|
 |
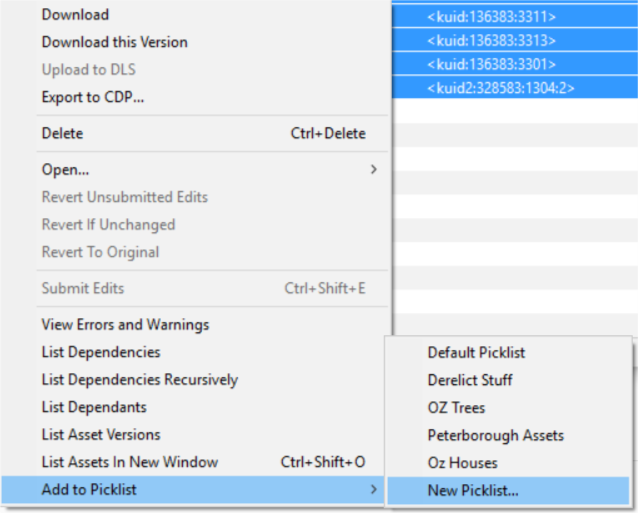
Step 3: Create a New Picklist The pasted asset list will appear in the CM display window, as shown below.
|
 |
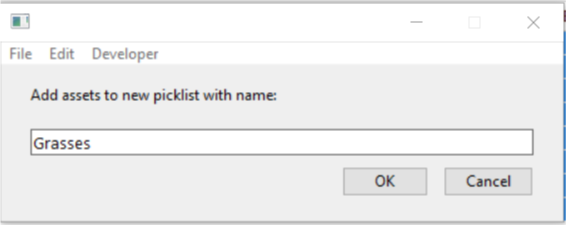
Step 4: Enter a Name for the Picklist
|
Trainz Wiki
 |
More Tutorials and Guides to Using Trainz |
