Help/Layers Tab
(Created page with "400px {{clear}} File:layer hide.jpg {{clear}} File:layer lock.jpg {{clear}} File:object add.jpg {{clear}} File:area cancel.jpg {{clear}} [[...") |
(→File:lock entire route.jpg Lock Entire Route) |
||
| (5 intermediate revisions by 4 users not shown) | |||
| Line 1: | Line 1: | ||
| + | |||
| + | Trainz - Content Creation - #7 - Understanding Layers in Surveyor and what to use them for: [https://youtu.be/KoXvafsMC3k Video] | ||
| + | |||
| + | When you create a new route, you are by default adding | ||
| + | objects to the route layer and so they will be present in any | ||
| + | session created for the route. | ||
| + | To switch to working in a session layer, open the layers tab | ||
| + | and Click where it says “Session-layer”. Objects you add | ||
| + | will now be placed in the session layer. | ||
| + | If you Click Place a scenery object on a new route, Click on a scenery object, then on the Edit | ||
| + | Properties button (N). Beside an option | ||
| + | to name the object, which layer the object is | ||
| + | on can be seen. To move the object to another layer scroll to that layer by | ||
| + | using the spinners on either side of the Layer name. | ||
| + | |||
[[File:layers.jpg|400px]] | [[File:layers.jpg|400px]] | ||
{{clear}} | {{clear}} | ||
| − | [[File:layer hide.jpg]] | + | |
| + | |||
| + | == [[File:layer hide.jpg]] Hide Layer == | ||
| + | |||
| + | Click on Hide Layer to clear space when working on a route, Click again to make it appear. | ||
{{clear}} | {{clear}} | ||
| − | [[File:layer lock.jpg]] | + | |
| + | == [[File:layer lock.jpg]] Lock Layer == | ||
| + | |||
{{clear}} | {{clear}} | ||
| − | [[File:object add.jpg]] | + | Click on Lock Layer to prevent edits from being made, Click again to enable it. |
| + | |||
| + | == [[File:object add.jpg]] Add Layer == | ||
| + | |||
{{clear}} | {{clear}} | ||
| − | [[File:area cancel.jpg]] | + | Click on the Add Layer button. Enter a name for the new layer |
| + | and select Route level or Session level in the popup | ||
| + | dialogue and accept. | ||
| + | |||
| + | == [[File:area cancel.jpg]] Delete Layer == | ||
| + | |||
{{clear}} | {{clear}} | ||
| − | [[File:layer merge.jpg]] | + | Select a layer and Click on the Delete Layer |
| + | button to remove it. | ||
| + | |||
| + | == [[File:layer merge.jpg]] Merge Layer == | ||
| + | |||
{{clear}} | {{clear}} | ||
| − | [[File:lock entire route.jpg]] | + | Select a layer and Click on Merge Layers button. |
| + | A popup dialogue gives you the option to choose a | ||
| + | specific layer to merge with. | ||
| + | |||
| + | == [[File:lock entire route.jpg]] Lock Entire Route == | ||
| + | Click on Lock Entire Route to disable editing on all layers. Ideal for preventing accidental changes when inspecting whole routes. | ||
{{clear}} | {{clear}} | ||
| + | |||
| + | Return To | ||
| + | *[[Help:Surveyor_Tools|Surveyor Tools]] | ||
| + | *[[Help:TRS2019_Surveyor|Surveyor]] | ||
| + | |||
| + | [[Category:TRS19]] | ||
| + | [[Category:Help|Surveyor Layers Tab]] | ||
Latest revision as of 22:45, 2 August 2018
Trainz - Content Creation - #7 - Understanding Layers in Surveyor and what to use them for: Video
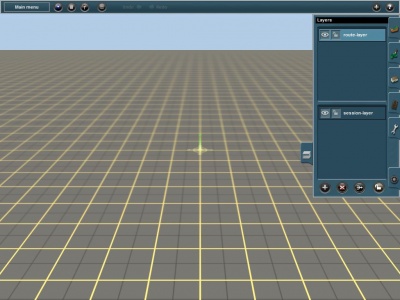
When you create a new route, you are by default adding objects to the route layer and so they will be present in any session created for the route. To switch to working in a session layer, open the layers tab and Click where it says “Session-layer”. Objects you add will now be placed in the session layer. If you Click Place a scenery object on a new route, Click on a scenery object, then on the Edit Properties button (N). Beside an option to name the object, which layer the object is on can be seen. To move the object to another layer scroll to that layer by using the spinners on either side of the Layer name.
Contents |
[edit]  Hide Layer
Click on Hide Layer to clear space when working on a route, Click again to make it appear.
[edit]  Lock Layer
Click on Lock Layer to prevent edits from being made, Click again to enable it.
[edit]  Add Layer
Click on the Add Layer button. Enter a name for the new layer and select Route level or Session level in the popup dialogue and accept.
[edit]  Delete Layer
Select a layer and Click on the Delete Layer button to remove it.
[edit]  Merge Layer
Select a layer and Click on Merge Layers button. A popup dialogue gives you the option to choose a specific layer to merge with.
[edit]  Lock Entire Route
Click on Lock Entire Route to disable editing on all layers. Ideal for preventing accidental changes when inspecting whole routes.
Return To
