Attachment point
Each mesh file may have zero or more attachment points, which can be used within the game to identify a specific position and orientation in 3D space relative to the mesh. Attachment point names should be prefixed with "a." (eg. "a.light") to avoid confusion with other nodes in the scene hierarchy. Attachment points may be used for a number of purposes, including:
- From within a config.txt file, to identify where a specific effect is to be attached to a mesh.
- From within a config.txt file mesh-table element when attaching to a parent mesh, to specify where on the parent mesh the origin of the child mesh will attach.
- From within the game code, as one of the Vehicle Attachment Points predefined for use in Trainz.
- From within an asset's script for various purposes.
Please note that it is not recommended to use a single attachment point for multiple unrelated purposes, as the game may adjust the exact function of the attachment point to suit its actual use. If two different usages would apply different semantics to the attachment point, the result is undefined. For example, attempting to play a sound or particle effect at a reserved "a.bog0" attachment point might cause the desired effect to fail if the bogey is not visible.
Attachment points may be present in the root of the mesh file, or may be a child of a sub-node such as an animated bone.
Contents |
3D Studio Max Guidelines
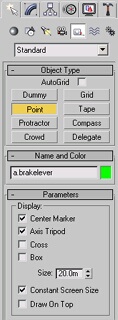
In 3dsmax: ‘Create’ tab, ‘Helpers’, ‘Point’.
To maintain correct alignment, attachment points should be created in the TOP viewport. The front end of the train body should be on the Left hand side when displayed in the RIGHT viewport in 3dsmax (ie, in TOP view, the loco should face down the page).
Any object in the scene that has to move (ie. levers and dials), or animate, will need to be ‘detached’ from the main model. To do this, select the polygons or elements you want detached and through the 3dsmax modify panel, press the detach button and name the new object.
To make life a heck of a lot easier later on, it pays to move the pivot point of each new object to it’s logical position. Ie. For needles and levers the pivot point should be the centre of rotation (with the rotation around the Z axis). Align lever shaft in the Positive Y direction.
To do this, access the 3dsmax Hierarchy panel, and press Affect Pivot Only. From here you can centre and align the pivot to the object and move it to the preferred location.
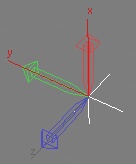
Be aware that the point itself must be rotated correctly, not the axis of the point. The Hierachy...Affect Pivot Only option may be turned on to determine the orientation of the point, it must then be turned off before rotating the point (click on the Affect Pivot Only box to toggle on/off). Turn on the axis information again to verify the rotation of the point has been done correctly.
Once the pivot points have been set for all your new objects, now is the time to start adding attachment points. Add these through the 3dsmax create panel (see image below). Remember to use the a.name naming convention. Attachment points are simply points in 3D space where another mesh can inserted (through config.txt reference).
Since you have already worked out the pivot points of all your objects, all you have to do is align the attachment points to your object pivot points. Press the icon (above) and select the object to align to....
These attachments are exported as part of the default mesh (or the main mesh). Objects for attachment must not be included in the export as they are each exported from their own 3dsmax files and attached to the default mesh separately (through config.txt reference).
Remember to save a backup of the 3dsmax file!! Select each object from the scene and save each one as its own 3dsmax file, (command panel, file - save selected). You may delete the object from the main mesh scene after you save it.
![]() The next step is to open each 3dsmax file you have just created (of the movable objects), and move the object to 0,0,0 and make the rotational values 0,0,0 (press and right click these 3dsmax icons). This makes the object (and it’s pivot) aligned correctly to the origin of the scene.
The next step is to open each 3dsmax file you have just created (of the movable objects), and move the object to 0,0,0 and make the rotational values 0,0,0 (press and right click these 3dsmax icons). This makes the object (and it’s pivot) aligned correctly to the origin of the scene.
Animated Attachment Points in IM
For an attachment point in an IM file to move with an animated dummy, there is a special naming convention for the point in 3dsmax, e.g. a.r.dummy/a.name.
If the attachment point in the main mesh is to move with an animation of that mesh, the special naming convention above must be used for the point to follow the animation, and allow the submesh to then follow the point. For example, a submesh is to be attached to a main mesh using the attachment name a.lever. This attachment point in the main mesh must be linked to a helper point called b.r.pivot, that is animated. The attachment point in the 3dsmax model must be named a.r.pivot/a.lever. In the config.txt file the attachment point will be entered as a.lever. Note the helper point in 3dsmax will be called b.r.pivot, not a.r.pivot! The submesh will now follow any animation in the main mesh. It can be useful for moving coronas, and animated nightwindow meshs.
Animated Attachment Points in FBX
Animated Attachment points in FBX files do not require a name prefix. The standard "a.name" convention is used. The parent bone is determined by the attachment point's parent node in the scene hierarchy.
LM.txt Attachment Culling
The LM.txt file LOD format allows attachments to be culled at a fixed distance from the camera. There are two requirements for this technique.
1. The following line must be added in the LM.txt file with the value tuned to the appropriate "fraction of screen space" at which to cull the attachment point(s):
attachmentCutOff = 0.1;
2. A ":Cull" suffix (case insensitive) must be added to any attachment point name which is to be dropped. This suffix should be kept consistent across all sub-meshes which comprise the LM mesh.
For example, to stop drawing the bogeys of a train vehicle at a specific level of detail, append :Cull to the bogie attachment point. (ie a.bog0:Cull ) The body mesh may need a low poly representation of the bogeys to be burned in at this detail level to avoid an obvious change in the mesh's silhouette. Note that many meshes (eg. animated fans) can be dropped without needing an alternative to be burned in due to their positioning and lack of effect on the silhouette.

