How to Create a Picklist
From TrainzOnline
(Difference between revisions)
(added Picklist feature summary) |
|||
| (29 intermediate revisions by one user not shown) | |||
| Line 1: | Line 1: | ||
| − | The information in this Wiki Page applies to '''TANE''' | + | <table width=1000> |
| + | <tr valign="top"> | ||
| + | <td>The information in this Wiki Page applies to '''TANE''' and '''TRS19'''. For information on creating, managing and using '''Picklists''' in '''Trainz Plus''' and '''TRS22''' refer to the more recent document at [[image:WikiLink.PNG|link=]] '''[[How_to_Manage_Filters_and_Picklists|How to Manage Search Filters and Picklists]]'''</td> | ||
| + | </tr> | ||
| + | </table> | ||
| − | <table | + | <table width=1000> |
<tr valign="top"> | <tr valign="top"> | ||
| − | <td | + | <td width=200> |
| + | __TOC__ | ||
| + | </td> | ||
<td> | <td> | ||
| − | + | <table bgcolor="lightcyan" cellpadding=2> | |
| − | + | <tr valign="top"> | |
| + | <td width=10>[[image:BlueDot10x10.png|link=]]</td> | ||
| + | <td>A Picklist is a user created list of commonly used assets (scenery, track objects, splines, textures, rolling stock - anything that you can add to a layout)</td> | ||
| + | </tr> | ||
| + | <tr valign="top"> | ||
| + | <td>[[image:BlueDot10x10.png|link=]]</td> | ||
| + | <td>You can create multiple picklists of related items (e.g. Bushes, Buildings, Trees, 4 wheel wagons, etc) that will be grouped together for easier selection</td> | ||
| + | </tr> | ||
| + | </table> | ||
</td> | </td> | ||
</tr> | </tr> | ||
</table> | </table> | ||
<br> | <br> | ||
| − | <table | + | <table bgcolor=#000000 cellpadding=2> |
<tr valign="top"> | <tr valign="top"> | ||
| − | <td | + | <td> |
| + | <table bgcolor=#ffffff cellpadding=2> | ||
| + | <tr valign="top"> | ||
| + | <td colspan=2>'''Trainz''' provides 3 methods of creating a picklist:-</td> | ||
</tr> | </tr> | ||
<tr valign="top"> | <tr valign="top"> | ||
| − | <td>[[ | + | <td width=10>[[image:DotPoint.JPG|10px|link=]]</td> |
| − | <td>''' | + | <td>the '''Full Search Filter''' in '''Surveyor Classic''', <span style="font-weight: 700; font-size: 15px;">OR</span></td> |
</tr> | </tr> | ||
<tr valign="top"> | <tr valign="top"> | ||
| − | <td>[[ | + | <td>[[image:DotPoint.JPG|10px|link=]]</td> |
| − | <td>''' | + | <td>the '''Assets Palette''' and '''Info Palette''' in '''Surveyor 2.0''' (in '''Trainz Plus''' and '''TRS22 Platinum''' only), <span style="font-weight: 700; font-size: 15px;">OR</span></td> |
| + | </tr> | ||
| + | <tr valign="top"> | ||
| + | <td>[[image:DotPoint.JPG|10px|link=]]</td> | ||
| + | <td>'''Content Manager'''</td> | ||
| + | </tr> | ||
| + | </table> | ||
</td> | </td> | ||
</tr> | </tr> | ||
</table> | </table> | ||
<br> | <br> | ||
| − | ''' | + | <table width=1000> <!-- BEGIN Nav Buttons Table NO SKIPS --> |
| + | <tr valign="top"> | ||
| + | <td width=629><span id="stepUsingSurveyor10"></span> | ||
| + | ='''Using Surveyor Classic'''= | ||
| + | </td> | ||
| + | <td width=50> </td> <!-- Skip Down --> | ||
| + | <td width=50> </td> <!-- Skip Up --> | ||
| + | <td width=46>[[image:BackToTop.png|link=#top|alt=Top|Top]]</td> | ||
| + | <td width=75>[[image:NextDown.png|link=#stepUsingSurveyor20|Skip Down]]</td> | ||
| + | <td width=75> </td> | ||
| + | <td width=75>[[image:BackToBottom.png|link=#bottom|alt=Bottom|Bottom]]</td> | ||
| + | </tr> | ||
| + | </table> <!-- END Nav Buttons Table --> | ||
| − | + | <table width=1000 cellpadding=2> | |
| − | + | ||
| − | <table cellpadding= | + | |
<tr valign="top"> | <tr valign="top"> | ||
| − | <td>[[ | + | <td colspan=2><span style="font-weight: 700; font-size: 15px;">Steps:</span></td> |
| − | <td><span style="font-size: 17px;"> | + | </tr> |
| + | <tr valign="top"> | ||
| + | <td width=25>[[image:DotPoint1.JPG|link=]]</td> | ||
| + | <td><span style="font-size: 17px; font-weight: 700;">Open the Picklist Window:</span><br> | ||
<table> | <table> | ||
| + | <tr> | ||
| + | <td>From '''Surveyor Classic''' press <span style="color: white; background-color: black; font-weight: 700; font-size: 15px;"> Ctrl </span> '''+''' <span style="color: white; background-color: black; font-weight: 700; font-size: 15px;"> Shift </span> '''+''' <span style="color: white; background-color: black; font-weight: 700; font-size: 15px;"> F </span> to open the '''Full Search Filter''' tool ('''Note:''' pressing <span style="color: white; background-color: black; font-weight: 700; font-size: 15px;"> Ctrl </span> '''+''' <span style="color: white; background-color: black; font-weight: 700; font-size: 15px;"> F </span> will only open the find named asset filter tool). | ||
| + | <br> | ||
| + | <table bgcolor=#000000 cellpadding=2> | ||
<tr valign="top"> | <tr valign="top"> | ||
| − | <td>< | + | <td> |
| − | + | <table bgcolor=#ffffb0 cellpadding=2> | |
| − | + | <tr valign="top"> | |
| − | + | <td width=25>[[image:NotePad.PNG|link=]]</td> | |
| − | + | <td>If you already have one or more Picklists then the currently selected Picklist will be shown in the '''Picklist Window'''. An empty Picklist Window indicates that no Picklist has been created</td> | |
</tr> | </tr> | ||
| − | </table></td> | + | </table> |
| + | </td> | ||
| + | </tr> | ||
| + | </table> | ||
| + | </td> | ||
| + | </tr> | ||
| + | </table> | ||
| + | </td> | ||
</tr> | </tr> | ||
</table> | </table> | ||
<br> | <br> | ||
| − | <table | + | <table width=1000 cellpadding=2> |
<tr valign="top"> | <tr valign="top"> | ||
| − | <td>[[ | + | <td width=25>[[image:DotPoint2.JPG|link=]]</td> |
| − | <td><span style="font-size: 17px;"> | + | <td><span style="font-size: 17px; font-weight: 700;">Select a Picklist or Create a New Picklist:</span><br> |
| − | <table | + | <table> <!-- BEGIN Step 1 A Table --> |
<tr valign="top"> | <tr valign="top"> | ||
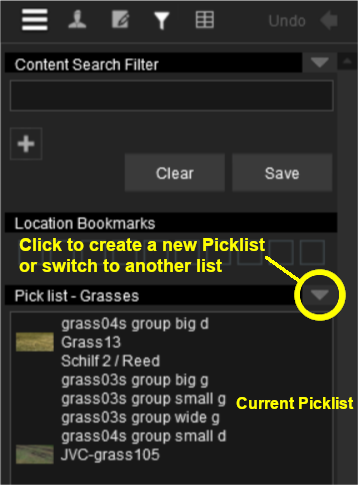
| − | <td>[[ | + | <td>[[image:PickList_Surveyor01.png|link=]]</td> |
| − | <td><span style="font-size: | + | <td>To switch to a different Picklist or to create a new one:- |
| − | + | <table> | |
| + | <tr valign="top"> | ||
| + | <td width=25>[[image:DotPoint1Blue.png|link=]]</td> | ||
| + | <td><span style="font-weight: 700; font-size: 15px; background-color: lightcyan;">Left Click</span> on the '''down arrowhead''' icon shown in the image on the left to open the '''Picklist Menu'''</td> | ||
| + | </tr> | ||
| + | <tr valign="top"> | ||
| + | <td colspan=2>[[image:PickList_Surveyor03.png|link=]]</td> | ||
| + | </tr> | ||
| + | <tr valign="top"> | ||
| + | <td>[[image:DotPoint2Blue.png|link=]]</td> | ||
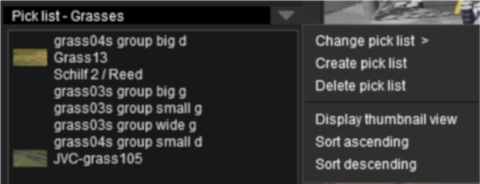
| + | <td><span style="font-weight: 700; font-size: 15px; background-color: lightcyan;">Left Click</span> either:- | ||
| + | <table> | ||
| + | <tr valign="top"> | ||
| + | <td width=25>[[image:Ablue.png|link=]]</td> | ||
| + | <td><span style="font-weight: 700; font-size: 15px; color: white; background-color: black;"> Change pick list > </span> to select a different list<br> | ||
| + | Select an existing '''Picklist''' from the list shown, <span style="font-weight: 700; font-size: 15px;">OR</span></td> | ||
| + | </tr> | ||
| + | <tr valign="top"> | ||
| + | <td>[[image:Bblue.png|link=]]</td> | ||
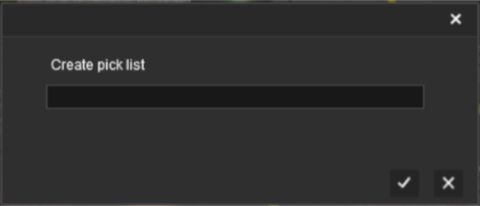
| + | <td><span style="font-weight: 700; font-size: 15px; color: white; background-color: black;"> Create pick list </span> to create a new one<br> | ||
| + | Enter a name for the new list then <span style="font-weight: 700; font-size: 15px; background-color: lightcyan;">Left Click</span> the [[image:Tick.PNG|link=]] button.<br></td> | ||
| + | </tr> | ||
| + | </table> <!-- END Step 1 B Table --> | ||
| + | [[image:PickList_Surveyor04.png|link=]]</td> | ||
| + | </tr> | ||
| + | </table> <!-- END Step 1 A Table --> | ||
| + | </td> | ||
</tr> | </tr> | ||
</table> | </table> | ||
| + | </td> | ||
| + | </tr> | ||
| + | </table> <!-- END Step 1 table --> | ||
| + | <br> | ||
| + | <table width=1000> | ||
| + | <tr valign="top"> | ||
| + | <td width=25>[[image:DotPoint3.JPG|link=]]</td> | ||
| + | <td><span style="font-size: 17px; font-weight: 700;">Add Assets to the Picklist:</span><br> | ||
| + | <span style="font-weight: 700; font-size: 15px;">Options:</span> Choose one of two methods:-</td> | ||
| + | </tr> | ||
| + | <tr valign="top"> | ||
| + | <td colspan=2> | ||
| + | <table width=975> | ||
| + | <tr valign="top"> | ||
| + | <td> | ||
| + | <table width=485 bgcolor=#0000ff cellpadding=2> | ||
| + | <tr valign="top"> | ||
| + | <td> | ||
| + | <table bgcolor=#ffffff cellpadding=2> | ||
| + | <tr valign="top"> | ||
| + | <td width=25>[[image:Ablue.png|link=]]</td> | ||
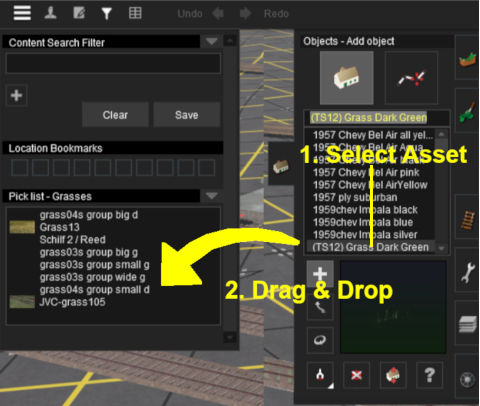
| + | <td><span style="font-weight: 700; font-size: 15px;">Steps: Using the Asset List</span>:-<br> | ||
| + | Use this method if the asset you want to add to the new Picklist is not already in the route or is not present in the Surveyor scene in front of you.</td> | ||
| + | </tr> | ||
| + | <tr valign="top"> | ||
| + | <td colspan=2> | ||
<table> | <table> | ||
<tr valign="top"> | <tr valign="top"> | ||
| + | <td width=25>[[image:DotPoint1Blue.png|link=]]</td> | ||
| + | <td>Open the tool selection window for the types of assets to be added. For example: the Object Tool Window (<span style="font-weight: 700; font-size: 15px; color: white; background-color: black;"> F3 </span> key)</td> | ||
| + | </tr> | ||
| + | <tr valign="top"> | ||
| + | <td>[[image:DotPoint2Blue.png|link=]]</td> | ||
| + | <td>Scroll down the selection window to an asset that is to be added to the Picklist</td> | ||
| + | </tr> | ||
| + | <tr valign="top"> | ||
| + | <td colspan=2>[[image:PickList_Surveyor02.png|link=]]</td> | ||
| + | </tr> | ||
| + | <tr valign="top"> | ||
| + | <td>[[image:DotPoint3Blue.png|link=]]</td> | ||
| + | <td><span style="font-weight: 700; font-size: 15px; background-color: lightcyan;">Left Click and Drag</span> the asset from the selection window to the Picklist window</td> | ||
| + | </tr> | ||
| + | <tr valign="top"> | ||
| + | <td>[[image:DotPoint4Blue.png|link=]]</td> | ||
| + | <td>Repeat as required</td> | ||
| + | </tr> | ||
| + | </table> | ||
| + | </td> | ||
| + | </tr> | ||
| + | </table> | ||
| + | </td> | ||
| + | </tr> | ||
| + | </table> | ||
| + | </td> | ||
<td> | <td> | ||
| − | # | + | <table width=485 bgcolor=#0000ff cellpadding=2> |
| − | + | <tr valign="top"> | |
| − | + | <td> | |
| − | + | <table bgcolor=#ffffff cellpadding=2> | |
| − | + | <tr valign="top"> | |
| − | [[ | + | <td width=25>[[image:Bblue.png|link=]]</td> |
| + | <td><span style="font-weight: 700; font-size: 15px;">Steps: Using the Object Picker</span>:-<br> | ||
| + | Use this method if the asset you want to add to the new Picklist is already in the route and is present in the Surveyor scene in front of you.</td> | ||
</tr> | </tr> | ||
| − | </table></td> | + | <tr valign="top"> |
| + | <td colspan=2> | ||
| + | <table> | ||
| + | <tr valign="top"> | ||
| + | <td width=25>[[image:DotPoint1Blue.png|link=]]</td> | ||
| + | <td>Open the tool selection window for the types of assets to be added. For example: the Object Tool Window (<span style="font-weight: 700; font-size: 15px; color: white; background-color: black;"> F3 </span> key)</td> | ||
| + | </tr> | ||
| + | <tr valign="top"> | ||
| + | <td>[[image:DotPoint2Blue.png|link=]]</td> | ||
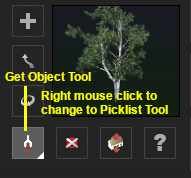
| + | <td><span style="font-weight: 700; font-size: 15px; background-color: lightcyan;">Right Click</span> the '''Get Object''' tool to change it to a '''Picklist''' tool ...</td> | ||
| + | </tr> | ||
| + | <tr valign="top"> | ||
| + | <td align="center" colspan=2>[[image:PickObjectGetTool.png|link=]]</td> | ||
| + | </tr> | ||
| + | <tr valign="top"> | ||
| + | <td width=25>[[image:DotPoint3Blue.png|link=]]</td> | ||
| + | <td> | ||
| + | <table> | ||
| + | <tr valign="top"> | ||
| + | <td>[[image:PickListGetTool.png|link=]]</td> | ||
| + | <td> and then simply <span style="font-weight: 700; font-size: 15px; background-color: lightcyan;">Left Click</span> on each object in Surveyor to add it to the current Picklist</td> | ||
</tr> | </tr> | ||
</table> | </table> | ||
| − | < | + | </td> |
| + | </tr> | ||
<tr valign="top"> | <tr valign="top"> | ||
| − | <td>[[ | + | <td>[[image:DotPoint4Blue.png|link=]]</td> |
| − | <td> | + | <td>When finished, <span style="font-weight: 700; font-size: 15px; background-color: lightcyan;">Right Click</span> on the tool again to restore it to its '''Get Object''' state</td> |
| + | </tr> | ||
| + | </table> | ||
| + | </td> | ||
| + | </tr> | ||
| + | </table> | ||
| + | </td> | ||
</tr> | </tr> | ||
</table> | </table> | ||
<br> | <br> | ||
| − | <table | + | <table bgcolor=#000000 cellpadding=2> |
<tr valign="top"> | <tr valign="top"> | ||
| − | <td> | + | <td> |
| − | < | + | <table bgcolor=#ffffff cellpadding=2> |
| + | <tr valign="top"> | ||
| + | <td>To close the '''Search Filter/Picklist Tool''':- | ||
<table> | <table> | ||
| + | <tr valign="top"> | ||
| + | <td width=10>[[image:DotPoint.JPG|10px|link=]]</td> | ||
| + | <td>In '''TANE''' press the <span style="color: white; background-color: black; font-weight: 700; font-size: 15px;"> ESC </span> ('''escape''') key</td> | ||
| + | </tr> | ||
| + | <tr valign="top"> | ||
| + | <td>[[image:DotPoint.JPG|10px|link=]]</td> | ||
| + | <td>In '''TRS19''' and later versions press <span style="color: white; background-color: black; font-weight: 700; font-size: 15px;"> Ctrl </span> '''+''' <span style="color: white; background-color: black; font-weight: 700; font-size: 15px;"> Shift </span> '''+''' <span style="color: white; background-color: black; font-weight: 700; font-size: 15px;"> F </span> again</td> | ||
| + | </tr> | ||
| + | </table> | ||
| + | </td> | ||
| + | </tr> | ||
| + | </table> | ||
| + | </td> | ||
| + | </tr> | ||
| + | </table> | ||
| + | </td> | ||
| + | </tr> | ||
| + | </table> | ||
| + | </td> | ||
| + | </tr> | ||
| + | </table> | ||
| + | <br> | ||
| + | <table bgcolor=#000000 cellpadding=2> | ||
<tr valign="top"> | <tr valign="top"> | ||
<td> | <td> | ||
| − | + | <table bgcolor=#ffffb0 cellpadding=2> | |
| − | [[ | + | <tr valign="top"> |
| − | </tr>< | + | <td width=25>[[image:NotePad.PNG|link=]]</td> |
| − | </table></td> | + | <td><span style="font-size: 17px;">'''Notes:'''</span> In both methods [[image:Ablue.png|link=]] and [[image:Bblue.png|link=]]:-<br> |
| + | ---- | ||
| + | </td> | ||
| + | </tr> | ||
| + | <tr valign="top"> | ||
| + | <td>[[image:DotPoint.JPG|10px|link=]]</td> | ||
| + | <td>Each asset is automatically saved to the Picklist when it is added into the Picklist Window</td> | ||
| + | </tr> | ||
| + | <tr valign="top"> | ||
| + | <td>[[image:DotPoint.JPG|10px|link=]]</td> | ||
| + | <td>If an added asset does not appear in the window, then it usually means that the asset is already present in the list</td> | ||
| + | </tr> | ||
| + | <tr valign="top"> | ||
| + | <td>[[image:DotPoint.JPG|10px|link=]]</td> | ||
| + | <td>To remove an asset simply drag it out of the Picklist Window onto the Surveyor screen</td> | ||
| + | </tr> | ||
| + | </table> | ||
| + | </td> | ||
</tr> | </tr> | ||
</table> | </table> | ||
<br> | <br> | ||
| − | <table width= | + | <table width=1000> <!-- BEGIN Nav Buttons Table NO SKIPS --> |
<tr valign="top"> | <tr valign="top"> | ||
| − | <td | + | <td width=629><span id="stepUsingSurveyor20"></span> |
| + | ='''Using Surveyor 2.0'''= | ||
| + | </td> | ||
| + | <td width=50>[[image:SkipDown.png|link=#skipCreate20|Skip Down]]</td> | ||
| + | <td width=50> </td> <!-- Skip Up --> | ||
| + | <td width=46>[[image:BackToTop.png|link=#top|alt=Top|Top]]</td> | ||
| + | <td width=75>[[image:NextDown.png|link=#stepUsingCM|Skip Down]]</td> | ||
| + | <td width=75>[[image:NextUp.png|link=#stepUsingSurveyor10|Skip Up]]</td> | ||
| + | <td width=75>[[image:BackToBottom.png|link=#bottom|alt=Bottom|Bottom]]</td> | ||
| + | </tr> | ||
| + | </table> <!-- END Nav Buttons Table --> | ||
| + | <br> | ||
| + | <table width=1000 bgcolor=#000000 cellpadding=2> | ||
| + | <tr valign="top"> | ||
| + | <td> | ||
| + | <table width=996 bgcolor=#ffffff cellpadding=2> | ||
| + | <tr valign="top"> | ||
| + | <td align="center"><span style="font-size: 15px;">'''Surveyor 2.0''' is available in '''Trainz Plus''' and '''TRS22 Platinum''' only</span></td> | ||
| + | </tr> | ||
| + | </table> | ||
| + | </td> | ||
</tr> | </tr> | ||
</table> | </table> | ||
| − | =''' | + | =='''Locating the Picklists'''== |
| − | + | <table width=1000 bgcolor="lightcyan" cellpadding=2> | |
| + | <tr valign="top"> | ||
| + | <td width=10>[[image:BlueDot10x10.png|link=]]</td> | ||
| + | <td>Picklists are created, managed and deleted using the '''Assets Palette''' in '''Surveyor 2.0'''</td> | ||
| + | </tr> | ||
| + | </table> | ||
| + | |||
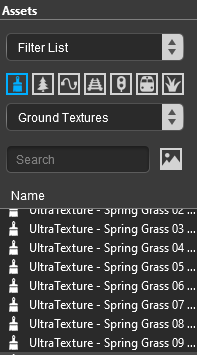
| + | The '''Assets Palette''' gives you access to all the installed '''Assets''', the '''Search Filters''' created in '''Content Manager''' and the '''Picklists'''.<br> | ||
| − | <table | + | <table width=1000 cellpadding=2> |
<tr valign="top"> | <tr valign="top"> | ||
| − | <td>[[ | + | <td width=200 align="center">[[image:AssetsPaletteList_S20.png|link=]]<br> |
| − | <td><span style="font-size: 17px;">''' | + | '''The Assets Palette'''</td> |
| + | <td> | ||
| + | <table bgcolor=#000000 cellpadding=2> | ||
| + | <tr valign="top"> | ||
| + | <td> | ||
| + | <table bgcolor=#ffffb0 cellpadding=2> | ||
| + | <tr valign="top"> | ||
| + | <td width=25>[[image:NotePad.PNG|link=]]</td> | ||
| + | <td><span style="font-size: 17px; font-weight: 700;">Notes: Showing a Hidden Palette</span><br> | ||
| + | ---- | ||
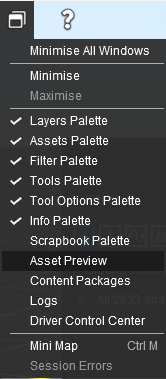
| + | If the '''Assets Palete''' is not visible on the screen then:- | ||
| + | <table bgcolor=#ffffff cellpadding=2> | ||
| + | <tr valign="top"> | ||
| + | <td width=175>[[image:WindowsMenu_S20.png|link=]]</td> | ||
| + | <td> | ||
| + | <table cellpadding=2> | ||
| + | <tr valign="top"> | ||
| + | <td colspan=2><span style="font-weight: 700; font-size: 15px;;">Steps:</span> To Show a Hidden Palette:-</td> | ||
| + | </tr> | ||
| + | <tr valign="top"> | ||
| + | <td width=20>[[image:DotPoint1Blue.png|link=]]</td> | ||
| + | <td><span style="font-weight: 700; font-size: 15px; background-color: lightcyan;">Left Click</span> on the [[image:SurveyorWindowIcon.png|link=]] '''Window Menu'''<br> | ||
<table> | <table> | ||
<tr valign="top"> | <tr valign="top"> | ||
| − | <td><br> | + | <td colspan=2>A drop down menu will appear:-</td> |
| − | + | </tr> | |
| + | <tr valign="top"> | ||
| + | <td width=10>[[image:BulletTick.png|link=]]</td> | ||
| + | <td>visible palettes have ticks next to their names - this includes those that are visible but minimised</td> | ||
| + | </tr> | ||
| + | <tr valign="top"> | ||
| + | <td>[[image:BulletNoTick.png|link=]]</td> | ||
| + | <td>invisible (hidden) palettes have no ticks next to their names</td> | ||
| + | </tr> | ||
| + | </table> | ||
| + | </td> | ||
| + | </tr> | ||
| + | <tr valign="top"> | ||
| + | <td>[[image:DotPoint2Blue.png|link=]]</td> | ||
| + | <td>To reveal a hidden Palette, simply <span style="font-weight: 700; font-size: 15px; background-color: lightcyan;">Left Click</span> on its name <span style="font-weight: 700; font-size: 15px;">OR</span> on the [[image:BulletNoTick.png|link=]] icon next to its name<br> | ||
| + | <table cellpadding=2> | ||
| + | <tr valign="top"> | ||
| + | <td width=10>[[image:DotPoint.JPG|10px|link=]]</td> | ||
| + | <td>if the '''Assets Palette''' has no tick ([[image:BulletNoTick.png|link=]]) then <span style="font-weight: 700; font-size: 15px; background-color: lightcyan;">Left Click</span> on its name <span style="font-weight: 700; font-size: 15px;">OR</span> on the [[image:BulletNoTick.png|link=]]. This will add the [[image:BulletTick.png|link=]] and it will appear docked on the screen</td> | ||
| + | </tr> | ||
| + | <tr valign="top"> | ||
| + | <td>[[image:DotPoint.JPG|10px|link=]]</td> | ||
| + | <td>if the '''Assets Palette''' name has a tick ([[image:BulletTick.png|link=]]) but is not visible on the screen then check the '''Minimised''' section at the bottom of the list below the horizontal dividing line. If its name appears there then it has been '''Minimised'''. <span style="font-weight: 700; font-size: 15px; background-color: lightcyan;">Left Click</span> on its name in the '''Minimised''' section ('''NOT''' in the Palettes section) to restore it to its normal size on the screen</td> | ||
| + | </tr> | ||
| + | </table> | ||
| + | </td> | ||
| + | </tr> | ||
| + | </table> | ||
| + | </td> | ||
| + | </tr> | ||
| + | </table> | ||
| + | </td> | ||
| + | </tr> | ||
| + | </table> | ||
| + | </td> | ||
| + | </tr> | ||
| + | </table> | ||
| + | </td> | ||
| + | </tr> | ||
| + | </table> | ||
| + | <br> | ||
| + | <table width=1000 cellpadding=2> | ||
| + | <tr valign="top"> | ||
| + | <td width=200 align="center">[[image:PickListFind_S20.png|link=]]</td> | ||
| + | <td> | ||
| + | <table bgcolor=#000000 cellpadding=2> | ||
| + | <tr valign="top"> | ||
| + | <td> | ||
| + | <table bgcolor=#ffffb0 cellpadding=2> | ||
| + | <tr valign="top"> | ||
| + | <td width=25>[[image:NotePad.PNG|link=]]</td> | ||
| + | <td><span style="font-size: 17px; font-weight: 700;">Notes:'''</span><br> | ||
| + | ---- | ||
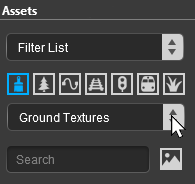
| + | The '''Assets Palette''' has a '''Selection List'''.<br><br> | ||
| + | <span style="font-weight: 700; font-size: 15px; background-color: lightcyan;">Left Click</span> on the data box (showing '''Ground Textures''' in the image) or on the double arrowhead as shown on the left. This will open up its list of contents. | ||
<table> | <table> | ||
<tr valign="top"> | <tr valign="top"> | ||
| − | <td>[[ | + | <td>[[image:PickLists01_S20.png|link=]]</td> |
| − | <td | + | <td> |
| − | + | ||
<table> | <table> | ||
<tr valign="top"> | <tr valign="top"> | ||
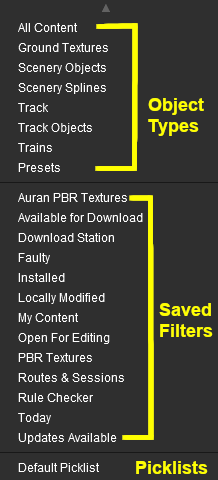
| − | <td> | + | <td colspan=2> All the:-</td> |
| − | + | ||
| − | + | ||
| − | + | ||
</tr> | </tr> | ||
| − | < | + | <tr valign="top"> |
| − | + | <td width=10>[[image:DotPoint.JPG|10px|link=]]</td> | |
| − | [[ | + | <td>'''Object Types''' (textures, scenery, splines, trains, etc) - these are search filters that are built into the palette to assist you in locating specific types of assets</td> |
</tr> | </tr> | ||
| − | </table></td> | + | <tr valign="top"> |
| + | <td>[[image:DotPoint.JPG|10px|link=]]</td> | ||
| + | <td>'''Saved Filters''' - these are the '''Search Filters''' that are used with '''Content Manager'''. They consist of:- | ||
| + | <table> | ||
| + | <tr valign="top"> | ||
| + | <td width=10>[[image:RedDot10x10.png|link=]]</td> | ||
| + | <td>Those that are built into '''Content Manager''':- | ||
| + | <table> | ||
| + | <tr valign="top"> | ||
| + | <td colspan=2>'''All Content''' (appears in the '''Object Types''')</td> | ||
</tr> | </tr> | ||
| − | </table></td> | + | <tr valign="top"> |
| + | <td width=200>'''Download Station'''</td> | ||
| + | <td width=200>'''Faulty'''</td> | ||
| + | </tr> | ||
| + | <tr valign="top"> | ||
| + | <td>'''Installed'''</td> | ||
| + | <td>'''Locally Modified'''</td> | ||
| + | </tr> | ||
| + | <tr valign="top"> | ||
| + | <td>'''My Content'''</td> | ||
| + | <td>'''Open for Editing'''</td> | ||
| + | </tr> | ||
| + | <tr valign="top"> | ||
| + | <td>'''Routes & Sessions'''</td> | ||
| + | <td>'''Today'''</td> | ||
| + | </tr> | ||
| + | <tr valign="top"> | ||
| + | <td colspan=2>'''Custom...''' (create your own filter)</td> | ||
| + | </tr> | ||
| + | </table> | ||
| + | </td> | ||
| + | </tr> | ||
| + | </table> | ||
| + | <table> | ||
| + | <tr valign="top"> | ||
| + | <td width=10>[[image:RedDot10x10.png|link=]]</td> | ||
| + | <td>Plus any filters that you have created and saved yourself using '''Content Manager''' - for example '''Updates Available'''</td> | ||
| + | </tr> | ||
| + | </table> | ||
| + | </td> | ||
| + | </tr> | ||
| + | <tr valign="top"> | ||
| + | <td>[[image:DotPoint.JPG|10px|link=]]</td> | ||
| + | <td>'''Picklists''' - standard and saved. In the image shown left only one Picklist, the standard '''Default Picklist''', is present. Any other saved picklists will be listed below this</td> | ||
| + | </tr> | ||
| + | </table> | ||
| + | </td> | ||
| + | </tr> | ||
| + | </table> | ||
| + | </td> | ||
| + | </tr> | ||
| + | </table> | ||
| + | </td> | ||
| + | </tr> | ||
| + | </table> | ||
| + | </td> | ||
| + | </tr> | ||
| + | </table> | ||
| + | |||
| + | <table width=1000> <!-- BEGIN Nav Buttons Table SKIPS NO SECTIONS --> | ||
| + | <tr valign="top"> | ||
| + | <td width=629><span id="skipCreate20"></span> | ||
| + | =='''Creating a New Picklist'''== | ||
| + | </td> | ||
| + | <td width=50>[[image:SkipDown.png|link=#stepUsingCM|Skip Down]]</td> <!-- skip Down --> | ||
| + | <td width=50>[[image:SkipUp.png|link=#stepUsingSurveyor20|Skip Up]]</td> <!-- skip Up --> | ||
| + | <td width=46> </td> | ||
| + | <td width=75> </td> | ||
| + | <td width=75> </td> | ||
| + | <td width=75> </td> | ||
| + | </tr> | ||
| + | </table> <!-- END Nav Buttons Table --> | ||
| + | |||
| + | <table width=1000 bgcolor="lightcyan" cellpadding=2> | ||
| + | <tr valign="top"> | ||
| + | <td width=10>[[image:BlueDot10x10.png|link=]]</td> | ||
| + | <td>New Picklists are created by selecting an asset in the '''Assets Palette''' or by selecting an existing object in the route</td> | ||
| + | </tr> | ||
| + | </table> | ||
| + | |||
| + | <table width=1000> | ||
| + | <tr valign="top"> | ||
| + | <td colspan=2>A new Picklist is created by first identifying an asset or object that will be added to the new (yet to be created) Picklist. You cannot create an empty Picklist.</td> | ||
| + | </tr> | ||
| + | <tr valign="top"> | ||
| + | <td colspan=2><span style="font-weight: 700; font-size: 15px;">Options:</span> Choose one of two methods:-</td> | ||
| + | </tr> | ||
| + | <tr valign="top"> | ||
| + | <td> | ||
| + | <table width=485 bgcolor=#0000ff cellpadding=2> | ||
| + | <tr valign="top"> | ||
| + | <td> | ||
| + | <table width=481 bgcolor=#ffffff cellpadding=2> | ||
| + | <tr valign="top"> | ||
| + | <td width=25>[[image:Ablue.png|link=]]</td> | ||
| + | <td><span style="font-weight: 700; font-size: 15px;">Steps: Using the Asset List in the Assets Palette</span></td> | ||
| + | </tr> | ||
| + | <tr valign="top"> | ||
| + | <td colspan=2> | ||
| + | <table> | ||
| + | <tr> | ||
| + | <td> | ||
| + | <table cellpadding=2> | ||
| + | <tr valign="top"> | ||
| + | <td colspan=2><span style="font-weight: 700; font-size: 15px;">Steps:</span> To create a Picklist from the '''Assets Palette''':-<br> | ||
| + | Use this method if the object you want to add to the new Picklist is not already in the route or is not present in the Surveyor scene in front of you.</td> | ||
| + | </tr> | ||
| + | <tr valign="top"> | ||
| + | <td width=25>[[image:DotPoint1.JPG|link=]]</td> | ||
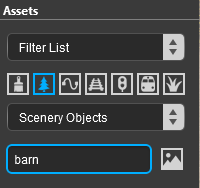
| + | <td>Find the asset in the '''Asset Palette''' list of assets - you may use the filters to help narrow the search.<br> | ||
| + | For example to locate a scenery asset named '''Wooden Barn''':- | ||
| + | <table> | ||
| + | <tr valign="top"> | ||
| + | <td>Select the '''Scenery Objects''' icon (it looks like a tree) and type the text '''barn''' (Upper/lower case is not important) into the search text entry box. This will filter all the assets to only show those that are '''Scenery (non-spline) Objects''' and have the text "'''barn'''" in their names or descriptions.</td> | ||
| + | <td>[[image:FilterSelectSearchBarn_S20.png|link=]]</td> | ||
| + | </tr> | ||
| + | </table> | ||
| + | </td> | ||
| + | </tr> | ||
| + | <tr valign="top"> | ||
| + | <td>[[image:DotPoint2.JPG|link=]]</td> | ||
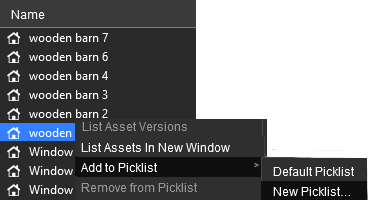
| + | <td>From the list of assets find and <span style="font-weight: 700; font-size: 15px; background-color: lightcyan;">Right Click</span> on the particular asset that you want to use to create a new Picklist<br> | ||
| + | [[image:PickListFromAssets_S20.png|link=]]</td> | ||
| + | </tr> | ||
| + | <tr valign="top"> | ||
| + | <td>[[image:DotPoint3.JPG|link=]]</td> | ||
| + | <td>select the option <span style="font-weight: 700; font-size: 15px; color: white; background-color: black;"> Add to Picklist </span> from the popout menu</td> | ||
| + | </tr> | ||
| + | </table> | ||
| + | </td> | ||
| + | </tr> | ||
| + | </table> | ||
| + | </td> | ||
| + | </tr> | ||
| + | </table> | ||
| + | </td> | ||
| + | </tr> | ||
| + | </table> | ||
| + | </td> | ||
| + | <td> | ||
| + | <table width=485 bgcolor=#0000ff cellpadding=2> | ||
| + | <tr valign="top"> | ||
| + | <td> | ||
| + | <table width=481 bgcolor=#ffffff cellpadding=2> | ||
| + | <tr valign="top"> | ||
| + | <td width=25>[[image:Bblue.png|link=]]</td> | ||
| + | <td><span style="font-weight: 700; font-size: 15px;">Steps: Using an Existing Object</span></td> | ||
| + | </tr> | ||
| + | <tr valign="top"> | ||
| + | <td colspan=2> | ||
| + | <table> | ||
| + | <tr> | ||
| + | <td> | ||
| + | <table cellpadding=2> | ||
| + | <tr valign="top"> | ||
| + | <td colspan=2><span style="font-weight: 700; font-size: 15px;">Steps:</span> To create a Picklist from an existing object:-<br> | ||
| + | Use this method if the object you want to add to the new Picklist is already in the route and is present in the Surveyor scene in front of you.</td> | ||
| + | </tr> | ||
| + | <tr valign="top"> | ||
| + | <td width=25>[[image:DotPoint1.JPG|link=]]</td> | ||
| + | <td>using either the '''Free Move Tool''' or the '''Fine Adjustment Tool''' <span style="font-weight: 700; font-size: 15px; background-color: lightcyan;">Left Click</span> on the object to highlight it</td> | ||
| + | </tr> | ||
| + | <tr valign="top"> | ||
| + | <td>[[image:DotPoint2.JPG|link=]]</td> | ||
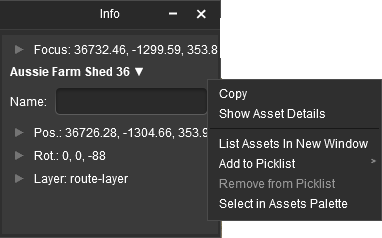
| + | <td>In the '''Info Palette''' <span style="font-weight: 700; font-size: 15px; background-color: lightcyan;">Left Click</span> on the '''Down Arrowhead''' next to the asset name ('''Aussie Farm Shed 36''' in the image below)<br> | ||
| + | <table bgcolor=#ffffb0 cellpadding=2> | ||
| + | <tr valign="top"> | ||
| + | <td width=25>[[image:NotePad.PNG|link=]]</td> | ||
| + | <td><span style="font-size: 17px; font-weight: 700;">Notes:'''</span><br> | ||
| + | ---- | ||
| + | If the '''Info Palette''' is not shown on the screen then refer to the '''Notes: Showing a Hidden Palette''' in the section above</td> | ||
| + | </tr> | ||
| + | </table> | ||
| + | </td> | ||
| + | </tr> | ||
| + | <tr valign="top"> | ||
| + | <td colspan=2>[[image:InfoPaletteMenu_S20.png|link=]]</td> | ||
| + | </tr> | ||
| + | <tr valign="top"> | ||
| + | <td>[[image:DotPoint3.JPG|link=]]</td> | ||
| + | <td>select the option <span style="font-weight: 700; font-size: 15px; color: white; background-color: black;"> Add to Picklist </span> from the popout menu</td> | ||
| + | </tr> | ||
| + | </table> | ||
| + | </td> | ||
| + | </tr> | ||
| + | </table> | ||
| + | </td> | ||
| + | </tr> | ||
| + | </table> | ||
| + | </td> | ||
| + | </tr> | ||
| + | </table> | ||
| + | </td> | ||
</tr> | </tr> | ||
</table> | </table> | ||
<br> | <br> | ||
| − | <table | + | <table width=1000> |
<tr valign="top"> | <tr valign="top"> | ||
| − | <td>[[ | + | <td colspan=2>In both Options [[image:Ablue.png|link=]] and [[image:Bblue.png|link=]] a new popout menu will appear.</td> |
| − | <td><span style="font-size: | + | </tr> |
| − | + | <tr valign="top"> | |
| + | <td>[[image:PickListNewList_S20.png|link=]]</td> | ||
| + | <td> | ||
| + | <table bgcolor=#000000 cellpadding=2> | ||
| + | <tr valign="top"> | ||
| + | <td> | ||
| + | <table bgcolor=#ffffb0 cellpadding=2> | ||
| + | <tr valign="top"> | ||
| + | <td width=25>[[image:NotePad.PNG|link=]]</td> | ||
| + | <td>If you already have created Picklists then their names will appear between the <span style="font-weight: 700; font-size: 15px; color: white; background-color: black;"> Default Picklist </span> and the <span style="font-weight: 700; font-size: 15px; color: white; background-color: black;"> New Picklist... </span> options</td> | ||
</tr> | </tr> | ||
</table> | </table> | ||
| + | </td> | ||
| + | </tr> | ||
| + | </table> | ||
| + | </td> | ||
| + | </tr> | ||
| + | </table> | ||
| + | |||
| + | <table width=1000> | ||
| + | <tr valign="top"> | ||
| + | <td> | ||
<table> | <table> | ||
<tr valign="top"> | <tr valign="top"> | ||
| − | <td | + | <td>[[image:DotPoint4.JPG|link=]]</td> |
| − | <td | + | <td><span style="font-weight: 700; font-size: 15px; background-color: lightcyan;">Left Click</span> on the <span style="font-weight: 700; font-size: 15px; color: white; background-color: black;"> New Picklist... </span> option</td> |
| − | + | </tr> | |
| − | + | <tr valign="top"> | |
| − | # | + | <td>[[image:DotPoint5.JPG|link=]]</td> |
| − | # | + | <td>Enter a name for the new Picklist (make it brief but informative) and <span style="font-weight: 700; font-size: 15px; background-color: lightcyan;">Left Click</span> on the <span style="font-weight: 700; font-size: 15px; color: white; background-color: blue;"> OK </span> button<br> |
| + | [[image:PickListCreateNew_S20.png|link=]]</td> | ||
| + | </tr> | ||
| + | </table> | ||
| + | </td> | ||
| + | </tr> | ||
| + | </table> | ||
| + | <br> | ||
| + | <span style="font-weight: 700; font-size: 15px;">To Remove Assets from a Picklist</span> | ||
| + | <br> | ||
| + | <table bgcolor=#000000 cellpadding=2> | ||
| + | <tr valign="top"> | ||
<td> | <td> | ||
| − | <td | + | <table bgcolor=#ffffff cellpadding=2> |
| − | <td>[[ | + | <tr valign="top"> |
| − | + | <td colspan=2><span style="font-weight: 700; font-size: 15px;">Steps:</span> To remove assets from a Picklist:-</td> | |
| − | # | + | </tr> |
| − | + | <tr valign="top"> | |
| − | < | + | <td>[[image:DotPoint1.JPG|link=]]</td> |
| + | <td>select the Picklist in the '''Assets Palette'''</td> | ||
| + | </tr> | ||
| + | <tr valign="top"> | ||
| + | <td>[[image:DotPoint2.JPG|link=]]</td> | ||
| + | <td>select the asset(s) in the Picklist (you can select multiple assets):-<br> | ||
| + | <span style="font-weight: 700; font-size: 15px;">Options:</span> Choose one of:- | ||
| + | <table> | ||
| + | <tr valign="top"> | ||
| + | <td width=25>[[image:Ablue.png|link=]]</td> | ||
| + | <td><span style="font-weight: 700; font-size: 15px; background-color: lightcyan;">Right Click</span> on the asset to select a single asset, <span style="font-weight: 700; font-size: 15px;">OR</span></td> | ||
| + | </tr> | ||
| + | <tr valign="top"> | ||
| + | <td>[[image:Bblue.png|link=]]</td> | ||
| + | <td><span style="font-weight: 700; font-size: 15px;"><span style="color: white; background-color: black;"> Shift </span> + <span style="color: black; background-color: lightcyan;"> Left Click </span></span> on the '''first''' and '''last''' in a sequence of multiple assets to be removed. Then <span style="font-weight: 700; font-size: 15px; background-color: lightcyan;">Right Click</span> on one of the highlighted assets, <span style="font-weight: 700; font-size: 15px;">OR</span></td> | ||
| + | </tr> | ||
| + | <tr valign="top"> | ||
| + | <td>[[image:Cblue.png|link=]]</td> | ||
| + | <td><span style="font-weight: 700; font-size: 15px;"><span style="color: white; background-color: black;"> Ctrl </span> + <span style="color: black; background-color: lightcyan;"> Left Click </span></span> on any number of individual assets to be removed. Then <span style="font-weight: 700; font-size: 15px; background-color: lightcyan;">Right Click</span> on one of the highlighted assets</td> | ||
</tr> | </tr> | ||
</table> | </table> | ||
| − | < | + | </td> |
| + | </tr> | ||
<tr valign="top"> | <tr valign="top"> | ||
| − | <td>[[ | + | <td>[[image:DotPoint3.JPG|link=]]</td> |
| − | <td> | + | <td>select the option <span style="font-weight: 700; font-size: 15px; color: white; background-color: black;"> Remove from Picklist </span> |
| + | <table bgcolor=#ffffb0 cellpadding=2> | ||
| + | <tr valign="top"> | ||
| + | <td width=25>[[image:NotePad.PNG|link=]]</td> | ||
| + | <td>Removing the last item from a Picklist will delete the Picklist</td> | ||
</tr> | </tr> | ||
| + | </table> | ||
| + | </td> | ||
| + | </tr> | ||
| + | </table> | ||
| + | </td> | ||
| + | </tr> | ||
| + | </table> | ||
| + | <br> | ||
| + | <table width=1000> <!-- BEGIN Nav Buttons Table NO SKIPS --> | ||
<tr valign="top"> | <tr valign="top"> | ||
| − | <td>[[ | + | <td width=629><span id="stepUsingCM"></span> |
| − | <td> | + | ='''Using Content Manager (CM)'''= |
| + | </td> | ||
| + | <td width=50> </td> <!-- Skip Down --> | ||
| + | <td width=50>[[image:SkipUp.png|link=#skipCreate20|Skip Up]]</td> <!-- skip Up --> | ||
| + | <td width=46>[[image:BackToTop.png|link=#top|alt=Top|Top]]</td> | ||
| + | <td width=75> </td> | ||
| + | <td width=75>[[image:NextUp.png|link=#stepUsingSurveyor20|Next Up]]</td> | ||
| + | <td width=75>[[image:BackToBottom.png|link=#bottom|alt=Bottom|Bottom]]</td> | ||
</tr> | </tr> | ||
| + | </table> <!-- END Nav Buttons Table --> | ||
| + | |||
| + | <table width=1000 cellpadding=2> | ||
<tr valign="top"> | <tr valign="top"> | ||
| − | <td | + | <td colspan=2><span style="font-weight: 700; font-size: 15px;">Steps:</span></td> |
| − | < | + | |
</tr> | </tr> | ||
| − | |||
| − | |||
<tr valign="top"> | <tr valign="top"> | ||
| − | <td>[[ | + | <td width=25>[[image:DotPoint1.JPG|link=]]</td> |
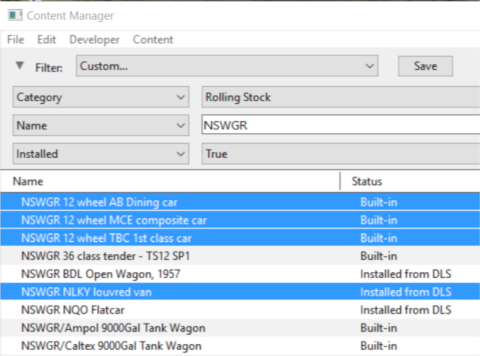
| − | <td> | + | <td><span style="font-size: 17px; font-weight: 700;">Select the Assets:</span><br> |
| − | + | <table> | |
| − | + | <tr> | |
| + | <td width=25>[[image:DotPoint1Blue.png|link=]]</td> | ||
| + | <td>From the '''Trainz''' Launcher select <span style="color: white; background-color: black; font-weight: 700; font-size: 15px;"> Manage Content </span> to open '''Content Manager'''</td> | ||
| + | </tr> | ||
| + | <tr valign="top"> | ||
| + | <td>[[image:DotPoint2Blue.png|link=]]</td> | ||
| + | <td>(optional step) in '''Content Manager''' select a filter or create a custom filter to show the assets you want to add to a Picklist</td> | ||
| + | </tr> | ||
| + | <tr valign="top"> | ||
| + | <td>[[image:DotPoint3Blue.png|link=]]</td> | ||
| + | <td>hold down either the <span style="color: white; background-color: black; font-weight: 700; font-size: 15px;"> Ctrl </span> key '''OR''' the <span style="color: white; background-color: black; font-weight: 700; font-size: 15px;"> Shift </span> key while you <span style="font-weight: 700; font-size: 15px; background-color: lightcyan;">Left Click</span> on each asset that is to be added to the Picklist | ||
| + | <table> | ||
| + | <tr valign="top"> | ||
| + | <td>[[image:PickList_CM01.png|link=]]</td> | ||
| + | <td> | ||
| + | <table bgcolor=#000000 cellpadding=2> | ||
| + | <tr valign="top"> | ||
| + | <td> | ||
| + | <table bgcolor=#ffffb0 cellpadding=2> | ||
| + | <tr valign="top"> | ||
| + | <td width=25>[[image:NotePad.PNG|link=]]</td> | ||
| + | <td>Only assets that are currently installed on your system can be added to a Picklist. They can be '''built-in''', '''base''', '''payware''', '''packaged''' or '''installed from the DLS'''</td> | ||
| + | </tr> | ||
| + | </table> | ||
| + | </td> | ||
| + | </tr> | ||
| + | </table> | ||
| + | </td> | ||
| + | </tr> | ||
| + | </table> | ||
| + | </td> | ||
| + | </tr> | ||
| + | </table> | ||
| + | </td> | ||
</tr> | </tr> | ||
</table> | </table> | ||
<br> | <br> | ||
| − | <table width= | + | <table width=1000 cellpadding=2> |
<tr valign="top"> | <tr valign="top"> | ||
| − | <td | + | <td width=25>[[image:DotPoint2.JPG|link=]]</td> |
| + | <td><span style="font-size: 17px; font-weight: 700;">Add the Assets to the Picklist:</span> | ||
| + | <table> | ||
| + | <tr valign="top"> | ||
| + | <td width=25>[[image:DotPoint1Blue.png|link=]]</td> | ||
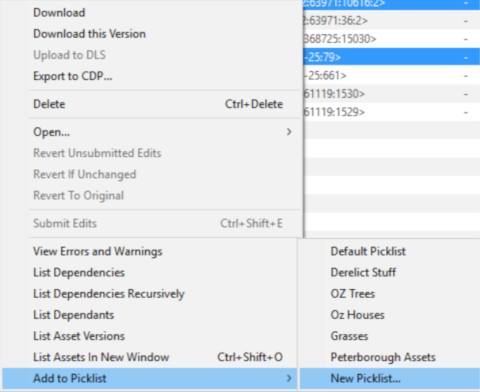
| + | <td><span style="font-weight: 700; font-size: 15px; background-color: lightcyan;">Right Click</span> on '''any one''' of the highlighted assets</td> | ||
| + | </tr> | ||
| + | <tr valign="top"> | ||
| + | <td>[[image:DotPoint2Blue.png|link=]]</td> | ||
| + | <td><span style="font-weight: 700; font-size: 15px; background-color: lightcyan;">Left Click</span> the option <span style="font-weight: 700; font-size: 15px; color: white; background-color: black;"> Add to Picklist </span> from the popup menu</td> | ||
| + | </tr> | ||
| + | <tr valign="top"> | ||
| + | <td>[[image:DotPoint3Blue.png|link=]]</td> | ||
| + | <td>select either:- | ||
| + | <table> | ||
| + | <tr valign="top"> | ||
| + | <td width=25>[[image:Ablue.png|link=]]</td> | ||
| + | <td><span style="font-weight: 700; font-size: 15px; background-color: lightcyan;">Left Click</span> on an existing Picklist name (if any are present) to add the assets to that Picklist, <span style="font-weight: 700; font-size: 15px;">OR</span></td> | ||
| + | </tr> | ||
| + | <tr valign="top"> | ||
| + | <td>[[image:Bblue.png|link=]]</td> | ||
| + | <td><span style="font-weight: 700; font-size: 15px; background-color: lightcyan;">Left Click</span> the option <span style="font-weight: 700; font-size: 15px; color: white; background-color: black;"> New Picklist </span> to create a new list</td> | ||
</tr> | </tr> | ||
</table> | </table> | ||
| + | <table> | ||
| + | <tr valign="top"> | ||
| + | <td>[[image:PickList_CM02.png|link=]]</td> | ||
| + | <td> | ||
| + | <table bgcolor=#000000 cellpadding=2> | ||
| + | <tr valign="top"> | ||
| + | <td> | ||
| + | <table bgcolor=#ffffb0 cellpadding=2> | ||
| + | <tr valign="top"> | ||
| + | <td width=25>[[image:NotePad.PNG|link=]]</td> | ||
| + | <td><span style="font-size: 17px;">'''Notes:'''</span><br> | ||
| + | ---- | ||
| + | </td> | ||
| + | </tr> | ||
| + | <tr valign="top"> | ||
| + | <td width=10>[[image:DotPoint.JPG|10px|link=]]</td> | ||
| + | <td>In '''T:ANE''', '''TRS19 SP3''' and '''Trainz Plus SP3''' the '''Default Picklist''' should only be used for temporary assets that are used in the current project because this list cannot be backed up or moved to another installation of Trainz</td> | ||
| + | </tr> | ||
| + | <tr valign="top"> | ||
| + | <td>[[image:DotPoint.JPG|10px|link=]]</td> | ||
| + | <td>This limitation has been removed in '''TRS19 SP4''', '''Trainz Plus SP4''' and '''TRS22'''</td> | ||
| + | </tr> | ||
| + | </table> | ||
| + | </td> | ||
| + | </tr> | ||
| + | </table> | ||
| + | </td> | ||
| + | </tr> | ||
| + | </table> | ||
| + | </td> | ||
| + | </tr> | ||
| + | </table> | ||
| + | </td> | ||
| + | </tr> | ||
| + | </table> | ||
| + | <br> | ||
| + | <table> | ||
| + | <tr valign="top"> | ||
| + | <td width=25>[[image:DotPoint3.JPG|link=]]</td> | ||
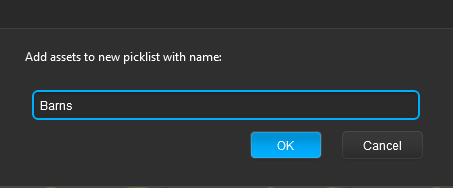
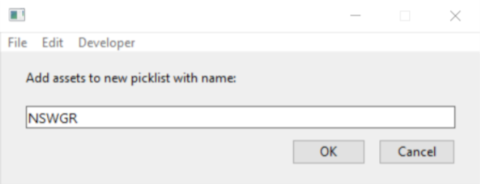
| + | <td><span style="font-size: 17px; font-weight: 700;">Enter Picklist Name (for New Picklist Option Only):</span><br> | ||
| + | <table> <!-- BEGIN Step 3 table --> | ||
| + | <tr valign="top"> | ||
| + | <td width=25>[[image:DotPoint1Blue.png|link=]]</td> | ||
| + | <td>type a name for the new Picklist</td> | ||
| + | </tr> | ||
| + | <tr valign="top"> | ||
| + | <td>[[image:DotPoint2Blue.png|link=]]</td> | ||
| + | <td><span style="font-weight: 700; font-size: 15px; background-color: lightcyan;">Left Click</span> the <span style="font-weight: 700; font-size: 15px; color: white; background-color: black;"> OK </span> button<br> | ||
| + | [[image:PickList_CM03.png|link=]] | ||
| + | </td> | ||
| + | </tr> | ||
| + | </table> <!-- END Step 3 table --> | ||
| + | </td> | ||
| + | </tr> | ||
| + | </table> <!-- END Steps Table --> | ||
| + | <br> | ||
| + | <table width=1000> <!-- BEGIN Nav Buttons Table NO SKIPS --> | ||
| + | <tr valign="top"> | ||
| + | <td width=629><span id="bottom"></span> </td> | ||
| + | <td width=50> </td> <!-- Skip Down --> | ||
| + | <td width=50> </td> <!-- Skip Up --> | ||
| + | <td width=46>[[image:BackToTop.png|link=#top|alt=Top|Top]]</td> | ||
| + | <td width=75>[[image:NextUp.png|link=#stepUsingSurveyor20|alt=Next Up|Next Up]]</td> | ||
| + | <td width=75> </td> | ||
| + | <td width=75> </td> | ||
| + | </tr> | ||
| + | </table> <!-- END Nav Buttons Table --> | ||
| + | ---- | ||
---- | ---- | ||
| − | |||
='''Trainz Wiki'''= | ='''Trainz Wiki'''= | ||
| − | <table | + | <table width=1000> |
<tr valign="top"> | <tr valign="top"> | ||
| − | <td>[[ | + | <td> |
| + | <table width=500 cellpadding=2 bgcolor=#ffffff> | ||
| + | <tr valign="top"> | ||
| + | <td width=80>[[image:TrainzWiki.png|link=]]</td> | ||
<td> | <td> | ||
<span style="font-size: 17px;">'''More Tutorials and Guides to Using Trainz'''</span><br> | <span style="font-size: 17px;">'''More Tutorials and Guides to Using Trainz'''</span><br> | ||
| Line 198: | Line 876: | ||
</tr> | </tr> | ||
</table> | </table> | ||
| − | + | </td> | |
| + | <td> | ||
| + | <table width=500 cellpadding=4 bgcolor="aquamarine"> | ||
| + | <tr valign="top"> | ||
| + | <td width=50>[[image:LinkWiki.PNG|link=]]</td> | ||
| + | <td> | ||
| + | <span style="font-size: 17px;">'''Related Links'''</span><br> | ||
| + | * '''[[How_to_Backup_a_Picklist|How to Backup a Picklist]]''' | ||
| + | * '''[[How_to_Move a Picklist|How to Move a Picklist]]''' | ||
| + | * '''[[How_to_Manage_Filters_and_Picklists|How to Manage Search Filters and Picklists]]''' | ||
| + | * '''[[How_to_Rename_a_Picklist|How to Rename a Picklist]]''' (for '''TRS19 SP3''' and earlier versions) | ||
| + | </td> | ||
| + | </tr> | ||
| + | </table> | ||
| + | </td> | ||
| + | </tr> | ||
| + | </table> | ||
| + | ---- | ||
| + | This page was created by Trainz user '''<span class="plainlinks">[http://online.ts2009.com/mediaWiki/index.php/User:Pware pware]</span>''' in January 2019 and was last updated as shown below. | ||
| + | ---- | ||
[[Category:How-to guides]] | [[Category:How-to guides]] | ||
Latest revision as of 11:48, 21 November 2023
| The information in this Wiki Page applies to TANE and TRS19. For information on creating, managing and using Picklists in Trainz Plus and TRS22 refer to the more recent document at |
|
|
|
||||||||
[edit] Using Surveyor Classic |
| Steps: | |||||
Open the Picklist Window:
|
|||||
Select a Picklist or Create a New Picklist:
|
|||||||||||||
| Add Assets to the Picklist: Options: Choose one of two methods:- |
|||||||||||||||||||||||||||||||||||||||||
|
|||||||||||||||||||||||||||||||||||||||||
|
[edit] Using Surveyor 2.0 |
|
[edit] Locating the Picklists
| Picklists are created, managed and deleted using the Assets Palette in Surveyor 2.0 |
The Assets Palette gives you access to all the installed Assets, the Search Filters created in Content Manager and the Picklists.
 The Assets Palette |
|
|||||||||||||||||||||
 |
|
|||||||||||||||||||||||||||||
[edit] Creating a New Picklist |
| New Picklists are created by selecting an asset in the Assets Palette or by selecting an existing object in the route |
| A new Picklist is created by first identifying an asset or object that will be added to the new (yet to be created) Picklist. You cannot create an empty Picklist. | |||||||||||||||||||||||||||||||||||
| Options: Choose one of two methods:- | |||||||||||||||||||||||||||||||||||
|
|
||||||||||||||||||||||||||||||||||
| In both Options |
||||
 |
|
|||
|
To Remove Assets from a Picklist
|
||||||||||||||||
[edit] Using Content Manager (CM) |
| Steps: | ||||||||||||
Select the Assets:
|
||||||||||||
Add the Assets to the Picklist:
|
Enter Picklist Name (for New Picklist Option Only):
|
[edit] Trainz Wiki
|
|


This page was created by Trainz user pware in January 2019 and was last updated as shown below.