HowTo/Export Blender FBX Animation
(First version) |
|||
| Line 1: | Line 1: | ||
| − | This page describes a process for exporting animated meshes from Blender to the [[FBX file format]]. | + | This page describes a process for exporting animated meshes from Blender to the [[FBX file format]]. It is intended for new content creators or those more experienced who need to migrate from older versions of Blender and Trainz animation. |
You should be familiar with Blender FBX export as described here [[HowTo/Export from Blender using FBX]] | You should be familiar with Blender FBX export as described here [[HowTo/Export from Blender using FBX]] | ||
| − | This tutorial is for Trainz Build 4.6. | + | This tutorial is for Trainz Build 4.6 and Blender 2.80. |
=Overview= | =Overview= | ||
| − | + | ==Trainz Animation== | |
| − | + | ||
| − | + | ||
| − | = | + | |
| − | + | ||
| − | + | ||
| − | + | ||
| − | + | In Blender you can animate meshes but that animation is not recognised by Trainz. Trainz only recognises animation helper objects that it calls bones. A bone, for Trainz purposes, is an animated helper object using a "b.r." notation. | |
| − | + | Meshes are attached to bones in a parent-child relationship where the child is the mesh. When the parent bone moves in 3D space, the child mesh moves with it. In Trainz you cannot see the animated bones but you can see the mesh. | |
| − | + | ||
| − | + | ||
| − | + | ||
| − | + | Animation helpers in Blender can be armatures or empties. Lattices cannot be used since FBX doesn't recognise them. | |
| − | + | ||
| − | + | ||
| − | + | ||
| − | + | ||
| − | + | ||
| − | + | ||
| − | + | ||
| − | + | ||
| − | + | ||
| − | + | ||
| − | + | =Examples= | |
| − | + | Here are a number of example animations. Each example is provided with source files but only the first example is fully explained. | |
| + | ==Example 1 - A Revolving Sphere== | ||
| + | This example is a very basic animation of a sphere using an empty as the animation helper. The Blender file consists of a sphere located at grid centre and at elevation 2 (metres). The sphere has a PBR material and a simple UV map. | ||
| + | Your task is add the animation helper, add the rotation animation, export to FBX and import into Trainz. | ||
| + | ===Load Example 1=== | ||
| + | :* On your computer, create a project folder called "anim_example_1" or whatever name suits you. | ||
| + | :* Download the source files from here: [[File:Ex1 export.zip]] | ||
| + | :* The source file is in zip format so extract it into the project folder. The source includes: | ||
| + | example1_start.blend; | ||
| + | example1_completed.blend; | ||
| + | ex1_albedo.png | ||
| + | ex1_albedo.texture.txt | ||
| + | ex1_normal.png | ||
| + | ex1_normal.texture.txt | ||
| + | ex1_parameter.png | ||
| + | ex1_parameter.texture.txt | ||
| + | thumbnail_0.jpg | ||
| + | config.txt | ||
| + | :* The config.txt is complete but you will need to change the asset kuid to be one of your own. | ||
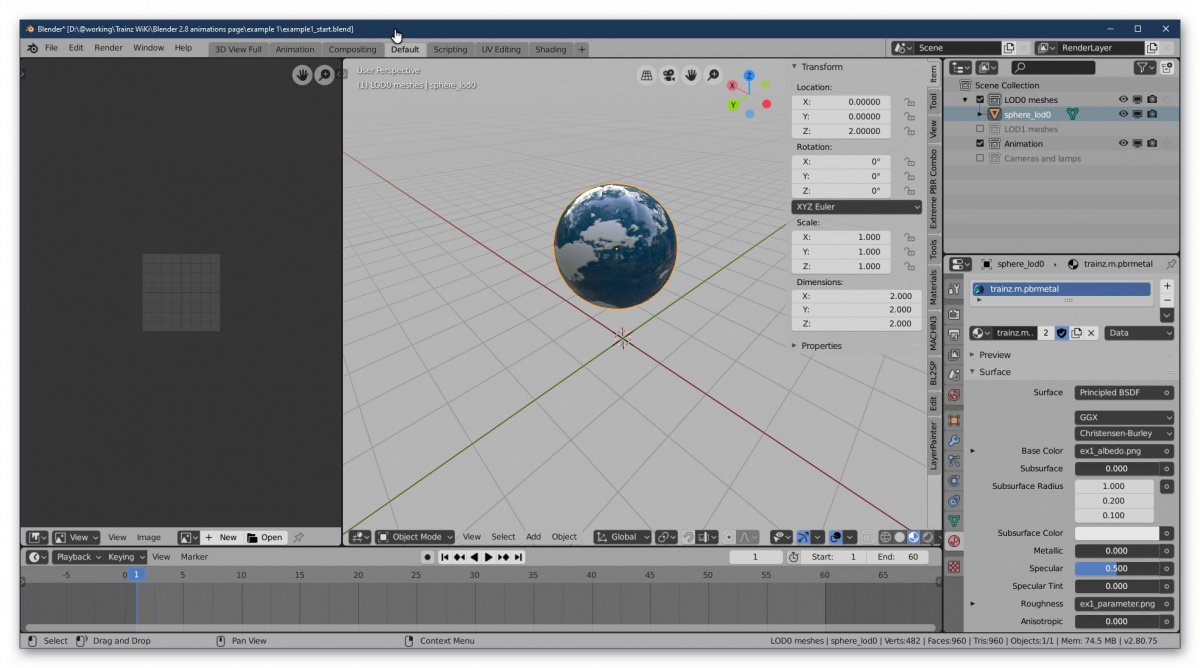
| + | :* Open the ex1_example.blend Blender source file in Blender 2.8. It should look similar to the following. If the sphere is a pink/purple colour then that means Blender can't find the material textures. You should be able to correct that by reloading the textures within Blender. | ||
| + | [[File:Ex1 start.jpg|1200px|thumb|center|The Start Layout]] | ||
| + | :* Save the file as "ex1_working.blend". | ||
| + | ===Add the Trainz Animation Helper=== | ||
| + | :* Position the Blender cursor at World Origin (0,0,0). Press Shift S to bring up the Snap menu and select Cursor to World Origin. | ||
| + | :* Add an empty at the cursor location. Use menu Add->Empty->Arrows. Shift A should also work. | ||
| + | :* Double click on the new Empty in the Properties Editor and rename it to "b.r.main". | ||
| + | :* Move the b.r.main helper into the Animation collection. You can either drag and drop it in the Properties Window or the menu Object->Collection->Move to Collection. Having a collection name Animation makes it easier to export different LOD meshes. | ||
| + | ===Animate the Trainz Helper=== | ||
| + | :* Change to the Animation Workspace and ensure the b.r.main object is selected. You will need to use the object's Context values that are shown at the bottom right - location, rotation, scale, etc. | ||
| + | [[File:Blender280 anim example1- view1.jpg|1200px|thumb|center|B.R.Main]] | ||
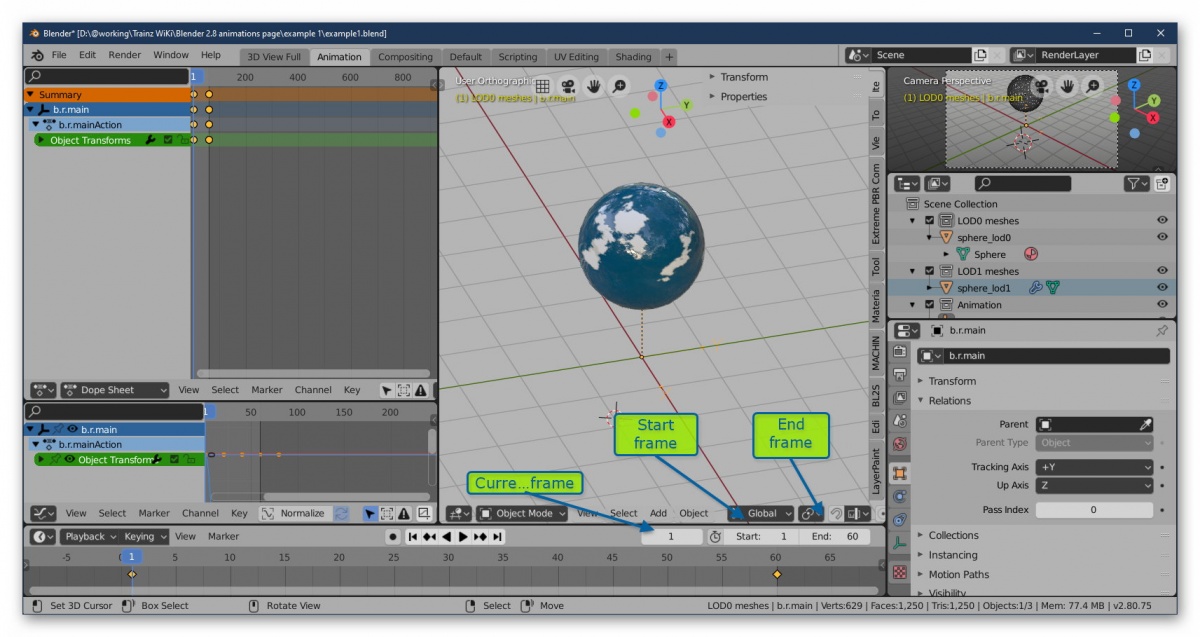
| + | :* For animation we use keyframes (aka frames) to manage our animation. Trainz operates animations at 30 frames per second (fps) and, as we want to run this animation for two seconds, the End Frame in Timeline should be 60. Make sure the Start Frame is 1 and the Current Keyframe is 1. See the following image. | ||
| + | [[File:Blender280 anim example1- view2.jpg|1200px|thumb|center|Animation timeline]] | ||
| + | :* Select the b.r.main helper if not already selected. | ||
| + | :* For the start of our animation we need to set the rotation of our helper to be at 0 (zero) degrees. For this example we can just leave the helper as Blender placed it.. | ||
| + | :* Press the I key and select Rotation. This creates a frame with just rotation data which, in this case, is 0. You will see a keyframe indicator appear at frame 1 in Timeline and, if you are using the Animation workspace, you will also see entries appear in both the Dope Sheet and Graph editors. | ||
| + | :* Change the Current frame in Timeline to the last keyframe (6). You can click on frame 60 in Timeline, manually change the current frame number or use the "Jump to end" icon in Timeline. | ||
| + | :* At the end of our animation we want the helper to have completed one full rotation of 360 degrees so select the helper and, in the Properties Window->Context, change the Z Rotation value to 360. The result should look like the following: | ||
| + | <br> | ||
| + | [[File:Setting the rotation.jpg|400px|thumb|left|Setting the rotation]] | ||
| + | <br> | ||
| − | :* Press the | + | :* Press the I key and select Rotation. This sets the final keyframe. |
| − | :* | + | :* Test out the animation by clicking on the Forward and Reverse icons in Timeline. When finished reset the animation by stopping it first and then selecting the Start Endpoint icon. Note that the sphere is not moving yet. |
| − | + | ||
| − | + | ||
| − | + | ||
| − | + | ||
| − | + | ||
| − | = | + | ===Review=== |
| − | == | + | So far we have created the helper with a correct name that Trainz will recognise for animation. We have set the animation to compete one full circle in the Z axis in 60 keyframes and, since we are using 30fps, the animation will run for 2 seconds. |
| − | :* Select | + | The use of the value 360 is somewhat of a trick to make sure that Blender animates the helper through 360 degrees. Although 360 is essentially the same as 0, if you left it at 0 then no animation would take place even though keyframs exist. Try a zero value and see what happens or rather what doesn't happen. |
| − | :* | + | Using the value of 360 means that the helper will rotate 360 degrees in the anti-clockwise direction. If you want clockwise motion then change the value to -360. |
| − | :* | + | ===Smoothing the Animation=== |
| − | :* | + | While watching the animation you may have noticed that the animation pauses briefly between the end and restart of the animation. There is no time gap but this indicates that the animation is not following a linear path but one using an "F curve". These pauses may be noticeable in game except for bogie animations where the animation is dynamically managed by the game engine. |
| − | + | Within Blender this characteristic is known as the extrapolation mode of the animation channel. By default Blender uses an F curve that resembles a Bezier curve. For many Trainz animations you may want a continuous animation and that means the Linear Extrapolation. Note that there is a Constant Animation but that may not give the same result as it essentially freezes the animation between keyframes. | |
| − | + | :* Change the workspace to Animation if not there already. | |
| + | :* In the Graph Editor or the Dope Sheet Editor, select menu Channel>Extrapolation Mode>Linear Extrapolation. | ||
| + | :* Run the animation again and there should be no pauses. | ||
| + | [[File:Linear extrapolation.jpg|400px|thumb|left|Changing to linear extrapolation]] | ||
| + | For more information on Blender animation channel extrapolation see [https://docs.blender.org/manual/en/latest/editors/graph_editor/fcurves/introduction.html] | ||
| + | ===Animating the mesh objects=== | ||
| + | :* As stated earlier you cannot animate the meshes directly but you can make them follow the animation helper. We do this by making the mesh a child of the helper. | ||
| + | :* There are two meshes to animated: the LOD0 and LOD1 meshes. | ||
| + | :* Enable viewing of both the LOD0 and LOD1 mesh by ticking the two collections. | ||
| + | :* Select the objects sphere_lod0, sphere_lod1 and finally b.r.main. The help must be selected last. | ||
| + | :* In the 3D window, press Ctrl P>Object (Keep Transform). | ||
| + | :* Test the animation by starting the animation and showing or hiding the two mesh objects. | ||
| + | :* Save your work. | ||
| + | ===Exporting the Animation=== | ||
| + | The animation data for the helper(s) as well as the parent/child relationships are exported within the FBX file. The Trainz FBX importer will extract the animation data and store it in a KIN file. Since we have two LOD meshes this means that the importer will create two KIN files but with slightly different names. As the animation is the same for both meshes you can use just one of the KIN files and delete the other. Or you can use both. | ||
| + | Blender's FBX exporter will export each animation channel it finds and this can result in multiple KIN files for each mesh. This doesn't work well if at all. The solution is to use what is called a baked animation where all the channels and keyframes are "baked" together. This is actually inefficient for Trainz purposes but is the only answer that currently works reliably. | ||
| + | ====Exporting LOD0 Animation==== | ||
| + | :* Disable viewing of the LOD1 meshes by unclicking the LOD1 collection. | ||
| + | :* Enable both the LOD0 and Animation collections. | ||
| + | :* In the 3D Editor select all objects using the A key. You may need to press it twice. | ||
| + | [[File:Exporting LOD0.jpg|400px|thumb||LOD0 FBX Objects Collections]] | ||
| + | :* Go to the File menu and select Export>FBX. | ||
| + | :* The default options will not work for us so we need to change a few things: | ||
| + | :* For the Main tab: | ||
| + | :* Check Selected Objects. | ||
| + | :* Scale - either change the scale value to 0.01 and have the adjacent icon selected, or leave the scale at 1.00 and deselect the icon. (VALIDATE) | ||
| + | :* Apply Scale - use FBX All. | ||
| + | :* Forward - use Y forward | ||
| + | :* Up - Z up. | ||
| + | :* The next area lists those objects to be exported. In this case we want Empty and Mesh. | ||
| + | :* Leave the other options at their default value. | ||
| + | :* For the Animation tab: | ||
| + | :* Check Baked Animation. | ||
| + | :* Uncheck all other options. For this example we don't care about the other tabs but suggested values are shown in the next set of images. | ||
| + | [[File:Fbx main.jpg|300px|thumb||Main Tab]][[File:FBX geometry.jpg|300px|thumb||Geometry Tab]][[File:FBX armature.jpg|300px|thumb||Armatures Tab]][[File:FBX animation.jpg|300px|thumb||Animation Tab]] | ||
| − | == | + | :* In the output filename space enter ex1_lod0.fbx and click on the Export FBX icon at the top right. |
| − | :* | + | ====Exporting LOD1 Animation==== |
| − | + | :* Uncheck the LOD0 collection. | |
| − | :* | + | :* Check the LOD1 collection. |
| − | + | :* Leave the Animation collection checked. | |
| − | + | :* Repeat the LOD0 process only changing the output name to ex1_lod1.fbx. You shouldn't need to change any of the export settings unless you restarted Blender. | |
| − | + | [[File:Exporting LOD1.jpg|400px|thumb||LOD1 FBX Objects Collections]] | |
| − | |||
| − | |||
| − | |||
| − | |||
| − | =Setting up the Asset= | + | ===Setting up the Asset in Trainz=== |
The FBX file contains both the mesh and the b.r.main empty plus the animation data. When the FBX file is imported into Trainz, an animation file (KIN) is created in addition to the Trainzmesh file. | The FBX file contains both the mesh and the b.r.main empty plus the animation data. When the FBX file is imported into Trainz, an animation file (KIN) is created in addition to the Trainzmesh file. | ||
| − | The name of the kin file depends on the options chosen within the Export FBX->Animation panel. If you choose the Baked Animation option, then the kin filename will be the mesh name plus “_scene.kin”. In this instance, the kin | + | The name of the kin file depends on the options chosen within the Export FBX->Animation panel. If you choose the Baked Animation option, then the kin filename will be the mesh name plus “_scene.kin”. In this instance, the kin filenames will be “ex1_lod0_scene.kin” and “ex1_lod1_scene.kin”. |
| − | + | ||
| − | + | ||
| − | ==Config.txt== | + | ====Config.txt==== |
The names of mesh and KIN files may not be obvious so you may need to create some dummy names for your mesh and KIN files. After importing into Trainz, open the asset for editing and look for the files created. Then go back and correct entries in the config.txt. You can always rename the kin file to a simpler name. | The names of mesh and KIN files may not be obvious so you may need to create some dummy names for your mesh and KIN files. After importing into Trainz, open the asset for editing and look for the files created. Then go back and correct entries in the config.txt. You can always rename the kin file to a simpler name. | ||
For this asset the mesh table will look like this: | For this asset the mesh table will look like this: | ||
| − | + | mesh-table { | |
lod_0 { | lod_0 { | ||
| − | mesh " | + | mesh "ex1_lod0.trainzmesh" |
auto-create 1 | auto-create 1 | ||
lod-level 0 | lod-level 0 | ||
| − | anim " | + | anim "ex1_lod0_scene.kin" |
| + | animation-loop-speed 1.00 | ||
| + | } | ||
| + | lod_1 { | ||
| + | mesh "ex1_lod1.trainzmesh" | ||
| + | auto-create 1 | ||
| + | lod-level 1 | ||
| + | anim "ex1_lod1_scene.kin" | ||
animation-loop-speed 1.00 | animation-loop-speed 1.00 | ||
} | } | ||
} | } | ||
| − | |||
| − | |||
| − | |||
| − | |||
| − | |||
| + | ===Asset in game=== | ||
| − | [[ | + | [[File:Ex1 in game.jpg|400px|thumb||Example 1 in Trainz]] |
| − | + | ||
| Line 112: | Line 157: | ||
| − | + | (more examples to come) | |
| − | + | ||
| − | + | ||
| − | + | ||
| − | + | ||
| − | + | ||
| − | + | ||
| − | + | ||
| − | + | ||
| − | + | ||
| − | + | ||
| − | + | ||
| − | + | ||
| − | + | ||
| − | + | ||
| − | + | ||
| − | + | ||
| − | + | ||
| − | + | ||
| − | + | ||
| − | + | ||
| − | + | ||
| − | + | ||
| − | + | ||
| − | + | ||
| − | + | ||
| − | + | ||
| − | + | ||
| − | + | ||
| − | + | ||
| − | + | ||
| − | + | ||
| − | + | ||
| − | + | ||
| − | + | ||
| − | + | ||
| − | + | ||
| − | + | ||
| − | + | ||
| − | + | ||
| − | + | ||
| − | + | ||
| − | + | ||
| − | + | ||
| − | + | ||
| − | + | ||
| − | + | ||
| − | + | ||
| − | + | ||
| − | + | ||
| − | + | ||
| − | + | ||
| − | + | ||
| − | + | ||
| − | + | ||
| − | + | ||
| − | + | ||
| − | + | ||
| − | + | ||
| − | + | ||
| − | + | ||
| − | + | ||
| − | + | ||
| − | + | ||
| − | + | ||
| − | + | ||
| − | + | ||
| − | + | ||
| Line 186: | Line 164: | ||
[[HowToGuides|<< How To Guides]] | [[HowToGuides|<< How To Guides]] | ||
| − | |||
[[Category:How-to guides]] | [[Category:How-to guides]] | ||
[[Category:Modeling]] | [[Category:Modeling]] | ||
[[Category:Content creation]] | [[Category:Content creation]] | ||
Revision as of 18:33, 26 August 2019
This page describes a process for exporting animated meshes from Blender to the FBX file format. It is intended for new content creators or those more experienced who need to migrate from older versions of Blender and Trainz animation.
You should be familiar with Blender FBX export as described here HowTo/Export from Blender using FBX
This tutorial is for Trainz Build 4.6 and Blender 2.80.
Contents
|
Overview
Trainz Animation
In Blender you can animate meshes but that animation is not recognised by Trainz. Trainz only recognises animation helper objects that it calls bones. A bone, for Trainz purposes, is an animated helper object using a "b.r." notation. Meshes are attached to bones in a parent-child relationship where the child is the mesh. When the parent bone moves in 3D space, the child mesh moves with it. In Trainz you cannot see the animated bones but you can see the mesh.
Animation helpers in Blender can be armatures or empties. Lattices cannot be used since FBX doesn't recognise them.
Examples
Here are a number of example animations. Each example is provided with source files but only the first example is fully explained.
Example 1 - A Revolving Sphere
This example is a very basic animation of a sphere using an empty as the animation helper. The Blender file consists of a sphere located at grid centre and at elevation 2 (metres). The sphere has a PBR material and a simple UV map. Your task is add the animation helper, add the rotation animation, export to FBX and import into Trainz.
Load Example 1
- On your computer, create a project folder called "anim_example_1" or whatever name suits you.
- Download the source files from here: File:Ex1 export.zip
- The source file is in zip format so extract it into the project folder. The source includes:
  example1_start.blend;
  example1_completed.blend;
  ex1_albedo.png
  ex1_albedo.texture.txt
  ex1_normal.png
  ex1_normal.texture.txt
  ex1_parameter.png
  ex1_parameter.texture.txt
  thumbnail_0.jpg
  config.txt
- The config.txt is complete but you will need to change the asset kuid to be one of your own.
- Open the ex1_example.blend Blender source file in Blender 2.8. It should look similar to the following. If the sphere is a pink/purple colour then that means Blender can't find the material textures. You should be able to correct that by reloading the textures within Blender.
- Save the file as "ex1_working.blend".
Add the Trainz Animation Helper
- Position the Blender cursor at World Origin (0,0,0). Press Shift S to bring up the Snap menu and select Cursor to World Origin.
- Add an empty at the cursor location. Use menu Add->Empty->Arrows. Shift A should also work.
- Double click on the new Empty in the Properties Editor and rename it to "b.r.main".
- Move the b.r.main helper into the Animation collection. You can either drag and drop it in the Properties Window or the menu Object->Collection->Move to Collection. Having a collection name Animation makes it easier to export different LOD meshes.
Animate the Trainz Helper
- Change to the Animation Workspace and ensure the b.r.main object is selected. You will need to use the object's Context values that are shown at the bottom right - location, rotation, scale, etc.
- For animation we use keyframes (aka frames) to manage our animation. Trainz operates animations at 30 frames per second (fps) and, as we want to run this animation for two seconds, the End Frame in Timeline should be 60. Make sure the Start Frame is 1 and the Current Keyframe is 1. See the following image.
- Select the b.r.main helper if not already selected.
- For the start of our animation we need to set the rotation of our helper to be at 0 (zero) degrees. For this example we can just leave the helper as Blender placed it..
- Press the I key and select Rotation. This creates a frame with just rotation data which, in this case, is 0. You will see a keyframe indicator appear at frame 1 in Timeline and, if you are using the Animation workspace, you will also see entries appear in both the Dope Sheet and Graph editors.
- Change the Current frame in Timeline to the last keyframe (6). You can click on frame 60 in Timeline, manually change the current frame number or use the "Jump to end" icon in Timeline.
- At the end of our animation we want the helper to have completed one full rotation of 360 degrees so select the helper and, in the Properties Window->Context, change the Z Rotation value to 360. The result should look like the following:
- Press the I key and select Rotation. This sets the final keyframe.
- Test out the animation by clicking on the Forward and Reverse icons in Timeline. When finished reset the animation by stopping it first and then selecting the Start Endpoint icon. Note that the sphere is not moving yet.
Review
So far we have created the helper with a correct name that Trainz will recognise for animation. We have set the animation to compete one full circle in the Z axis in 60 keyframes and, since we are using 30fps, the animation will run for 2 seconds. The use of the value 360 is somewhat of a trick to make sure that Blender animates the helper through 360 degrees. Although 360 is essentially the same as 0, if you left it at 0 then no animation would take place even though keyframs exist. Try a zero value and see what happens or rather what doesn't happen. Using the value of 360 means that the helper will rotate 360 degrees in the anti-clockwise direction. If you want clockwise motion then change the value to -360.
Smoothing the Animation
While watching the animation you may have noticed that the animation pauses briefly between the end and restart of the animation. There is no time gap but this indicates that the animation is not following a linear path but one using an "F curve". These pauses may be noticeable in game except for bogie animations where the animation is dynamically managed by the game engine. Within Blender this characteristic is known as the extrapolation mode of the animation channel. By default Blender uses an F curve that resembles a Bezier curve. For many Trainz animations you may want a continuous animation and that means the Linear Extrapolation. Note that there is a Constant Animation but that may not give the same result as it essentially freezes the animation between keyframes.
- Change the workspace to Animation if not there already.
- In the Graph Editor or the Dope Sheet Editor, select menu Channel>Extrapolation Mode>Linear Extrapolation.
- Run the animation again and there should be no pauses.
For more information on Blender animation channel extrapolation see [1]
Animating the mesh objects
- As stated earlier you cannot animate the meshes directly but you can make them follow the animation helper. We do this by making the mesh a child of the helper.
- There are two meshes to animated: the LOD0 and LOD1 meshes.
- Enable viewing of both the LOD0 and LOD1 mesh by ticking the two collections.
- Select the objects sphere_lod0, sphere_lod1 and finally b.r.main. The help must be selected last.
- In the 3D window, press Ctrl P>Object (Keep Transform).
- Test the animation by starting the animation and showing or hiding the two mesh objects.
- Save your work.
Exporting the Animation
The animation data for the helper(s) as well as the parent/child relationships are exported within the FBX file. The Trainz FBX importer will extract the animation data and store it in a KIN file. Since we have two LOD meshes this means that the importer will create two KIN files but with slightly different names. As the animation is the same for both meshes you can use just one of the KIN files and delete the other. Or you can use both. Blender's FBX exporter will export each animation channel it finds and this can result in multiple KIN files for each mesh. This doesn't work well if at all. The solution is to use what is called a baked animation where all the channels and keyframes are "baked" together. This is actually inefficient for Trainz purposes but is the only answer that currently works reliably.
Exporting LOD0 Animation
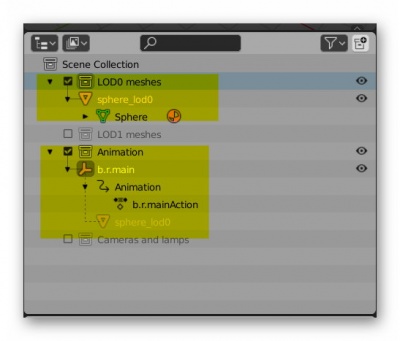
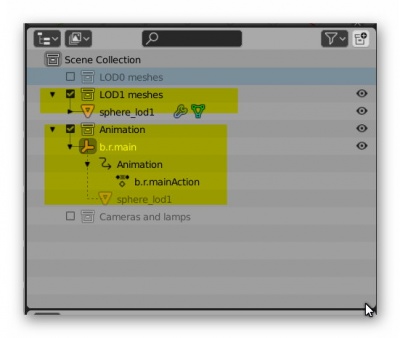
- Disable viewing of the LOD1 meshes by unclicking the LOD1 collection.
- Enable both the LOD0 and Animation collections.
- In the 3D Editor select all objects using the A key. You may need to press it twice.
- Go to the File menu and select Export>FBX.
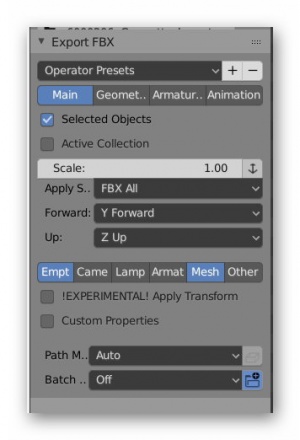
- The default options will not work for us so we need to change a few things:
- For the Main tab:
- Check Selected Objects.
- Scale - either change the scale value to 0.01 and have the adjacent icon selected, or leave the scale at 1.00 and deselect the icon. (VALIDATE)
- Apply Scale - use FBX All.
- Forward - use Y forward
- Up - Z up.
- The next area lists those objects to be exported. In this case we want Empty and Mesh.
- Leave the other options at their default value.
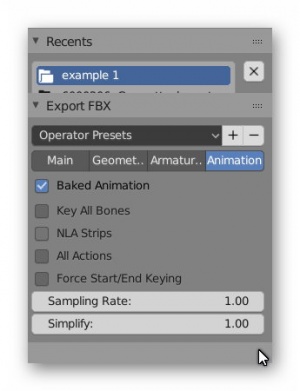
- For the Animation tab:
- Check Baked Animation.
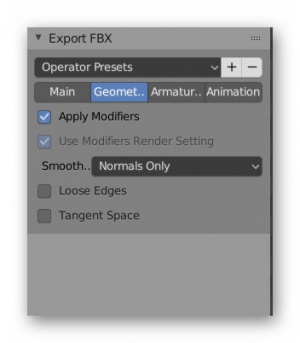
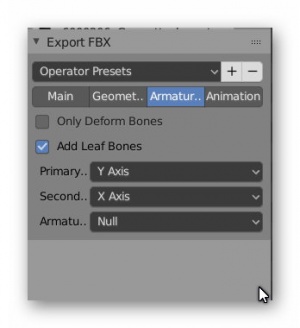
- Uncheck all other options. For this example we don't care about the other tabs but suggested values are shown in the next set of images.
- In the output filename space enter ex1_lod0.fbx and click on the Export FBX icon at the top right.
Exporting LOD1 Animation
- Uncheck the LOD0 collection.
- Check the LOD1 collection.
- Leave the Animation collection checked.
- Repeat the LOD0 process only changing the output name to ex1_lod1.fbx. You shouldn't need to change any of the export settings unless you restarted Blender.
Setting up the Asset in Trainz
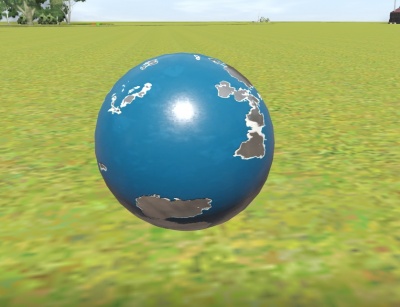
The FBX file contains both the mesh and the b.r.main empty plus the animation data. When the FBX file is imported into Trainz, an animation file (KIN) is created in addition to the Trainzmesh file. The name of the kin file depends on the options chosen within the Export FBX->Animation panel. If you choose the Baked Animation option, then the kin filename will be the mesh name plus “_scene.kin”. In this instance, the kin filenames will be “ex1_lod0_scene.kin” and “ex1_lod1_scene.kin”.
Config.txt
The names of mesh and KIN files may not be obvious so you may need to create some dummy names for your mesh and KIN files. After importing into Trainz, open the asset for editing and look for the files created. Then go back and correct entries in the config.txt. You can always rename the kin file to a simpler name. For this asset the mesh table will look like this:
mesh-table {
 lod_0 {
   mesh                                  "ex1_lod0.trainzmesh"
   auto-create                           1
   lod-level                             0
   anim                                  "ex1_lod0_scene.kin"
   animation-loop-speed                  1.00
 }
 lod_1 {
   mesh                                  "ex1_lod1.trainzmesh"
   auto-create                           1
   lod-level                             1
   anim                                  "ex1_lod1_scene.kin"
   animation-loop-speed                  1.00
 }
}
Asset in game
Animation warnings and errors
| Warning/Error | Help/Explanation |
|---|---|
| ! ... T14120: Simplified dummy tracks with just one key. | Not sure what this warning is about but the animation is OK. |
| ! ... Skipping one or more lines with the same contents | This is an ASSIMP message and can be ignored. |
(more examples to come)
