SAR Gladstone V2
m |
m |
||
| (One intermediate revision by one user not shown) | |||
| Line 1: | Line 1: | ||
<!-- V2.0 (seperate V1.0 file) --> | <!-- V2.0 (seperate V1.0 file) --> | ||
| − | + | <table> | |
| − | <table | + | |
<tr valign="top"> | <tr valign="top"> | ||
<td width=750> | <td width=750> | ||
| Line 10: | Line 9: | ||
</tr> | </tr> | ||
<tr valign="top"> | <tr valign="top"> | ||
| − | <td align="center">[[image:Tab_HM_White.png|link=]] [[image:Tab_IN_Grey.png|link= | + | <td align="center">[[image:Tab_HM_White.png|link=]] [[image:Tab_IN_Grey.png|link=SAR_Gladstone_Industry_V2]] [[image:Tab_TM_Grey.png|link=SAR_Gladstone_TrackMarks_V2]] [[image:Tab_SW_Grey.png|link=SAR_Gladstone_Switches_V2]] [[image:Tab_Blank_Grey.png|link=]]</td> |
</tr> | </tr> | ||
<tr valign="top"> | <tr valign="top"> | ||
| Line 20: | Line 19: | ||
<tr valign="middle"> | <tr valign="middle"> | ||
| − | <td width=220 align="right">[[Image:SAR_PortPirie- | + | <td width=220 align="right">[[Image:SAR_PortPirie-BrokenHill Line.png|link=SAR Port Pirie-Broken Hill_V2|alt=Port Pirie-Broken Hill Line|Show Port Pirie-Broken Hill Line]]<br> |
| − | <td width=110 align="center"> | + | [[Image:BroadGaugeLine.png|link=|alt=Broad Gauge Line]]</td> |
| − | + | <td width=110 align="center"> </td> | |
<td width=90 align="center">[[Image:Location Index.png|link=SAR Index_V2|alt=Location Index|Location Index]]<br>[[image:Scenario Index.png|link=SAR Peterborough Base Session_V2|alt=Scenarios|Scenario Index]]</td> | <td width=90 align="center">[[Image:Location Index.png|link=SAR Index_V2|alt=Location Index|Location Index]]<br>[[image:Scenario Index.png|link=SAR Peterborough Base Session_V2|alt=Scenarios|Scenario Index]]</td> | ||
| − | <td width=110 align="center">[[Image:Next Right.png|link=|alt=]]<br>[[Image: | + | <td width=110 align="center">[[Image:Next Right.png|link=|alt=]]<br>[[Image:SAR_Yangya_Name.png|link=SAR Yangya_V2|alt=Yangya|Next Down Location]]<br>[[Image:SAR_Laura_Name.png|link=SAR Laura_V2|alt=Laura|Next Down Location]]</td> |
| − | <td width=220 align="left">[[Image:SAR_PortPirie- | + | <td width=220 align="left">[[Image:SAR_PortPirie-BrokenHill Line.png|link=SAR_Port_Pirie-Broken_Hill_V2|alt=PortPirie-BrokenHill|Show Port Pirie-Broken Hill]]<br> |
| − | [[Image: | + | [[Image:SAR_Gladstone-Wilmington_Line.png|link=SAR Gladstone-Wilmington_V2|alt=Gladstone-Wilmington|Show Gladstone-Wilmington]]</td> |
</tr> | </tr> | ||
| Line 33: | Line 32: | ||
<table width=750> | <table width=750> | ||
<tr valign="top"> | <tr valign="top"> | ||
| − | <td>[[image: | + | <td>[[image:SAR_Gladstone_V2.png|link=|alt=Gladstone map]]</td> |
</tr> | </tr> | ||
<tr valign="top"> | <tr valign="top"> | ||
| − | <td align="center"><span style="font-weight: 700;">For <span style="color: blue;">SAR Peterborough Narrow Gauge Division v2.0</span>. For the original <span style="color: blue;">V1.0</span> click <span style="background-color: yellow;">[[ | + | <td align="center"><span style="font-weight: 700;">For <span style="color: blue;">SAR Peterborough Narrow Gauge Division v2.0</span>. For the original <span style="color: blue;">V1.0</span> click <span style="background-color: yellow;">[[SAR_Gladstone_V1|here]]</span></span></td> |
</tr> | </tr> | ||
</table> | </table> | ||
| Line 51: | Line 50: | ||
<td><span style="font-weight: 700; background-color: black; color: white;"> Commodities: </span> | <td><span style="font-weight: 700; background-color: black; color: white;"> Commodities: </span> | ||
| − | <table width= | + | <table width=250> |
<tr valign="top"> | <tr valign="top"> | ||
| Line 58: | Line 57: | ||
<td align="center" width=50>[[Image:Grain_Icon.png|link=|alt=Grain]]<br><span style="font-size: 10px; font-weight: 700;">Grain</span><br>[[image:Grain_Label.png|link=]]</td> | <td align="center" width=50>[[Image:Grain_Icon.png|link=|alt=Grain]]<br><span style="font-size: 10px; font-weight: 700;">Grain</span><br>[[image:Grain_Label.png|link=]]</td> | ||
<td align="center" width=50>[[Image:Livestock_Icon.png|link=|alt=Livestock]]<br><span style="font-size: 10px; font-weight: 700;">Livestock</span><br>[[image:Stockyard_Label.png|link=]]</td> | <td align="center" width=50>[[Image:Livestock_Icon.png|link=|alt=Livestock]]<br><span style="font-size: 10px; font-weight: 700;">Livestock</span><br>[[image:Stockyard_Label.png|link=]]</td> | ||
| − | <td align="center" width=50> | + | <td align="center" width=50>[[Image:Wool_icon.png|link=|alt=Wool]]<br><span style="font-size: 10px; font-weight: 700;">Wool</span><br>[[image:Wool_Label.png|link=]]</td> |
</tr> | </tr> | ||
| Line 66: | Line 65: | ||
<td style="background-color: black;"><span style="color: white; font-weight: 700;"> Loco Services: </span> | <td style="background-color: black;"><span style="color: white; font-weight: 700;"> Loco Services: </span> | ||
| − | <table width= | + | <table width=250> |
<tr valign="top"> | <tr valign="top"> | ||
<td align="center" width=50>[[image:Bunker_Oil_Icon.png|link=|alt=Fuel]]<br><span style="font-size: 10px; color: white; font-weight: 700;">Bunker Oil</span><br>[[image:Loco_Label.png|link=]]</td> | <td align="center" width=50>[[image:Bunker_Oil_Icon.png|link=|alt=Fuel]]<br><span style="font-size: 10px; color: white; font-weight: 700;">Bunker Oil</span><br>[[image:Loco_Label.png|link=]]</td> | ||
<td align="center" width=50>[[Image:Coal_Icon.png|link=|alt=Coal]]<br><span style="font-size: 10px; color: white; font-weight: 700;">Coal</span><br>[[image:Loco_Label.png|link=]]</td> | <td align="center" width=50>[[Image:Coal_Icon.png|link=|alt=Coal]]<br><span style="font-size: 10px; color: white; font-weight: 700;">Coal</span><br>[[image:Loco_Label.png|link=]]</td> | ||
| − | <td align="center" width=50>[[Image:Water_Icon.png|link=|alt=Water]]<br><span style="font-size: 10px; color: white; font-weight: 700;">Water</span><br>[[image:Loco_Label.png|link=]]</td> | + | <td align="center" width=50>[[Image:Water_Icon.png|link=|alt=Water]]<br><span style="font-size: 10px; color: white; font-weight: 700;">Water</span><br>[[image:Loco_Label.png|link=]]<br>[[image:Station_Label.png|link=]]<br>[[image:Relief_Label.png|link=]]</td> |
| + | <td align="center" width=50>[[Image:Water_Icon.png|link=|alt=Water]]<br><span style="font-size: 10px; color: white; font-weight: 700;">Water</span><br>[[image:Loop_Label.png|link=]]<br>[[image:Main_Label.png|link=]]</td> | ||
</tr> | </tr> | ||
| Line 79: | Line 79: | ||
<td><span style="font-weight: 700;"><span style="background-color: black; color: white;"> Facilities: </span></span> | <td><span style="font-weight: 700;"><span style="background-color: black; color: white;"> Facilities: </span></span> | ||
| − | <table width= | + | <table width=200> |
<tr valign="top"> | <tr valign="top"> | ||
| Line 85: | Line 85: | ||
<td align="center" width=50>[[Image:Loop_Icon.png|link=|alt=Loop]]<br><span style="font-size: 10px; font-weight: 700;">Loop</span><br>[[image:Loop_Label.png|link=]]</td> | <td align="center" width=50>[[Image:Loop_Icon.png|link=|alt=Loop]]<br><span style="font-size: 10px; font-weight: 700;">Loop</span><br>[[image:Loop_Label.png|link=]]</td> | ||
<td align="center" width=50>[[Image:Turntable_Icon.png|link=|alt=Turntable]]<br><span style="font-size: 10px; font-weight: 700;">Turntable</span><br>[[image:Loco_Label.png|link=]]</td> | <td align="center" width=50>[[Image:Turntable_Icon.png|link=|alt=Turntable]]<br><span style="font-size: 10px; font-weight: 700;">Turntable</span><br>[[image:Loco_Label.png|link=]]</td> | ||
| − | <td align="center" width=50> </td> | + | <td align="center" width=50> </td> |
</tr> | </tr> | ||
| Line 92: | Line 92: | ||
</td> | </td> | ||
</tr> | </tr> | ||
| − | |||
</table> | </table> | ||
<table bgcolor="lightcyan" width=750> | <table bgcolor="lightcyan" width=750> | ||
<tr valign="top"> | <tr valign="top"> | ||
| − | <td colspan=2><span style="font-weight: 700;"><span style="background-color: black; color: white;"> Scenario Sessions | + | <td colspan=2><span style="font-weight: 700;"><span style="background-color: black; color: white;"> Scenario Sessions Starting at Gladstone: </span></span></td> |
</tr> | </tr> | ||
| − | |||
<tr valign="top"> | <tr valign="top"> | ||
| − | <td width=375>[[image: | + | <td width=375>[[image:No_1.png|link=|alt=1]] '''[[SAR Scenario Depot Fuel Run_V2|Depot Fuel Run]]'''</td> |
| − | <td width=375>[[image: | + | <td width=375>[[image:No_3.png|link=|alt=3]] '''[[SAR Scenario Wilmington Freight_V2|Wilmington Local Freight]]'''</td> |
</tr> | </tr> | ||
<tr valign="top"> | <tr valign="top"> | ||
| − | <td>[[image: | + | <td>[[image:No_4.png|link=|alt=4]] '''[[SAR Scenario Gladstone-Terowie Passenger_V2|Gladstone to Terowie Passenger]]'''</td> |
| − | <td>[[image: | + | <td>[[image:No_6.png|link=|alt=6]] '''[[SAR Scenario Paratoo Empty Ore_V2|Paratoo Empty Ore]]'''</td> |
</tr> | </tr> | ||
<tr valign="top"> | <tr valign="top"> | ||
| − | <td>[[image: | + | <td>[[image:No_10.png|link=|alt=10]] '''[[SAR Scenario Transcontinental Express Freight_V2|Transcontinental Express Freights]]'''</td> |
| − | <td>[[image: | + | <td>[[image:No_13.png|link=|alt=13]] '''[[SAR Scenario Gladstone Shunter_V2|Gladstone Shunter]]'''</td> |
</tr> | </tr> | ||
<tr valign="top"> | <tr valign="top"> | ||
| − | <td>[[image: | + | <td>[[image:No_16.png|link=|alt=16]] '''[[SAR Scenario Booleroo Passenger_V2|Gladstone-Wilmington Railmotor]]'''</td> |
| − | <td>[[image: | + | <td>[[image:No_18.png|link=|alt=22]] '''[[SAR Scenario Gladstone Pickup Grain_V2|Gladstone Local Grain]]'''</td> |
</tr> | </tr> | ||
<tr valign="top"> | <tr valign="top"> | ||
| − | <td>[[image: | + | <td>[[image:No_22.png|link=|alt=22]] '''[[SAR Scenario Gladstone Local Livestock_V2|Gladstone Livestock]]'''</td> |
<td> </td> | <td> </td> | ||
</tr> | </tr> | ||
| Line 128: | Line 126: | ||
<tr valign="top"> | <tr valign="top"> | ||
<td> | <td> | ||
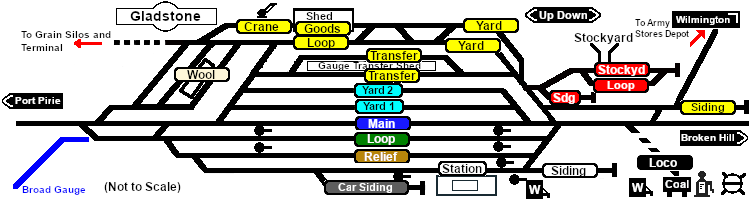
| − | <span style="font-weight: 700;"><span style="color: white; background-color: black;"> Distance from | + | <span style="font-weight: 700;"><span style="color: white; background-color: black;"> Distance from Port Pirie: </span> 52 kms, 32¼ miles <span style="color: white; background-color: black;"> from Peterborough: </span> 65½ kms, 40¾ miles</span><br> |
| − | A major manned station, | + | A major manned station, junction and a break-of-gauge location on the narrow gauge (3ft6in - 1067mm) <span style="font-weight: 700; color: white; background-color: black;"> Port Pirie-Broken Hill Line </span> and <span style="font-weight: 700; color: white; background-color: black;"> Gladstone-Wilmington Line </span>, and the broad gauge (5ft3in - 1600mm) <span style="font-weight: 700; color: white; background-color: blue;"> Gladstone-Hamley Bridge-Adelaide Line </span>.<br> |
| − | Multiple loops and sidings for | + | Multiple loops, yards and sidings for goods, grain, livestock, station, transfer platforms and loco servicing facilities.<br> |
| − | + | The '''Port Pirie-Broken Hill Line''' was converted to standard gauge (4ft8½in - 1435mm) during 1969-1970 and '''Gladstone''' then became a triple gauge location (narrow, standard and broad gauges) until the closure of the narrow and broad gauge lines by 1990. To keep things simple, only a few dual narrow and broad gauge tracks, and no dual gauge switches, are used in the layout.<br> | |
| − | + | At its peak, before standardisation, '''Gladstone''' employed over 1,000 workers in servicing locomotives and the break-of-gauge facilities.<br> | |
| − | ''' | + | '''Gladstone''' is now just a crossing loop and a grain terminal. The loco servicing facilities have been removed. The station building still stands but is no longer in use. There are no rail passenger services. |
</td> | </td> | ||
</tr> | </tr> | ||
<tr valign="top"> | <tr valign="top"> | ||
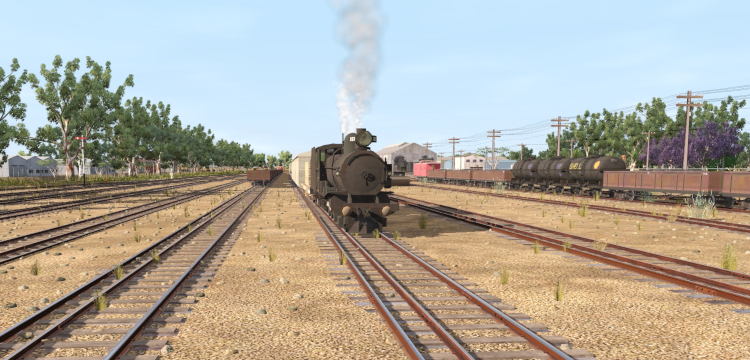
| − | <td align="center">[[Image: | + | <td align="center">[[Image:Gladstone_Image.png|link=|alt=Gladstone Yard]]</td> |
</tr> | </tr> | ||
<tr valign="top"> | <tr valign="top"> | ||
<td align="center">[[Image:line740.png|link=]]</td> | <td align="center">[[Image:line740.png|link=]]</td> | ||
</tr> | </tr> | ||
| − | |||
</table> | </table> | ||
| − | |||
| − | |||
| − | |||
| − | |||
| − | |||
</td> | </td> | ||
| + | <td> | ||
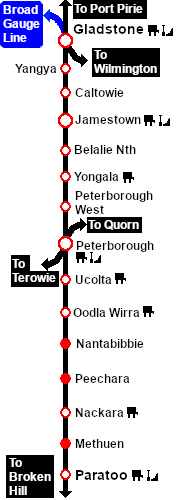
| + | [[Image:SAR_PortPirie-BrokenHill Line.png|link=SAR Port Pirie-Broken Hill_V2|alt=Port Pirie-Broken Hill Line|Show Port Pirie-Broken Hill Line]]<br>[[Image:SAR_Gladstone-Paratoo Strip Map V2.png|link=|alt=Gladstone-Paratoo Strip Map]]<br><br> | ||
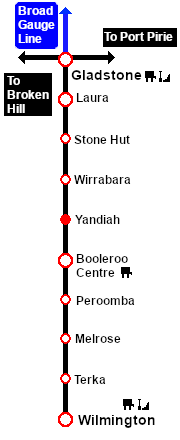
| + | [[Image:SAR_Gladstone-Wilmington_Line.png|link=SAR Gladstone-Wilmington_V2|alt=Gladstone-Wilmington|Show Gladstone-Wilmington]]<br>[[Image:SAR_Gladstone-Wilmington Strip Map V2.png|link=|alt=Gladstone-Wilmington Strip Map]]</td> | ||
</tr> | </tr> | ||
</table> | </table> | ||
Latest revision as of 08:23, 14 May 2024
|
 |