The information in this Wiki Page applies to TANE, TRS19, Trainz Plus and TRS22.
|
|
 |
Merging allows two separate routes to be joined to make a single larger route |
|
The Route Data (terrain, textures, effect layers) and Route Layers (assets) of both routes are merged but only the Session Data and Layers from the first route can, optionally, be retained in the new enlarged route |
|
Physical difference between the routes will cause problems in the merging process but most of these can be overcome |
|
A Payware (DLC) route cannot be selected to be merged |
|
|
You are strongly advised to make backup copies of any routes that you are going to merge |
|
In most cases there should be no technical problems in merging routes (and completing the task in minutes) on systems that meet the recommended specs |
Before you start merging there are some important points you will need to consider and there may be some preparation work that will have to be performed.
 |
Identify...
 |
if either of the routes is a payware route. Payware routes cannot be used in a merge |
|
the route that will be the base route. This route will form the backbone of the merged routes. It will usually be the larger route or the route that contains Session data that you want to keep in the merge |
|
the route that will be the to-be-merged route. This route will be joined to the base route |
|
the orientation (North-South or East-West) of both routes. This may cause problems depending on where they will be merged |
|
the baseboards in both routes where they will be joined. The join must be along edges with no overlaps |
|
the height of the baseboards in both routes at the merge point. A difference in heights could cause problems |
|
any layers in the two routes that have the same name. This will cause a temporary problem that can be easily fixed during the merging process |
|
which layers in both routes contain the tracks and the track objects (signals, switches, speed signs, etc). You may have to move some layers before merging |
|
|
Latitude, Longitude and Altitude
|
A common misconception is that the Latitude and Longitude of the routes being merged plays a part in the merging process |
The Latitude and Longitude of a route has absolutely no effect on the route itself apart from setting, along with the date entered into the Environment Tools, the season of the year. Even then it is only the North/South component of the entered Latitude, not the value, that is important.
A route with its geographic coordinates set in Northern Alaska will happily merge with a route set in outback Australia - but what you do with all the snow and dust is another problem 😀
Altitude differences between the two selected routes can cause serious issues. See Common Problems (and Their Solutions) below. |
Route File Sizes
|
The success of the merging process will depend on the size of the two routes being merged and the size of your systems available memory |
The merging process occurs within your computers on-board memory (RAM). If this is not large enough then your system will also use virtual RAM, i.e. your disk storage space as temporary memory, which is significantly slower. If your system does not have enough memory, both on-board and virtual, then merging large routes will become a problem (i.e. impossible or will take a very long time).
The Trainz forums contain several threads where attempts to merge very large routes (hundreds of Megabytes in size) have taken "days" to complete or failed to complete at all. In many of these cases the users did not have enough RAM (on-board and virtual) installed in their system. In one documented case, doubling the available on-board RAM from 16GB to 32GB and increasing the Windows virtual memory page size (disk based or virtual RAM) reduced the merge time for two extremely large routes from failing to complete in over 50 hours to successfully completing in 10 hours. |
Common Problems (and Their Solutions)
|
Most route mergers will have problems but most of these problems can be easily fixed |
| Some problems will require you to do a bit (or a lot) of extra work before you can merge two routes into one. But for some problems, the best solution may be to select other routes to merge. |
|
|
The most common problems can be fixed during the merging process itself |
|
Sometimes textures from the base route will bleed into the to-be-merged route particularly if the latter route is not textured. The solution to this can be found in the Trainz Wiki  How to Use Bulk Asset Update/Replace Tool How to Use Bulk Asset Update/Replace Tool |
|
The most common problem in the "hard to fix but do-able" category is merging two routes that have been built at different heights or altitudes. This will create a vertical cliff along the merge line, as shown on the left. The solutions to this will vary depending on the height difference. Common solutions are:-
 |
add extra baseboards between the two routes to create an easy gradient between them. See the "Tips" box below. If the height difference is large then many additional baseboards will be needed. If the difference is too big then other options may have to be considered |
|
use a spiral tunnel or switchback/zigzag to build track between the two levels. This will reduce number of extra baseboards |
|
add portals to both routes so that a consist entering the portal on one route will emerge from the portal on the other route. Portals can have their own issues and this solution may not suit everyone and every layout. |
|
|
|
Another fixable problem can occur if a layer containing track from the to-be-merged route ends up below the layer that also contains track in the base route. This can be fixed by merging the lower track layer into the higher track layer either during the merging process or afterwards using the Layer Tools in Surveyor.
|
 |
The most common problem in the "impossible to fix" category is when both routes have different orientations (N-S and E-W) and you were hoping to join them end-to-end in the same direction to make an even longer route. Once a route has been created its orientation can be extremely difficult to change (it is not impossible but often not worth the time and effort). |
|
For the solutions to other problems that have been known to occur, but less frequently than those described above, jump to the section  Uncommon Problems (and Their Solutions) found at the end of this page. Uncommon Problems (and Their Solutions) found at the end of this page. |
Selecting and Loading the Routes to Merge
|
|
|
 |
 |
 |
 |
| Steps |
 |
Load the Base Route Into Surveyor:
|
Merging usually works best when the Base or Starting Route is the larger of the two routes |
|
 |
Should you load the Route or the Route and the Session?
The answer depends on whether or not the Session contains assets (scenery, consists) and settings (rules, driver commands, industry and wagon loads, weather, time of day, etc) that you want to continue to use in the new merged Route and its Session. If this is the case then load the Session. If the Session contains nothing that you need, then only load the Route.
Note: When you add the to-be-merged route its Route assets and data will be loaded but not any Session assets or data so this decision is the only opportunity you will have to load anything from a Session. If the Session attached to the base route contains nothing that you need then load the Route only into Surveyor. |
|
|
 |
Start the Merge Route Tool and load the Route to-be-merged:
 |
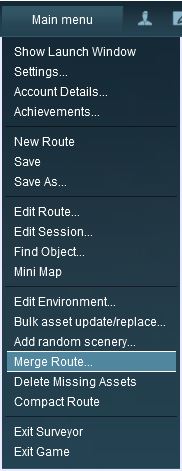
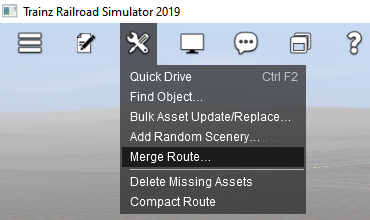
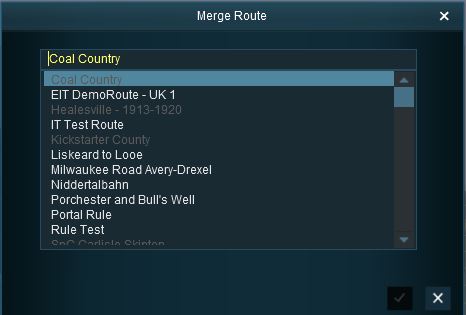
Select the Merge Route option in the Surveyor Main Menu (TANE - shown below left) or the Surveyor Tools Menu (TRS19/Trainz Plus/TRS22 - shown below middle). This will open a Route Selection window (shown below right)
 |
DLC payware routes cannot be selected for merging |
|
|
 |
Select the route to-be-merged. Only the Route Data (terrain, textures, effect layers) and Route Layers (assets) will be loaded from this route |
|
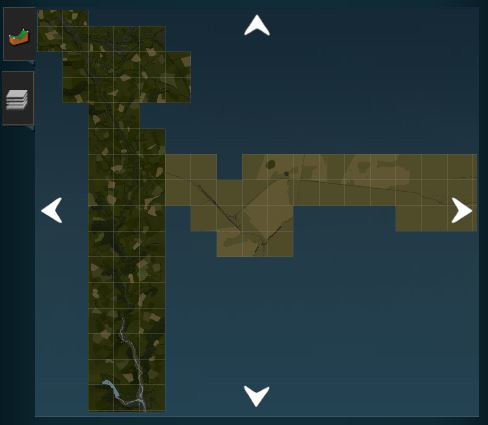
This will display a "minimap" of the proposed merger (nothing will be merged until after the final step) with some control options.
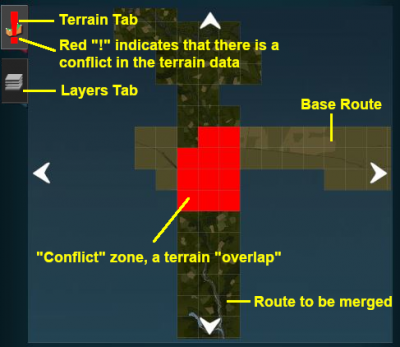 |
| The two tabs shown on the left are the:- |
|
which is automatically selected when the MiniMap is first displayed - this shows the baseboards of the to-be-merged route superimposed on the baseboards of the base route. A red ! symbol on this tab, as shown in the figure on the left, indicates that the two routes have baseboards that are in conflict - they are overlapping. The overlapping baseboards are shown in red on the MiniMap |
|
Layers Tab - this shows the layers that have been copied from both routes. A red background colour on this tab indicates that the two routes have layers that are in conflict |
|
Notes:
|
|
You can zoom the MiniMap in and out using the mouse control wheel. There appears to be no keyboard zoom control |
|
You can move the centre of focus (the centre of the MiniMap view) by moving the mouse pointer to a new position and Right Click |
|
The four arrows shown at the top, bottom and both sides of the map display will move the to-be-merged route in the direction shown on each arrow by a Left Click. |
|
|
Move the "To-Be-Merged Route" into its New Position
|
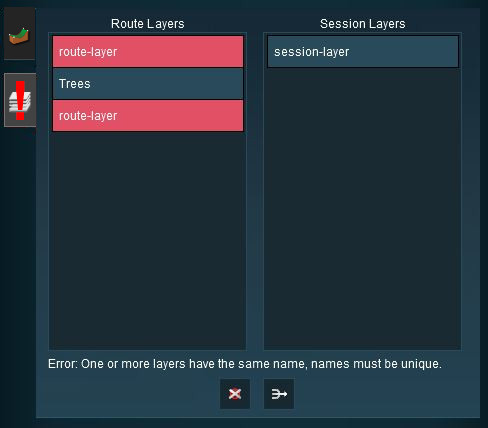
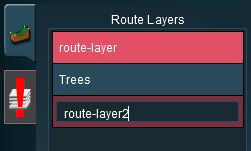
The most common merging issue in the Layers Tab is having layers from each route with the same name |
In the example shown below two of the layers, one from each route, are using the same name "'route-layer".
|
This causes a conflict, indicated by the red ! symbol on the Layers Tab, that must be resolved before the merge can be completed |
|
The layers with the name conflicts are highlighetd with red backgrounds |
There are three simple options for solving this problem:- |
|
|
|
The route merge will NOT proceed until ALL the terrain and layer conflicts have been eliminated |
|
|
 |
Rename one of the conflicting layers |
 |
| Steps: To rename a layer:- |
|
Double Left Click on the layer to be renamed |
 |
|
type in the new name and press the Enter key |
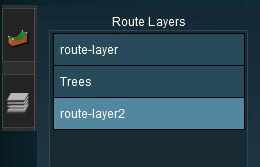 |
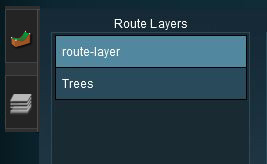
| After renaming the conflict has been resolved. |
|
|
 |
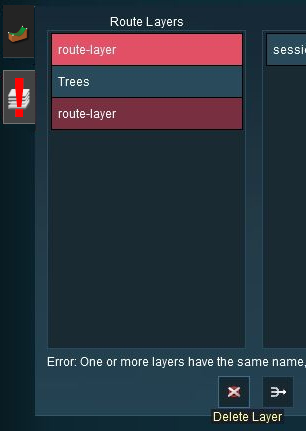
Delete one of the conflicting layers |
 |
Merge the conflicting layers |
|
CAUTION:
When selecting a layer to merge into be aware that layers containing track objects such as signals, switches, speed signs, etc CANNOT be placed above a layer that contains the track |
|
|
|
|
| Steps: To merge two layers:- |
|
Left Click on the layer that is to be merged |
|
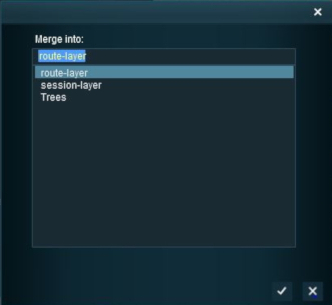
Left Click on the  Merge Icon. This will open a list of layers as shown below Merge Icon. This will open a list of layers as shown below
 |
 |
Left Click on the layer that it will be merged into |
 |
Left Click the  icon icon |
|
|
|
Accept or Reject
Once all the conflicts have been resolved, the final step in the merging process can take place.
| |
ACCEPT: Left Click to accept the merge. This icon will not be clickable unless ALL conflicts have been resolved. If you have problems after clicking Accept, see the sections at the top of this wiki page on File Sizes and Common Problems |
 |
REJECT: Left Click to reject the merge. The merging will be cancelled, no routes will be lost or altered. |
Uncommon Problems (and Their Solutions)
|
|
|
|
|
|
|
|
All of these problems occur along baseboard boundaries after the merge but not just on the merge boundary - they can appear many baseboards away and can take a lot of searching to find |
These problems include:-
|
random needle spikes (like tall sewing needles sticking up through your layout) |
|
random inverted needle spikes (like someone decided to bore very narrow vertical shafts into your layout) |
|
long straight ditches |
|
texture bleeds (on bare baseboards) |
|
random dark "splotches" (on textured baseboards) |
|
|
Notes:
|
|
the texture bleeds are relatively easy to solve after the merge has occurred and that solution can be found in the Trainz Wiki at How to Use Bulk Asset Update/Replace Tool |
|
the other issues are more difficult or time consuming to solve after the merge. A better option is to restart the merge process from the original routes (that is why you should make backup copies first) using the steps described below |
|
|
Create a Small Dummy Route:
Create a new route using just two bare baseboards (no textures or scenery) with:-
|
an East-West orientation for an East-West merge, OR |
|
a North-South orientation for a North-South merge |
| Do not worry about the height of the baseboards. Save the route using an easy to remember name such as Merge Dummy |
|
|
If merging is something that you will do often then create your Merge Dummy route as a 2x2 baseboard square for quickly solving these problems if they should appear. The 2x2 baseboards will work with both East-West and North-South merges |
|
|
|
Load the First Route:
|
|
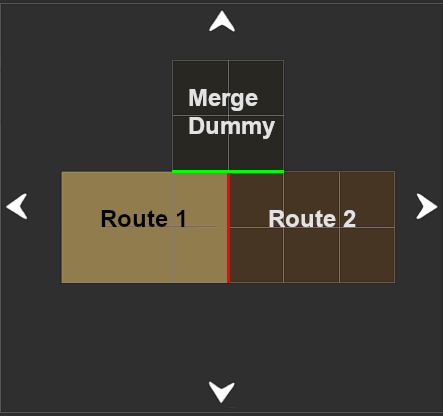
Load and Position the Merge Dummy Route:
|
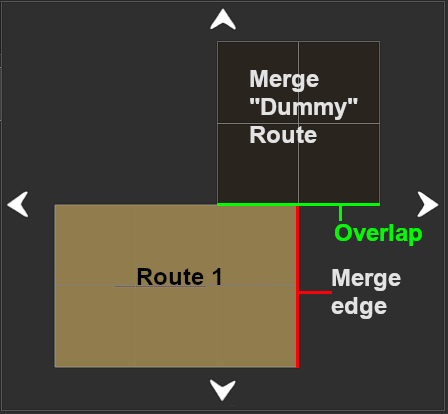
Select the Merge Route option and load the Merge Dummy into Surveyor (the images below show a 2x2 baseboard Merge Dummy route) |
|
Move the Merge Dummy route into position so that it will touch the baseboard edges, by one baseboard each, of the first route and the yet to be loaded second route
 |
 |
Resolve any Layer conflicts |
 |
Accept the merge |
 |
Save the new merged route |
|
|
|
|
Load and Position the Second Route:
| Starting with the new merged route from Step: 3 above:- |
|
Select the Merge Route option and load the second route into Surveyor |
|
Move the second route into its merge position with the first route. It must overlap, by one baseboard, the Merge Dummy route
 |
|
Resolve any Layer conflicts |
|
Accept the merge |
|
Save the new merged route |
|
|
|
|
 |
Delete the Merge Dummy Route
Do not worry if the bare baseboards in the Merge Dummy route show any texture bleeds because the final step is to:-
|
Delete each of the blank baseboards from the Merge Dummy part of the route |
|
|
Trainz Wiki
 |
More Tutorials and Guides to Using Trainz
|
This page was created by Trainz user pware in July 2018 and was last updated as shown below.